Sử dụng Nexmo service xác thực tài khoản
Bài đăng này đã không được cập nhật trong 8 năm
- Tình hình là đã chuyển dự án và dự án mới cũng không dùng VueJS nữa, nên tháng này mình sẽ tạm dừng loạt bài về VueJS ở đây, để giới thiệu mấy cái mới mới, hay hay mà không quá khó để khoe với ae.
- Bài này mình sẽ viết về Nexmo service, nó cho phép ta gửi tin nhắn đến số điện thoại một cách dễ dàng.
- Ở dự án hiện tại của mình thì mình dùng nó để xác thực tài khoản. Nếu các bạn đã quá quen với Nexmo thì đừng lo, ở cuối bài viết mình sẽ share cho các bạn một list các service tương tự.
I. Tạo project Laravel
- Ta sử dụng phiên bản laravel 5.6 mới nhất tại thời điểm viết bài.
- Bước 1: Tạo project laravel bằng 1 trong 2 lệnh sau:
laravel new laravel_nexmohoặccomposer create-project laravel_nexmo - Bước 2: Tạo database:
- Thêm 3 cột
phone_number,codevàactivatevào file database/migrations/2014_10_12_000000_create_users_table.php :Schema::create('users', function (Blueprint $table) { $table->increments('id'); $table->string('name'); $table->string('email')->unique(); $table->string('password'); $table->string('phone_number'); $table->string('code'); $table->tinyInteger('activate')->default(0); $table->rememberToken(); $table->timestamps(); }); - Chạy lệnh
php artisan migrateđể tạo database. - Bước 3: Chạy lệnh
php artisan make:authđể tạo mẫu signup, login, logout.
II. Nexmo service
- Cài đặt Nexmo với lệnh sau:
composer require nexmo/client - Sau khi chạy xong ta sẽ thấy package được thêm vào file composer.json như sau:
... "require": { "php": "^7.1.3", "fideloper/proxy": "^4.0", "laravel/framework": "5.6.*", "laravel/tinker": "^1.0", "nexmo/client": "^1.4" }, .... - Tạo file NexmoService.php với đường dẫn app/Services/Helpers/NexmoService.php
- Nội dung file này sẽ như sau:
namespace App\Services\Helpers; use Nexmo\Client\Credentials\Basic; use Nexmo\Client; use Nexmo\Client\Exception\Request as NexmoExceptionRequest; use Log; class NexmoService { public static function send($phoneNumber, $content, $from = null) { $basic = new Basic(env('NEXMO_API_KEY'), env('NEXMO_API_SECRET')); $client = new Client($basic); try { $client->message()->send([ 'to' => $phoneNumber, 'from' => $from ?? env('NEXMO_FROM_SEND'), 'text' => $content, ]); return true; } catch (NexmoExceptionRequest $e) { Log::error($e); //Nexmo error } throw new \Exception('Nexmo send sms code error', 200); } } public static function generateRandomString($length = 6) { return substr(sha1(rand()), 0, $length); } - Bạn nhớ thêm mấy const sau vào file .env nhé:
NEXMO_API_KEY= NEXMO_API_SECRET= NEXMO_FROM_SEND= - Vậy mấy const này được lấy từ đâu,
NEXMO_FROM_SENDthì tùy ý bạn đặt rồi, còn key và secret thì ta phải tạo tài khoản tại trang https://www.nexmo.com/. - Cụ thể nó sẽ như thế này:
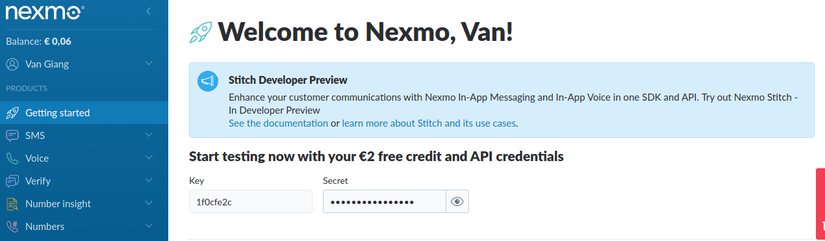
- Ta lấy key và secret update vào file .env là xong bước cài đặt Nexmo service.
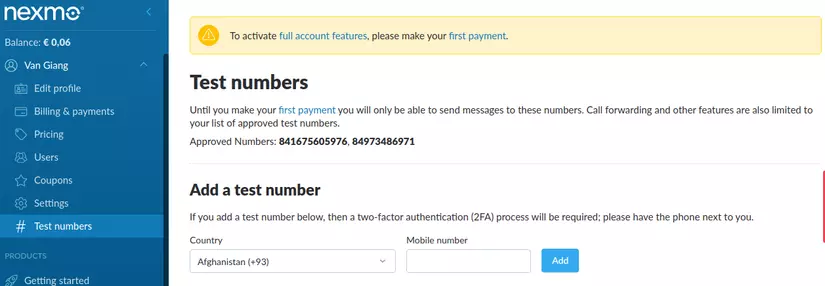
- Nhưng lưu ý tài khoản free chỉ được €2 để gửi tin nhắn nên các bạn test từ từ khẻo hết tiền nha.
- Ngoài ra vì là tài khoản free nên ta chỉ gửi được tin nhắn đến 1 vài số cố định, danh sách các số điện thoại có thể nhận được tin nhắn test ta có thể thêm ở đây:
III. Xác thực tài khoản
-
Đến đây thì việc sử dụng NexmoService rất đơn giản, chẳng hạn như ta gửi activate code cho user khi đăng ký tài khoản, ta sẽ sửa file app/Http/Controllers/Auth/RegisterController.php như sau:
... use App\Services\Helpers\NexmoService; ... ... protected function validator(array $data) { return Validator::make($data, [ 'name' => 'required|string|max:255', 'email' => 'required|string|email|max:255|unique:users', 'password' => 'required|string|min:6|confirmed', 'phone_number' => 'required', ]); } ... ... protected function create(array $data) { $activeCode = NexmoService::generateSmsCode(); $content = "Your activate code is: $activeCode"; NexmoService::send($data['phone_number'], $content); return User::create([ 'name' => $data['name'], 'email' => $data['email'], 'password' => Hash::make($data['password']), 'phone_number' => $data['phone_number'], 'code' => $activeCode, ]); } -
Như vậy khi đăng ký một user, ta đã tạo được 1 bản ghi trong bảng users với trường
activatemặc định bằng 0 (not activate). -
Bước còn lại của chúng ta chỉ là tạo ra 1 form để activate user, nếu người dùng nhập đúng activate code thì ta sẽ tiến hành update trường
activatebằng 1 và cho phép login. Bước này rất đơn giải nên ở đây mình sẽ không hướng dẫn nữa, các bạn thử làm xem sao nhé. -
Ngoài ra nếu như không thích dùng Nexmo thì bạn cũng có thể sử dụng một trong số các service bên sau:
CM Telecom My Cool SMS Bulk SMS Click Tell Inovative text budget sms- Nếu có bất cứ khó khăn gì có thể liên hệ trực tiếp với mình hoặc tham khảo tài liệu bên dưới.
Tài liệu tham khảo
All rights reserved
