Upload image (Laravel + Vue.js)
Bài đăng này đã không được cập nhật trong 8 năm
Indexs
- Phần 1: Simple CRUD Project
- Phần 2: Chat room với laravel 5.5 và Vue.js trong 15 phút
- Phần 3: Web Push Notifications
- Ở loạt bài trước bài trước mình đã giới thiệu đến các bạn các bài viết kết hợp laravel + vue.js như trên. Phần 1 là cách kết hợp laravel với vue.js, phần 2 và 3 mình tạo ra một ứng dụng chát đơn giản, và trong lúc test mình chợt nhận ra tất cả các ứng dụng chát đều có phần gửi ảnh. Nên bài này ta sẽ tìm hiểu cách upload ảnh sử dụng Laravel + vue.js. Nhưng để cho rõ ràng, bài này mình sẽ viết tách riêng chứ ko tiếp nối như bài trước, cho các bạn chỉ muốn xem phần upload ảnh thì cùng không phải đọc lại các bài trước. Bắt đầu nào:
I. Chuẩn bị
- Tạo project laravel vuefileupload bằng câu lệnh sau:
composer create-project laravel/laravel vuefileupload --prefer-dist - Sau khi tạo được project vuefileupload ta di chuyển vào thư mục gốc và cài đặt
npmcd vuefileupload npm install - Tạo database và model:
php artisan make:model FileUpload -m - Câu lệnh tạo model với
-mtrên sẽ đồng thời tạo ra 1 file migrate tạo bảng file file_uploads trong thư mục database/migrations/ với tên file YYYY_mm_dd_xxxxxx_cretae_file_uploads_table.php. Ta cần sửa file này như sau:Schema::create('file_uploads', function (Blueprint $table) { $table->increments('id'); $table->string('image_name'); $table->timestamps(); }); - Cuối cùng ta chạy lệnh sau để tạo DB:
php artisan migrate
II. Server laravel
- Định nghĩa route trong file web.php
Route::post('/image/store', 'ImageController@store'); - Tạo controller ImageController với câu lệnh:
php artisan make:controller ImageController - Trong controller này ta định nghĩa function store như sau:
namespace App\Http\Controllers; use App\FileUpload; use Illuminate\Http\Request; class ImageController extends Controller { public function store(Request $request) { if($request->get('image')) { $image = $request->get('image'); $name = time().'.' . explode('/', explode(':', substr($image, 0, strpos($image, ';')))[1])[1]; \Image::make($request->get('image'))->save(public_path('images/').$name); } $image= new FileUpload(); $image->image_name = $name; $image->save(); return response()->json(['success' => 'You have successfully uploaded an image'], 200); } } - Cài đặt package
image/interventionsử dụng composer:composer require intervention/image - Sau khi cài đặt ta thêm service provider vào file config/app.php như sau:
'providers' => [ Intervention\Image\ImageServiceProvider::class, ]; 'aliases' => [ 'Image' => Intervention\Image\Facades\Image::class, ] - Để có thể sử dụng package ta cần publish nó bằng câu lệnh:
php artisan vendor:publish --provider="Intervention\Image\ImageServiceProviderLaravel5"
III. Vue component
-
Tạo file ImageuploadComponent.vue trong thư mục resource/assets/js/components/ với nội dung:
<template> <div class="container" id="app"> <div class="row justify-content-center"> <div class="col-md-8"> <div class="card card-default"> <div class="card-header">File Upload Component</div> <div class="card-body"> We need to write here file upload HTML code. </div> </div> </div> </div> </div> </template> <script> export default { } </script> -
Tiếp theo ta sẽ đăng ký component này trong file resource/assets/js/app.js:
require('./bootstrap'); window.Vue = require('vue'); /** * Next, we will create a fresh Vue application instance and attach it to * the page. Then, you may begin adding components to this application * or customize the JavaScript scaffolding to fit your unique needs. */ Vue.component('image-component', require('./components/ImageuploadComponent.vue')); const app = new Vue({ el: '#app' }); -
Sau khi đăng ký vue component ta sẽ gọi nó từ welcome.blade.php:
<!doctype html> <html lang="{{ app()->getLocale() }}"> <head> <meta charset="utf-8"> <meta http-equiv="X-UA-Compatible" content="IE=edge"> <meta name="viewport" content="width=device-width, initial-scale=1"> <title>File Upload Tutorial</title> <link href="https://fonts.googleapis.com/css?family=Raleway:100,600" rel="stylesheet" type="text/css"> <link href="{{ asset('css/app.css') }}" rel="stylesheet"/> </head> <body> <div class="container" id="app"> <image-component></image-component> </div> <script> window.Laravel = <?php echo json_encode([ 'csrfToken' => csrf_token(), ]); ?> </script> <script src="{{asset('js/app.js')}}"></script> </body> </html> -
Trước khi test thử component ta cần compile file app.js bằng câu lệnh:
npm run dev -
Đến đây ta sẽ chạy 1 server để test thử:
php artisan serve -
Truy cập vào đường link
http://localhost:8000trên trình duyệt ta sẽ thu được kết quả:
-
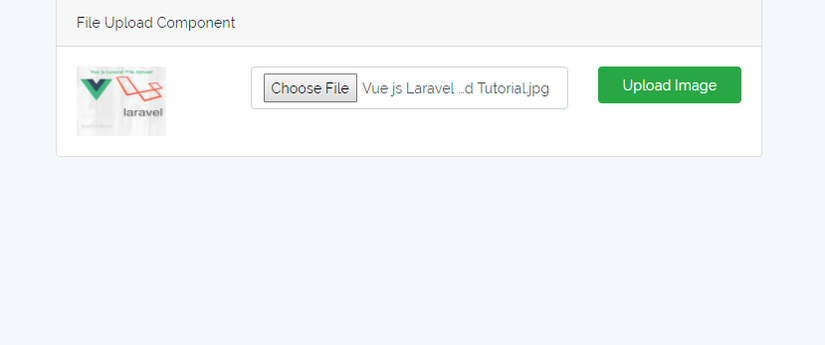
Tiếp đến ta sẽ tạo form upload và gọi đến method store trong ImageController.php, component ImageuploadComponent.vue bây giờ sẽ như sau:
// ImageuploadComponent.vue <template> <div class="container"> <div class="row justify-content-center"> <div class="col-md-8"> <div class="card card-default"> <div class="card-header">File Upload Component</div> <div class="card-body"> <div class="row"> <div class="col-md-3" v-if="image"> <img :src="image" class="img-responsive" height="70" width="90"> </div> <div class="col-md-6"> <input type="file" v-on:change="onImageChange" class="form-control"> </div> <div class="col-md-3"> <button class="btn btn-success btn-block" @click="uploadImage">Upload Image</button> </div> </div> </div> </div> </div> </div> </div> </template> <script> export default { data(){ return { image: '' } }, methods: { onImageChange(e) { let files = e.target.files || e.dataTransfer.files; if (!files.length) return; this.createImage(files[0]); }, createImage(file) { let reader = new FileReader(); let vm = this; reader.onload = (e) => { vm.image = e.target.result; }; reader.readAsDataURL(file); }, uploadImage(){ axios.post('/image/store',{image: this.image}).then(response => { console.log(response); }); } } } </script> -
Compile và khởi động lại server một lần nữa:
npm run dev php artisan serve -
Ta sẽ thu được kết quả:
-
Hy vọng bài viết sẽ giúp ích được bạn, nếu bạn có gặp khó khăn gì trong lúc thực hiện hãy liên hệ với mình hoặc tài liệu tham khảo bên dưới.
Tài liệu tham khảo
All rights reserved
