Nuxt.js + Electron bạn đã thử chưa?
Bài đăng này đã không được cập nhật trong 5 năm
Nếu bạn đã vào bài viết này có lẽ bạn ít nhiều đã nghe qua về electron? Còn nếu bạn chưa biết thì electron là một nền tảng được Github phát triển, giúp xây dựng desktop app cross-platform bằng HTML, Javascript và CSS. Đặc biệt trong bối cảnh nở rộ của công nghệ web frontend hiện nay thì sự kết hợp giữa electron và 1 frontend framework được ví như hổ mọc thêm cánh.
Trong bài viết này mình sẽ hướng dẫn cơ bản nhưng chi tiết cách tích hợp electron vào 1 project nuxt.js có sẵn. Trong thực tế, hiện đã có rất nhiều template tích hợp sẵn vue + electron và nuxt + electron, nhưng khi bạn đã nắm được cách thức cài đặt thì bạn hoàn toàn có thể tích hợp electron cho bất kỳ một dự án nào, từ Vue, nuxt, next, angular.
Installation
Nuxt.js
Trong khuôn khổ bài viết này mình sẽ không giới thiệu thêm về nuxt.js nữa, đã có rất nhiều bài viết bạn có thể tham khảo trên mạng.
Bây giờ mình sẽ bắt đầu với 1 project nuxt.js mới luôn. Lưu ý duy nhất dành cho bạn là Rendering mode: Single Page App
Bên dưới chỉ là cấu hình demo, bạn có thể tham khảo theo.
yarn create nuxt-app nuxtron
yarn create v1.17.3
[1/4] 🔍  Resolving packages...
[2/4] 🚚  Fetching packages...
[3/4] 🔗  Linking dependencies...
[4/4] 🔨  Building fresh packages...
success Installed "create-nuxt-app@3.4.0" with binaries:
      - create-nuxt-app

create-nuxt-app v3.4.0
✨  Generating Nuxt.js project in nuxtron
? Project name: nuxtron
? Programming language: JavaScript
? Package manager: Yarn
? UI framework: Tailwind CSS
? Nuxt.js modules: (Press <space> to select, <a> to toggle all, <i> to invert selection)
? Linting tools: ESLint, Prettier, StyleLint
? Testing framework: None
? Rendering mode: Single Page App
? Deployment target: Server (Node.js hosting)
? Development tools: jsconfig.json (Recommended for VS Code if you're not using typescript)
? Continuous integration: None
? Version control system: Git
yarn run v1.17.3
$ eslint --ext .js,.vue --ignore-path .gitignore . --fix
✨  Done in 3.92s.
yarn run v1.17.3
$ stylelint **/*.{vue,css} --ignore-path .gitignore --fix
✨  Done in 1.59s.

🎉  Successfully created project nuxtron

  To get started:

	cd nuxtron
	yarn dev

  To build & start for production:

	cd nuxtron
	yarn build
	yarn start

✨  Done in 161.07s.
Nếu run từ source code có sẵn, bạn có thể chuyển từ universial mode về single page app bằng cách thêm thuộc tính ssr: false (hoặc mode: spa đối với các source code cũ) trong file nuxt.config.js.
Bây giờ thử chạy nuxt app lên bằng lệnh
cd nuxtron
yarn dev
Truy cập http://localhost:3000 bạn sẽ nhìn thấy giao diện như sau
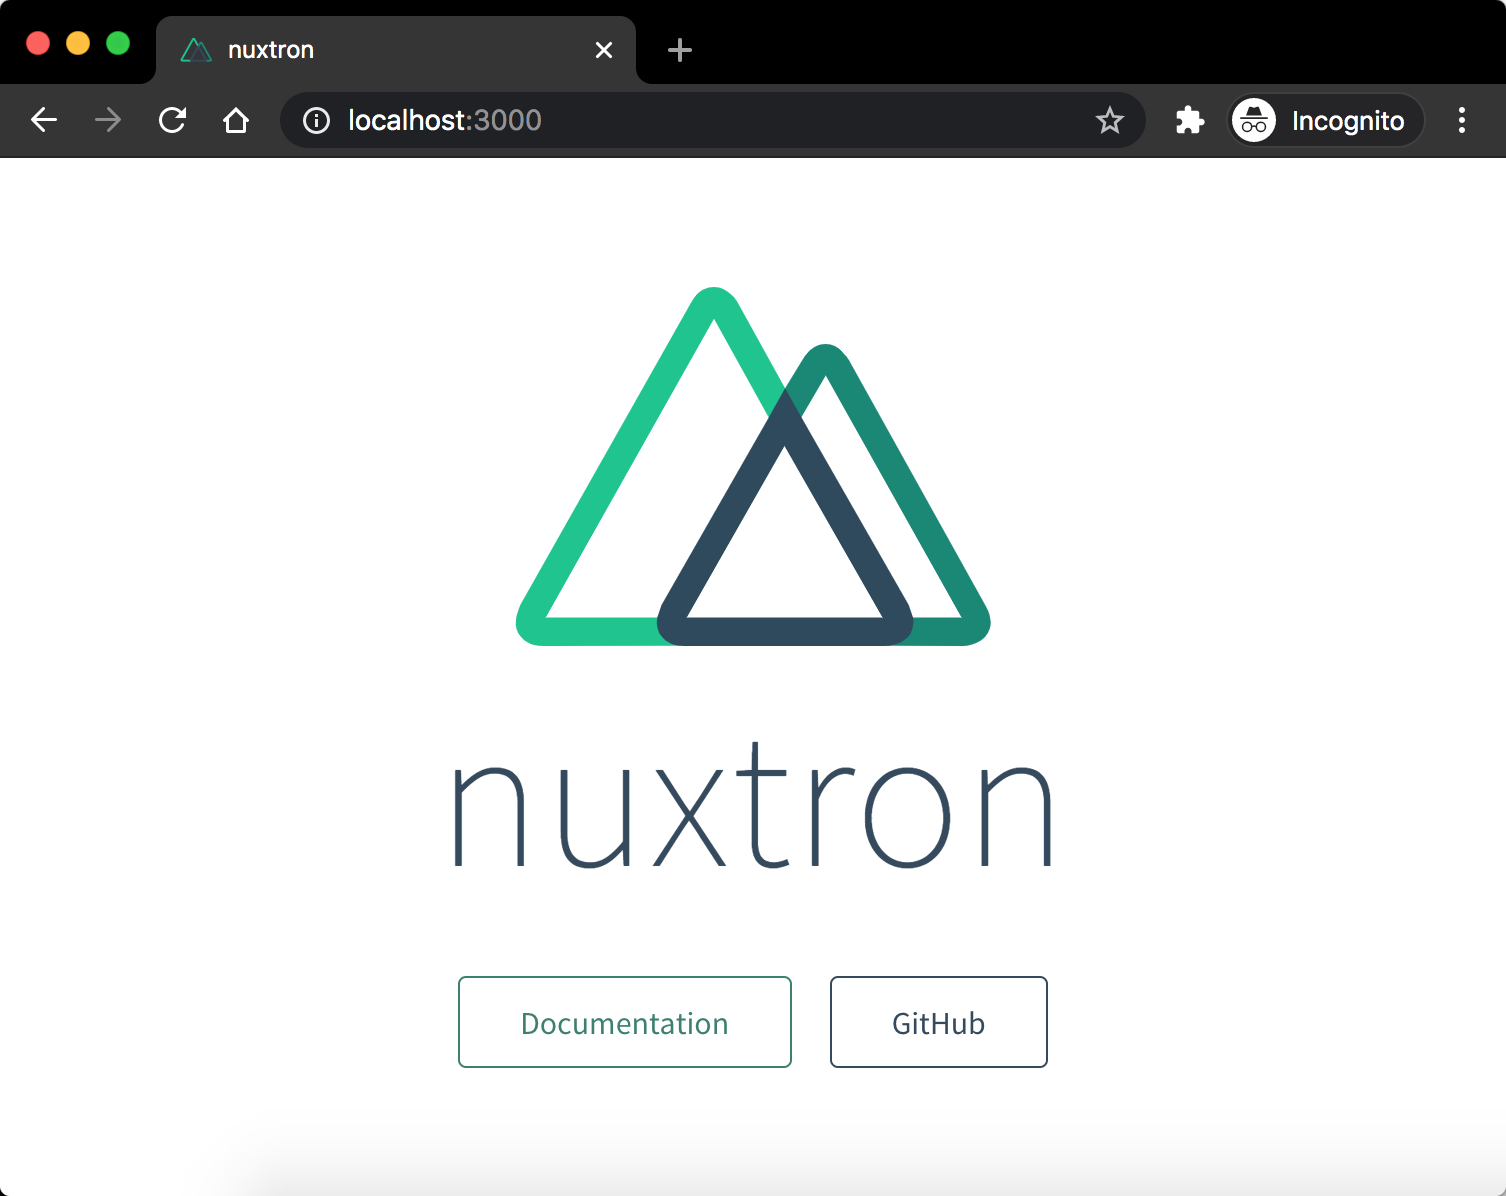
Công việc của chúng ta bây giờ là làm sao run app này trên electron thay vì browser.
Electron
Tiến hành cài đặt các package sau
yarn add -D electron electron-builder electron-devtools-installer
electron: package electron.electron-builder: công cụ hỗ trợ build.electron-devtools-installer: yêu cầu phải có nếu bạn muốn sử dụng vue-devtools trong quá trình phát triển.
Others
Cài thêm package cross-env để hỗ trợ set biến môi trường trong lúc run các script. Package này sẽ rất hữu ích đặc biệt nếu bạn đang sử dụng HĐH Windows.
yarn add -D cross-env
Getting started
Để bắt đầu cần chỉnh sửa và thêm vào 1 số file như hướng dẫn bên dưới
nuxt.config.js
-export default {
+/* eslint-disable nuxt/no-cjs-in-config */
+module.exports = {

   /* Other configs */

   build: {},

+  telemetry: false,
+
+  dev: process.env.NODE_ENV !== 'production',
+
+  router: {
+    mode: 'hash',
+  },
 }
devđể thuận tiện sử dụng về sau thôi, ko có gì đáng lưu ý.router.modebắc buộc phải làhashmode, vì khi chạy trên electron chúng ta thực chất là surve file tĩnh, hoàn toàn không có sử dụng domain,historymode sẽ dẫn đến chạy bị sai.
main.js
Tạo file main.js ở thư mục gốc của dự án với nội dung như dưới đây
/* eslint-disable no-console */
const http = require('http')
const path = require('path')
const { Nuxt, Builder } = require('nuxt')
const { app, BrowserWindow } = require('electron')
const config = require('./nuxt.config.js')

config.rootDir = __dirname

const nuxt = new Nuxt(config)
const builder = new Builder(nuxt)
const server = http.createServer(nuxt.render)

console.log('config port', config.server)

let _NUXT_URL_ = `file://${__dirname}/dist/index.html`
if (config.dev) {
  builder.build().catch((err) => {
    console.error(err)
    process.exit(1)
  })
  server.listen(process.env.PORT || 3000)
  _NUXT_URL_ = `http://localhost:${server.address().port}`
  console.log(`Nuxt working on ${_NUXT_URL_}`)
}

let mainWindow = null
const createWindow = () => {
  mainWindow = new BrowserWindow({
    webPreferences: {
      nodeIntegration: false,
      contextIsolation: true,
      worldSafeExecuteJavaScript: true,
      preload: path.resolve(path.join(__dirname, 'preload.js')),
    },
  })

  mainWindow.on('closed', () => (mainWindow = null))
  if (config.dev) {
    const pollServer = () => {
      http
        .get(_NUXT_URL_, async (res) => {
          if (res.statusCode !== 200) {
            console.log(
              `Failed to connect to ${_NUXT_URL_} (response ${res.statusCode})`
            )
            setTimeout(pollServer, 1000)
            return
          }

          await mainWindow.loadURL(_NUXT_URL_)
          const {
            default: installExtension,
            VUEJS_DEVTOOLS,
          } = require('electron-devtools-installer')

          installExtension(VUEJS_DEVTOOLS.id)
            .then(() => mainWindow.webContents.openDevTools())
            .catch((err) => console.log('An error occurred: ', err))
        })
        .on('error', () => setTimeout(pollServer, 1000))
    }
    pollServer()
  } else {
    mainWindow.loadURL(_NUXT_URL_)
  }
}
app.on('ready', createWindow)
app.on('window-all-closed', () => app.quit())
app.on('activate', () => mainWindow === null && createWindow())
Nhiệm vụ của file này là run server nuxt.js lên, sau đó khởi tạo 1 cửa sổ electron gọi là BrowserWindow.Trong môi trường dev, url của nuxt server được load vào main window thông qua giao thức http://, môi trường production thì có chút khác biệt là sẽ load file tĩnh vào thông qua giao thức file://.
preload.js
Tạo file preload.js đặt ở thư mục gốc. Tạm thời sẽ để nội dung rỗng, sau này trong quá trình phát triển nếu cần thiết run những đoạn code nào trước khi chạy app lên thì sẽ đặt trong file này.
package.json
 {
   "name": "nuxtron",
   "author": {
     "name": "Son Tran",
     "email": "sontd.it@gmail.com",
     "url": "https://github.com/trandaison"
   },
   "version": "1.0.0",
   "private": true,
+  "main": "main.js",
   "scripts": {
     "dev": "nuxt",
-    "build": "nuxt build",
-    "start": "nuxt start",
+    "build": "cross-env NODE_ENV=production nuxt build && electron-builder",
+    "start": "cross-env NODE_ENV=development electron .",
     "generate": "nuxt generate",
     "lint:js": "eslint --ext .js,.vue --ignore-path .gitignore .",
     "lint:style": "stylelint **/*.{vue,css} --ignore-path .gitignore",
yarn devvẫn được giữ lại để start server nuxt, phòng khi cần debug.yarn buildbây giờ được sử dụng để build package.yarn startsẽ được đổi lại để start ứng dụng electron trong quá trình phát triển.
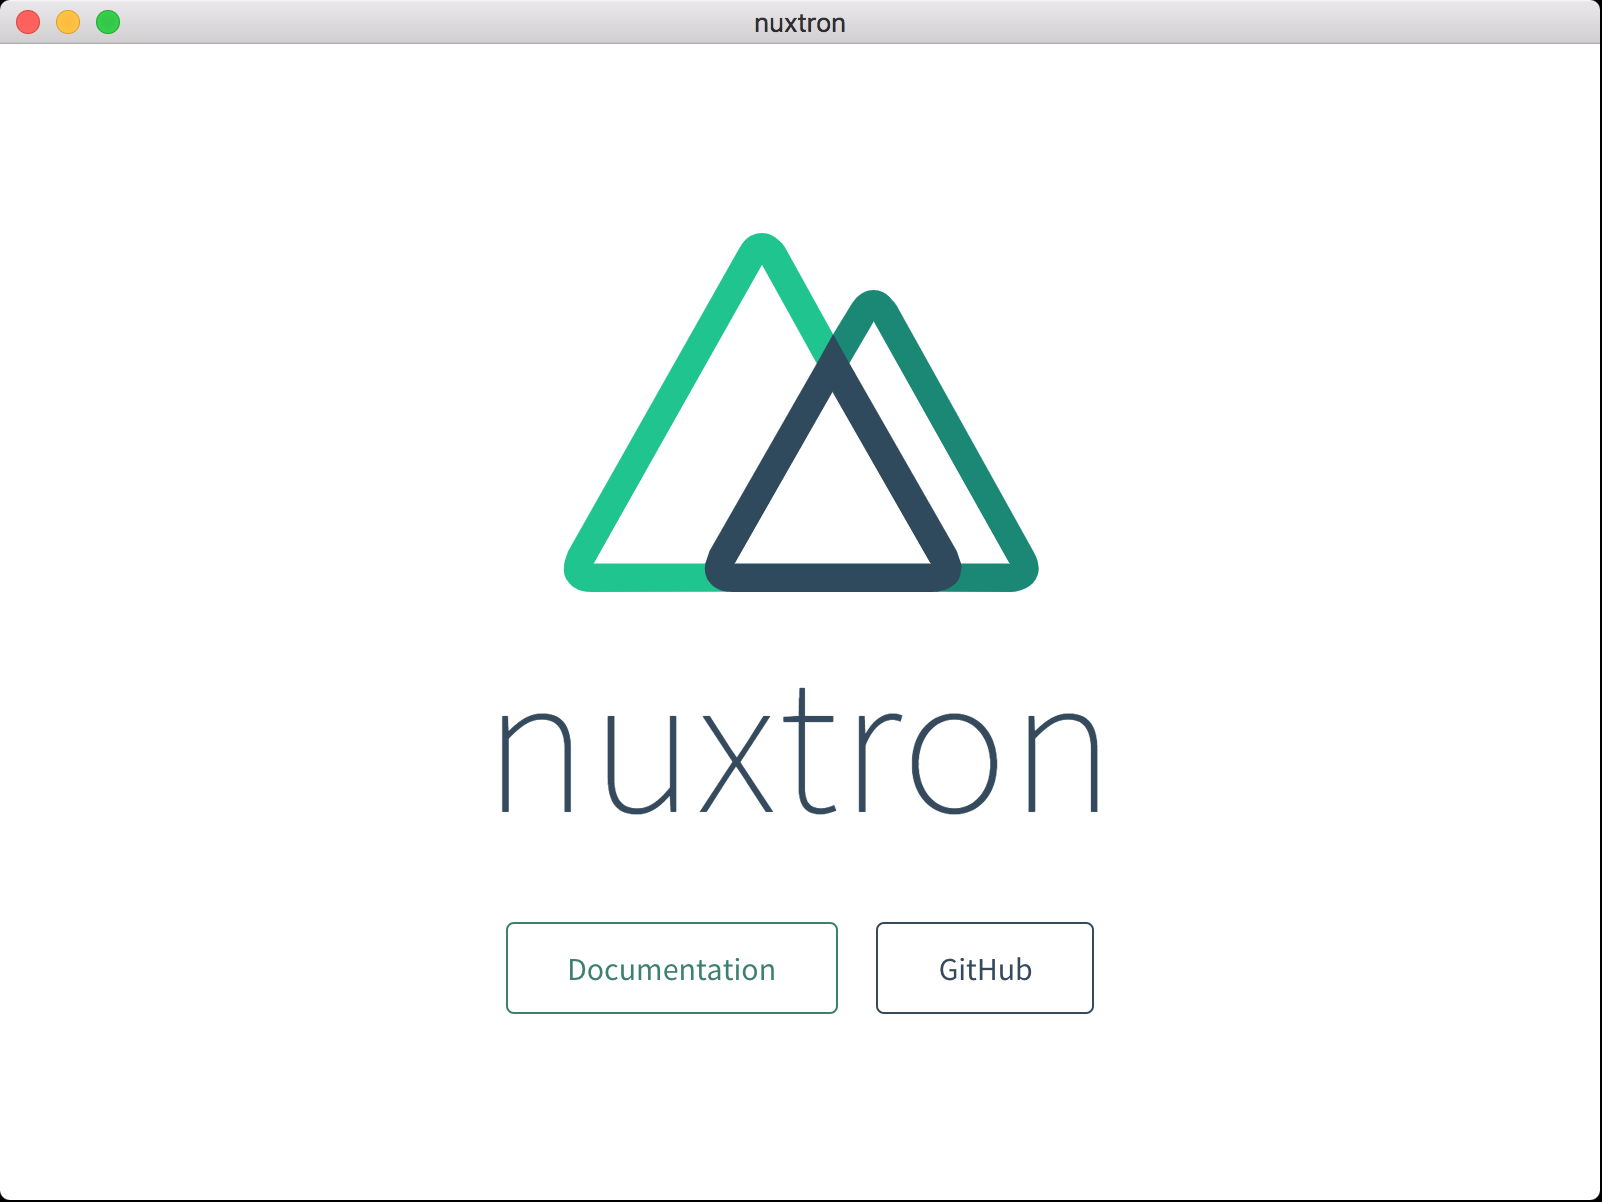
Bây giờ đã có thể start ứng dụng electron trong môi trường development
yarn start
Cửa sổ ứng dụng xuất hiện như này 😎
Conclusion
Vậy là bạn đã nắm được những cài đặt cơ bản để run một web app trên elecron.
Vì bản chất ứng dụng này là một web app nên thực tế sẽ còn khá nhiều vấn đề cần giải quyết như: open link trong tab mới thì sẽ như thế nào? Môi trường production sẽ serve file tĩnh ra sao khi ko run bằng server node? Đóng gói ứng dụng như thế nào để tạo thành file cài đặt (.exe cho Windows, .dmg cho MacOS, .deb cho ubuntu...)? Cài đặt icon cho ứng dụng như thế nào?...
Mình sẽ lần lượt đi qua từng vấn đề trên trong các bài viết tiếp theo, các bạn cùng đón chờ nhé.
Thanks for reading!
All rights reserved
