CSS breadcrumbs: một số shapes có thể có ích cho bạn
Bài đăng này đã không được cập nhật trong 4 năm
Một thanh breadcrumb (không biết gọi là gì trong tiếng Việt) sẽ chứa các link phân cấp cho phép người dùng dễ dàng định vị được vị trí hiện tại hoặc chuyển hướng nhanh đến trang higher-level. Ngoài ra, breadcrumb cũng giúp người dùng đỡ công sức hơn khi phải bấm back nhiều lần.
Một cách đơn giản nhất, nếu trang web của bạn có nhiều trang với nhiều sub-levels thì để tăng tính hữu dụng, bạn sẽ phải cần dùng đến breadcrumbs.
Như đã nói, trong bài viết này sẽ đưa ra một số CSS breadcrumb navigation bằng CSS pseudo.
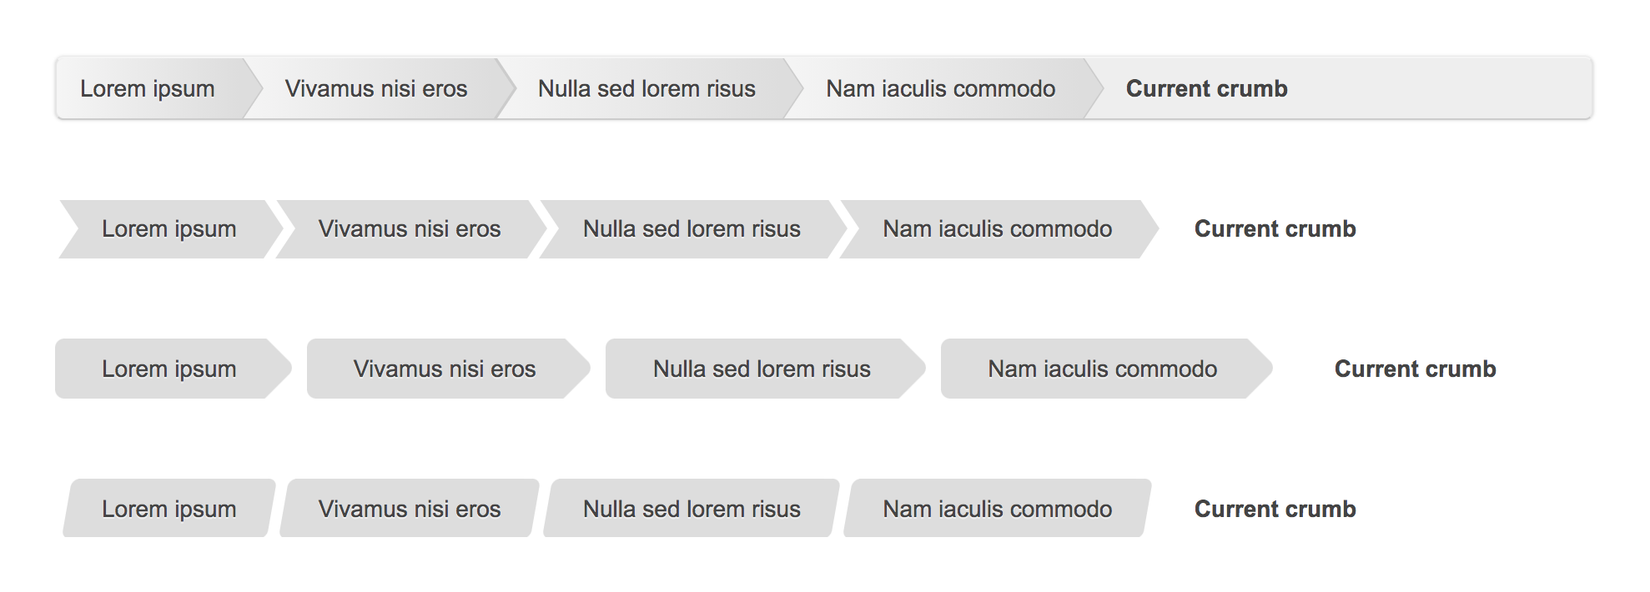
The HTML
Markup đơn giản như này thôi, sử dụng một unordered list
<ul id="breadcrumbs-one">
    <li><a href="">Lorem ipsum</a></li>
    <li><a href="">Vivamus nisi eros</a></li>
    <li><a href="">Nulla sed lorem risus</a></li>
    <li><a href="">Nam iaculis commodo</a></li>
    <li><a href="" class="current">Current crumb</a></li>
</ul>
The CSS
Trước hết reset style của thẻ ul trước đã.
ul {
    margin: 0;
    padding: 0;
    list-style: none;
}
Sau đó chúng ta sẽ tạo ra các breadcrumbs bằng CSS pseudo-elements.
First example
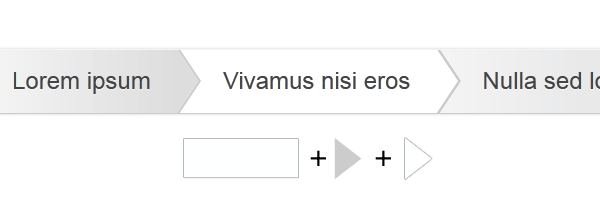
Với ví dụ đầu tiên này, kỹ thuật sử dụng tương tự như làm 1 CSS3 tooltips thôi. Về cơ bản, tạo ra một hình tam giác có border ở góc bên phải bằng cách tạo ra 2 hình tam giác, hình màu đậm hơn sẽ cần lớn hơn 1 tí và dịch sang trái 1 tí để tạo ra border.
#breadcrumbs-one {
  background: #eee;
  border-width: 1px;
  border-style: solid;
  border-color: #f5f5f5 #e5e5e5 #ccc;
  border-radius: 5px;
  box-shadow: 0 0 2px rgba(0,0,0,.2);
  overflow: hidden;
  width: 100%;

  li {
    float: left;

    &:first-child {
      a {
        padding-left: 1em;
        border-radius: 5px 0 0 5px;
      }
    }
  }

  a {
    padding: .7em 1em .7em 2em;
    float: left;
    text-decoration: none;
    color: #444;
    position: relative;
    text-shadow: 0 1px 0 rgba(255,255,255,.5);
    background-color: #ddd;
    background-image: linear-gradient(to right, #f5f5f5, #ddd);

    &:after,
    &:before {
      content: "";
      position: absolute;
      top: 50%;
      margin-top: -1.5em;
      border-top: 1.5em solid transparent;
      border-bottom: 1.5em solid transparent;
      border-left: 1em solid;
      right: -1em;
    }

    &:after {
      z-index: 2;
      border-left-color: #ddd;
    }

    &:before {
      border-left-color: #ccc;
      right: -1.1em;
      z-index: 1;
    }

    &:hover {
      background: #fff;

      &:after {
        border-left-color: #fff;
      }
    }
  }

  .current {
    font-weight: bold;
    background: none;

    &:after,
    &:before {
      content: normal;
    }

    &:hover {
      font-weight: bold;
      background: none;
    }
  }
}
Second example
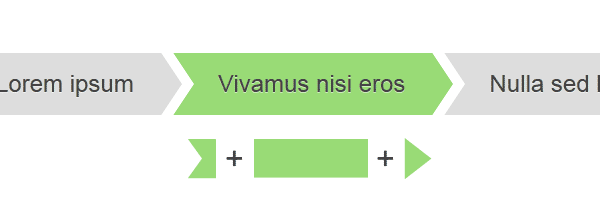
Ví dụ này cũng dễ hiểu đúng không, cũng ghép 3 hình trên lại với nhau, CSS như sau
#breadcrumbs-two {
  overflow: hidden;
  width: 100%;

  li {
    float: left;
    margin: 0 .5em 0 1em;
  }

  a {
    background: #ddd;
    padding: .7em 1em;
    float: left;
    text-decoration: none;
    color: #444;
    text-shadow: 0 1px 0 rgba(255, 255, 255, .5);
    position: relative;

    &:before {
      content: "";
      position: absolute;
      top: 50%;
      margin-top: -1.5em;
      border-width: 1.5em 0 1.5em 1em;
      border-style: solid;
      border-color: #ddd #ddd #ddd transparent;
      left: -1em;
    }

    &:after {
      content: "";
      position: absolute;
      top: 50%;
      margin-top: -1.5em;
      border-top: 1.5em solid transparent;
      border-bottom: 1.5em solid transparent;
      border-left: 1em solid #ddd;
      right: -1em;
    }

    &:hover {
      background: #99db76;

      &:before {
        border-color: #99db76 #99db76 #99db76 transparent;
      }

      &:after {
        border-left-color: #99db76;
      }
    }
  }


  .current,
  .current:hover {
    font-weight: bold;
    background: none;
  }

  .current {
    &:after,
    &:before {
      content: normal;
    }
  }
}
Third example
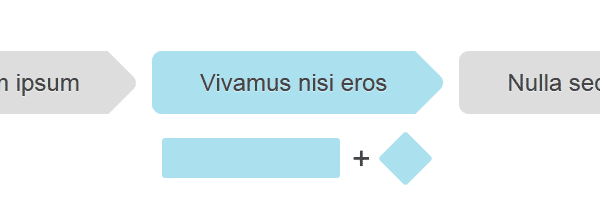
Ở ví dụ này chỉ cần dùng thêm chút border-radius chúng ta sẽ tạo ra được 1 hình chữ nhật bo góc và một hình vuông bo góc đã bị xoay 45 độ để có thể dựng thành hình giống... "cây bút chì".
#breadcrumbs-three {
  overflow: hidden;
  width: 100%;

  li {
    float: left;
    margin: 0 2em 0 0;
  }

  a {
    padding: .7em 1em .7em 2em;
    float: left;
    text-decoration: none;
    color: #444;
    background: #ddd;
    position: relative;
    z-index: 1;
    text-shadow: 0 1px 0 rgba(255, 255, 255, .5);
    border-radius: .4em 0 0 .4em;
  }

  &:after {
    background: #ddd;
    content: "";
    height: 2.5em;
    margin-top: -1.25em;
    position: absolute;
    right: -1em;
    top: 50%;
    width: 2.5em;
    z-index: -1;
    transform: rotate(45deg);
    border-radius: .4em;
  }

  &:hover {
    background: #abe0ef;

    &:after {
      background: #abe0ef;
    }
  }

  .current,
  .current:hover {
    font-weight: bold;
    background: none;
  }

  .current::after {
    content: normal;
  }
}
Fourth example
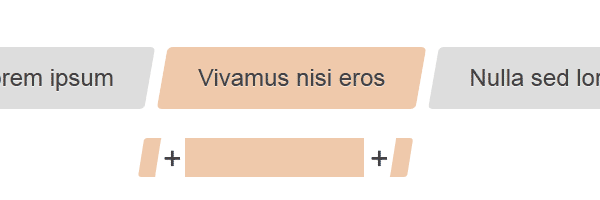
Lần này là nối 3 hình chữ nhật lại với nhau, kết hợp 1 tí border-radius nhẹ ở các góc của pseudo-elements, sau đó dùng transform skew để có được hình như mong muốn. Đơn giản nhưng trông khá cool nhỉ.
#breadcrumbs-four {
  overflow: hidden;
  width: 100%;
}

#breadcrumbs-four li {
  float: left;
  margin: 0 .5em 0 1em;
}

#breadcrumbs-four a {
  background: #ddd;
  padding: .7em 1em;
  float: left;
  text-decoration: none;
  color: #444;
  text-shadow: 0 1px 0 rgba(255, 255, 255, .5);
  position: relative;
}

#breadcrumbs-four a:hover {
  background: #efc9ab;
}

#breadcrumbs-four a::before,
#breadcrumbs-four a::after {
  content: '';
  position: absolute;
  top: 0;
  bottom: 0;
  width: 1em;
  background: #ddd;
  transform: skew(-10deg);
}

#breadcrumbs-four a::before {

  left: -.5em;
  border-radius: 5px 0 0 5px;
}

#breadcrumbs-four a:hover::before {
  background: #efc9ab;
}

#breadcrumbs-four a::after {
  right: -.5em;
  border-radius: 0 5px 5px 0;
}

#breadcrumbs-four a:hover::after {
  background: #efc9ab;
}

#breadcrumbs-four .current,
#breadcrumbs-four .current:hover {
  font-weight: bold;
  background: none;
}

#breadcrumbs-four .current::after,
#breadcrumbs-four .current::before {
  content: normal;
}
Lợi thế của breadcrumbs bằng CSS
- Không dùng images, rất dễ để sửa và bảo trì.
- Mọi thứ đều scalable, kích thước đều dùng
emcả. - Support ngon trên các browser cũ luôn.
Lời kết
Style ở phía trên lặp lại code khá nhiều nhưng mình không merge chung lại với nhau. Có thể bạn sẽ cần đến một thiết kế cụ thể trong đó, như vậy chỉ cần copy phần CSS thì mọi thứ đã có thể hoạt động (đừng quên sửa id ở HTML).
Bonus thêm cho bạn quả design này, thực ra nó là của form steps chứ ko phải breadcrumbs, nhưng shape cũng tương tự, có cả quả hình zoom to cho bạn thử CSS (nhớ đừng bỏ qua border và border-radius nhé)
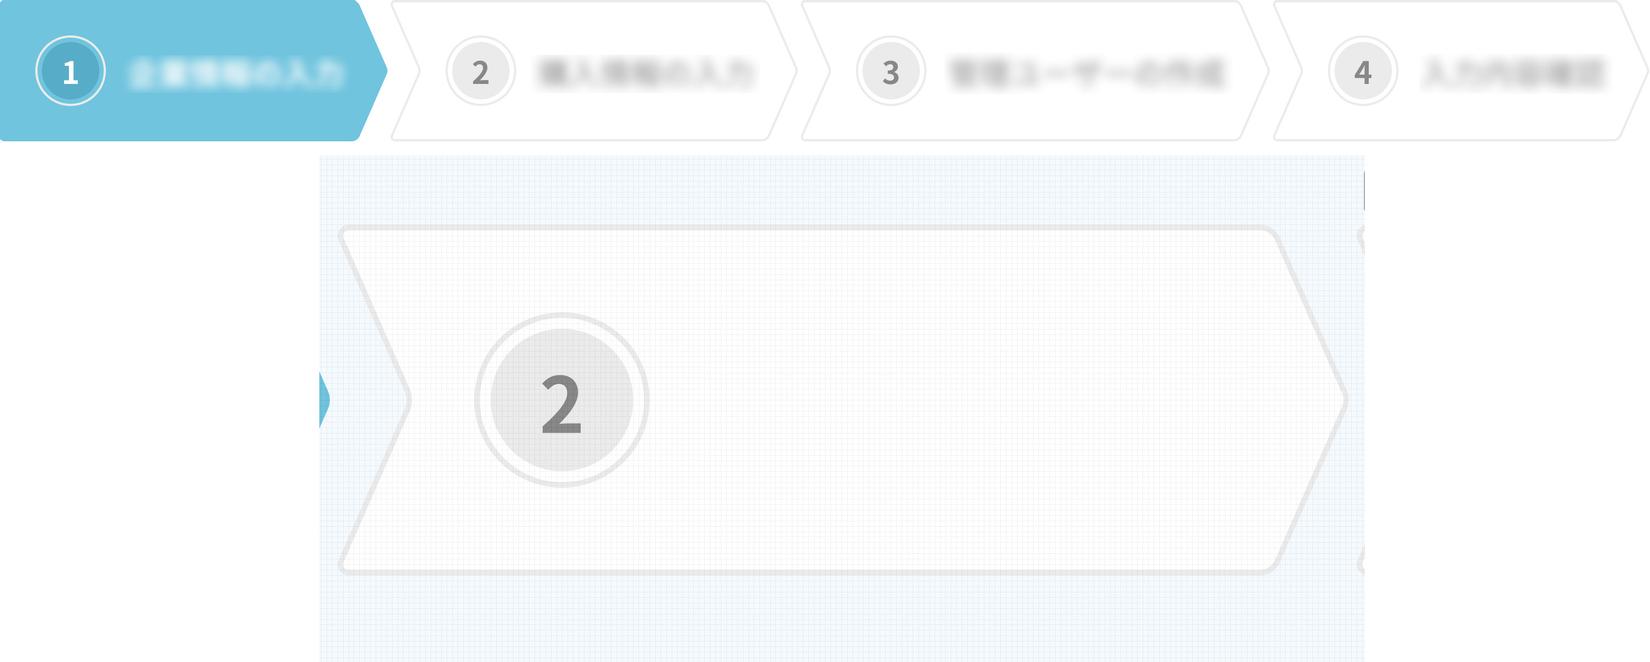
Comment kết quả của bạn vào phần bình luận phía bên dưới nhé.
Thank you for reading and I hope you liked this tutorial!
All rights reserved