Xây dựng ứng dụng đơn giản với Laravel và Nuxt.js sử dụng GraphQL (Phần 2)
Bài đăng này đã không được cập nhật trong 7 năm
Chào các bạn, mình quay lại rồi đây. Trong phần 1 mình đã giới thiệu với các bạn về GraphQL cũng như tạo được endpoint và query được lên phía Server. Ở phần 2 này mình sẽ tiếp tục giới thiệu với các bạn về
Mutation, Validate và Pagination khi sử dụng GraphQL.
Các bạn có thể tham khảo phần 1 ở đây.
Bắt đầu
Create Mutation
$ php artisan make:graphql:mutation CreateUserMutation
$ php artisan make:graphql:mutation UpdateUserMutation
$ php artisan make:graphql:mutation DeleteUserMutation
Rồi, bắt đầu thôi!
Tại file App/GraphQL/Mutation/CreateUserMutation:
<?php

namespace App\GraphQL\Mutation;

use Folklore\GraphQL\Support\Mutation;
use GraphQL\Type\Definition\Type;
use GraphQL;
use App\User;

class CreateUserMutation extends Mutation
{
    protected $attributes = [
        'name' => 'CreateUserMutation',
        'description' => 'A mutation'
    ];

    public function type()
    {
        return GraphQL::type('User');
    }

    public function args()
    {
        return [
            'email' => ['name' => 'email', 'type' => Type::string()],
            'name' => ['name' => 'name', 'type' => Type::string()],
            'password' => ['name' => 'password', 'type' => Type::string()],
        ];
    }

    public function resolve($root, $args, $context, ResolveInfo $info)
    {
        return User::create($args);;
    }
}
Nếu bạn đọc qua phần 1 thì có lẽ sẽ không cần giải thích thêm về đoạn code này nữa. Mình sẽ đi tiếp nhé 
File App/GraphQL/Mutation/UpdateUserMutation:
<?php

namespace App\GraphQL\Mutation;

use App\User;
use Folklore\GraphQL\Support\Mutation;
use GraphQL\Type\Definition\ResolveInfo;
use GraphQL\Type\Definition\Type;
use GraphQL;

class UpdateUserMutation extends Mutation
{
    protected $attributes = [
        'name' => 'UpdateUserMutation',
        'description' => 'A mutation'
    ];

    public function type()
    {
        return GraphQL::type('User');
    }

    public function args()
    {
        return [
            'id' => ['name' => 'id', 'type' => Type::int()],
            'name' => ['name' => 'name', 'type' => Type::string()],
            'email' => ['name' => 'email', 'type' => Type::string()],
            'password' => ['name' => 'password', 'type' => Type::string()],
        ];
    }

    public function resolve($root, $args, $context, ResolveInfo $info)
    {
        $user = User::find($args['id']);

        if (! $user) {
            return null;
        }

        $fields = isset($args['password'])
                ? array_merge($args, ['password' => $args['password']])
                : $args;

        $user->update($fields);

        return $user;
    }
}
File App/GraphQL/Mutation/DeleteUserMutation:
<?php

namespace App\GraphQL\Mutation;

use App\User;
use Folklore\GraphQL\Support\Mutation;
use GraphQL\Type\Definition\ResolveInfo;
use GraphQL\Type\Definition\Type;
use GraphQL;

class DeleteUserMutation extends Mutation
{
    protected $attributes = [
        'name' => 'DeleteUserMutation',
        'description' => 'A mutation'
    ];

    public function type()
    {
        return GraphQL::type('User');
    }

    public function args()
    {
        return [
            'id' => ['name' => 'id', 'type' => Type::int()],
        ];
    }

    public function resolve($root, $args, $context, ResolveInfo $info)
    {
        if ($user = User::findOrFail($args['id'])) {
            $user->delete();

            return $user;
        }

        return null;
    }
}
Code rất quen thuộc đúng không ạ
Giờ chúng ta sẽ đăng kí các Mutation này tại file graphql.php.
'schemas' => [
    'default' => [
        'query' => [
            'users' => App\GraphQL\Query\UsersQuery::class,
            'user' => App\GraphQL\Query\UserQuery::class
        ],
        'mutation' => [
            'createUser' => \App\GraphQL\Mutation\CreateUserMutation::class,
            'updateUser' => \App\GraphQL\Mutation\UpdateUserMutation::class,
            'deleteUser' => \App\GraphQL\Mutation\DeleteUserMutation::class,
        ]
    ]
],
Giờ chúng ta chạy server lên và test thôi. Ta lại chạy vào địa chỉ localhost:8000/graphiql và test. Mình sẽ test ở máy của mình nhé.

Thành công rồi
Đoạn
(name: "Boy Dep Trai",email:"vunguyen9555@gmail.com",password: "secret") chính là request từ Client
Còn { id name, email } chính là response.
Bạn có thể response tùy chọn các field của Model, nơi mà đã được config trong UserType.php
Tiếp theo là update 1 user:

Cuối cùng, chúng ta sẽ delete chính user này:

Validate
Quay lại bước mà chúng ta tạo mới một user. Vào file CreateUserMutation.php và thêm đoạn sau:
public function rules()
{
    return [
        'email' => 'required|email|unique:users',
        'name' => 'required|min:2',
        'password' => 'required|min:6',
    ];
}
Giờ các bạn thêm lại một user mới, nếu không thỏa mãn function rules(), sẽ có lỗi xảy ra. Ví dụ:
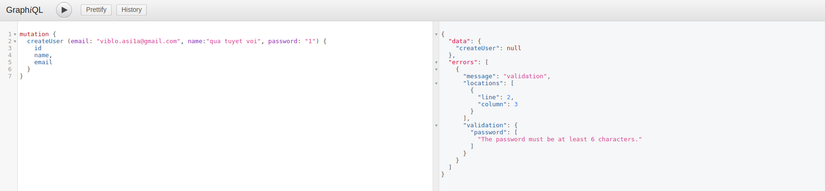
Vậy hãy nhớ sử dụng Validate trong tình huống mà bạn cần thiết nhé. Vì nó đã được tích hợp sẵn rồi
Mình cũng sẽ validate trong file UpdateUserMutation.php:
public function rules()
{
    return [
        'email' => 'required|email',
        'name' => 'min:2',
        'password' => 'min:6'
    ];
}
Pagination
Sau khi mình làm đến đây, mình cũng nảy sinh ra một ý nghĩ, đó là nếu muốn sử dụng pagination thì làm thế nào. Lọ mọ lên mạng search thì cũng thấy nhiều kết quả là:
return GraphQL::pagination(GraphQL::type('User'));
Mình làm theo:
Tại file app/Query/UsersQuery.php:
public function type()
{
    // return Type::listOf(GraphQL::type('User'));
    return GraphQL::pagination(GraphQL::type('User'));
}
Chạy ra query lại:
query {
  users {
    id //vừa đến đoạn này thì bị báo lỗi đỏ lòm gạch chân. Chỉ vào thì thấy: Cannot query field id on type UserPagination
    name,
    email
  }
}
Sau đó mình tìm lỗi mãi, vào sửa cả type User thành UserPagination cũng k được =)))
Lại lóc cóc lên mạng xem. Lần này lên hẳn trang đủ đọc nữa. Cuối cùng thì cũng hiểu. Khi phân trang data bằng GraphQL
We could do something like friends(first:2 after:$friendCursor), where we get a cursor from the last item and use that to paginate.
Đại loại là khi sử dụng phân trang, thì bạn sẽ cần phải biết mình sẽ lấy số lượng là bao nhiêu trên 1 page (mặc định là tất cả) và 1 tham số nữa đó là page. Ví dụ chúng ta query từ Client lên Server như sau:
localhost:8000/users?page=2 thì 2 chính là args['page'] mà chúng ta đang cần.
Sau khi paginate, chúng ta sẽ có các dữ liệu trả về như total, currentPage, perPage, tất cả chúng sẽ được nằm trong object cursor. Cùng sửa lại một chút nhé.
File App/GraphQL/Query/UsersQuery.php:
public function args()
{
    return [
        'id' => ['name' => 'id', 'type' => Type::int()],
        'name' => ['name' => 'name', 'type' => Type::string()],
        'email' => ['name' => 'email', 'type' => Type::string()],
        'amount' => ['name' => 'amount', 'type' => Type::int()],
        'take' => ['name' => 'take', 'type' => Type::int()],
        'page' => ['name' => 'page', 'type' => Type::int()]
    ];
}

public function resolve($root, $args)
    {
        $user = new User;

        if(isset($args['amount'])) {
            $user = $user->limit($args['amount'])->latest();
        }

        if (isset($args['name'])) {
            $user = $user->where('name', $args['name']);
        }

        if (isset($args['id'])) {
            $user = $user->where('id', $args['id']);
        }

        $perPage = $args['take'] ?? 20;

        $page = $args['page'] ?? 1;

        return $user->paginate($perPage, ['*'], 'page', $page);
    }
Cuối cùng, ta sẽ lấy dữ liệu và paginate, kết quả sẽ như sau:
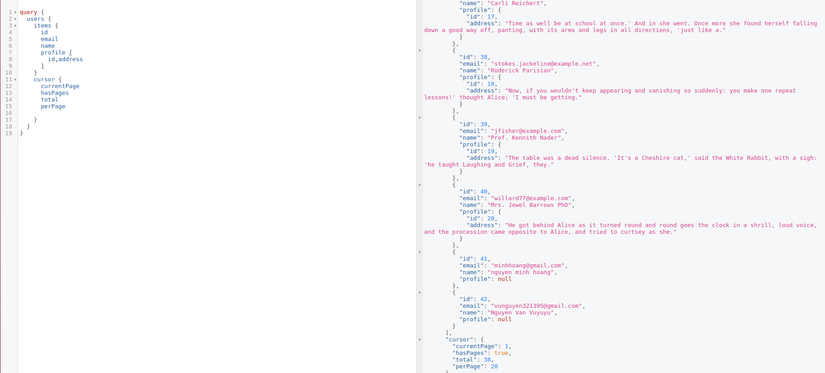
Vậy là chúng ta đã phân trang thành công.
Lời kết
Đến đây mình cũng xin dừng lại. Vậy là việc sử dụng Laravel kết hợp với GraphQL xây dựng được một ứng dụng todos cũng đã hoàn thành được một nửa rồi. Ở đây mình chỉ tìm hiểu đơn giản, các bạn cũng có thể tìm hiểu thêm, ví dụ như thêm cả Profile khi tạo User chả hạn. Ở phần cuối, mình sẽ xây dựng một project bằng Nuxt.js sử dụng các api đã xây dựng ở trên. Nếu có gì không hiểu các bạn cứ comment lại nhé.
Cảm ơn các bạn đã theo dõi bài viết này. Mình xin cảm ơn!
Source code
https://github.com/vunguyen10111995/graphql-todos/tree/master/graphql-backend
All rights reserved
