Xây dựng ứng dụng đơn giản với Laravel và Nuxt.js sử dụng GraphQL (Phần 1)
Bài đăng này đã không được cập nhật trong 7 năm
Mở đầu
Trong bài viết này mình sẽ giới thiệu về GraphQL, và tại sao nó lại giải quyết được các vấn đề tồn đọng của RESTful API. Trong nội dung của bài này, mình cũng cố gắng hướng dẫn chi tiết nhất về cách tạo ra một endpoint bằng GraphQL sử dụng query để thao tác với dữ liệu sử dụng Laravel framework.
Giới thiệu
Theo trang chủ của GraphQL:
GraphQL is a query language for APIs and a runtime for fulfilling those queries with your existing data. GraphQL provides a complete and understandable description of the data in your API, gives clients the power to ask for exactly what they need and nothing more, makes it easier to evolve APIs over time, and enables powerful developer tools.
Có thể hiểu rằng GraphQL là một ngôn ngữ được dùng cho API, nó đáp ứng đầy đủ, chính xác và linh hoạt những gì mà phía client yêu cầu, và nó cũng dễ dàng để phát triển =))
Thường thì chúng ta đang sử dụng các RESTful API, tuy nhiên việc sử dụng RESTful API cũng có những bất cập khá lớn.
Ví dụ :
- Giả sử chúng ta có một danh sách các user có các field: id, name, email, password, gender, address. Giả sử hôm nay là chủ nhật, Client muốn lấy ra các user với các field name, email thôi. OK, quá đơn giản, anh Server sẽ viết response chỉ trả về những trường như trên.
Sáng mai ngủ dậy, anh Server lại nhận được tin: Tao không cần name nữa, cho tao trường address vào.
Ngày kia cũng vậy, rồi ngày tiếp theo cũng vậy, anh Client cứ yêu cầu thay đổi xoành xạch, thêm trường này, bớt trường kia Nhất là trong các dự án lớn, dữ liệu thay đổi bởi yêu cầu từ Client là điều tất yếu, và anh Server cứ phải sửa theo yêu cầu của anh Client. Công nhận là nhọc, từ đó a Server không thấy đơn giản nữa.
Lại một ví dụ nữa:
- Trong dự án lớn, giả sử có rất nhiều các endpoint (lên đến hàng trăm, hàng nghìn), thì việc tìm kiếm để xử lý, đặt tên cũng như sắp xếp là một vấn đề không nhỏ.
Giải pháp chính là GraphQL. Với GraphQL, bạn chỉ cần một endpoint duy nhất mà vẫn đảm bảo được sức mạnh cũng như tính linh hoạt về response của Server, bạn sẽ không cần phải đau đầu về việc đặt tên, để controller này trong thư mục nào, tên route này như thế nào nữa
..v.v

Tạm thời một chút lý thuyết là vậy, mình cần phải bắt tay vào làm mới có thể hiểu được. 
Bắt đầu
Setup project:
$ composer create-project --prefer-dist laravel/laravel graphql-backend
Install GraphQL:
$ composer require folklore/graphql:dev-develop
Sau đó, các bạn vào file config/app.php và thêm vào danh sách providers và aliases:
'providers' => [
    ...
    Folklore\GraphQL\ServiceProvider::class,
]

'aliases' => [
    ...
    'GraphQL' => Folklore\GraphQL\Support\Facades\GraphQL::class,
]
Chạy command để tạo file cấu hình cho GraphQL:
$ php artisan vendor:publish --provider="Folklore\GraphQL\ServiceProvider"
Migration
Ở đây mình sẽ tạo thêm 1 bảng nữa, mình đặt tên là bảng profiles:
public function up()
    {
        Schema::create('profiles', function (Blueprint $table) {
            $table->increments('id');
            $table->integer('user_id');
            $table->string('address');
            $table->string('company');
            $table->date('dob')->nullable();
            $table->boolean('ny')->default(false);
            $table->timestamps();
        });
    }

    /**
     * Reverse the migrations.
     *
     * @return void
     */
    public function down()
    {
        Schema::dropIfExists('profiles');
    }
Seeder
File ModelFactory:
<?php

use Faker\Generator as Faker;

/*
|--------------------------------------------------------------------------
| Model Factories
|--------------------------------------------------------------------------
|
| This directory should contain each of the model factory definitions for
| your application. Factories provide a convenient way to generate new
| model instances for testing / seeding your application's database.
|
*/

$factory->define(App\User::class, function (Faker $faker) {
    return [
        'name' => $faker->name,
        'email' => $faker->unique()->safeEmail,
        'password' => '$2y$10$TKh8H1.PfQx37YgCzwiKb.KjNyWgaHb9cbcoQgdIVFlYg7B77UdFm', // secret
        'remember_token' => str_random(10),
    ];
});

$factory->define(App\Profile::class, function (Faker $faker) {
    return [
        'company' => $faker->company,
        'address' => $faker->realText(rand(20, 200)),
        'user_id' => function() {
            return App\User::inRandomOrder()->first()->id;
        },
        'dob' => $date = $faker->dateTimeThisMonth,
        'ny' => false,
    ];
});
File DataBaseSeeder.php:
<?php

use Illuminate\Database\Seeder;

class DatabaseSeeder extends Seeder
{
    /**
     * Seed the application's database.
     *
     * @return void
     */
    public function run()
    {
        if ($this->command->confirm('Do you wish to refresh migration before seeding, it will clear all old data ?')) {

            $this->command->call('migrate:refresh');

            $this->command->warn("Data cleared, starting from blank database.");
        }

        $numberOfUser = (int) $this->command->ask('How many users you need ?', 20);

        $users = factory(\App\User::class, $numberOfUser)->create();

        $users->each(function($user) {
            // create profile for user
            factory(\App\Profile::class)->create(['user_id' => $user->id]);
        });

        $this->command->warn("Tạo xong rồi!");
    }
}
Xong các bạn nhớ chạy seeder nhé!  Nhớ chờ 1 tí vì fake data sẽ mất chút thời gian.
Create Model
File User.php:
public function profile()
    {
        return $this->hasOne(Profile::class);
    }

    public function setPasswordAttribute($password)
    {
        $this->attributes['password'] = bcrypt($password);
    }
Create Type, Query
Sau khi có data rồi, chúng ta bắt đầu tạo Type, Query và Mutation.
Chạy php artisan make và bạn sẽ thấy chúng ta có thể tạo được type cho model User và model Profile như sau:
$ php artisan make:graphql:type UserType
$ php artisan make:graphql:type ProfileType
Vào thư mục app/GraphQL/Type bạn sẽ thấy 2 file đó là UserType.php và ProfileType.php. Giờ chúng ta sẽ đi config cho nó.
File ProfileType.php:
<?php

namespace App\GraphQL\Type;

use GraphQL\Type\Definition\Type;
use Folklore\GraphQL\Support\Type as BaseType;

class ProfileType extends BaseType
{
    protected $attributes = [
        'name' => 'ProfileType',
        'description' => 'A type'
    ];

    // Khai báo các trường thuộc vào table và kiểu của nó.
    public function fields()
    {
        return [
            'id' => [
                'type' => Type::nonNull(Type::int())
            ],

            'address' => [
                'type' => Type::string()
            ],

            'company' => [
                'type' => Type::string()
            ],

            'dob' => [
                'type' => Type::string()
            ],

            'ny' => [
                'type' => Type::int()
            ],

            'created_at' => [
                'type' => Type::string()
            ],

            'updated_at' => [
                'type' => Type::string()
            ],
        ];
    }
}
File UserType.php:
<?php

namespace App\GraphQL\Type;

use GraphQL\Type\Definition\Type;
use Folklore\GraphQL\Support\Type as BaseType;
use GraphQL;

class UserType extends BaseType
{
    public function fields()
    {
        return [
            'id' => [
                'type' => Type::nonNull(Type::int())
            ],

            'name' => [
                'type' => Type::string()
            ],

            'email' => [
                'type' => Type::string()
            ],

            'created_at' => [
                'type' => Type::string()
            ],
            'updated_at' => [
                'type' => Type::string()
            ],

            'profile' => [ //relation of model User
                'type' => GraphQL::type('Profile') // This Type is ProfileType.php and was declared in graphql.php below
            ]
        ];
    }
    // Transform field created_at in response
    // Use function resolve[field]Field to transform field in response
    protected function resolveCreatedAtField($root, $args)
    {
        return $root->created_at->toIso8601String();
    }
}
Đoạn code trên cũng không có gì khó hiểu lắm, mình cũng đã comment lại một số lưu ý nhỏ lại rồi.
Giờ chúng ta sẽ tạo Query:
File UserQuery.php:
<?php

namespace App\GraphQL\Query;

use Folklore\GraphQL\Support\Query;
use GraphQL\Type\Definition\Type;
use GraphQL;
use App\User;

class UserQuery extends Query
{
    protected $attributes = [
        'name' => 'user',
        'description' => 'A query'
    ];

    public function type()
    {
        return GraphQL::type('User'); // lấy ra 1 record
    }

    // Đây là các args mà có thể có trong query
    public function args()
    {
        return [
            'id' => ['name' => 'id', 'type' => Type::int()],
            'name' => ['name' => 'name', 'type' => Type::string()],
            'email' => ['name' => 'email', 'type' => Type::string()],
        ];
    }

    public function resolve($root, $args, $context)
    {
        $user = new User;

        if (isset($args['name'])) {
            $user = $user->where('name', $args['name']);
        }

        if (isset($args['email'])) {
            $user = $user->where('email', $args['email']);
        }

        if (isset($args['id'])) {
            $user = $user->where('id', $args['id']);
        }

        return $user->first();
    }
}
File UsersQuery.php:
<?php

namespace App\GraphQL\Query;

use Folklore\GraphQL\Support\Query;
use GraphQL\Type\Definition\Type;
use GraphQL;
use App\User;

class UsersQuery extends Query
{
    protected $attributes = [
        'name' => 'users',
    ];

    public function type()
    {
        return Type::listOf(GraphQL::type('User'));  // lấy ra 1 danh sách, chú ý (Type::listOf)
    }

    public function args()
    {
        return [
            'id' => ['name' => 'id', 'type' => Type::int()],
            'name' => ['name' => 'name', 'type' => Type::string()],
            'email' => ['name' => 'email', 'type' => Type::string()],
            'amount' => ['name' => 'amount', 'type' => Type::int()]
        ];
    }

    /**
     * @param $root
     * @param $args
     * @return mixed
     */
    public function resolve($root, $args)
    {
        $user = new User;

        if(isset($args['amount'])) {
            $user = $user->limit($args['amount'])->latest();
        }

        if (isset($args['name'])) {
            $user = $user->where('name', $args['name']);
        }

        if (isset($args['id'])) {
            $user = $user->where('id', $args['id']);
        }

        return $user->get();
    }
}
Vậy là mình đã tạo xong type và query rồi, giờ việc cần làm là đăng ký nó trong file graphql.php
Mình sẽ sửa lại như sau:
'schemas' => [
    'default' => [
        'query' => [
            'users' => App\GraphQL\Query\UsersQuery::class,
            'user' => App\GraphQL\Query\UserQuery::class
        ],
        'mutation' => [
        ]
    ]
],

...
...
'types' => [
    'User' => \App\GraphQL\Type\UserType::class,
    'Profile' => \App\GraphQL\Type\ProfileType::class
],
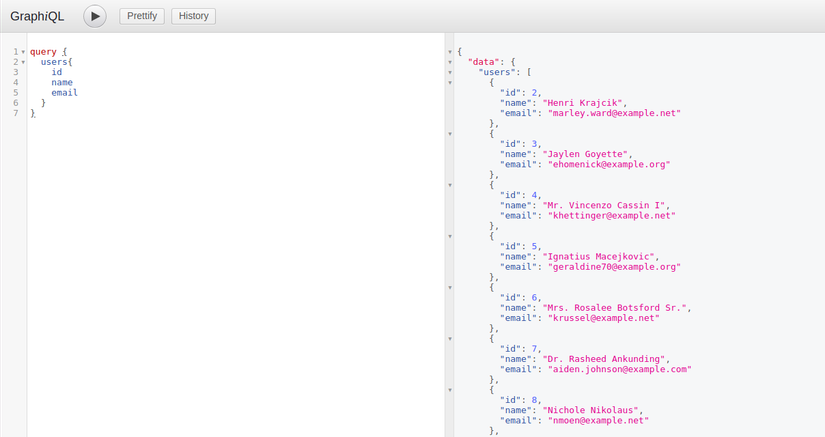
Vậy là bước đầu đã xong. Đến đây chúng ta bắt đầu có thể sử dụng được GraphQL được rồi. Các bạn run php artisan serve, sau đó mở trình duyệt và truy cập vào localhost:8000/graphiql và chạy thôi. Ví dụ mình sẽ lấy ra tất cả users và mỗi user sẽ có các field như id, email, name:

Kết quả đúng rồi phải không nào  , giờ giả sử chúng ta không muốn lấy id hay một trường bất kì nào nữa, ta có thể bỏ đi, ví dụ
query {
  users {
    name //all users but only field 'name'
  }
}

// hoặc
query {
  users (amount:5){ //get 5 users and profile
    id
    name
    profile {
        address
        company
    }
  }
}

//hoặc
query {
  user (id:3) { //get user where user.id = 3
    id
    name // response id & name
  }
}
và kết quả là server sẽ trả về toàn bộ dữ liệu mà chúng ta mong muốn. Vậy là Client chỉ việc gọi những gì nó thích, còn server cũng được giảm tải công việc để phục vụ cho Client. Mọi thứ có vẻ rất nuột =))). Tất nhiên, các args chính là args mà chúng ta đã viết nó ở trong
public function args()
{
    return [
        'id' => ['name' => 'id', 'type' => Type::int()],
        'name' => ['name' => 'name', 'type' => Type::string()],
        'email' => ['name' => 'email', 'type' => Type::string()],
        'amount' => ['name' => 'amount', 'type' => Type::int()],
    ];
}
Nếu bạn query một trường không có trong này, như ví dụ dưới :
query {
  users {
    id
    name
    gender
  }
}
thì lập tức sẽ có lỗi
{
  "data": null,
  "errors": [
    {
      "message": "Cannot query field \"gender\" on type \"User\".",
      "locations": [
        {
          "line": 6,
          "column": 5
        }
      ]
    }
  ]
}
Lời kết
Vậy là mình đã tìm hiểu một chút về GraphQL trong Laravel, biết được một cách sử dụng nó, cũng như tạo ra các Type, Query. Ở Phần 2 mình sẽ giới thiêu với các bạn về Mutation trong GraphQL để giúp cho việc Client gửi request lên server xử lý data. Cùng với đó mình sẽ đề cập đến Validate và Pagination. Còn gì không hiểu các bạn hãy comment lại nhé. Rất cảm ơn bạn đã đọc bài viết của mình.
Source code
Đây là source code của mình: https://github.com/vunguyen10111995/graphql-todos/tree/master/graphql-backend
All rights reserved