Hướng dẫn viết plugin cơ bản cho jenkins trên OSX
Bài đăng này đã không được cập nhật trong 4 năm
_Lưu ý: Ở bài viết này mình giả sử các bạn đã cài đặt được jenkins server. Nếu các bạn chưa cài đặt được thì có thể xem bài viết này, khác đơn giản thôi. _ Setup Jenkins
Bài viết này có 2 mục tiêu chính.
I- Cài đặt môi trường, Tao mới plugin, Cài đặt thành công lên jenkins server
II- Hướng dẫn basic làm thế nào để viết code cho jenkins plugin.
I. Hướng dẫn cài đặt môi trường, tạo ra và cài đặt thành công plugin cho jenkins.
-
Chuẩn bị môi trường
a. Cài Maven
brew install mavenb.Cài đặt JDK 6.0 or later
http://www.oracle.com/technetwork/java/javaee/downloads/java-ee-sdk-6u3-jdk-6u29-downloads-523388.htmlC. File settings
Tạo ra file settings như sau (settings.xml) và copy vào thư mục User/.m2/. Đây là thư mục ẩn => Các bạn open Terminal và type dòng lệnh sau để hiển thị các thư mục ẩn này (YES: Hiện, NO: ẩn)
defaults write com.apple.finder AppleShowAllFiles YES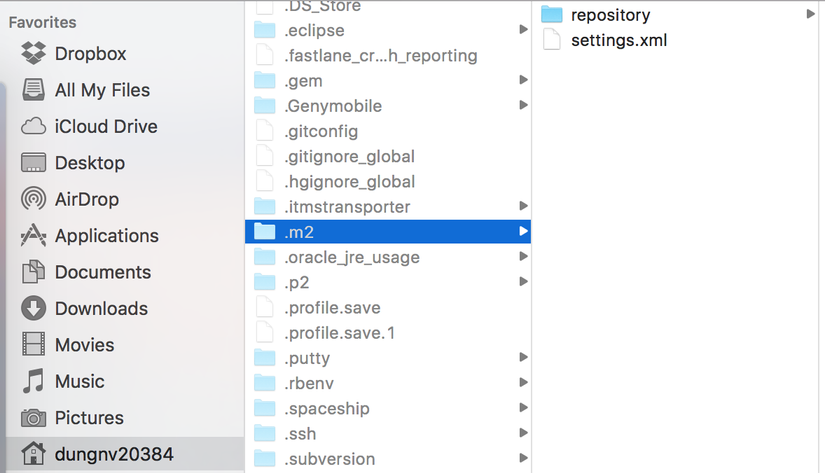
-
</settings><settings> <pluginGroups> <pluginGroup>org.jenkins-ci.tools</pluginGroup> </pluginGroups> <profiles> <!-- Give access to Jenkins plugins --> <profile> <id>jenkins</id> <activation> <activeByDefault>true</activeByDefault> <!-- change this to false, if you don't like to have it on per default --> </activation> <repositories> <repository> <id>repo.jenkins-ci.org</id> <url>http://repo.jenkins-ci.org/public/</url> </repository> </repositories> <pluginRepositories> <pluginRepository> <id>repo.jenkins-ci.org</id> <url>http://repo.jenkins-ci.org/public/</url> </pluginRepository> </pluginRepositories> </profile> </profiles> <mirrors> <mirror> <id>repo.jenkins-ci.org</id> <url>http://repo.jenkins-ci.org/public/</url> <mirrorOf>m.g.o-public</mirrorOf> </mirror> </mirrors>d. Install Eclipse (Neon)
https://www.eclipse.org/
-
Tạo mới plugin a. Tạo 1 thư mục chưa projects b. Mở terminal và type dòng lệnh sau:
$ mvn -U org.jenkins-ci.tools:maven-hpi-plugin:create=> sau khi tạo thành công thì trong thư mục project có- file POM: dùng để setting một số attributes cần thiết (như tên, version, description ...)
- thư mục src: chứa source code của plugin
-
Mở project với Eclipse
- Chạy Eclipse.
- Vào menu -> file -> import -> chọn maven -> existing maven project
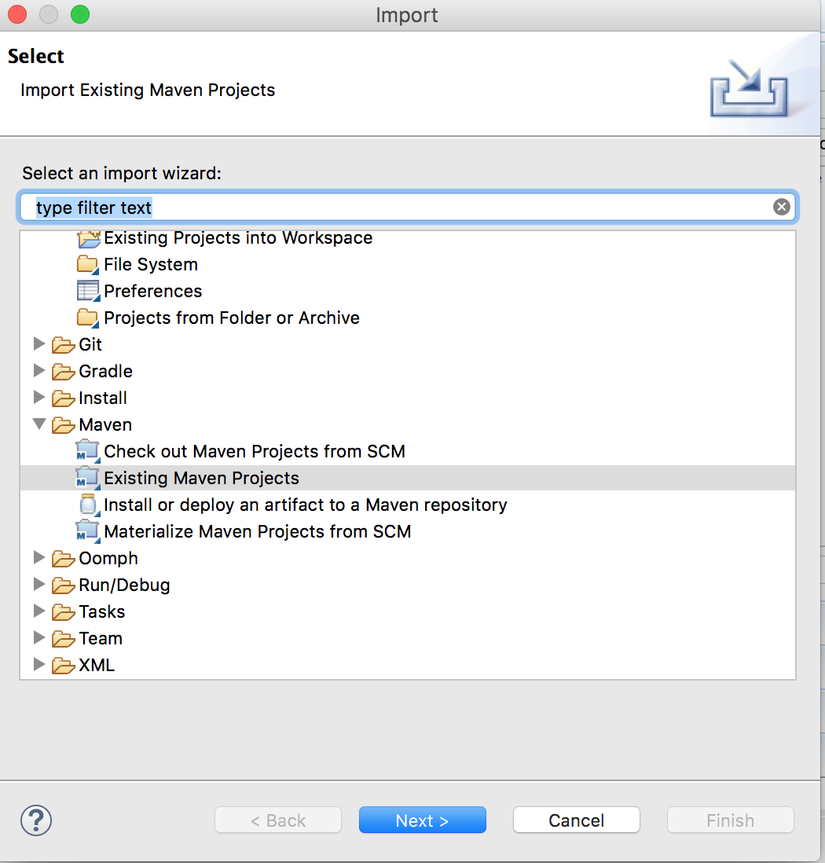
- Chọn url tới thư mục chưa project vừa tạo -> import -> chờ một lúc cho Eclipse download các dependency package.
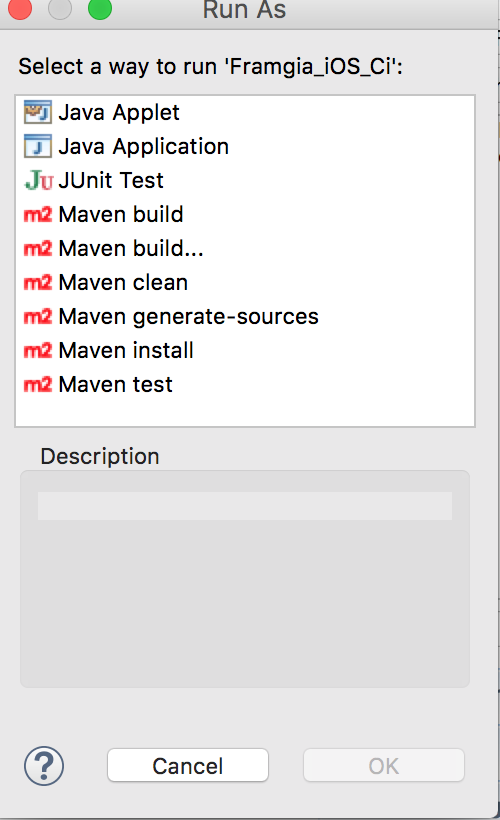
- Sau đó chúng ta có thể build thử xem có thành công hay không. Tuỳ theo mục đich và chọn target tương ứng như hình dưới.
-
Distributing a Plugin Để cài đặt plugin của chúng ta vào jenkins thì cần tao ra file .hpi bằng cách.
mvn package=> sau khi có file .hpi thì có 2 cách để deploy lên jenkins server. a. Upload lên jenkins từ GUI: b. Copy file vừa tạo ra vào thư mục $JENKINS_HOME/plugins c. Restart jenkins bằng cách gọi như sau:
=> Ngoài ra chúng ta cũng có thể tạo ra file .hpi này từ Eclise. Package sinh ra được locate ở thư mục target cùng với thư mục project tạo ban đầu.
[jenkins url]/restartví dụ: localhost:8080/restartĐể kiểm tra việc cài đặt plugin có thành công hay không thì chúng ta làm như sau.
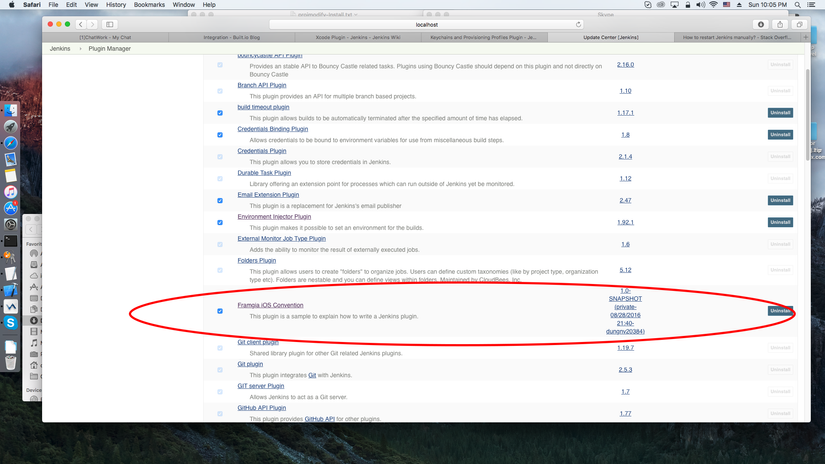
a. Mở jenkins home page b. Vào mục Manager Jenkins c. Vào mục Manager plugins d. Vào mục installed e. Tìm plugin của chúng ta ví dụ như hình dưới.
=> OK. Done. Chúc các bạn tạo ra được các plugin hữu ích.
II- Implement plugin basic
- Entry point
- tạo class có tên: PluginImpl content như sau. package org.jenkinsci.plugins.Framgia_iOS_Ci;
`import hudson.Plugin;

import java.util.logging.Logger;

public class PluginImpl extends Plugin {
    private final static Logger LOG = Logger.getLogger(PluginImpl.class.getName());

    public void start() throws Exception {
        LOG.info("");
    }
}`
- Xác định loại extension chúng ta sẽ viết Vào đây để tìm các extension. (Mình sẽ cập nhật tiếp phần code basic sớm nhất.)
All rights reserved
