Dynamic Table View Cell Height and Auto Layout Part 2
Bài đăng này đã không được cập nhật trong 4 năm
Tiếp theo từ phần trước: https://viblo.asia/thevinh92/posts/ZabG9z35vzY6 Vẫn dựa theo tài liệu từ: http://www.raywenderlich.com/73602/dynamic-table-view-cell-height-auto-layout
Ở phần 1, sau khi implement các method của table view delegate và data source, app đã chạy và show 1 table view với dữ liệu lấy về từ Deviant Art. Tuy nhiên khi xoay device và chuyển sang landscape mode ta có thể thấy 1 số điều không ổn:
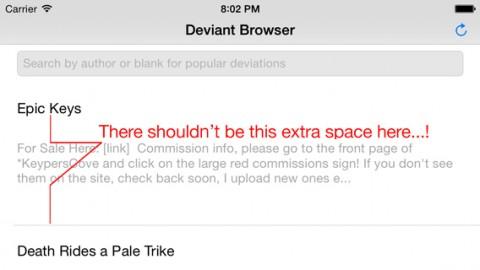
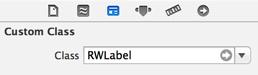
Vấn đề này xảy ra chính là do việc khi chúng ta set Preferred Width cho cả titleLabel, subtitleLabel là Explicit. Nên mỗi khi thay đổi orientation của screen, preferred width của label ko được update. Do đó, việc tính toán intrinsic height của cell bị sai. Đó là lý do vì sao iOS 8 introdiced "implicit" preferred widths, nhưng nó lại ko available trong iOS7, nếu cố tình sử dụng thì app sẽ crash. Chúng ta có thể sửa nó bằng cách tạo ra 1 subclass của UILabel. Add thêm 1 class mới vào project, và đặt tên là RWLabel và nhớ là nó phải là subclass của UILabel.
Trong file RWlabel.m, thay thế tất cả những gì bên trong @implement RWLabel với code sau:
- (void)setBounds:(CGRect)bounds {
  [super setBounds:bounds];

  // If this is a multiline label, need to make sure
  // preferredMaxLayoutWidth always matches the frame width
  // (i.e. orientation change can mess this up)

  if (self.numberOfLines == 0 && bounds.size.width != self.preferredMaxLayoutWidth) {
    self.preferredMaxLayoutWidth = self.bounds.size.width;
    [self setNeedsUpdateConstraints];
  }
}
RWLabel luôn đảm bảo rằng preferredMaxLayoutWidth luôn luôn bằng với width của cái view bao lấy nó. TIếp theo update RWBasicCell để sử dụng RWLabel, trong file RWBasicCell.h:
#import "RWLabel.h"
@property (nonatomic, weak) IBOutlet RWLabel *titleLabel;
@property (nonatomic, weak) IBOutlet RWLabel *subtitleLabel;
Trong Main.storyboard, chuyển tới FeedNewController scene và chuyển class của title label thành RWLabel. (tương tự với subtitle label)
trong RWFeedViewController.m, thêm đoạn code sau vào calculateHeightForConfiguredSizingCell:(dòng đầu tiên trong method):
sizingCell.bounds = CGRectMake(0.0f, 0.0f, CGRectGetWidth(self.tableView.frame), CGRectGetHeight(sizingCell.bounds));
Nó sẽ làm cho mỗi RWLabel trong cell update preferredMaxLayoutWidth của nó. Build&Run, labels sẽ điều chỉnh vị trí và kích thước đúng với cả portrait & landscape orientation.
Images
Deviant Art is all about images, vì vậy bạn cần phải add thêm images vào. Nhưng bởi vì Deviant Art có cả 2 kiểu deviations (post có image) và blog post (không có image) thì tối nhất chúng ta nên tạo ra thêm 1 custom cell.
thêm 1 class vào project, đặt tên RWImageCell và nhớ set nó là subclass của RWBasicCell. Lý do là vì nó cũng cần có titleLabel và subtitleLabel. Mở RWImageCell.h và thêm dòng sau ngay dưới @interface RWImageCell : RWBasicCell
@property (nonatomic, weak) IBOutlet UIImageView *customImageView;
Tên của property này là customImageView thì sẽ tốt hơn imageView, bởi vì đã có sẵn 1 property tên là imageView trong UITableViewCell.
Mở file Main.storyboard, chọn basic cell mà chúng ta đang làm việc lúc trước, copy và paste vào tableView. thay đổi Custom Class của cell mới này là RWImageCell, và thay đổi Reuse Identifier thành RWImageCell. Thay đổi titleLabel của RWImageCell với các giá trị x là 128 và width là 172. Làm tương tự với subtitleLabel. InterfaceBuilder có thể sẽ đưa ra warning về ambigous auto layout constraints, bởi vì constraints trên các labels khiến chúng ở vị khác với những gì mà bạn đặt lúc đầu. Để sửa nó, đầu tiên, delete cái leading constraint của cả titleLabel và subtile Label. Bây giờ hãy điều chỉnh lại Intrinsic Size của titleLabel và subtitleLabel như hình sau:
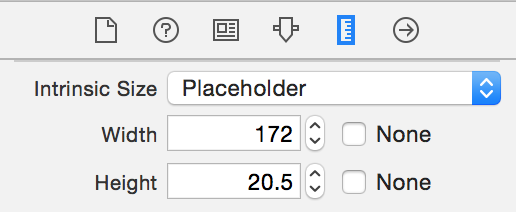 Nó sẽ cho Interface Builder biết để update Placeholder theo frame hiện tại của view. Kiểu tra lại bạn sẽ thấy warning ko còn nữa. Bạn cần phải add thêm image view vào trong cell, nhưng height của cell đang hơi nhỏ => chỉnh Row height của RWImageCell lên 141. Drag&Drop 1 Imageview vào trong RWImageCell. Set size và position của imageview đó như sau:
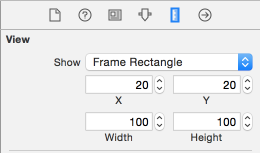
chọn ImageView và pin leading, top, bottom với giá trị 20; pin width & height với giá trị 100; chắc chắn rằng Constrain to margins ko đc checked; và nhấn "Add 5 constrains".
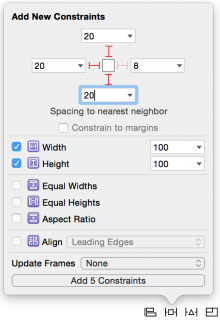
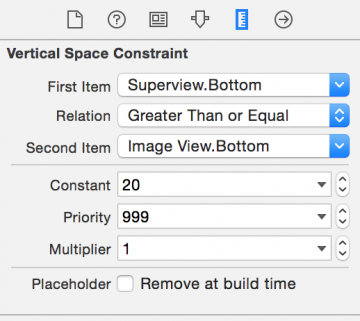
edit bottom constrain của imageview: thay đổi trong attributes editor: Relation thành Greater Than or Equal và Priority thành 999
Tương tự như vậy, bạn làm thế với subtitleLabel: chọn bottom constraint của nó, thay đổi giá trị Relation thành Greater Than or Equal, và vẫn để Priority là 1000. Điều này, về cơ bản nói với autolayout rằng:"Nên có ít nhất 20 point phía dưới imageView và subtitleLabel, nhưng subtitleLabel đc ưu tiên hơn: tức là nếu subtitleLabel quá dài, và tạo thành nhiều dòng thì bottom constrain của subtitleLabel vẫn là 20, còn imageView thì có thể lớn hơn".
Tiếp theo, select imageview và chỉnh sửa height constraint của nó để Priority là 999. Tương tự, chỉnh Priority cỉa width constraint của nó thành 999. Những thay đổi này là cần thiết bởi vì hệ thống auto layout đôi khi sẽ bị "bối rối" giữa system-defined constraints và custom-defined size constraints. Khi điều chỉnh như trên, nó giống như bạn nói với auto layout rằng:"mày là người tốt, mày không nên phá vỡ những cái constrain này, nhưng nếu mày thực sự phải phá vỡ thì mày mày có thể phá vỡ nó." Trong hầu hết các trường hợp, auto layout sẽ có thể làmm những điều trên. Đôi khi, hiếm hoi, nó không thể break được constraints - đôi khi gây ra bởi việc xoay màn hình, vd nó thường có sự khác biệt từ 1-2 pixel, mà như vậy thì không đáng để ý lắm.
Pro-tip: Nó ko phải luôn luôn rõ ràng auto layout sẽ thể hiện đc custom-defined constraints, đặc biệt là trên 1 tableViewCell. Nếu bạn nhìn thấy warning thông báo rằng auto layout phải break 1 constraint nào đó, hãy thử tinh chỉnh các thuộc tính cảu custom-defined constraints.
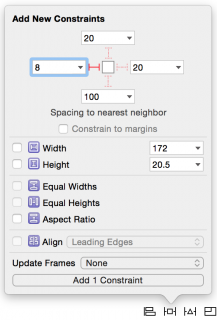
Cuối cùng, chọn RWImageCell's titleLabel, pin leading to 8, add thêm constraint đó và làm tương tự với subtitleLabel:
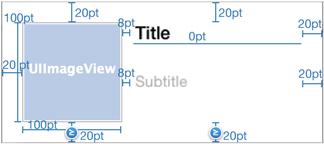
Cuối cùng, auto layout của RWImageCell sẽ nhìn như sau:
Bạn cũng cần phải connect outlet cho customImageView trên file xib với trong code. CUối cùng, lại phải tạo 1 segue từ RWImageCell tới scene titled Deviant Media, như vậy app có thể show scene này ra khi user click vào RWImageCell. Tương tự như việc setup basic cell, chọn RWImageCell, control-drag tới scene titled Deviant Media, chọn Push từ Selection Segue option. Chắc chắn rằng bạn cũng chuyển Accessory thành None. Như vậy bạn đã setup xong RWImageCell, bây h chỉ cần add code để display nó.
Show Images
Thêm line sau vào phần top của file RWFeedViewController.m
#import "RWImageCell.h"
static NSString * const RWImageCellIdentifier = "RWImageCell";
Ta sẽ add RWImageCell vào cả datasource và delegate method. Ta cần phải identify nó bằng Reuse Identifier, mà được set bằng RWImageCellIdentifier. Vẫn trong file RWFeedViewController.m, thay thế tableView:cellForRowAtIndexPath: với đoạn sau:
- (UITableViewCell *)tableView:(UITableView *)tableView cellForRowAtIndexPath:(NSIndexPath *)indexPath {
  if ([self hasImageAtIndexPath:indexPath]) {
    return [self galleryCellAtIndexPath:indexPath];
  } else {
    return [self basicCellAtIndexPath:indexPath];
  }
}

- (BOOL)hasImageAtIndexPath:(NSIndexPath *)indexPath {
  RSSItem *item = self.feedItems[indexPath.row];
  RSSMediaThumbnail *mediaThumbnail = [item.mediaThumbnails firstObject];
  return mediaThumbnail.url != nil;
}

- (RWImageCell *)galleryCellAtIndexPath:(NSIndexPath *)indexPath {
  RWImageCell *cell = [self.tableView dequeueReusableCellWithIdentifier:RWImageCellIdentifier forIndexPath:indexPath];
  [self configureImageCell:cell atIndexPath:indexPath];
  return cell;
}

- (void)configureImageCell:(RWImageCell *)cell atIndexPath:(NSIndexPath *)indexPath {
  RSSItem *item = self.feedItems[indexPath.row];
  [self setTitleForCell:cell item:item];
  [self setSubtitleForCell:cell item:item];
  [self setImageForCell:(id)cell item:item];
}

- (void)setImageForCell:(RWImageCell *)cell item:(RSSItem *)item {
  RSSMediaThumbnail *mediaThumbnail = [item.mediaThumbnails firstObject];

  // mediaThumbnails are generally ordered by size,
  // so get the second mediaThumbnail, which is a
  // "medium" sized image

  if (item.mediaThumbnails.count >= 2) {
    mediaThumbnail = item.mediaThumbnails[1];
  } else {
    mediaThumbnail = [item.mediaThumbnails firstObject];
  }

  [cell.customImageView setImage:nil];
  [cell.customImageView setImageWithURL:mediaThumbnail.url];
}
Đoạn code trên khá tương tự với cách ta create BasicCell ở trước đó, tuy nhiên có vài sự khác biệt như sau:
- (BOOL)hasImageAtIndexPath:(NSIndexPath *)indexPath : kiểm tra xem item tại indexPath đó có mediaThumbnail với 1 non-nil URL hay không. Deviant Art tự động sinh ra thumbnalil cho tất các các deviations đc uploat. Vì vậy nếu item ko có "non-nil" URL, bạn cần phải display item sử dụng ImageCell
- (void)configureImageCell:(RWImageCell *)cell atIndexPath:(NSIndexPath *)indexPath : Tương tự như method basicCellAtIndexPath: nhưng nó còn set cả image trong cell bằng method (void)setImageForCell:(RWImageCell *)cell item:(RSSItem *)item
- (void)setImageForCell:(RWImageCell *)cell item:(RSSItem *)item : cố gắng để lấy được media thumbnail thứ 2 - 1 hình ảnh có kích thước trung bình mà phù hợp với kích cỡ của image view. thumbnail sau đó được đặt vào customImageView bằng cách sử dụng method đc cung cấp bởi AFNetworking, setImageWithURL:
Optimizing the Table View
Trước đây chúng ta đã set estimatedRowHeight là 160.0, thuộc tính này haotj đọng cho 1 BasicCell khi portrait orientation, nhưng nó chưa chính xác. Thay vào đó, ta có thể implement 1 method của UITableViewDelegate để tính toán estimated height của mỗi cell tại run time.
Đầu tiên, ta cần phải delete dòng này trong method configureTableView:
tableView.estimatedRowHeight = 160.f;
Và add nhưgnx method sau vào ngay bên dưới // MARK: UITextFieldDelegate.
- (CGFloat)tableView:(UITableView *)tableView estimatedHeightForRowAtIndexPath:(NSIndexPath *)indexPath {
    if ([self isLandscapeOrientation]) {
        return [self hasImageAtIndexPath:indexPath] ? 140.f : 120.f;
    } else {
        return [self hasImageAtIndexPath:indexPath] ? 235.f : 155.f;
    }
}

- (BOOL)isLandscapeOrientation {
    return UIInterfaceOrientationIsLandscape([[UIApplication sharedApplication] statusBarOrientation]);
}
Pro Tip: Cho dù bạn implement cái method estimatedHeightForRowAtIndexPath: hay là đơn giản hơn, ta chỉ set 1 constant cho estimatedRowHeight cũng là 1 yếu tố quan trọng.
TableView sẽ sử dụng delegate method này hoặc thuộc tính estimatedRowHeight để tính toán tổng chiều cao của table view. Điều này ảnh hưởng đến cả chỉ số và hiệu suất của việc scroll. Nếu việc ước tính chiều cao cell của bạn là ko chính xác, scroll có thể thay đổi thất thường và content offset có thể bị lẫn lộn, nếu ước tính của bạn là chuẩn xác nhưng mất nhiều thời gian tính toán thì scroll của table có thể bị chậm. Vấn đề vẫn là việc cần bằng giữa việc ước tính chiều cao cell và các chi phí thực hiện các tính toán cần thiết.
All rights reserved
