Custom UI Master Class: Infinite Paging Scroll View
Bài đăng này đã không được cập nhật trong 7 năm

Use case
Trong demo này, chúng ta sẽ xây dựng một infinite paging scroll view. Như bạn thấy ở animation trên, bên có một sô lượng nhỏ các tuỳ chọn( option) và bạn muốn thể hiện nó một cách đơn giản nhất, chiếm ít không gian nhất.
The Illusion of Infinite Scrolling
Trước khi tiến hành triển khai, chúng ta sẽ bàn về ảo ảnh trong hoạt động của Infinite Scrolling. Bạn muốn cài đặt scroll theo chiều ngang để thể hiện dữ liệu của mảng.
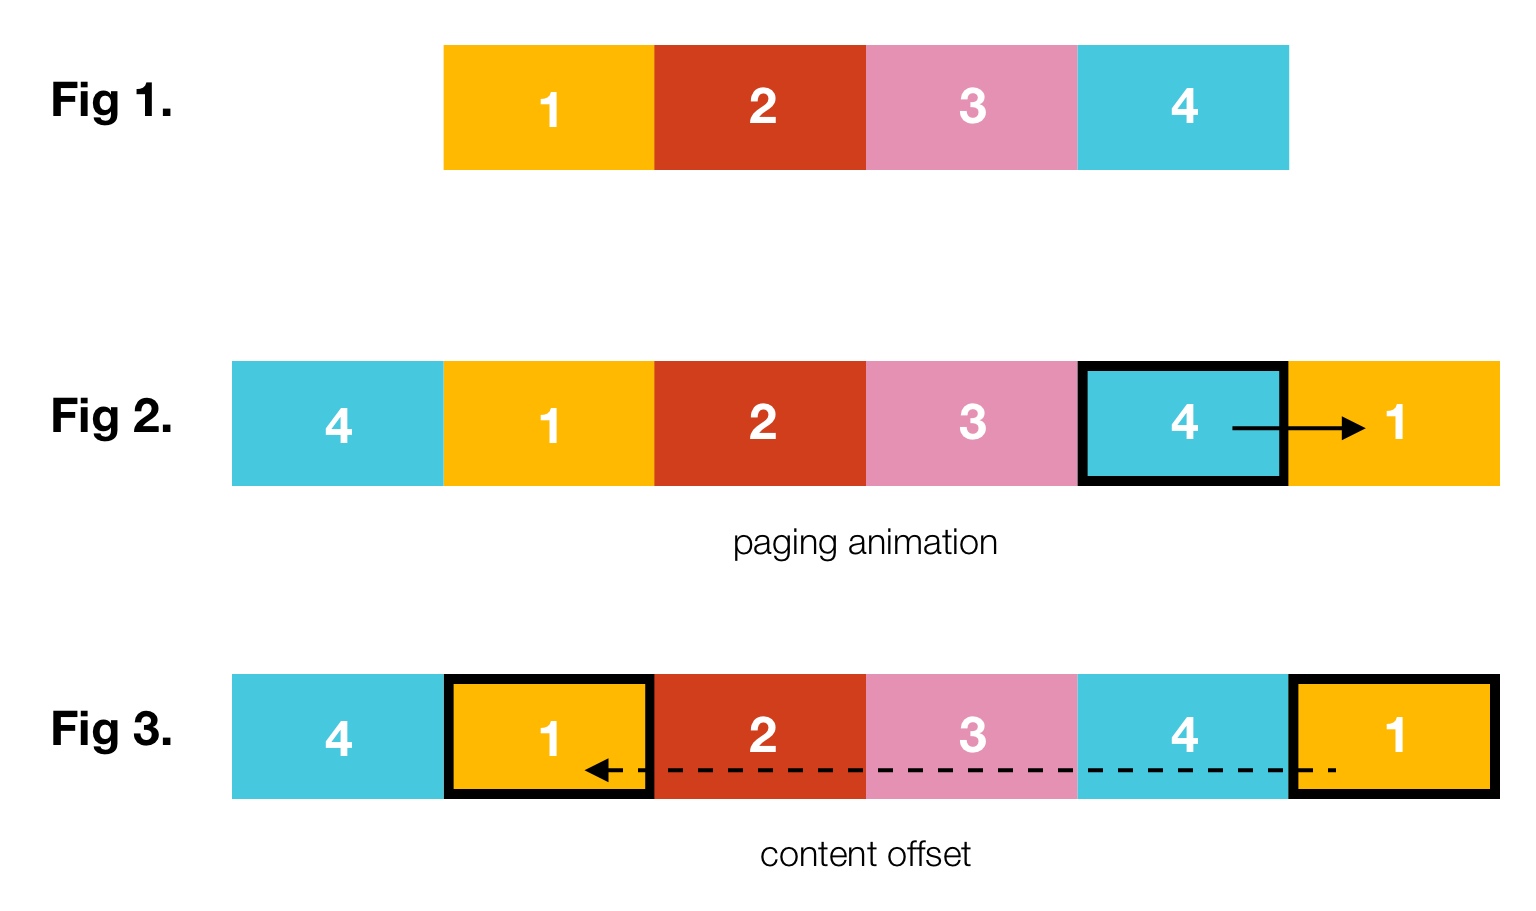
Fig 1.
Chúng ta có 4 yêu tố với màu và số mà ta muốn hiện thi như một trong riêng biệt trong scroll view. Thông thường chúng ta đặng content size của sroll view gấp bốn lần chiều rộng sao cho mỗi phần tử là một trang riêng. Tuy nhiên khi cuộn đến trang thứ tư, chúng ta phải xét nội dung về trang đầu, điều này khiến nó bị giật, không như chúng ta mong muốn.
Fig 2.
Thay vào đó, ta sửa đổi dữ liệu đầu vào, với phần tử đầu và cuối sao chép lại phẩn tử đối diện. Điều này có nghĩa ta cần sáu trang để hiển thị bốn phần tử. Bây giờ chúng ta đã nhìn được animation như mong muốn.
Fig 3.
Khi animation hoàn tất, Scroll view sẽ hiển thị phần tử đầu tiên, ở cuối của content view. Chúng ta sẽ thực hiện nó và người dùng sẽ không thể phát hiện.
Step 1: Thiết lập cơ bản
Chúng ta tạo một custom class InfiniteScrollView kế thừa UIView, và set background màu gray(line 20). Sau đó định nghĩa 2 properties: scrollView và tapView. Scrollview được thiết lập paging enable và bỏ indicator.
class InfiniteScrollView: UIView {

    let scrollView: UIScrollView = {
        let scroll = UIScrollView()
        scroll.backgroundColor = UIColor.red
        scroll.showsHorizontalScrollIndicator = false
        scroll.isPagingEnabled = true
        return scroll
    }()

    lazy var tapView: UIView = {
        let view = UIView()
        view.backgroundColor = UIColor.clear
        return view
    }()

    override init(frame: CGRect) {
        super.init(frame: frame)

        self.backgroundColor = UIColor.gray

        setupSubviews()
    }

    required init?(coder aDecoder: NSCoder) {
        fatalError("init(coder:) has not been implemented")
    }

    func setupSubviews() {
        scrollView.frame = CGRect(x: (self.bounds.width / 2),
                                  y: 0,
                                  width: (self.bounds.width / 2),
                                  height: self.bounds.height)
        self.addSubview(scrollView)

        tapView.frame = self.bounds
        self.addSubview(tapView)
    }
}
//In the View Controller
self.scrollOptionsView = InfiniteScrollView(frame: CGRect(x: 0, y: 300, width: self.view.bounds.width, height: 40))
self.view.addSubview(scrollOptionsView)
Step2: Sửa đổi Datasource and Layout ScrollView Content
Bước tiếp là thêm data vào scrollView và hiển thị các thành phần của các labels được thêm vào content view. Bạn cần phải thêm vào 2 properties: dataSource
Tiếp theo, chúng ta có hai phương thức modifyDatasource và setupContentView. Hãy xem xét modifyDatasource trước (dòng 15–25). Lưu ý function này được gọi trong didSet của dataSource, vì vậy giao diện sẽ được update bất kỳ lúc nào khi dataSource thay đổi.
class InfiniteScrollView: UIView {

    var datasource: [String]? {
        didSet {
            modifyDatasource()
        }
    }

    private var _datasource: [String]? {
        didSet {
            setupContentView()
        }
    }

    private func modifyDatasource() {
       guard var tempInput = datasource, tempInput.count >= 2 else {
           return
        }

        let firstLast = (tempInput.first!, tempInput.last!)
        tempInput.append(firstLast.0)
        tempInput.insert(firstLast.1, at: 0)

        print("_datasource set to: \(tempInput)")

        self._datasource = tempInput
    }

    private func setupContentView() {

       let subviews = scrollView.subviews
        for subview in subviews {
            subview.removeFromSuperview()
        }

        guard let data = _datasource else { return }

        self.scrollView.contentSize = CGSize(width: scrollView.frame.size.width * CGFloat(data.count),
                                             height: scrollView.frame.size.height)

        for i in 0..<data.count {
            var frame = CGRect()
            frame.origin.x = scrollView.frame.size.width * CGFloat(i)
            frame.origin.y = 0
            frame.size = scrollView.frame.size

            let label = UILabel(frame: frame)
            label.text = data[i]
            self.scrollView.addSubview(label)
        }
        let index = 1
        scrollView.contentOffset = CGPoint(x: (scrollView.frame.width * CGFloat(index)), y: 0)
    }

}
self.infiniteScrollView.datasource = ["option one", "option two", "option three", "option four"]

/*prints:
_datasource set to: ["option four", "option one", "option two", "option three", "option four", "option one"]
*/
Để xem hoạt động, bạn hãy thêm dataSource vào infiniteScrollView trong view controller và chạy ứng dụng. Lưu ý khi print _dataSource ra thì phần tử đầu tiên, và cuối cùng đã được thêm vào.
Step 3: Thêm Tap Gesture và Paging Logic
class InfiniteScrollView: UIView {

    lazy var tapView: UIView = {
        let view = UIView()
        view.backgroundColor = UIColor.clear
        let tapGesture = UITapGestureRecognizer(target: self, action: #selector(didReceiveTap(sender:)))
        view.addGestureRecognizer(tapGesture)
        return view
    }()

    override init(frame: CGRect) {
        super.init(frame: frame)

        self.backgroundColor = UIColor.gray
        scrollView.delegate = self
        setupSubviews()
    }

    @objc
    func didReceiveTap(sender: UITapGestureRecognizer) {
        let x = scrollView.contentOffset.x
        let nextRect = CGRect(x: x + scrollView.frame.width,
                              y: 0,
                              width: scrollView.frame.width,
                              height: scrollView.frame.height)

        scrollView.scrollRectToVisible(nextRect, animated: true)
    }
}

extension InfiniteScrollView: UIScrollViewDelegate {

    func scrollViewDidScroll(_ scrollView: UIScrollView) {
        guard _datasource != nil else { return }
        let x = scrollView.contentOffset.x
        if x >=  scrollView.frame.size.width * CGFloat(_datasource!.count - 1) {
            self.scrollView.contentOffset = CGPoint(x: scrollView.frame.size.width , y: 0)
        } else if x < scrollView.frame.width {
            self.scrollView.contentOffset = CGPoint(x: scrollView.frame.size.width * CGFloat(_datasource!.count - 2), y: 0)
        }
    }
}
Step4: Tạo Delegate để chuyển Selected Option
protocol InfiniteScrollViewDelegate {
   func optionChanged(to option: String)
}

class InfiniteScrollView: UIView {

   var selectedOption: String! {
       didSet {
           self.delegate?.optionChanged(to: selectedOption)
       }
   }

   var delegate: InfiniteScrollViewDelegate?

   private func setupContentView() {

        let subviews = scrollView.subviews
        for subview in subviews {
            subview.removeFromSuperview()
        }

        guard let data = _datasource else { return }

        self.scrollView.contentSize = CGSize(width: scrollView.frame.size.width * CGFloat(data.count),
                                             height: scrollView.frame.size.height)

        for i in 0..<data.count {
            var frame = CGRect()
            frame.origin.x = scrollView.frame.size.width * CGFloat(i)
            frame.origin.y = 0
            frame.size = scrollView.frame.size

            let label = UILabel(frame: frame)
            label.text = data[i]
            self.scrollView.addSubview(label)
        }
        let index = 1
        scrollView.contentOffset = CGPoint(x: (scrollView.frame.width * CGFloat(index)), y: 0)
        self.selectedOption = data[index]
    }

    @objc
    func didReceiveTap(sender: UITapGestureRecognizer) {
       guard let data = datasource else { return }

       var index = Int(scrollView.contentOffset.x / scrollView.frame.width)
       index = index < data.count ? index : 0
       self.selectedOption = data[index]

        let x = scrollView.contentOffset.x
        let nextRect = CGRect(x: x + scrollView.frame.width,
                              y: 0,
                              width: scrollView.frame.width,
                              height: scrollView.frame.height)

        scrollView.scrollRectToVisible(nextRect, animated: true)
    }
}
//In the VC
self.infiniteScrollView.delegate = self

extension ViewController: InfiniteScrollViewDelegate {

    func optionChanged(to option: String) {
        print("delegate called with option: \(option)")
    }

}
Trong View controller, chúng ta có thể áp dụng giao thức InfiniteScrollViewDelegate và xử lý như mong muốn.
All rights reserved
