Custom Android Views
Bài đăng này đã không được cập nhật trong 6 năm
Basic Shapes Making
Quá trình học hỏi về nền tảng Android là quá trình tiêu tốn một khoảng thời gian rất dài.
Ở một thời điểm nhất định trong quá trình học hỏi này, bạn đạt tới điểm mà nơi hầu hết các developers gần như là tương đồng về kinh nghiệm. Như thế, họ phát triển các ứng dụng nhìn gần giống nhau, với các nguyên tắc thiết kế giống hệt nhau. Ở những thời điểm như vậy, điều tạo cho các ứng dụng của bạn sự khác biệt và tính duy nhất so với những cái khác đó là các kĩ năng bổ xung cái mà bạn học trong lĩnh vực này. Các kĩ năng này giúp bạn thoát ra khỏi đám đông, và đưa bạn bước một bước lớn tới pro level.
Các kĩ năng này có thể là:
- Các thay đổi vô hình cho app như tăng cường hiệu năng.
- Hiển thị các thay đổi tuân theo Material Disign Guidelines hoặc tạo Custom Views cái tạo cho ứng dụng của bạn có cảm giác hùng vĩ. Bài viết này nhắm tới mục đích tăng cường kĩ năng custom views của bạn, cũng như khái quát hầu hết các khía cạnh liên quan tới nó.
Có hai cách thức đẻ tạo custom views trong Android:
- Kế thừa View class xây dựng các custom views từ đầu.
- Kế thừa các views sẵn có(TextView, LinearLayout,...).
Trong bài viết này chúng ta sẽ tập trung vào cách thức đầu tiên của quá trình tạo một custom view. Một khi bạn đi hết bài viết này, việc tạo các custom views bằng cách thức thứ hai sẽ là một miếng bánh cho bạn.  )
)
Bài viết này sẽ gồm 4 phần:
- Làm thế nào để tạo các khối hình học cơ bản sử dụng cho các Custom Views.
- Làm thế nào để thêm vào các thuộc tính tùy biến(custom attributes) cho Custom Views của bạn.
- Làm thế nào để tạo cách thức điều khiển các khối hình học(shape manipulations) sử dụng cho các Custom Views(Tăng/giảm kích thước của hình, thay đổi màu sắc sử dụng các functions).
- Làm thế nào để thêm các móc truy cập(Accessibility hooks) và Custom Views của bạn.
Như vậy là bạn đã có cái nhìn khái quát về những thứ bạn cần đi qua, hãy bắt đầu với phần đầu tiên của bài viết ngay bây giờ.
Toàn bộ mã nguồn cho bài viết bạn có thể lấy tại đây.
Bạn có thể xem qua về cái bạn sẽ tạo sau khi hoàn thành hết bài viết này như hình minh họa bên dưới.
Quá trình tạo một Custom View sẽ tuân theo các bước bên dưới:
-
Tạo một Android Studio project mới và chọn Empty Acitivity template. Tại thời điểm này bạn chỉ nên có một class với tên là MainActivity bên trong project của mình.
-
Tạo một lớp mới, đặt tên nó là "MyCustomView", và kế thừa lớp View.
-
Tại thời điểm này, Android Studio sẽ nhắc bạn một lỗi nhằm tạo các Constructor(s) tương ứng với lớp cha(super). Bằng cách click vào nhắc nhở này, bạn sẽ chọn tất cả các tùy chọn cho constructor.
package com.robillo.customviewstutorial;

import android.content.Context;
import android.os.Build;
import android.support.annotation.Nullable;
import android.support.annotation.RequiresApi;
import android.util.AttributeSet;
import android.view.View;

/**
 * Created by robinkamboj on 06/08/17.
 */

public class MyCustomView extends View{

    public MyCustomView(Context context) {
        super(context);
    }

    public MyCustomView(Context context, @Nullable AttributeSet attrs) {
        super(context, attrs);
    }

    public MyCustomView(Context context, @Nullable AttributeSet attrs, int defStyleAttr) {
        super(context, attrs, defStyleAttr);
    }

    @RequiresApi(api = Build.VERSION_CODES.LOLLIPOP)
    public MyCustomView(Context context, @Nullable AttributeSet attrs, int defStyleAttr, int defStyleRes) {
        super(context, attrs, defStyleAttr, defStyleRes);
    }
}
-
Tiếp theo, bạn tạo một function mới: void init(@Nullable AttributeSet set) với thân hàm rỗng và làm cho tất cả các constructors truy cập vào function này bằng cách gọi init(attrs) trong tất cả các constructors(ngoại trừ bạn phải truyền null vào trong constructor đầu tiên) để sử dụng sau này.
-
Ghi đè phương thức onDraw(Canvas canvas) trong lớp này. Trong function này bạn phải: Tạo một đối tượng Paint mới và truyền một màu vào cho nó; Tạo một đối tượng Rect và truyền vào các tọa độ left, right, top, bottom cho nó(Xin hãy chú ý rằng một hình trong canvas có các tọa độ rõ ràng từ top tới bottom và left tới right); rồi gọi canvas.drawRect(rect, paint). Bỏ qua bất cứ cảnh báo xuất hiện sau đó, chúng sẽ được xử lý sau.
package com.robillo.customviewstutorial;

import android.content.Context;
import android.graphics.Canvas;
import android.graphics.Color;
import android.graphics.Paint;
import android.graphics.Rect;
import android.os.Build;
import android.support.annotation.Nullable;
import android.support.annotation.RequiresApi;
import android.util.AttributeSet;
import android.view.View;

/**
 * Created by robinkamboj on 06/08/17.
 */

public class MyCustomView extends View{

    public MyCustomView(Context context) {
        super(context);
        init(null);
    }

    public MyCustomView(Context context, @Nullable AttributeSet attrs) {
        super(context, attrs);
        init(attrs);
    }

    public MyCustomView(Context context, @Nullable AttributeSet attrs, int defStyleAttr) {
        super(context, attrs, defStyleAttr);
        init(attrs);
    }

    @RequiresApi(api = Build.VERSION_CODES.LOLLIPOP)
    public MyCustomView(Context context, @Nullable AttributeSet attrs, int defStyleAttr, int defStyleRes) {
        super(context, attrs, defStyleAttr, defStyleRes);
        init(attrs);
    }

    private void init(@Nullable AttributeSet set){

    }

    @Override
    protected void onDraw(Canvas canvas) {
        super.onDraw(canvas);
        Paint paint = new Paint(Paint.ANTI_ALIAS_FLAG);
        paint.setColor(Color.MAGENTA);
        Rect rect = new Rect();
        rect.left = 0;
        rect.right = getWidth();
        rect.top = 0;
        rect.bottom = getHeight();

        canvas.drawRect(rect, paint);
    }
}
- Bước cuối cùng: Thêm custom view của bạn vào trong activity_main.xml.
<?xml version="1.0" encoding="utf-8"?>
<LinearLayout xmlns:android="http://schemas.android.com/apk/res/android"
    xmlns:app="http://schemas.android.com/apk/res-auto"
    xmlns:tools="http://schemas.android.com/tools"
    android:layout_width="match_parent"
    android:layout_height="match_parent"
    android:gravity="center"
    tools:context="com.robillo.customviewstutorial.MainActivity">

    <com.robillo.customviewstutorial.MyCustomView
        android:layout_width="300sp"
        android:layout_height="300sp" />

</LinearLayout>
Đó là tất cả những gì bạn cần để thực hiện công việc tạo ra một hình đơn giản từ đầu như là một custom view cho Android.Trong các phần tiếp theo, bạn sẽ có được nhiều kiểm soát trên các custom views này nhiều hơn bằng cách tạo thêm cho chúng những custom attributes, quá trình xử lý các touch events,.... Do đó nó được khuyến nghị rằng bạn nên tìm hiểu chi tiết các phần tiếp theo của bài viết.
Custom Attributes
Sau khi đã thêm được các hình cơ bản vào custom view của mình, chúng ta sẽ thảo luận xem làm thế nào để tạo các hình tùy biến cơ bản cho custom view của mình trong Android. Phần này chúng ta sẽ học cách thêm vào các custom attributes cho custom views của mình.
Trong phần trước, chúng ta đã triển khai mã nguồn cho MyCustomView, trong mã nguồn này, bạn có thể đã chú ý tới việc chúng ta có phương thức trống init(), và một vài cảnh báo trong phương thức onDraw() cái được ghi đè nhằm tránh sử dụng layout được chỉ định trong suốt các hoạt động draw. Việc loại bỏ những cảnh báo này là rất quan trọng, bởi vì điều này là một thứ dễ gây ra memory leak nhất. Do đó, bước đầu tiên của phần này là chúng ta sẽ tìm cách xóa hết những cảnh báo như thế.
-
Tạo các đối tượng mRect và mPaint của lớp Rect và Paint tương ứng như là một biến toàn cục của lớp. Tạo các thể hiện của chúng trong phương thức init() cái đã được tạo. Rồi thay thế rect bằng mRect, cũng như paint bằng mPaint. Cảnh báo sẽ được loại bỏ sau khi thực hiện bước này.
-
Bây giờ, để bắt đầu việc thêm vào custom attributes cho custom views của bạn, bạn phải thêm một file mới vào đường dẫn values trước, và đặt tên cho nó là attrs.xml. Bên trong file xml này, trong các tags: <resources></resource> thêm một tag: declare-styleable với thuộc tính có tên là MyCustomView(tên của lớp custom view của bạn).
-
Trong các tags này, tất cả các custom attributes sẽ được thêm vào với theo các cặp với cấu trúc key("name=") - value("format="). Trong trường hợp của chúng ta, chúng ta sẽ thêm vào một custom attribute với tên square_color với format là color.
<?xml version="1.0" encoding="utf-8"?>
<resources>
    <declare-styleable name="MyCustomView">
        <attr name="square_color" format="color"/>
    </declare-styleable>
</resources>
-
Tiếp theo, chúng ta cần kiểm tra trong phương thức init() của mình liệu rằng AttributeSet set đã được truyền vào như một tham số là null hay không. Nếu nó không null thì chúng ta có được một TypeArray typedArray bằng cách gọi obtainStyledAttributes(set, R.styleable.MyCustomView) sử dụng getContext().
-
Tiếp theo, chúng ta định nghĩa một biến int mSquareColor và khởi tạo giá trịnh cho nó với các giá trị đầu vào thông qua TypedArray ta, cũng như cung cấp color mặc định trong trường hợp khong có giá trị cho thuộc tính đó từ input của người dùng. Cần nhớ rằng gọi ta.recycle() ngay sau khi bạn hoàn thành việc truy caapjnos. Lớp của bạn giờ đây trông như thế này:
package com.robillo.customviewstutorial;

import android.content.Context;
import android.content.res.TypedArray;
import android.graphics.Canvas;
import android.graphics.Color;
import android.graphics.Paint;
import android.graphics.Rect;
import android.os.Build;
import android.support.annotation.Nullable;
import android.support.annotation.RequiresApi;
import android.util.AttributeSet;
import android.view.View;

/**
 * Created by robinkamboj on 06/08/17.
 */

public class MyCustomView extends View{

    Paint mPaint;
    Rect mRect;
    int mSquareColor;

    public MyCustomView(Context context) {
        super(context);
        init(null);
    }

    public MyCustomView(Context context, @Nullable AttributeSet attrs) {
        super(context, attrs);
        init(attrs);
    }

    public MyCustomView(Context context, @Nullable AttributeSet attrs, int defStyleAttr) {
        super(context, attrs, defStyleAttr);
        init(attrs);
    }

    @RequiresApi(api = Build.VERSION_CODES.LOLLIPOP)
    public MyCustomView(Context context, @Nullable AttributeSet attrs, int defStyleAttr, int defStyleRes) {
        super(context, attrs, defStyleAttr, defStyleRes);
        init(attrs);
    }

    private void init(@Nullable AttributeSet set){
        mPaint = new Paint(Paint.ANTI_ALIAS_FLAG);
        mRect = new Rect();

        if(set == null){
            return;
        }

        TypedArray ta = getContext().obtainStyledAttributes(set, R.styleable.MyCustomView);
        mSquareColor = ta.getColor(R.styleable.MyCustomView_square_color, Color.GREEN);
        mPaint.setColor(mSquareColor);
        ta.recycle();
    }

    @Override
    protected void onDraw(Canvas canvas) {
        super.onDraw(canvas);
        mRect.left = 0;
        mRect.right = getWidth();
        mRect.top = 0;
        mRect.bottom = getHeight();

        canvas.drawRect(mRect, mPaint);
    }
}
- Giờ đây tất cả bạn cần thực hiện đó là thêm thuộc tính square_color vào activity_main.xml của bạn, bạn sẽ thấy rằng custom view color thay đổi thì liệu rằng colour bạn thêm vào bên trong custom view có thay đổi.
<?xml version="1.0" encoding="utf-8"?>
<LinearLayout xmlns:android="http://schemas.android.com/apk/res/android"
    xmlns:app="http://schemas.android.com/apk/res-auto"
    xmlns:tools="http://schemas.android.com/tools"
    android:layout_width="match_parent"
    android:layout_height="match_parent"
    android:gravity="center"
    tools:context="com.robillo.customviewstutorial.MainActivity">

    <com.robillo.customviewstutorial.MyCustomView
        android:layout_width="300sp"
        android:layout_height="300sp"
        app:square_color="@color/colorPrimary"/>

</LinearLayout>
Đó là tất cả những gì bạn cần biết về làm thế nào bạn tạo được các custom attributes cho custom views của mình. Các ví dụ khác về custom attributs là cho size(kích thước) của view, radius(trong trường hợp hình tròn), text input,....
Shape Manipulations
Công việc dễ nhất trong khi tạo một custom view là làm cho nó là one-time static pat, đó là, view có thể nhìn thấy được khi nó được kết xuất ngay lần đầu tiên. Cái gì xuất hiện tiếp theo sau những custom attributes bạn đã thêm vào là quá trình tạo các thao tác hình ảnh(shape manipulations) cái sử dụng như là các chức năng mà nhà phát triển định nghĩa trong lớp custom view của mình.
Đây là môt phần trong toàn bộ những kiến thức về làm thế nào để tạo các custom views. => Bạn nên tìm hiểu kĩ các phần trước, và có thể xem code của phần này tại đây.
Trong phần này, bạn sẽ tìm hiểu làm thế nào để tạo các thao tác với hình ảnh sử dụng các chức năng mà nhà phát triển định nghĩa sẵn cho custom view. Chúng ta sẽ tập trung vào tạo hai functions: nhằm cung cấp các shape manipulations trên các custom attributes(Giới thiệu trong phần trước) và một cái không sử dụng các custom attributes.
Chúng ta sẽ tập trung xử lý theo các bước được đề cập bên dưới:
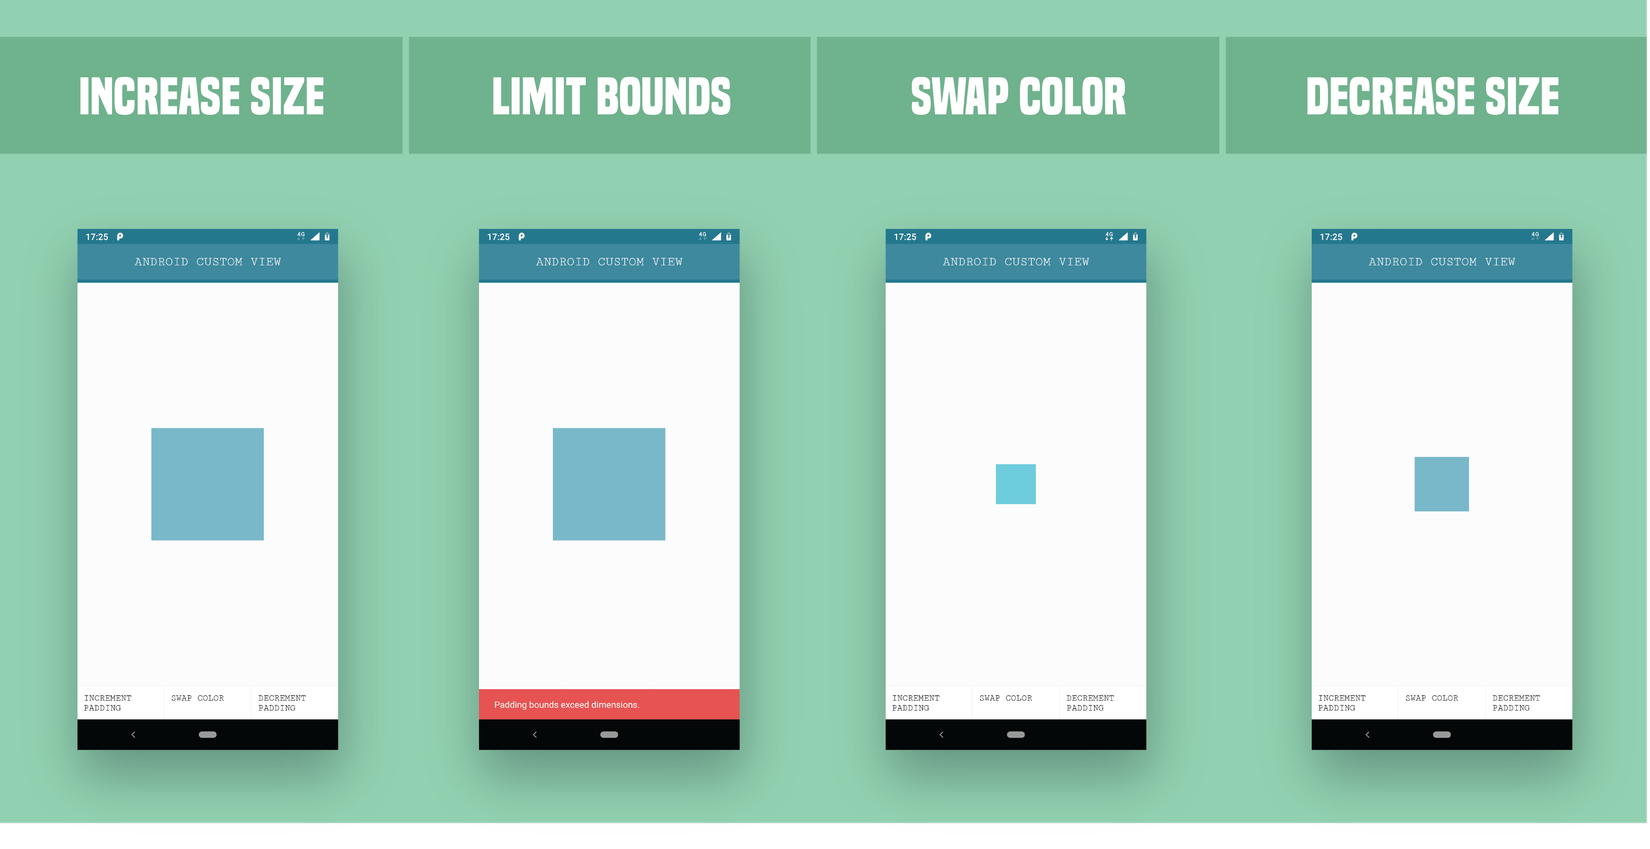
- Tạo 3 buttons trong activity_main.xml nhằm: tăng/giảm custom padding, và một cái nhằm chuyển đổi màu sắc; chúng ta cũng sẽ cung cấp các onClicks cho người dùng để họ có thể tương tác với activity.
<?xml version="1.0" encoding="utf-8"?>
<LinearLayout xmlns:android="http://schemas.android.com/apk/res/android"
    xmlns:app="http://schemas.android.com/apk/res-auto"
    xmlns:tools="http://schemas.android.com/tools"
    android:layout_width="match_parent"
    android:layout_height="match_parent"
    android:gravity="center"
    android:orientation="vertical"
    tools:context="com.robillo.customviewstutorial.MainActivity">

    <com.robillo.customviewstutorial.MyCustomView
        android:layout_width="300sp"
        android:layout_height="0sp"
        app:square_color="@color/colorPrimary"
        android:layout_weight="1"
        android:layout_margin="5sp"/>

    <LinearLayout
        android:layout_width="match_parent"
        android:layout_height="wrap_content"
        android:orientation="horizontal">

        <Button
            android:layout_width="0sp"
            android:layout_weight="1"
            android:layout_height="wrap_content"
            android:id="@+id/one"
            android:onClick="onClick"
            style="?android:attr/buttonBarStyle"
            android:background="?attr/selectableItemBackground"
            android:text="CUSTOM PADDING +"/>

        <Button
            android:layout_width="0sp"
            android:layout_weight="1"
            android:layout_height="wrap_content"
            android:id="@+id/two"
            android:onClick="onClick"
            style="?android:attr/buttonBarStyle"
            android:background="?attr/selectableItemBackground"
            android:text="SWAP COLOR"/>

        <Button
            android:layout_width="0sp"
            android:layout_weight="1"
            android:layout_height="wrap_content"
            android:id="@+id/three"
            android:onClick="onClick"
            style="?android:attr/buttonBarStyle"
            android:background="?attr/selectableItemBackground"
            android:text="CUSTOM PADDING -"/>

    </LinearLayout>

</LinearLayout>
- Đặt cho custom view một android id trong activity_main.xml để có thể tham chiếu được trong activity class. Tạo các functions trống trong MyCustomView.class và gọi chúng dựa vào các onClicks tương ứng của của các buttons trong activity_main.xml. Cũng như tạo một biến toàn cục mPadding cái cộng/trừ cho các kích thước mRect một cách phù hợp.
package com.robillo.customviewstutorial;

import android.content.Context;
import android.content.res.TypedArray;
import android.graphics.Canvas;
import android.graphics.Color;
import android.graphics.Paint;
import android.graphics.Rect;
import android.os.Build;
import android.support.annotation.Nullable;
import android.support.annotation.RequiresApi;
import android.util.AttributeSet;
import android.view.View;

/**
 * Created by robinkamboj on 06/08/17.
 */

public class MyCustomView extends View{

    Paint mPaint;
    Rect mRect;
    int mSquareColor;
    int mPadding = 0;

    public MyCustomView(Context context) {
        super(context);
        init(null);
    }

    public MyCustomView(Context context, @Nullable AttributeSet attrs) {
        super(context, attrs);
        init(attrs);
    }

    public MyCustomView(Context context, @Nullable AttributeSet attrs, int defStyleAttr) {
        super(context, attrs, defStyleAttr);
        init(attrs);
    }

    @RequiresApi(api = Build.VERSION_CODES.LOLLIPOP)
    public MyCustomView(Context context, @Nullable AttributeSet attrs, int defStyleAttr, int defStyleRes) {
        super(context, attrs, defStyleAttr, defStyleRes);
        init(attrs);
    }

    private void init(@Nullable AttributeSet set){
        mPaint = new Paint(Paint.ANTI_ALIAS_FLAG);
        mRect = new Rect();

        if(set == null){
            return;
        }

        TypedArray ta = getContext().obtainStyledAttributes(set, R.styleable.MyCustomView);
        mSquareColor = ta.getColor(R.styleable.MyCustomView_square_color, Color.GREEN);
        mPaint.setColor(mSquareColor);
        ta.recycle();
    }

    public void swapColor(){

    }

    public void customPaddingUp(int padding){

    }

    public void customPaddingDown(int padding){

    }

    @Override
    protected void onDraw(Canvas canvas) {
        super.onDraw(canvas);
        mRect.left = 0 + mPadding;
        mRect.right = getWidth() - mPadding;
        mRect.top = 0 + mPadding;
        mRect.bottom = getHeight() - mPadding;

        canvas.drawRect(mRect, mPaint);
    }
}
package com.robillo.customviewstutorial;

import android.support.v7.app.AppCompatActivity;
import android.os.Bundle;
import android.view.View;

public class MainActivity extends AppCompatActivity {

    MyCustomView myCustomView;

    @Override
    protected void onCreate(Bundle savedInstanceState) {
        super.onCreate(savedInstanceState);
        setContentView(R.layout.activity_main);

        myCustomView = (MyCustomView) findViewById(R.id.mcv);
    }

    public void onClick(View view) {
        switch (view.getId()){
            case R.id.one:{
                myCustomView.customPaddingUp(30);
                break;
            }
            case R.id.two:{
                myCustomView.swapColor();
                break;
            }
            case R.id.three:{
                myCustomView.customPaddingDown(30);
            }
        }
    }
}
- Bước tiếp theo là để cung cấp quá trình triển khai cho các functions nhằm tạo các sửa đổi, và rồi làm với custom view bằng các gọi postInvalidate().
package com.robillo.customviewstutorial;

import android.content.Context;
import android.content.res.TypedArray;
import android.graphics.Canvas;
import android.graphics.Color;
import android.graphics.Paint;
import android.graphics.Rect;
import android.os.Build;
import android.support.annotation.Nullable;
import android.support.annotation.RequiresApi;
import android.util.AttributeSet;
import android.view.View;

/**
 * Created by robinkamboj on 06/08/17.
 */

public class MyCustomView extends View{

    Paint mPaint;
    Rect mRect;
    static int mSquareColor;
    static int mPadding = 0;

    public MyCustomView(Context context) {
        super(context);
        init(null);
    }

    public MyCustomView(Context context, @Nullable AttributeSet attrs) {
        super(context, attrs);
        init(attrs);
    }

    public MyCustomView(Context context, @Nullable AttributeSet attrs, int defStyleAttr) {
        super(context, attrs, defStyleAttr);
        init(attrs);
    }

    @RequiresApi(api = Build.VERSION_CODES.LOLLIPOP)
    public MyCustomView(Context context, @Nullable AttributeSet attrs, int defStyleAttr, int defStyleRes) {
        super(context, attrs, defStyleAttr, defStyleRes);
        init(attrs);
    }

    private void init(@Nullable AttributeSet set){
        mPaint = new Paint(Paint.ANTI_ALIAS_FLAG);
        mRect = new Rect();

        if(set == null){
            return;
        }

        TypedArray ta = getContext().obtainStyledAttributes(set, R.styleable.MyCustomView);
        mSquareColor = ta.getColor(R.styleable.MyCustomView_square_color, Color.GREEN);
        mPaint.setColor(mSquareColor);
        ta.recycle();
    }

    public void swapColor(){
        mPaint.setColor(mPaint.getColor()==mSquareColor?Color.RED:mSquareColor);
        postInvalidate();
    }

    public void customPaddingUp(int padding){
        mPadding = mPadding + padding;
        postInvalidate();
    }

    public void customPaddingDown(int padding){
        mPadding = mPadding -  padding;
        postInvalidate();
    }

    @Override
    protected void onDraw(Canvas canvas) {
        super.onDraw(canvas);
        mRect.left = 0 + mPadding;
        mRect.right = getWidth() - mPadding;
        mRect.top = 0 + mPadding;
        mRect.bottom = getHeight() - mPadding;

        canvas.drawRect(mRect, mPaint);
    }
}
Tất cả là như vậy đó. Giờ đây bạn đã có custom views với những functions cái điều khiển các thức hiển thị cho custom view của bạn. Với quá trình thực hành và đổi mới liên tục, bạn có thể làm chủ được toàn bộ các phương thức theo sau đó.
Một lần nữa, bạn có thể chạy thử mã nguồn ở đây.
Making Views More Accessible
developer.android.com cung cấp một sự giải thích rất tốt và chi tiết như làm thế nào có ai đó có thể thêm và accessibility hooks cho một custom view, tôi chỉ than phiền(giống như rất nhiều lời than phiền của những người khác) đó là về sự dài dòng của những thứ tương tự nhau. Do đó, ở đây tôi sẽ rút gọn những lời giải thích đó một cách cơ bản nhất, tôi sẽ gửi đến các bạn những điểm nổi bật chính từ tài liệu được cung cấp ở đây.
Sau đâu sẽ là những điểm chính được trích dẫn:
-
Quá trình thực hiện các phương thức API có khả năng truy câp: Có 4 phương thức API truy cập chính: sendAccessibilityEvent(), sendAccessibilityEventUnchecked(), dispatchPopulateAccessibilityEvent() và onPopulateAccessibilityEvent(). Một vài phương thức hữu ích khác như: onInitializeAccessibilityEvent(), onInitializeAccessibilityNodeInfo(), onRequestSendAccessibilityEvent().
-
sendAccessibilityEvent(): đây là phương thức được sử dụng khi người dùng dự định lấy một action trên custom view của bạn. Ví dụ, nếu một user clicks vào custom view của bạn, bạn sẽ cần phải ghi đè lại phương thức onTouchEvent(MotionEvent event), rồi áp dụng switch case với event.getAction(), rồi tại trường hợp MotionEvent.ACTION_DOWN thêm vào sendAccessibilityEvent(AccessibilityEvent.TYPE_VIEW_CLICKED. Tương tự, có các hằng số tượng trưng khác được đặt tên trong tài liệu nhằm sử dụng với một cách thức tương tự. action laayd dược dựa trên sự kiện truy cập "sent" chỉ xảy ra nếu khả năng truy cập được kích hoạt trong system settings.
-
sendAccessibilityEventUnchecked(): đây là phương thức thực hiện việc gửi đi các sự kiện truy cập(accessibility events) tương tự với sendAccessibilityEvent(), ngoại trừ thực tế đói là action được lấy dự trên sự kiện truy cập "sent" xảy ra bất kể thự thế có hay không khả năng truy cập được kích hoạt trong system settings.
-
dispatchPopulateAccessibilityEvent(): Quá trình triển khai phương chuẩn của phương thức này gọi onPopulateAccessibilityEvent() cho view này và rồi phương thức dispatchPopulateAccessibilityEvent cho mỗi view con của nó.
-
onPopulateAccessibilityEvent(): Phương thức này thiết lập sự nhắc nhở bằng văn bản nói của AccessibilityEvent cho view của bạn. Phương thức này cũng được gọi nếu view là một con của một view cái được sinh ra một accessibility event. Ví dụ, một Textview với contentDescription "Text View" được clicked, một nhắc nhở âm thanh "Text view was clicked" có thể được gây ra nếu TYPE_VIEW_CLICKED được gửi tới.
-
onInitializeAccessibilityEvent(): Hệ thống gọi phương thức này nhằm đặt được các thông tin bổ xung về trạng thái của view, ngoài text content. Nếu custon view của bạn cung cấp điều khiển tương tác ngoài một TextView hoặc Button thông thường, bạn nên ghi đè lại phương thức này và thiết lập thông tin bổ xung về view của phạn vào event sử dụng phương thức này, như là password field type, checkbox type hoặc các states cái cung cấp các tương tác hoặc phản hồi của người dùng.
-
onInitializeAccessibilityNodeInfo(): Phương thức này cung cấp accessibility servcices với thông tin về trạng thái của view, đực biệt khi view của bạn kế thừa phạm vi của một view đơn, ví dụ, một custom calendar với thông tin 30 ngày có thể được gửi đi không cùng với phương thức này. Thông tin được gửi đi không kèm với phương thức này sẽ là "Calendar" hoặc tốt nhất là "April calendar".
-
onRequestSendAccessibilityEvent(): Hệ thông gọi phương thức này khi một view con được sinh ra một AccessibilityEvent. Bước này cho phép view cha sửa đổi accessibility event với các thông tin bổ xung. Bạn nên triển khai phương thức này chỉ khi custom view của bạn có các view con và khi view cha có thể cung cấp thông tin ngữ cảnh cho accessibility event cái sẽ là hữu ích cho accessibility services.
Để tổng kết lại, Như đã so sánh với ột inbuilt view như là TextView và ImageViews, nơi chỉ thêm đầy đủ contentDescription tĩnh (xml) hoặc động(java) cho accessibility tới một giới hạn rất lớn, quá trình tạo các tìm kiếm khả năng truy cập của custom view cho một tuyến dài hơn nhằm hoàn thành một cái gì đó mới và tốt hơn.
Nếu bạn muốn biết thêm về quá trình tạo các accessible đơn giản cho views, bạn có thể xem thêm bài viết này.
Source
Reference
- https://medium.com/@robillo/adding-accessibility-to-views-android-5afa4fbf5967
- https://developer.android.com/reference/android/view/accessibility/AccessibilityEvent.html
- https://developer.android.com/guide/topics/ui/accessibility/custom-views.html#accessibility-methods
- https://developer.android.com/guide/topics/ui/accessibility/apps.html
All rights reserved
