Cách sử dụng Android Keystore để lưu trữ mật khẩu và các thông tin nhạy cảm trong một ứng dụng Android
Bài đăng này đã không được cập nhật trong 4 năm
Trong quá trình phát triển ứng dụng Android, việc lưu trữ hoặc cache dữ liệu là việc phải làm như cơm bữa đối với một lập trình viên. Trong những dữ liệu cần lưu trữ đó một số thông tin cần thiết phải được mã hóa để tránh bị hacker chiếm được. Ví dụ đơn giản như việc lưu username, password hay là một token.
Khi mã hóa dữ liệu chúng ta cần phải có 1 key đễ phục vụ cho việc mã hóa và giải mã dữ liệu. Tuy nhiên lối mòn của nhiều developer là k mấy quan tâm đến key này, thường xuyên khai báo hardcode chúng trong code của ứng dụng, điều đó dẫn đến việc người khác có thể chiếm được key này nếu dịch ngược code.
Trong nội dung bài viết này tôi sẽ đưa ra một giải pháp để giải quyết vấn đề vừa nêu trên, đó là làm sao để tạo ra được một key an toàn và bảo mật để dùng cho việc mã hóa và giải mã dữ liệu. Không cần phải tìm kiếm đâu xa, thực chất Android đã hỗ trợ sẵn cho chúng ta công cụ giúp ta làm điều đó, đó chính là Android Keystore
Android Keystore cung cấp một lưu trữ chứng chỉ cấp hệ thống an toàn . Với keystore, ứng dụng có thể tạo ra cặp Private/Public key và sử dụng nó để mã hóa ứng dụng trước khi lưu nó vào thư mục lưu trữ riêng. Trong bài viết chúng ta sẽ thấy làm thế nào để sử dụng Android Keystore để tạo và xóa các key và các sử dụng chúng để mã hóa và giải mã dữ liệu kiểu văn bản text
Chuẩn bị
Trước khi bắt đầu code, chúng ta nên biết một chút về khả năng của Android keystore. Keystore nó không được sử dụng trực tiếp để lưu trữ thông tin bí mật của ứng dụng như mật khẩu, tài khoản... tuy nhiên nó cũng cấp một bộ chứa bảo mật, được sử dụng để lưu những private key , giúp cho việc lấy nó ra từ những người không được phép khó khăn hơn bao giờ hết.
Cái tên Keystore đã phần nào nói lên nó là gì, một ứng dụng có thể lưu trữ nhiều key trong KeyStore, nhưng ứng dụng chỉ có thể hiển thị và truy vấn key của chính nó. Lý tưởng nhất, với keystore , ứng dụng có thể sinh ra hoặc nhận một cặp Public/Private key và lưu trữ nó vào keystore. Public key sau đó có thể sử dụng để mã hóa dữ liệu ứng dụng, trước khi lưu trữ trong thư mục ứng dụng cụ thể, Private key được dùng để giải mã dữ liệu tượng tự khi cần thiết
Mặc dù Android Key store được giới thiệu từ API level 18 (Android 4.3), các Keystore bản thân đã có sẵn từ API 1, hạn chế sử dụng bởi hệ thống VPN và Wifi Các Keystore tự được mã hóa sử dụng lockscreen pin/password của người dùng, do đó khi màn hình bị khóa thì KeyStore không khả dụng. Nên nếu bạn có một service ngầm nào đó cần truy cập vào dữ liệu bí mật của ứng dụng thì bạn nên từ bỏ suy nghĩ đó đi cho đến khi điện thoại đc mở khóa
Layout
Ở ví dụ này, layout chính của app sẽ là một ListView , với các item của nó là danh sách các key ( thực chất là aliase) được tạo bởi app. Tên file layout/activity_main.xml
<ListView xmlns:android="http://schemas.android.com/apk/res/android"
    xmlns:tools="http://schemas.android.com/tools"
    android:id="@+id/listView"
    android:layout_width="match_parent"
    android:layout_height="match_parent"
    android:fillViewport="true"
    tools:context="com.sample.foo.simplekeystoreapp.MainActivity">
</ListView>
Mỗi item trên list sẽ chưa TextView để hiển thị key alisas, một nút đễ xóa key, và nút đễ mã hóa và giải mã text. Dưới đây là layout item

<?xml version="1.0" encoding="utf-8"?>
<RelativeLayout
    xmlns:card_view="http://schemas.android.com/apk/res-auto"
    xmlns:android="http://schemas.android.com/apk/res/android"
    android:id="@+id/cardBackground"
    android:layout_width="match_parent"
    android:layout_height="wrap_content"
    card_view:cardCornerRadius="4dp"
    android:layout_margin="5dp">

    <TextView
        android:id="@+id/keyAlias"
        android:layout_width="match_parent"
        android:layout_height="wrap_content"
        android:gravity="center_vertical"
        android:textSize="30dp"/>

    <Button
        android:id="@+id/deleteButton"
        android:layout_width="wrap_content"
        android:layout_height="wrap_content"
        android:layout_below="@id/keyAlias"
        android:layout_alignParentLeft="true"
        android:layout_centerHorizontal="true"
        android:text="@string/delete"
        style="@style/Base.Widget.AppCompat.Button.Borderless" />

    <Button
        android:id="@+id/encryptButton"
        android:layout_width="wrap_content"
        android:layout_height="wrap_content"
        android:layout_below="@+id/keyAlias"
        android:layout_alignRight="@+id/keyAlias"
        android:text="@string/encrypt"
        style="@style/Base.Widget.AppCompat.Button.Borderless"/>

    <Button
        android:id="@+id/decryptButton"
        android:layout_width="wrap_content"
        android:layout_height="wrap_content"
        android:layout_below="@+id/keyAlias"
        android:layout_toLeftOf="@+id/encryptButton"
        android:text="@string/decrypt"
        style="@style/Base.Widget.AppCompat.Button.Borderless"/>

</RelativeLayout>
List Header
The List header được thêm vào đầu ListView
View listHeader = View.inflate(this, R.layout.activity_main_header, null);
listView.addHeaderView(listHeader);
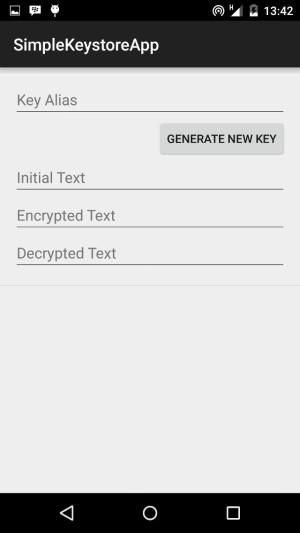
file * layout/activitymainheader.xml*
<?xml version="1.0" encoding="utf-8"?>
<RelativeLayout xmlns:android="http://schemas.android.com/apk/res/android"
    android:orientation="vertical"
    android:layout_width="match_parent"
    android:layout_height="match_parent"
    android:gravity="center_horizontal"
    android:paddingLeft="@dimen/activity_horizontal_margin"
    android:paddingRight="@dimen/activity_horizontal_margin"
    android:paddingTop="@dimen/activity_vertical_margin"
    android:paddingBottom="@dimen/activity_vertical_margin">

    <EditText
        android:id="@+id/aliasText"
        android:layout_width="match_parent"
        android:layout_height="wrap_content"
        android:layout_centerHorizontal="true"
        android:hint="@string/key_alias"/>

    <Button
        android:id="@+id/generateKeyPair"
        android:layout_width="wrap_content"
        android:layout_height="wrap_content"
        android:layout_below="@id/aliasText"
        android:layout_centerHorizontal="true"
        android:layout_alignParentRight="true"
        android:text="@string/generate"
        android:onClick="createNewKeys" />

    <EditText
        android:id="@+id/startText"
        android:layout_width="match_parent"
        android:layout_height="wrap_content"
        android:layout_below="@id/generateKeyPair"
        android:layout_centerHorizontal="true"
        android:hint="@string/initial_text"/>

    <EditText
        android:id="@+id/encryptedText"
        android:layout_width="match_parent"
        android:layout_height="wrap_content"
        android:layout_below="@id/startText"
        android:layout_centerHorizontal="true"
        android:editable="false"
        android:textIsSelectable="true"
        android:hint="@string/final_text"/>

    <EditText
        android:id="@+id/decryptedText"
        android:layout_width="match_parent"
        android:layout_height="wrap_content"
        android:layout_below="@id/encryptedText"
        android:layout_centerHorizontal="true"
        android:editable="false"
        android:textIsSelectable="true"
        android:hint="@string/decrypt_result"/>
</RelativeLayout>
Nhìn vào hình trên , ListView hiện tại đang trống nên ListView Header được hiển thị . EditText trên cùng để nhập bí danh (alias) khi tạo key.Button dùng để sinh ra key. Button được theo dõi bởi ba EditTexts, một mong đợi một chuỗi đầu vào phải được mã hóa, hiển thị một kết quả của việc mã hóa, và thứ ba cho thấy chuỗi giải mã (cho một giải mã thành công).
MainActivity
Tại onCreate() , đầu tiên chúng ta khỏi tạo AndroidKeyStore
Keystore.getInstance("AndroidKeyStore");
keystore.load(null)
Sau đó chúng ta gọi refreshKeys() (Method hiển thị list all key lên ListView sẽ đề cập bên dưới) . Điều này đảm bảo cho việc hiển thị danh sách tất cả các key lên ListView ngay từ khi bật app lên
Hiển thị danh sách key trong Keystore lên ListView
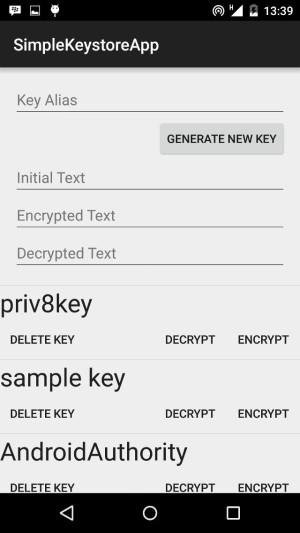
Để lấy Enumeration của tất cả key từ keystore, đơn giản chỉ cần gọi method ***aliases()***. Trong method refreshKeys() dưới đây ta sẽ lấy toàn bộ các alias sau đó hiển thị chúng lên ListView
    private void refreshKeys() {
        keyAliases = new ArrayList<>();
        try {
            Enumeration<String> aliases = keyStore.aliases();
            while (aliases.hasMoreElements()) {
                keyAliases.add(aliases.nextElement());
            }
        }
        catch(Exception e) {}

        if(listAdapter != null)
            listAdapter.notifyDataSetChanged();
    }
Thêm một key vào Keystore
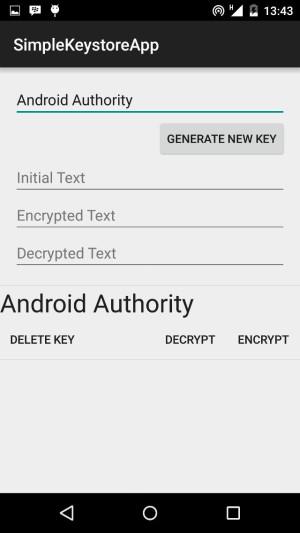
Mỗi key tạo ra ứng dụng phải có một alias (bí danh) duy nhất, alias này có thể là bất kì String nào. Chúng ta sử dụng KeyPairGeneratorSpec để build key. Bạn có thể set giá trị cho key (setStartDate() and setEndDate()) ,set alias và subject. subject phải là đối tượng X500Principal Để sinh ra một cặp Public/Private chúng ta cần KeyPairGenerator. Chúng ta lấy instance của nó và sử dụng giải thuật RSA algorithm cũng vs "AndroidKeyStore" . Gọi generateKeyPair để tao cặp key và thêm chúng vào keystore
    public void createNewKeys(View view) {
        String alias = aliasText.getText().toString();
        try {
            // Create new key if needed
            if (!keyStore.containsAlias(alias)) {
                Calendar start = Calendar.getInstance();
                Calendar end = Calendar.getInstance();
                end.add(Calendar.YEAR, 1);
                KeyPairGeneratorSpec spec = new KeyPairGeneratorSpec.Builder(this)
                        .setAlias(alias)
                        .setSubject(new X500Principal("CN=Sample Name, O=Android Authority"))
                        .setSerialNumber(BigInteger.ONE)
                        .setStartDate(start.getTime())
                        .setEndDate(end.getTime())
                        .build();
                KeyPairGenerator generator = KeyPairGenerator.getInstance("RSA", "AndroidKeyStore");
                generator.initialize(spec);

                KeyPair keyPair = generator.generateKeyPair();
            }
        } catch (Exception e) {
            Toast.makeText(this, "Exception " + e.getMessage() + " occured", Toast.LENGTH_LONG).show();
            Log.e(TAG, Log.getStackTraceString(e));
        }
        refreshKeys();
    }
Xóa key từ Keystore
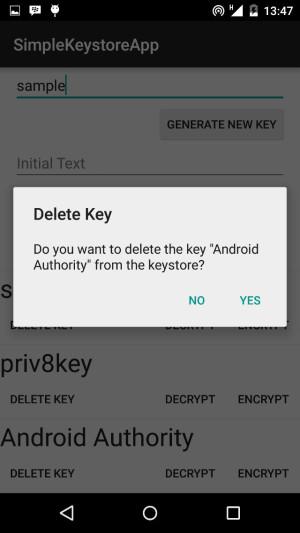
Xóa một key từ keystore khá là đơn giản. Thứ cần dùng ở đây cũng chính là alias , gọi keystore.deleteEntry(keyAlias) để xóa. Và một khi đã xóa thì k có cách nào có thể khôi phục lại key mà bạn đã xóa, vì vậy bạn cần chắc chắn trước khi làm điều đó
    public void deleteKey(final String alias) {
        AlertDialog alertDialog =new AlertDialog.Builder(this)
                .setTitle("Delete Key")
                .setMessage("Do you want to delete the key \"" + alias + "\" from the keystore?")
                .setPositiveButton("Yes", new DialogInterface.OnClickListener() {
                    public void onClick(DialogInterface dialog, int which) {
                        try {
                            keyStore.deleteEntry(alias);
                            refreshKeys();
                        } catch (KeyStoreException e) {
                            Toast.makeText(MainActivity.this,
                                    "Exception " + e.getMessage() + " occured",
                                    Toast.LENGTH_LONG).show();
                            Log.e(TAG, Log.getStackTraceString(e));
                        }
                        dialog.dismiss();
                    }
                })
                .setNegativeButton("No", new DialogInterface.OnClickListener() {
                    public void onClick(DialogInterface dialog, int which) {
                        dialog.dismiss();
                    }
                })
                .create();
        alertDialog.show();
    }
Mã hóa text
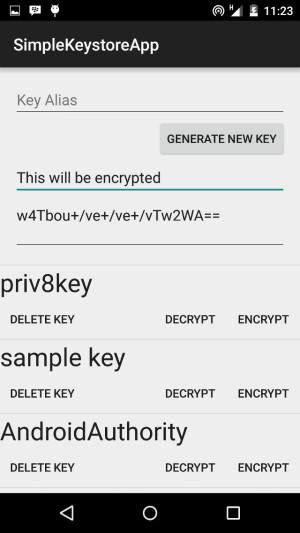
Mã hóa text được thực hiện với Public key của Keypair. Chúng ta lấy Public key, yêu cầu Cipher mã hoá, giả mã bằng (“RSA/ECB/PKCS1Padding”)
    public void encryptString(String alias) {
        try {
            KeyStore.PrivateKeyEntry privateKeyEntry = (KeyStore.PrivateKeyEntry)keyStore.getEntry(alias, null);
            RSAPublicKey publicKey = (RSAPublicKey) privateKeyEntry.getCertificate().getPublicKey();

            // Encrypt the text
            String initialText = startText.getText().toString();
            if(initialText.isEmpty()) {
                Toast.makeText(this, "Enter text in the 'Initial Text' widget", Toast.LENGTH_LONG).show();
                return;
            }

            Cipher input = Cipher.getInstance("RSA/ECB/PKCS1Padding", "AndroidOpenSSL");
            input.init(Cipher.ENCRYPT_MODE, publicKey);

            ByteArrayOutputStream outputStream = new ByteArrayOutputStream();
            CipherOutputStream cipherOutputStream = new CipherOutputStream(
                    outputStream, input);
            cipherOutputStream.write(initialText.getBytes("UTF-8"));
            cipherOutputStream.close();

            byte [] vals = outputStream.toByteArray();
            encryptedText.setText(Base64.encodeToString(vals, Base64.DEFAULT));
        } catch (Exception e) {
            Toast.makeText(this, "Exception " + e.getMessage() + " occured", Toast.LENGTH_LONG).show();
            Log.e(TAG, Log.getStackTraceString(e));
        }
    }
Giải mã dữ liệu
Giải mã những dữ liệu trước đó mà ta đã mã hóa
    public void decryptString(String alias) {
        try {
            KeyStore.PrivateKeyEntry privateKeyEntry = (KeyStore.PrivateKeyEntry)keyStore.getEntry(alias, null);
            RSAPrivateKey privateKey = (RSAPrivateKey) privateKeyEntry.getPrivateKey();

            Cipher output = Cipher.getInstance("RSA/ECB/PKCS1Padding", "AndroidOpenSSL");
            output.init(Cipher.DECRYPT_MODE, privateKey);

            String cipherText = encryptedText.getText().toString();
            CipherInputStream cipherInputStream = new CipherInputStream(
                    new ByteArrayInputStream(Base64.decode(cipherText, Base64.DEFAULT)), output);
            ArrayList<Byte> values = new ArrayList<>();
            int nextByte;
            while ((nextByte = cipherInputStream.read()) != -1) {
                values.add((byte)nextByte);
            }

            byte[] bytes = new byte[values.size()];
            for(int i = 0; i < bytes.length; i++) {
                bytes[i] = values.get(i).byteValue();
            }

            String finalText = new String(bytes, 0, bytes.length, "UTF-8");
            decryptedText.setText(finalText);

        } catch (Exception e) {
            Toast.makeText(this, "Exception " + e.getMessage() + " occured", Toast.LENGTH_LONG).show();
            Log.e(TAG, Log.getStackTraceString(e));
        }
    }
Vừa rồi là một ví dụ cơ bản về việc sừ dụng Android keystore dùng để quản lí key một cách bảo mật và hiệu quả nhất. Project tham khảo có thể xem tại Github Nguồn Android authority
All rights reserved