5 bước tích hợp Biometric Authentication vào ứng dụng Android
Bài đăng này đã không được cập nhật trong 8 năm
Như chúng ta thấy hiện nay hầu như các thiết bị di động Android đều có hỗ trợ các phương thức bảo mật. Đặc biệt phổ biến nhất là bảo mật bằng vân tay. Nếu bạn đang có ý định tích hợp tính năng nhận diện tay vào ứng dụng của mình thì bài viết này chính là thứ bạn đang cần. Chỉ với 5 bước mà thôi. Theo thông báo chính thức từ Google thì họ đã chính thức support việc nhận diện vân tay trên Android bắt đâu từ Android 6.0 (M). Bằng việc sử dụng API BiometricPrompt hứa hẹn tiện ích cho lập trình viên và mang lại sự chính xác với nhiều cấp độ bảo mật. Sau đây là những bước cần thiết để mang tính năng cực thú vị này lên ứng dụng của mình.
Bước 1: Thêm permissions cần thiết vào file AndroidManifest.xml
<manifest xmlns:android="http://schemas.android.com/apk/res/android"
    package="com.an.biometric">

    <!-- Step 1: Add the following permission to the app  -->
    <uses-permission android:name="android.permission.USE_BIOMETRIC" />

    <!-- Step 2: This permission is depreciated in Android P  -->
    <uses-permission android:name="android.permission.USE_FINGERPRINT" />

</manifest>
Bước 2: Kiểm tra xem thiết bị có hỗ trợ Biometric Authentication hay không.
Các điều kiện kiểm tra như sau:
- Thiết bị phải chạy trên Android >= Android 6.0
- Thiết bị có hỗ trợ cảm biến vân tay không.
- Người dùng đã cho phép ứng dụng sử dụng cảm biến vân tay hay chưa.
- Người dùng đã bật tính năng vân tay và thêm dấu vân tay trước đó. Chúng ta có thể tạo thành 1 file Utils check như sau:
public class BiometricUtils {


    public static boolean isBiometricPromptEnabled() {
        return (Build.VERSION.SDK_INT >= Build.VERSION_CODES.P);
    }


    /*
     * Condition I: Check if the android version in device is greater than
     * Marshmallow, since fingerprint authentication is only supported
     * from Android 6.0.
     * Note: If your project's minSdkversion is 23 or higher,
     * then you won't need to perform this check.
     *
     * */
    public static boolean isSdkVersionSupported() {
        return (Build.VERSION.SDK_INT >= Build.VERSION_CODES.M);
    }


    /*
     * Condition II: Check if the device has fingerprint sensors.
     * Note: If you marked android.hardware.fingerprint as something that
     * your app requires (android:required="true"), then you don't need
     * to perform this check.
     *
     * */
    public static boolean isHardwareSupported(Context context) {
        FingerprintManagerCompat fingerprintManager = FingerprintManagerCompat.from(context);
        return fingerprintManager.isHardwareDetected();
    }


    /*
     * Condition III: Fingerprint authentication can be matched with a
     * registered fingerprint of the user. So we need to perform this check
     * in order to enable fingerprint authentication
     *
     * */
    public static boolean isFingerprintAvailable(Context context) {
        FingerprintManagerCompat fingerprintManager = FingerprintManagerCompat.from(context);
        return fingerprintManager.hasEnrolledFingerprints();
    }


    /*
     * Condition IV: Check if the permission has been added to
     * the app. This permission will be granted as soon as the user
     * installs the app on their device.
     *
     * */
    public static boolean isPermissionGranted(Context context) {
        return ActivityCompat.checkSelfPermission(context, Manifest.permission.USE_FINGERPRINT) ==
                PackageManager.PERMISSION_GRANTED;
    }
}
Bước 3: Hiển thị Dialog BiometricPrompt
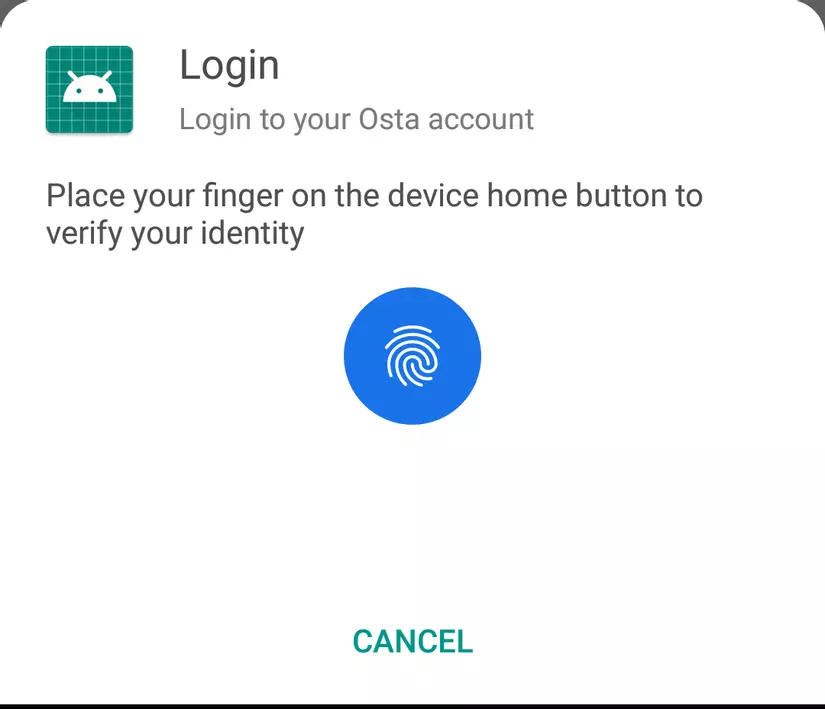
Khi tất cả các điều kiện trên đều thỏa mãn thì ta sẽ hiển thị ra Dialog thông báo như sau:
@TargetApi(Build.VERSION_CODES.P)
    private void displayBiometricPrompt(final BiometricCallback biometricCallback) {
        new BiometricPrompt.Builder(context)
                .setTitle(title)
                .setSubtitle(subtitle)
                .setDescription(description)
                .setNegativeButton(negativeButtonText, context.getMainExecutor(), new DialogInterface.OnClickListener() {
                    @Override
                    public void onClick(DialogInterface dialogInterface, int i) {
                        biometricCallback.onAuthenticationCancelled();
                    }
                })
                .build();
    }
BiometricPrompt chỉ có thể hiển thị trên Android P trở lên.Ta có thể custom nội dung của dialog :
- setTitle() — Tiêu đề hiển thị (Bắt buộc)
- setSubtitle() — Tiêu đề phụ bên dưới(Tùy chọn)
- setDescription() — Mô ta nội dung(Tùy chọn)
- setNegativeButton() — Nội dung của nút tắt dialog(Bắt buộc)
Bước 4: Xử lí Callback
Ta sử dụng callback BiometricPrompt.AuthenticationCallback để lắng nghe từ user. Callback trả về thì có 4 phương thức chính:
onAuthenticationSucceeded
Khi nhận diện vân tay thành công thì callback sẽ trả về 1 AuthenticationResult
onAuthenticationFailed
Hàm gọi khi không có vân tay nào khớp với tập dữ liệu của hệ thống. Tức là không nhận diện được vân tay.
onAuthenticationError
Khi đã hoàn thành quá trình xác thực mà không thành công thì callback này sẽ được gọi và trả về các mã lỗi được mô tả chi tiết theo tài liệu này
onAuthenticationHelp
Hàm được gọi khi xảy ra các lỗi không nghiêm trọng ví dụ như phần nhận diện bẩn, user move tay quá nhanh..... Các mã lỗi cũng được mô tả chi tiết ở tài liệu này
Khi implement nó sẽ như sau:
@RequiresApi(api = Build.VERSION_CODES.P)
public class BiometricCallbackV28 extends BiometricPrompt.AuthenticationCallback {

    private BiometricCallback biometricCallback;
    public BiometricCallbackV28(BiometricCallback biometricCallback) {
        this.biometricCallback = biometricCallback;
    }


    @Override
    public void onAuthenticationSucceeded(BiometricPrompt.AuthenticationResult result) {
        super.onAuthenticationSucceeded(result);
        biometricCallback.onAuthenticationSuccessful();
    }


    @Override
    public void onAuthenticationHelp(int helpCode, CharSequence helpString) {
        super.onAuthenticationHelp(helpCode, helpString);
        biometricCallback.onAuthenticationHelp(helpCode, helpString);
    }


    @Override
    public void onAuthenticationError(int errorCode, CharSequence errString) {
        super.onAuthenticationError(errorCode, errString);
        biometricCallback.onAuthenticationError(errorCode, errString);
    }


    @Override
    public void onAuthenticationFailed() {
        super.onAuthenticationFailed();
        biometricCallback.onAuthenticationFailed();
    }
}
Nếu thiết bị của bản là > Android P thì tuyệt với rồi. Còn nếu không phải thì sao?
Điều gì xảy ra nếu thiết bị không support Android P
Tất cả các version < Android P đều sẽ không thể dùng BiometricPrompt API. Nhưng may mắn thay ta có thể dùng FingerprintManagerCompat API để xác thực user. Vậy ta cần làm gì ?
- Dùng Keystore và generating key : Android cho phép bạn lưu trữ cryptographic keys bằng cách làm cho nó khó có thể truy xuất ra từ device. Nó cũng hạn chế cách thức và thời điểm mỗi khóa có thể được sử dụng. Khi khóa được tạo, nó sẽ được lưu trữ an toàn trên thiết bị bằng cách sử dụng KeyStore và được sử dụng để khởi tạo đối tượng cipher trong bước tiếp theo.
    private void generateKey() {
        try {

            KeyStore keyStore = KeyStore.getInstance("AndroidKeyStore");
            keyStore.load(null);

            keyGenerator = KeyGenerator.getInstance(KeyProperties.KEY_ALGORITHM_AES, "AndroidKeyStore");
            keyGenerator.init(new
                    KeyGenParameterSpec.Builder(KEY_NAME, KeyProperties.PURPOSE_ENCRYPT | KeyProperties.PURPOSE_DECRYPT)
                    .setBlockModes(KeyProperties.BLOCK_MODE_CBC)
                    .setUserAuthenticationRequired(true)
                    .setEncryptionPaddings(KeyProperties.ENCRYPTION_PADDING_PKCS7)
                    .build());

            keyGenerator.generateKey();

        } catch (KeyStoreException
                | NoSuchAlgorithmException
                | NoSuchProviderException
                | InvalidAlgorithmParameterException
                | CertificateException
                | IOException exc) {
            exc.printStackTrace();
        }
    }
- Khởi tạo the cipher Việc khởi tạo Cipher này sẽ được sử dụng để tạo ra instance CryptoObject. Trong khi khởi tạo cipher, khóa được tạo và khóa lưu trữ trong keystore container được sử dụng
private boolean initCipher() {
        try {
          Cipher cipher = Cipher.getInstance(
                    KeyProperties.KEY_ALGORITHM_AES + "/"
                            + KeyProperties.BLOCK_MODE_CBC + "/"
                            + KeyProperties.ENCRYPTION_PADDING_PKCS7);

        } catch (NoSuchAlgorithmException |
                NoSuchPaddingException e) {
            throw new RuntimeException("Failed to get Cipher", e);
        }

        try {
            keyStore.load(null);
            SecretKey key = (SecretKey) keyStore.getKey(KEY_NAME,
                    null);
            cipher.init(Cipher.ENCRYPT_MODE, key);
            return true;


        } catch (KeyPermanentlyInvalidatedException e) {
            return false;

        } catch (KeyStoreException | CertificateException
                | UnrecoverableKeyException | IOException
                | NoSuchAlgorithmException | InvalidKeyException e) {

            throw new RuntimeException("Failed to init Cipher", e);
        }
    }
- Tạo CrytoObject Bộ scan vân tay sẽ dùng CrytoObject cho việc giúp ích xác thực, và đưa ra kết quả của việc scan.
FingerprintManagerCompat.CryptoObject cryptoObject = new FingerprintManagerCompat.CryptoObject(cipher);
- Assign CrytoObject cho FingerprintManagerCompat
/*
 * Step 1: Instantiate a FingerprintManagerCompat and call the authenticate method.
 * The authenticate method requires the:
 * 1. cryptoObject
 * 2. The second parameter is always zero.
 *    The Android documentation identifies this as set of flags and is most likely
 *    reserved for future use.
 * 3. The third parameter, cancellationSignal is an object used to turn off the
 *    fingerprint scanner and cancel the current request.
 * 4. The fourth parameteris a class that subclasses the AuthenticationCallback abstract class.
 *    This will be the same as the BiometricAuthenticationCallback
 * 5. The fifth parameter is an optional Handler instance.
 *    If a Handler object is provided, the FingerprintManager will use the Looper from that
 *    object when processing the messages from the fingerprint hardware.
 */
FingerprintManagerCompat fingerprintManagerCompat = FingerprintManagerCompat.from(context);

            fingerprintManagerCompat.authenticate(cryptoObject, 0, new CancellationSignal(),
                    new FingerprintManagerCompat.AuthenticationCallback() {
                        @Override
                        public void onAuthenticationError(int errMsgId, CharSequence errString) {
                            super.onAuthenticationError(errMsgId, errString);
                            updateStatus(String.valueOf(errString));
                            biometricCallback.onAuthenticationError(errMsgId, errString);
                        }

                        @Override
                        public void onAuthenticationHelp(int helpMsgId, CharSequence helpString) {
                            super.onAuthenticationHelp(helpMsgId, helpString);
                            updateStatus(String.valueOf(helpString));
                            biometricCallback.onAuthenticationHelp(helpMsgId, helpString);
                        }

                        @Override
                        public void onAuthenticationSucceeded(FingerprintManagerCompat.AuthenticationResult result) {
                            super.onAuthenticationSucceeded(result);
                            dismissDialog();
                            biometricCallback.onAuthenticationSuccessful();
                        }


                        @Override
                        public void onAuthenticationFailed() {
                            super.onAuthenticationFailed();
                            updateStatus(context.getString(R.string.biometric_failed));
                            biometricCallback.onAuthenticationFailed();
                        }
                    }, null);
Phương thức authenticate bắt buộc các param :
- cryptoObject
- Tham số thứ 2 luôn để là 0. Theo Android Document thì nó là 1 flag, có thể dành riêng cho 1 việc nào đó sau này.
- Tham số thứ 3 cancellationSignal đối tượng để tắt quét vân tay và hủy request hiện tại
- Tham số thứ tư AuthenticationCallback giống như BiometricAuthenticationCallback
- Tham số thứ 5 là optional: Handler, nếu cung cấp Handler thì FingerprintManagerCompat sẽ sử dụng Looper khi sử lí message từ phần cứng scan vân tay.
- Tạo UI giống như BiometricPrompt Dialog Chúng ta có thể tạo 1 custom dialog theo ý thích của mình
public class BiometricDialogV23 extends BottomSheetDialog implements View.OnClickListener {

    private Context context;

    private Button btnCancel;
    private ImageView imgLogo;
    private TextView itemTitle, itemDescription, itemSubtitle, itemStatus;

    private BiometricCallback biometricCallback;

    public BiometricDialogV23(@NonNull Context context) {
        super(context, R.style.BottomSheetDialogTheme);
        this.context = context.getApplicationContext();
        setDialogView();
    }

    public BiometricDialogV23(@NonNull Context context, BiometricCallback biometricCallback) {
        super(context, R.style.BottomSheetDialogTheme);
        this.context = context.getApplicationContext();
        this.biometricCallback = biometricCallback;
        setDialogView();
    }

    public BiometricDialogV23(@NonNull Context context, int theme) {
        super(context, theme);
    }

    protected BiometricDialogV23(@NonNull Context context, boolean cancelable, OnCancelListener cancelListener) {
        super(context, cancelable, cancelListener);
    }

    private void setDialogView() {
        View bottomSheetView = getLayoutInflater().inflate(R.layout.view_bottom_sheet, null);
        setContentView(bottomSheetView);

        btnCancel = findViewById(R.id.btn_cancel);
        btnCancel.setOnClickListener(this);

        imgLogo = findViewById(R.id.img_logo);
        itemTitle = findViewById(R.id.item_title);
        itemStatus = findViewById(R.id.item_status);
        itemSubtitle = findViewById(R.id.item_subtitle);
        itemDescription = findViewById(R.id.item_description);

        updateLogo();
    }

    public void setTitle(String title) {
        itemTitle.setText(title);
    }

    public void updateStatus(String status) {
        itemStatus.setText(status);
    }

    public void setSubtitle(String subtitle) {
        itemSubtitle.setText(subtitle);
    }

    public void setDescription(String description) {
        itemDescription.setText(description);
    }

    public void setButtonText(String negativeButtonText) {
        btnCancel.setText(negativeButtonText);
    }

    private void updateLogo() {
        try {
            Drawable drawable = getContext().getPackageManager().getApplicationIcon(context.getPackageName());
            imgLogo.setImageDrawable(drawable);

        } catch (Exception e) {
            e.printStackTrace();
        }
    }


    @Override
    public void onClick(View view) {
        dismiss();
        biometricCallback.onAuthenticationCancelled();
    }
}
Cuối cùng ta có được kết quả như sau:
Tổng kết
Mong rằng bài chia sẻ của tôi sẽ mang lại giá trị cho bạn. Khi gặp vấn đề về tích hợp nhận diện vân tay thì tôi mong rằng đây sẽ là một tutorial dành cho bạn. Cảm ơn và hẹn gặp lại.
Tham khảo https://proandroiddev.com/5-steps-to-implement-biometric-authentication-in-android-dbeb825aeee8
All rights reserved
