Text to speech with Android
This post hasn't been updated for 4 years
Giới thiệu
Hôm nay, chúng ta cùng tìm hiểu về text-to-speech với Android. Hay chính là việc chuyển từ chữ sang tiếng nói trong android. Nó giúp cho chúng ta luyện nghe và nói rất nhiều khi chũng ta muốn học một ngôn ngữ mới nào đó. Đối với mỗi máy thì đều có một sỗ ngôn ngữ hỗ trợ sẵn việc đọc này. Bạn có thể vào Settings -> Language & input -> Text to speech output -> Google text to speech engine settings để cài đặt ngôn ngữ mặc định hoặc là down gói ngôn ngữ mới về để hỗ trợ thêm.
Android cung cấp cho chúng ta lớp TextToSpeech để thực hiện việc chuyển đổi từ text thành voice. Lớp TextToSpeech này chứa một số hàm cơ bản mà chúng ta hay sử dụng sau:
-
addSpeech(String text, String filename)Thêm vào một ánh xạ giữa text và file ghi âm thanh
-
getLanguage() hoặc getAvailableLanguages()Trả về list ngôn ngữ được hỗ trợ của máy.
-
isSpeaking()Kiểm tra xem đối tượng có đang nói không.
-
setSpeechRate(float speechRate)Cài đặt tốc độ nói.
-
stop()Dừng nói. -
speak(CharSequence text, int queueMode, Bundle params, String utteranceId)Nói ra câu text truyền vào.
-
speak(String text, int queueMode, HashMap<String, String> params)Phương thức này được thay thế bằng phương thức trên từ API 21 trở đi. Tác dụng tương tự nhau.
CODE
Để hiểu rõ hơn về text-to-speech, chúng ta cùng làm một ví dụ nhỏ. Ở đây, mình lấy code chủ yếu là từ trang tutorialspoint và có chỉnh sửa đôi chút để chúng ta có thể thay đổi ngôn ngữ nói cho ứng dụng của mình.
Những dòng code chính trong MainActivity.
	TextToSpeech speak;
    EditText ed1;
    TextView textview_language;
    Button b1, select_language;
    Dialog dialog;
    RadioGroup radioLanguageGroup;
    final Context context = this;

    @Override
    protected void onCreate(Bundle savedInstanceState) {
        super.onCreate(savedInstanceState);
        setContentView(R.layout.activity_main);
        ed1 = (EditText) findViewById(R.id.editText);
        b1 = (Button) findViewById(R.id.button);
        select_language = (Button) findViewById(R.id.language);
        textview_language = (TextView)findViewById(R.id.tv_lang);

        speak = new TextToSpeech(getApplicationContext(), new TextToSpeech.OnInitListener() {
            @Override
            public void onInit(int status) {
                if(status != TextToSpeech.ERROR) {
                    speak.setLanguage(Locale.US);
                }
            }
        });

        b1.setOnClickListener(new View.OnClickListener() {
            @Override
            public void onClick(View v) {
                String toSpeak = ed1.getText().toString();
                Toast.makeText(getApplicationContext(), toSpeak,Toast.LENGTH_SHORT).show();
                speak.speak(toSpeak, TextToSpeech.QUEUE_FLUSH, null);
            }
        });

        select_language.setOnClickListener(new View.OnClickListener(){
            @Override
            public void onClick(View v) {
                dialog = new Dialog(context);
                dialog.setContentView(R.layout.select_language);
                dialog.setTitle("Language?");
                Button bt_ok = (Button)dialog.findViewById(R.id.bt_Ok);
                radioLanguageGroup = (RadioGroup)dialog.findViewById(R.id.radioGroup);
                bt_ok.setOnClickListener(new View.OnClickListener(){
                    @Override
                    public void onClick(View v) {
                        int selectedId = radioLanguageGroup.getCheckedRadioButtonId();
                        RadioButton selectedButton = (RadioButton) dialog.findViewById(selectedId);

                        Languages lang = Languages.valueOf((String) selectedButton.getText());

                        switch (lang){
                            case US:
                                speak.setLanguage(Locale.US);
                                textview_language.setText("US");
                                break;
                            case GERMANY:
                                speak.setLanguage(Locale.GERMANY);
                                textview_language.setText("GERMANY");
                                break;
                            case ITALY:
                                speak.setLanguage(Locale.ITALY);
                                textview_language.setText("ITALY");
                                break;
                        }
                        dialog.dismiss();
                    }
                });
                dialog.show();
            }
        });
    }

    enum Languages {
        US, GERMANY, ITALY;
    }
Luồng xử lý chính ở trong file MainActivity chính là cài đặt các event cho button chọn ngôn ngữ (Khi ấn vào button này thì sẽ hiển thị một dialog cho người dùng chọn ngôn ngữ), và button speak (Khi ấn vào button này thì sẽ phát ra câu nói cho những đoạn text mà bạn đã nhập vào).
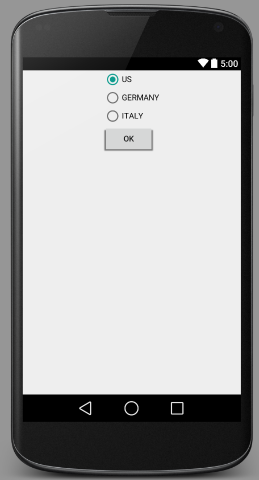
Khi hiển thị dialog ở đây, chúng ta phải hiển thị ra list các radio button cho người dùng chọn. Chính vì vậy, mà ta không thể sử dụng dialog default mà android cung cấp. Ở đây, mình sử dụng custom dialog với layout mà mình dựng sẵn chứ ko chỉ có chứa text như dialog default.

<?xml version="1.0" encoding="utf-8"?>
<RadioGroup xmlns:android="http://schemas.android.com/apk/res/android"
    android:layout_width="fill_parent"
    android:layout_height="wrap_content"
    android:orientation="vertical"
    android:gravity="center_vertical|center_horizontal"
    >
    <LinearLayout
        android:orientation="vertical"
        android:layout_width="wrap_content"
        android:layout_height="wrap_content">

        <RadioGroup
            android:layout_width="wrap_content"
            android:layout_height="wrap_content"
            android:layout_gravity="center_horizontal"
            android:id="@+id/radioGroup">
            <RadioButton android:id="@+id/us"
                android:layout_width="wrap_content"
                android:layout_height="wrap_content"
                android:text="US"
                android:checked="true"/>

            <RadioButton android:id="@+id/germany"
                android:layout_width="wrap_content"
                android:layout_height="wrap_content"
                android:text="GERMANY"/>
            <RadioButton android:id="@+id/italy"
                android:layout_width="wrap_content"
                android:layout_height="wrap_content"
                android:text="ITALY"/>

            <Button
                android:layout_width="wrap_content"
                android:layout_height="wrap_content"
                android:text="OK"
                android:id="@+id/bt_Ok" />
        </RadioGroup>

        </LinearLayout>
</RadioGroup>
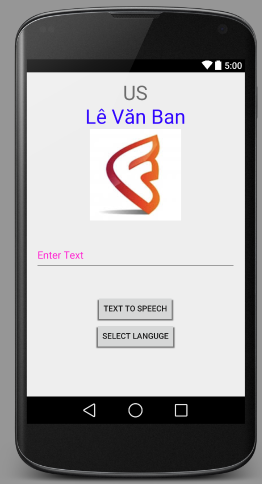
Và giao diện chính của ứng dụng sẽ được thấy như sau:

<RelativeLayout xmlns:android="http://schemas.android.com/apk/res/android"
    xmlns:tools="http://schemas.android.com/tools" android:layout_width="match_parent"
    android:layout_height="match_parent" android:paddingLeft="@dimen/activity_horizontal_margin"
    android:paddingRight="@dimen/activity_horizontal_margin"
    android:paddingTop="@dimen/activity_vertical_margin"
    android:paddingBottom="@dimen/activity_vertical_margin"
    tools:context=".MainActivity"
    android:transitionGroup="true">

    <TextView android:text="US" android:layout_width="wrap_content"
        android:layout_height="wrap_content"
        android:id="@+id/tv_lang"
        android:textSize="35dp"
        android:layout_alignParentTop="true"
        android:layout_centerHorizontal="true" />

    <TextView
        android:layout_width="wrap_content"
        android:layout_height="wrap_content"
        android:text="Lê Văn Ban"
        android:id="@+id/textView"
        android:layout_below="@+id/tv_lang"
        android:layout_centerHorizontal="true"
        android:textColor="#ff3005ff"
        android:textSize="35dp" />

    <ImageView
        android:layout_width="wrap_content"
        android:layout_height="wrap_content"
        android:id="@+id/imageView"
        android:src="@drawable/logo_fr"
        android:layout_below="@+id/textView"
        android:layout_centerHorizontal="true"
        android:theme="@style/Base.TextAppearance.AppCompat" />

    <EditText
        android:layout_width="wrap_content"
        android:layout_height="wrap_content"
        android:id="@+id/editText"
        android:layout_below="@+id/imageView"
        android:layout_marginTop="46dp"
        android:hint="Enter Text"
        android:layout_alignParentRight="true"
        android:layout_alignParentEnd="true"
        android:layout_alignParentLeft="true"
        android:layout_alignParentStart="true"
        android:textColor="#ff7aff10"
        android:textColorHint="#ffff23d1" />

    <Button
        android:layout_width="wrap_content"
        android:layout_height="wrap_content"
        android:text="Text to Speech"
        android:id="@+id/button"
        android:layout_below="@+id/editText"
        android:layout_centerHorizontal="true"
        android:layout_marginTop="46dp" />

    <Button
        android:layout_width="wrap_content"
        android:layout_height="wrap_content"
        android:text="Select languge"
        android:id="@+id/language"
        android:layout_below="@+id/button"
        android:layout_centerHorizontal="true" />

</RelativeLayout>
Bạn nhớ copy icon mà bạn muốn và thay thế @drawable/logo_fr nhé.
Khi bạn chọn ngôn ngữ thì giá trị của ngôn ngữ đó sẽ được hiển thị ở vị trí của text "US" như trên hình.
Dưới đây là video demo với dòng text nhập vào là "from aisa to the world":
Source code hoàn chỉnh tại đây
Tài liệu tham khảo
All Rights Reserved