Tạo livesearch đơn giản trên Rails sử dụng ransack, JavaScript
Bài đăng này đã không được cập nhật trong 4 năm
Phần 1. Giới thiệu
Hiện tại hầu như trang web nào cũng có một khung tìm kiếm để tìm các thông tin từ nó. Và chắc hẳn nhiều bạn vừa mới tìm hiểu về web không biết nên bắt đầu từ đâu để làm ra một khung search như thế đúng không?
Trong bài này mình sẽ hướng dẫn các bạn tạo một khung search đơn giản bằng Rails và Jquery.
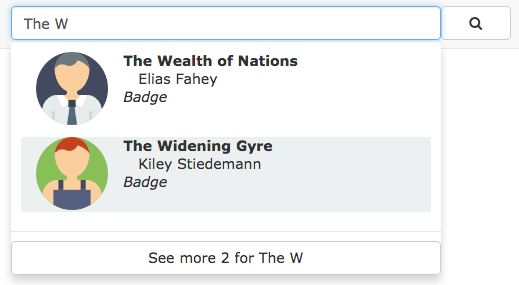
Giao diện sẽ được trình bày như sau:
Giao diện khung search

Giao diện khung search lúc hiển thị kết quả
Nào chúng ta bắt đầu thôi.
Phần 2. Chuẩn bị
2.1. Tạo một ứng dụng Rails mới
Cái này thì chắc ai cũng làm được nhỉ 
2.2. Thêm các gem để hỗ trợ việc cài đặt
gem "bootstrap-sass"
gem "font-awesome-rails"
// Để tạo các biểu thức search nhanh hơn
gem "ransack"
// Tạo dữ liệu ảo để test
gem "faker"
2.3. Thêm Search plugin
Các bạn hãy copy nội dung dưới đây và tạo ra file "searchbox.js" hoặc tên gì cũng được trong folder "app/assets/javascripts/"
// Author: Ryan Heath
// http://rpheath.com
// Mirs edited

(function($) {
  function HSearchBox(options){
    var defaults = {
      url: '/search',
      param: 'query',
      dom_id: '#livesearch_results',
      delay: 250,
      minChars: 2,
      loading_css: '#livesearch_loading',
      del_id: '#livesearch_del',
      form_id: '#livesearch_form',
      dataType: 'text',
      onInitSearch: function(){},
      onStartSearch: function(){},
      onFinishSearch: function(){}u
    }

    this.settings = $.extend({}, defaults, options || {})

    this.loading = function() {
      $(this.settings.loading_css).show()
    }

    this.idle = function() {
      $(this.settings.loading_css).hide()
    }

    this.start = function() {
      this.loading()
      this.settings.onStartSearch()
    }

    this.stop = function() {
      this.idle()
      this.settings.onFinishSearch()
    }

    this.kill = function() {
      $(this.settings.dom_id).fadeOut(50)
      $(this.settings.dom_id).html('')
      $(this.settings.del_id).fadeOut(100)
    }

    this.reset = function() {
      $(this.settings.dom_id).html('')
      $(this.settings.dom_id).fadeOut(50)
      $(this.settings.form_id).val('')
      $(this.settings.del_id).fadeOut(100)
    }

    this.resetTimer = function(timer) {
      if (timer) clearTimeout(timer)
    }

    this.process = function(terms) {
      var currentSearchBox = this
      if (/\S/.test(terms)) {
        $.ajax({
          type: 'GET',
          dataType : currentSearchBox.settings.dataType,
          url: currentSearchBox.settings.url,
          data: {
            search: terms.trim()
          },
          complete: function(data) {
            $(currentSearchBox.settings.del_id).fadeIn(50)
            $(currentSearchBox.settings.dom_id).html(data.responseText)
            if (!$(currentSearchBox.settings.dom_id).is(':empty')) {
              $(currentSearchBox.settings.dom_id).fadeIn(100)
            }
            currentSearchBox.stop()
          }
        })
        return false
      } else {
        currentSearchBox.kill()
      }
    }
  }

  $.fn.hsearchbox = function(configs) {
    var hsearchbox = new HSearchBox(configs)
    hsearchbox.settings.onInitSearch()
    hsearchbox.idle()

    return this.each(function() {
      var $input = $(this)
      $input
        .keyup(function() {
          if ($input.val() != this.previousValue) {
            if (/\S/.test($input.val().trim()) && $input.val().trim().length > hsearchbox.settings.minChars) {
              hsearchbox.resetTimer(this.timer)
              this.timer = setTimeout(function() {
                hsearchbox.start()
                hsearchbox.process($input.val())
              }, hsearchbox.settings.delay)
            } else {
              hsearchbox.kill()
            }
            this.previousValue = $input.val()
          }
        })
    })
  }
})(jQuery)
Các bạn có thể vào link sau để xem hướng dẫn cách dùng plugin này.
https://github.com/hoangmirs/searchbox/
Đây là một plugin của Ryan Heath và mình lấy về tùy biến thêm các phần cho phù hợp.
Phần 3. Chiến thôi
3.1. Tạo ra các model để test
Mình tạo 2 models để test, đó là User và Badge tương ứng như dưới.
User
class CreateUsers < ActiveRecord::Migration[5.0]
  def change
    create_table :users do |t|
      t.string :username
      t.string :fullname
      t.string :email
      t.string :avatar

      t.timestamps
    end
  end
end
Badge
class CreateBadges < ActiveRecord::Migration[5.0]
  def change
    create_table :badges do |t|
      t.string :name
      t.string :image
      t.references :user, foreign_key: true

      t.timestamps
    end
  end
end
Sau đó chạy Seed như sau để có dữ liệu test:
Seed
puts "Creating users...."
10.times do |n|
  fullname = Faker::Name.name
  username = Faker::Internet.user_name
  email = Faker::Internet.email
  avatar = "/assets/user-#{n%6 + 1}"
  User.create! fullname: fullname, username: username, email: email, avatar: avatar
end
puts "Created users!"
puts "Creating badges...."
10.times do |n|
  name = Faker::Book.title
  image = "/assets/user-#{n%6 + 1}"
  user_id = rand(User.count) + 1
  Badge.create! name: name, image: image, user_id: user_id
end
puts "Created badges!"
Mình có để sẵn 6 cái hình ở trong thư mục app/assets/images nên có phần này:
avatar = "/assets/user-#{n%6 + 1}".
Các bạn muốn thì cứ lên mạng kiếm 6 cái hình đặt tên dạng user-num cũng ok.
3.2. Tạo controllers
Mình sẽ làm 3 khung tìm kiếm, khung đầu tiên sẽ tìm cả Users lẫn Badges, khung thứ nhìn tìm Users và khung thứ ba tìm Badges.
File routes.rb của mình sẽ có dạng như sau:
Rails.application.routes.draw do
  get "search(/:search)", to: "searches#index", as: :search
  resources :badges
  resources :users
end
Tạo SearchesController để tìm cả Users lẫn Badges
SeachesController
class SearchesController < ApplicationController
  def index
    q = params[:search]
    users = User.search(fullname_or_username_or_email_cont: q).result
    badges = Badge.search(name_or_user_fullname_cont: q).result
      .includes(:user)
    @items = users + badges
    respond_to do |format|
      format.js
      format.html
    end
  end
end
Ở đây mình dùng các pattern search của gem Ransack nên có khó hiểu thì tìm hiểu gem này nhé. Mình cũng trả về chung 1 mảng dữ liệu là @items, sau đó sẽ xử lí dưới view sau.
UsersController
class UsersController < ApplicationController
  before_action :set_user, only: [:show, :edit, :update, :destroy]

  # GET /users
  # GET /users.json
  def index
    q = params[:search]
    if q
      @users = User.search(fullname_or_username_or_email_cont: q).result
    else
      @users = User.all
    end
    respond_to do |format|
      format.js
      format.html
    end
  end

  # GET /users/1
  # GET /users/1.json
  def show
  end

  # GET /users/new
  def new
    @user = User.new
  end

  # GET /users/1/edit
  def edit
  end

  # POST /users
  # POST /users.json
  def create
    @user = User.new(user_params)

    respond_to do |format|
      if @user.save
        format.html { redirect_to @user, notice: 'User was successfully created.' }
        format.json { render :show, status: :created, location: @user }
      else
        format.html { render :new }
        format.json { render json: @user.errors, status: :unprocessable_entity }
      end
    end
  end

  # PATCH/PUT /users/1
  # PATCH/PUT /users/1.json
  def update
    respond_to do |format|
      if @user.update(user_params)
        format.html { redirect_to @user, notice: 'User was successfully updated.' }
        format.json { render :show, status: :ok, location: @user }
      else
        format.html { render :edit }
        format.json { render json: @user.errors, status: :unprocessable_entity }
      end
    end
  end

  # DELETE /users/1
  # DELETE /users/1.json
  def destroy
    @user.destroy
    respond_to do |format|
      format.html { redirect_to users_url, notice: 'User was successfully destroyed.' }
      format.json { head :no_content }
    end
  end

  private
    # Use callbacks to share common setup or constraints between actions.
    def set_user
      @user = User.find(params[:id])
    end

    # Never trust parameters from the scary internet, only allow the white list through.
    def user_params
      params.require(:user).permit(:username, :fullname, :email, :avatar)
    end
end
Cái này mình generate scaffold nên nó nhìu như vậy. Tương tự badges cũng thế. Hai cái này mình chỉ sửa lại action index thôi
BadgesController
class BadgesController < ApplicationController
  before_action :set_badge, only: [:show, :edit, :update, :destroy]

  # GET /badges
  # GET /badges.json
  def index
    q = params[:search]
    if q
      @badges = Badge.search(name_or_user_fullname_cont: q).result
    else
      @badges = Badge.all
    end
    respond_to do |format|
      format.js
      format.html
    end
  end

  # GET /badges/1
  # GET /badges/1.json
  def show
  end

  # GET /badges/new
  def new
    @badge = Badge.new
  end

  # GET /badges/1/edit
  def edit
  end

  # POST /badges
  # POST /badges.json
  def create
    @badge = Badge.new(badge_params)

    respond_to do |format|
      if @badge.save
        format.html { redirect_to @badge, notice: 'Badge was successfully created.' }
        format.json { render :show, status: :created, location: @badge }
      else
        format.html { render :new }
        format.json { render json: @badge.errors, status: :unprocessable_entity }
      end
    end
  end

  # PATCH/PUT /badges/1
  # PATCH/PUT /badges/1.json
  def update
    respond_to do |format|
      if @badge.update(badge_params)
        format.html { redirect_to @badge, notice: 'Badge was successfully updated.' }
        format.json { render :show, status: :ok, location: @badge }
      else
        format.html { render :edit }
        format.json { render json: @badge.errors, status: :unprocessable_entity }
      end
    end
  end

  # DELETE /badges/1
  # DELETE /badges/1.json
  def destroy
    @badge.destroy
    respond_to do |format|
      format.html { redirect_to badges_url, notice: 'Badge was successfully destroyed.' }
      format.json { head :no_content }
    end
  end

  private
    # Use callbacks to share common setup or constraints between actions.
    def set_badge
      @badge = Badge.find(params[:id])
    end

    # Never trust parameters from the scary internet, only allow the white list through.
    def badge_params
      params.require(:badge).permit(:name, :image, :user_id)
    end
end
3.3. Tạo views
Ở file _header.html.erb mình làm 3 thanh navbar:
<nav class="navbar navbar-default">
  <div class="row">
    <!-- Brand and toggle get grouped for better mobile display -->
    <div class="col-md-2">
      <a class="navbar-brand" href="#">All</a>
    </div>

    <!-- Collect the nav links, forms, and other content for toggling -->
    <div class="col-md-8">
      <%= form_tag search_path, method: :get,
        class: "navbar-form search-form", id: "livesearch_form" do %>
        <div class="form-group dropdown">
          <%= text_field_tag :search, params[:search],
            class: "form-control dropdown-toggle",
            placeholder: "Search...",
            "data-toggle": "dropdown", "aria-hidden": :true,
            autocomplete: :off, required: true, id: "livesearch_input" %>
          <ul class="dropdown-menu">
            <div id="livesearch_dom"></div>
          </ul>
        </div>
        <%= button_tag type: :submit, class: "btn btn-default" do %>
          <i class="fa fa-search"></i>
        <% end %>
      <% end %>
    </div><!-- /.navbar-collapse -->
  </div><!-- /.container-fluid -->
</nav>

<nav class="navbar navbar-default">
  <div class="row">
    <!-- Brand and toggle get grouped for better mobile display -->
    <div class="col-md-2">
      <a class="navbar-brand" href="#">Users</a>
    </div>

    <!-- Collect the nav links, forms, and other content for toggling -->
    <div class="col-md-8">
      <%= form_tag users_path, method: :get,
        class: "navbar-form search-form", id: "livesearch_user_form" do %>
        <div class="form-group dropdown">
          <%= text_field_tag :search, params[:search],
            class: "form-control dropdown-toggle",
            placeholder: "Search users...",
            "data-toggle": "dropdown", "aria-hidden": :true,
            autocomplete: :off, required: true, id: "livesearch_user_input" %>
          <ul class="dropdown-menu">
            <div id="livesearch_user_dom"></div>
            <div id="livesearch_user_loading"></div>
          </ul>
        </div>
        <%= button_tag type: :submit, class: "btn btn-default" do %>
          <i class="fa fa-search"></i>
        <% end %>
      <% end %>
    </div><!-- /.navbar-collapse -->
  </div><!-- /.container-fluid -->
</nav>

<nav class="navbar navbar-default">
  <div class="row">
    <!-- Brand and toggle get grouped for better mobile display -->
    <div class="col-md-2">
      <a class="navbar-brand" href="#">Badges</a>
    </div>

    <!-- Collect the nav links, forms, and other content for toggling -->
    <div class="col-md-8">
      <%= form_tag badges_path, method: :get,
        class: "navbar-form search-form", id: "livesearch_badge_form" do %>
        <div class="form-group dropdown">
          <%= text_field_tag :search, params[:search],
            class: "form-control dropdown-toggle",
            placeholder: "Search badges...",
            "data-toggle": "dropdown", "aria-hidden": :true,
            autocomplete: :off, required: true, id: "livesearch_badge_input" %>
          <ul class="dropdown-menu">
            <div id="livesearch_badge_dom"></div>
            <div id="livesearch_badge_loading"></div>
          </ul>
        </div>
        <%= button_tag type: :submit, class: "btn btn-default" do %>
          <i class="fa fa-search"></i>
        <% end %>
      <% end %>
    </div><!-- /.navbar-collapse -->
  </div><!-- /.container-fluid -->
</nav>
Ban đầu chỉ định thêm một cái thôi, nhưng nhác quá nên quất cả 3 cái trong này luôn.
Bây giờ ình sẽ làm view kết quả để hiển thị:
Mình tạo folder app/views/shared và tạo file _search.html.erb. Mục đích là định nghĩa cái view kết quả khi tìm kiếm ở khung tìm kiếm cả Users và Badges.
<% if items.blank? %>
  <li>
    <%= link_to search_path(params[:search]),
      class: "btn btn-default btn-block" do %>
      <%= "No results for #{params[:search]}" %>
    <% end %>
  </li>
<% else %>
  <div class="scrollable-menu">
    <% items.each do |item| %>
      <% if item.is_a? User %>
        <%= render "users/search_item", user: item %>
      <% elsif item.is_a? Badge %>
        <%= render "badges/search_item", badge: item %>
      <% end %>
    <% end %>
  </div>
  <li class="divider"></li>
  <li>
    <%= link_to search_path(params[:search]),
      class: "btn btn-default btn-block" do %>
      <%= "See more #{items.size} for #{params[:search]}" %>
    <% end %>
  </li>
<% end %>
Như khi nãy mình có nói là mình truyền về @items, thì trong này mình sẽ check xem từng từng item đó là gì và hiển thị partial tương ứng.
Tiếp theo sẽ đến tạo partial.
Mình tạo thêm partial search_item cho users bằng cách tạo file _search_item.html.erb trong folder app/views/users
_search_item.html.erb
<li class="search-item">
  <%= link_to user do %>
    <div class="col-md-3">
      <%= image_tag user.avatar, class: "img-responsive" %>
    </div>
    <div class="col-md-9">
      <div class="row">
        <strong><%= user.fullname %></strong>
      </div>
      <div class="row">
        <div class="col-md-8">
          <%= user.email %>
        </div>
      </div>
      <div class="row">
        <i><%= User.name %></i>
      </div>
    </div>
    <div class="clearfix"></div>
  <% end %>
</li>
Tương tự cho Badges, tạo file _search_item.html.erb trong folder app/views/badges
_search_item.html.erb
<li class="search-item">
  <%= link_to badge do %>
    <div class="col-xs-12 col-sm-3 col-md-3">
      <%= image_tag badge.image, class: "img-responsive" %>
    </div>
    <div class="col-xs-12 col-sm-9 col-md-9">
      <div class="row">
        <strong><%= badge.name %></strong>
      </div>
      <div class="row">
        <div class="col-md-8">
          <%= badge.user.fullname %>
        </div>
      </div>
      <div class="row">
        <i><%= Badge.name %></i>
      </div>
    </div>
    <div class="clearfix"></div>
  <% end %>
</li>
Vậy là xong cho view. Tiếp theo chúng ta sẽ thêm vài đoạn JS để nó chạy nào.
3.4. Tạo các đoạn JavaScript
3.4.1. Khởi tạo searchbox
Chúng ta sẽ khởi tạo các searchbox bằng cách tạo 1 file js ở app/assets/javascripts và đặt tên tùy ý. Ở đây mình đặt là header.js vì mấy khung search của mình để ở header  )
)
header.js
$(document).ready(function() {
  $('#livesearch_input').hsearchbox({
    url: $('#livesearch_form').attr('action'),
    param: 'search',
    dom_id: '#livesearch_dom',
    loading_css: '#livesearch_loading',
    onInitSearch: function() {
      console.log("search init:" + this.url);
    },
    onStartSearch: function() {
      console.log("search start");
    },
    onFinishSearch: function() {
      console.log("search finish");
    }
  });
  $('#livesearch_user_input').hsearchbox({
    url: $('#livesearch_user_form').attr('action'),
    param: 'search',
    dom_id: '#livesearch_user_dom',
    loading_css: '#livesearch_user_loading',
    onInitSearch: function() {
      console.log("user init:" + this.url);
    },
    onStartSearch: function() {
      console.log("user start");
    },
    onFinishSearch: function() {
      console.log("user finish");
    }
  });
  $('#livesearch_badge_input').hsearchbox({
    url: $('#livesearch_badge_form').attr('action'),
    param: 'search',
    dom_id: '#livesearch_badge_dom',
    loading_css: '#livesearch_badge_loading',
    onInitSearch: function() {
      console.log("badge init:" + this.url);
    },
    onStartSearch: function() {
      console.log("badge start");
    },
    onFinishSearch: function() {
      console.log("badge finish");
    }
  });
});
Phần config này các bạn có thể tìm hiểu thêm ở link github của plugin mình gửi ở trên.
3.4.2. Các file JS để render kết quả
Mình có 3 files JS tất cả, tương ứng với 3 action index của 3 controllers phía trên. Những files này để trả về kết quả cho plugin và hiển thị ra.
app/views/searches/index.js.erb
<%= render "shared/search", items: @items %>
app/views/users/index.js.erb
<%= render "shared/search", items: @users %>
app/views/badges/index.js.erb
<%= render "shared/search", items: @badges %>
3.5. Bonus thêm css
Mình có tạo file app/assets/stylesheets/livesearch.scss để custom cái khung search cho dễ nhìn tí. Các bạn có thể copy về để thử.
**livesearch.scss
.scrollable-menu {
  height: auto;
  max-height: 500px;
  overflow-x: hidden;
}

li.search-item {
  height: 75px;
  margin: 10px;
  &:hover {
    background-color: #ecf0f1;
    cursor:pointer;
  }
  a:link {
   color:inherit;
  }
}

#livesearch {
  a {
    color: #66757f;
  }
}

.search-form {
  display: table;
  width: 500px;
  background-color: #fff;
  padding: 0;
  .form-group {
    display: table-cell;
    width: 100%;
    .form-control {
      width: 100%;
    }
  }
    button {
      display: table-cell;
      width: 70px;
    }
}

.dropdown-menu {
  padding: 0;
  border: none;
  width: 100%;
}
Vậy là xong. Chúng ta đã có bộ 3 khung tìm kiếm ngon lành rồi (chuckle)
Phần 3. Kết luận
Qua bài chia sẻ bên trên, mình mong các bạn sẽ có thể tự tùy biến được cho mình một khung tìm kiếm đơn giản. Nếu thấy bài viết bổ ích, các bạn hãy ủng hộ cho mình nhé.
Dưới đây mình note lại link github của cái plugin và example mình làm mẫu. Các bạn có thể lấy về vọc thử:
https://github.com/hoangmirs/searchbox/
https://github.com/hoangmirs/hsearchbox-example
Nếu thấy hay thì nhớ Star cho mình. Cảm ơn các bạn.
All rights reserved
