Sử dụng React Native và GraphQL để xây dựng ứng dụng Todo List
Bài đăng này đã không được cập nhật trong 8 năm
Trong các bài trước, mình đã viết về sử dụng GraphQL và React, Apollo Client để xây dựng các ứng dụng Web.
Hôm nay mình xin phép dịch một bài viết sử dụng GraphQL kết hợp với React Native, Apollo Client để xây dựng một App Native. Để thấy được giờ đây chúng ta có thể code ra các sản phẩm chỉ cần tới một ngôn ngữ chính, đó là Javascript. Thật thú vị phải không nào?
Nguồn bài viết: https://blog.hasura.io/tutorial-fullstack-react-native-with-graphql-and-authentication-18183d13373a
Bài viết này trong Blog của công ty Hasura, cung cấp dịch vụ GraphQL backend với database Postgres.
Mình cùng bắt đầu nhé!
Mô tả
Về cơ bản sản phẩm cuối cùng sẽ như thế này. Chúng ta sẽ có 1 App Native: todos-list giúp quản lý các công việc.
- Xác thực người dùng (đăng nhập, đăng xuất, phân quyền cho tài nguyên..)
- Thêm, sửa, xoá công việc
todo - Đánh dấu hoàn thành công việc

Các công nghệ chính:
- React Native chắc chắn rồi

- Apollo Client để kết hợp GraphQL với React
- GraphQL backend sử dụng nền tảng Hasura
- React Native Auth Boilerplate để khởi tạo app, đã cài đặt sẵn tính năng Authenticate
Xây dựng backend GraphQL với Hasura
Sử dụng Hasura khởi tạo project để code backend với GraphQL
$ hasura quickstart base todo-app-backend
Giống như Heroku chúng ta sẽ cần đẩy code lên repo của Hasura
$ cd todo-app-backend
$ git add .
$ git commit -m "First commit"
$ git push hasura master
Tạo bảng dữ liệu
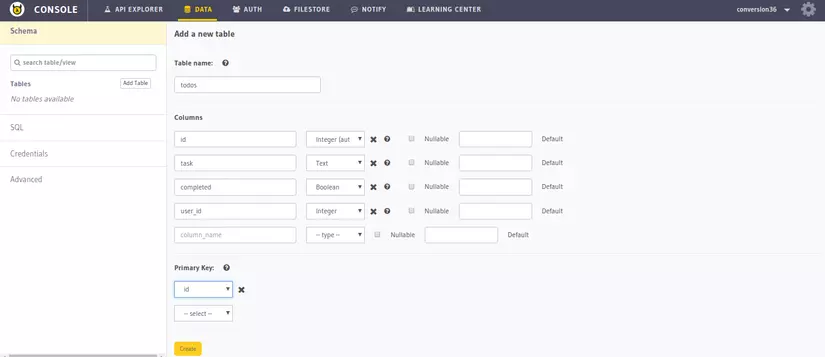
Để tạo app todos list, chúng ta sẽ cần một bảng với todos với những trường sau
todos
+-----------+------------------------------+
|  column   |       type                   |
+-----------+------------------------------+
| id        | serial NOT NULL primary key  |
| task      | text NOT NULL                |
| completed | boolean NOT NULL             |
| user_id   | integer NOT NULL             |
+-----------+------------------------------+
Mô tả ý nghĩa các trường (column trong bảng dữ liệu)
- id: Kiểu dữ liệu nguyên và duy nhất (integer, unique) dùng để xác định mỗi công việc (task). Đây là khoá chính (primary key) của bảng.
- task: Kiểu văn bản (text) dùng để mô tả nội dung công việc.
- completed: Kiểu boolean dùng để đánh dấu công việc đã hoàn thành chưa.
- user_id: Kiểu khoá ngoài (foreign key) để liên kết với bảng
user, người thực hiện công việc đó.
Giờ thì tạo bảng dữ liệu phía trên trong backend Hasura của chúng ta thôi.
Chạy lệnh sau trong thư mục todo-app-backend để chạy server
$ hasura api-console
Mở trình duyệt với đường link hiện ra trong terminal để tới giao diện của Hasura
Mở tab Data trên header sau đó click vào nút “Create Table”, và bắt đầu thêm các trường dữ liệu (tên và kiểu dữ liệu, cũng như các điều kiện)
GraphQL backend đã sẵn sàng ngay khi bạn thêm một bảng dữ liệu mới. Bạn có thể thử các queries và mutations ở tab API Explorer
Cài đặt quyền truy cập cho bảng dữ liệu
Mặc định thì mỗi bảng được tạo ra bởi nền tảng Hasura chỉ có được trao quyền cho admin. Điều đó có nghĩa là chỉ có admin mới được phép truy vấn, thêm, chỉnh sửa, xoá dữ liệu từ các bảng.
Mỗi user được tạo bởi nền tảng Hasura authentication APIs mặc định được trao quyền user . Bởi vì chúng ta cần sử dụng tính năng xác thực người dùng của Hasura authentication APIs cho react-native app của chúng ta, nên chúng ta cần thêm quyền cho bảng todos. Những quyền đó nên cho phép người dùng có thể truy vấn, thêm, sửa và xoá những todos của họ. Thật may, điều này có thể thực hiện hoàn toàn dễ dàng với API Console.
Vào tab Data, trong API Console và chọn bảng todos ở panel phía bên trái. Bạn có thể chỉnh sửa quyền ở tab Permissions.
Click on insert and add the permissions as shown below
Click vào insert và thêm các quyền như dưới đây.
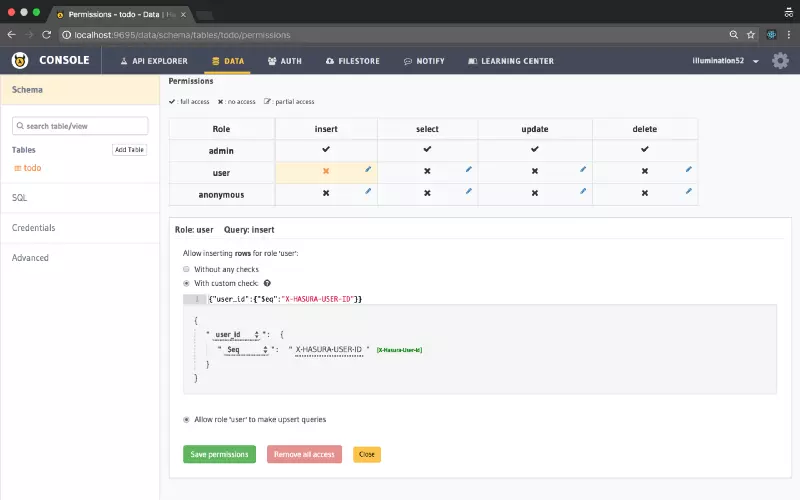

Quyền phía trên có nghĩa là mỗi mỗi một row được insert vào bảng, thì user_id nên giống với id của user của Hasura, người thực hiện request insert đó.
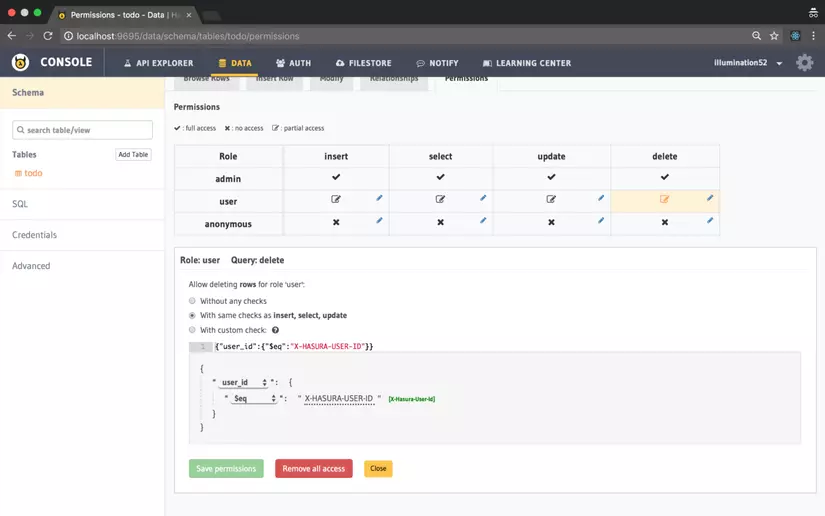
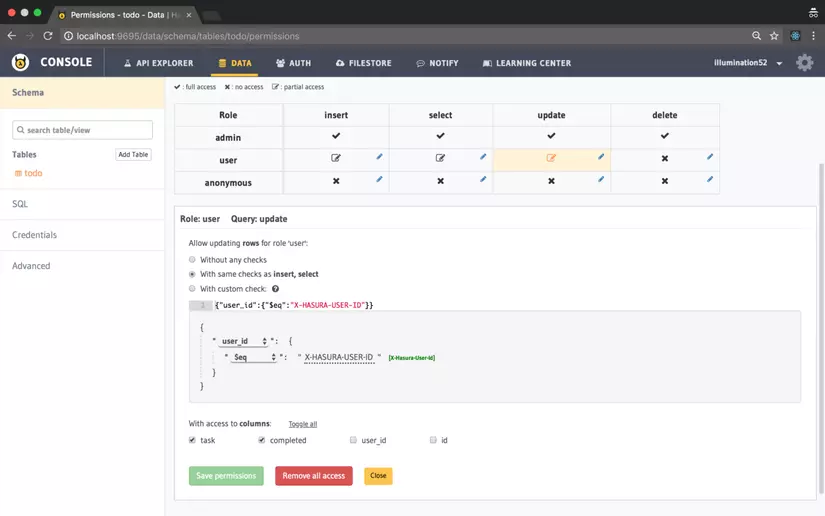
Tương tự, cài đặt quyền select, update và delete
Viết các GraphQL queries và mutations
Giờ hãy tạo một file, đặt tên là queries.js trong folder src để lưu lại tất cả các GraphQL queries và mutations mà chúng ta cần trong app. Chúng ta sẽ khai báo queries như gql strings. gql sẽ viết queries với dưới dạng template literals ES2015 và biên dịch chúng ra các AST với gql tag.
File queries.js sẽ như thế này:
import gql from 'graphql-tag';

// Query to fetch all the to-dos
const FETCH_TODOS = gql`
  query fetch_todos{
    todos {
      id
      task
      completed
      user_id
    }
  }
`;

// Mutation to insert a to-do.
const INSERT_TODO = gql`
  mutation insert_todos ($objects: [todos_input!]){
    insert_todos(objects: $objects) {
      affected_rows
      returning {
        id
      }
    }
  }
`;

// Mutation to update a to-do
const UPDATE_TODO = gql`
  mutation update_todos{
    update_todos(where: {id: {_eq: $todo_id}} _set: {completed: $completed}) {
      affected_rows
    }
  }
`;

// Mutation to delete a to-do
const DELETE_TODO = gql`
  mutation delete_todos{
    delete_todos(where: {id: {_eq: $todo_id}}) {
      affected_rows
    }
  }
`;

// Export all the queries and mutations
export {
  INSERT_TODO,
  FETCH_TODOS,
  UPDATE_TODO,
  DELETE_TODO
}
Tạo Query component đầu tiên
import {FETCH_TODOS} from './queries';
import { graphql, Query } from 'react-apollo';
import {FlatList, StyleSheet, Alert, Text, View} from 'react-native';

const TodoListComponent = () => (
  <Query query={FETCH_TODOS}>
    {({loading, error, data}) => {
      //Show an alert if there is an error
      if (error) {
        Alert.alert("Error", "Could not fetch todos");
        console.log(error);
        return null;
      }

      // Show a loading screen if the query is not yet finished
      if (loading) {
        return (
          <Text>Please Wait</Text>
        )
      }

      // Render the list
      return (
        <FlatList
          data={data.todos}
          keyExtractor = {(item, index) => index}
          renderItem={(todoItem) => {
            return (
              <View style={styles.todoItem} key={todoItem.index}>
                <Text> {todoItem.task} </Text>
              </View>
            );
          }}
        />
      );
    }}
  </Query>
)

// Some styles
const styles = StyleSheet.create({
  todoItem: {
    alignItems: 'center',
    padding: 8,
    width: 320,
    borderBottomWidth: 1.5,
    borderColor: '#e0e0e0',
    backgroundColor: '#fff',
    borderWidth: 1,
    flex: 1,
    flexDirection: 'row',
  }
})

//Export the component
export default TodoListComponent;
Tạo Mutation component đầu tiên
import React, { Component } from 'react';
import {INSERT_TODO, FETCH_TODOS} from './queries';
import { graphql, Mutation } from 'react-apollo';
import {Button, Keyboard} from 'react-native';

// The "update" prop is used to update the cache after the mutation so that the mutations reflect in the UI
const AddButton = (props) => {
  return (
    <Mutation
      mutation={INSERT_TODO}
      update= {(cache, {data: {insert_todos}}) => {
        const data = cache.readQuery({ query: FETCH_TODOS});
        const newTodo = {
          task: props.task,
          completed: false,
          user_id: props.userId,
          id: insert_todos.returning[0].id
        }
        data.todos.push(newTodo);
        cache.writeQuery({query: FETCH_TODOS, data})
      }}
    >
      {(insert_todos, {data}) => (
        <Button
          title="Insert Todo"
          style={props.style}
          onPress={() => {
            // "insert_todos" function takes a variable object to perform a mutation
            insert_todos({
              variables: {
                objects: [{
                  task: props.task,
                  completed: false,
                  user_id: props.userId
                }]
              }
            });
            // Clear the keyboard
            props.handleTextChange("");
            // Dismiss the keyboard
            Keyboard.dismiss();
          }}
        />
      )}
    </Mutation>
  )
}

// Export the component
export default AddButton;
import React, { Component } from 'react';
import {DELETE_TODO, FETCH_TODOS} from './queries';
import { graphql, Mutation } from 'react-apollo';
import {Button} from 'react-native';

// The "update" prop is used to update the cache after the mutation so that the mutations reflect in the UI
const DeleteButton = (props) => {
  return (
    <Mutation
      mutation={DELETE_TODO}
      update= {(cache) => {
        const data = cache.readQuery({ query: FETCH_TODOS});
        cache.writeQuery({
          query: FETCH_TODOS,
          data: {
            ...data,
            todos: data.todos.filter((todo) => (props.todo.id !== todo.id))
          }
        })
      }}
    >
      {(delete_todos, {data}) => (
        <Button
          title="Delete"
          style={props.style}
          onPress={() => {
            // "delete_todos" function takes a variable object to perform a mutation
            delete_todos({
              variables: {
                todo_id: props.todo.id
              }
            });
          }}
        />
      )}
    </Mutation>
  )
}

export default DeleteButton;
import React, { Component } from 'react';
import {UPDATE_TODO, FETCH_TODOS} from './queries';
import {StyleSheet, Text} from 'react-native';
import { graphql, Mutation } from 'react-apollo';

// The "update" prop is used to update the cache after the mutation so that the mutations reflect in the UI
const TodoTextItem = (props) => {
  const textStyle = props.todo.completed ? styles.completedText : styles.incompleteText;
  return (
    <Mutation
      mutation={UPDATE_TODO}
      update={(cache) => {
        const data = cache.readQuery({ query: FETCH_TODOS});
        cache.writeQuery({
          query: FETCH_TODOS,
          data: {
            ...data,
            todos: data.todos.map((todo) => {
              if (todo.id === props.todo.id) {
                return {
                  ...todo,
                  completed: !todo.completed
                }
              }
              return todo;
            })
          }
        })
      }}
    >
      {
        (update_todos) => (
          <Text
            style={textStyle}
            onPress={() => {
              // "update_todos" function takes a variable object to perform a mutation
              update_todos({
                variables: {
                  todo_id: props.todo.id,
                  completed: !props.todo.completed
                }
              })
            }}
          >
            {props.todo.task}
          </Text>
        )
      }
    </Mutation>
  )
}

const styles = StyleSheet.create({
  completedText: {
    flex:1,
    textDecorationLine: 'line-through'
  },
  incompleteText: {
    flex: 1
  }
})

export default TodoTextItem;
Kết hợp chúng lại
import React, { Component } from 'react';
import {FETCH_TODOS} from './queries';
import { graphql, Query } from 'react-apollo';
import {FlatList, StyleSheet, Alert, Text, View} from 'react-native';
import DeleteButton from './DeleteButton';
import TodoTextItem from './TodoTextItem'

const TodoListComponent = () => (
  <Query query={FETCH_TODOS}>
    {({loading, error, data}) => {
      if (error) {
        Alert.alert("Error", "Could not fetch todos");
        console.log(error);
        return null;
      }

      if (loading) {
        return (
          <Text>Please Wait</Text>
        )
      }

      return (
        <FlatList
          data={data.todos}
          keyExtractor = {(item, index) => index}
          renderItem={(todoItem) => {
            return (
              <View style={styles.todoItem} key={todoItem.index}>
                <TodoTextItem todo={todoItem.item} />
                <DeleteButton todo={todoItem.item} />
              </View>
            );
          }}
        />
      );
    }}
  </Query>
)

const styles = StyleSheet.create({
  todoItem: {
    alignItems: 'center',
    padding: 8,
    width: 320,
    borderBottomWidth: 1.5,
    borderColor: '#e0e0e0',
    backgroundColor: '#fff',
    borderWidth: 1,
    flex: 1,
    flexDirection: 'row',
  }
})

export default TodoListComponent;
import React, { Component } from 'react';
import { StyleSheet, TextInput, Button, View} from 'react-native';
import { Constants } from 'expo';
import AddButton from './AddButton';
import TodoListComponent from './TodoListComponent';

export default class App extends Component {

  state = {
    text: ''
  }

  handleTextChange = (text) => {
    this.setState({
      text
    })
  }

  logout = async () => {
    try {
      await this.props.client.resetStore();
    } catch (e) {
      console.log(e);
    }
    this.props.logoutCallback();
  }

  render() {
    return (
      <View style={styles.container}>
        <View style={styles.formView}>
          <TextInput
            style={styles.inputForm}
            value={this.state.text}
            onChangeText={this.handleTextChange}
            placeholder="Input todo"/>
          <AddButton task={this.state.text} userId={this.props.session.id} handleTextChange={this.handleTextChange}/>
        </View>
        <TodoListComponent />
        <Button title="Logout" onPress={this.logout}/>
      </View>
    );
  }
}

const styles = StyleSheet.create({
  container: {
    flex: 1,
    alignItems: 'center',
    justifyContent: 'space-around',
    paddingTop: Constants.statusBarHeight + 20,
    paddingBottom: 20,
    backgroundColor: '#eee',
  },
  formView: {
    borderBottomWidth: 1,
    borderColor: '#ccc',
    paddingBottom: 8,
  },
  inputForm: {
    backgroundColor: '#fff',
    width: 320,
    height: 40,
    padding: 8,
    marginBottom: 8,
  }
});
Chạy ứng dụng thôi
Giờ là bước cuối cùng rồi. Các bạn mở terminal và chạy 2 lệnh này để xem sản phẩm của chúng ta nhé!
Ứng dụng Android:
$ react-native run-android
Ứng dụng IOS:
$ react-native run-ios
Tóm lược
Chúng ta đã hoàn thành một sản phẩm todos-list sử dụng GraphQL và React Native 
Nếu các bạn làm theo các bước này và có được sản phẩm cho riêng mình thì nhớ chụp ảnh màn hình và comment ở phía dưới nhé!
Nếu không thì cũng mong bài viết này giúp các bạn có thêm tài liệu khi nghiên cứu bộ công nghệ mới và rất thú vị này. Cám ơn các bạn
All rights reserved
