Notion nhận dữ liệu đăng ký Chích Ngừa từ Nodejs
Bài đăng này đã không được cập nhật trong 4 năm
Hôm nay chúng ta sẽ học cách gửi dữ liệu đến Notion bằng API
Khởi tạo dữ án
Ở đây tôi sử dụng "Express application generator" để có thể tạo nhanh dự án Nodejs & Express
Steps:
1/ Cài đặt express-generator
npm install -g express-generator
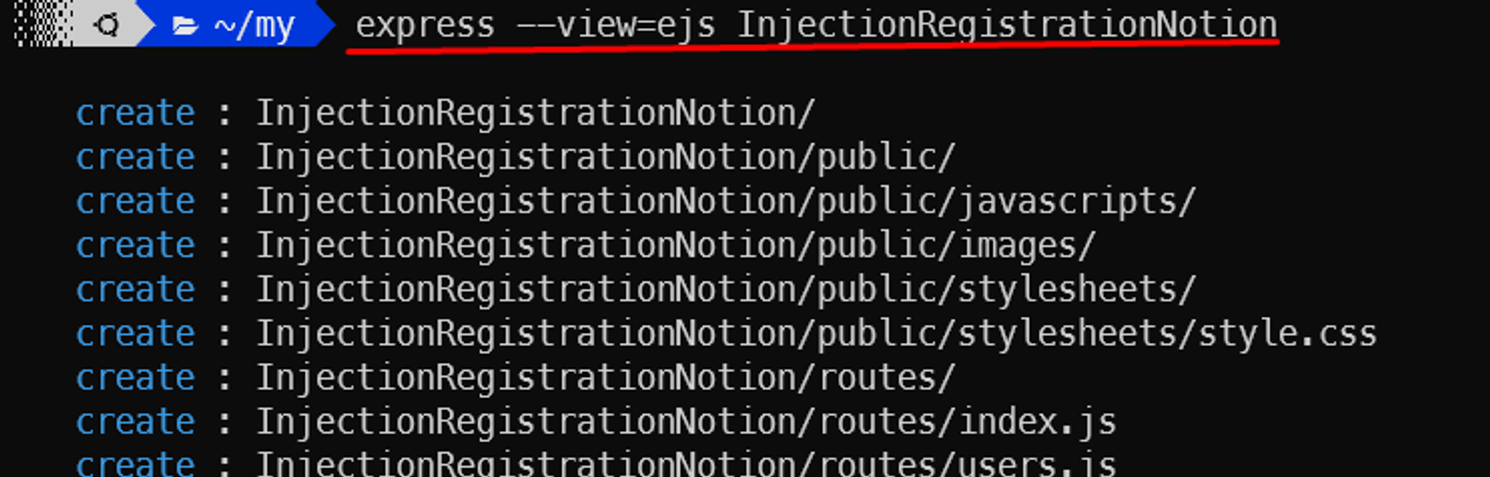
2/ Khời tạo dự án với tên InjectionRegistrationNotion
express **--view=ejs** **InjectionRegistrationNotion**
cd InjectionRegistrationNotion
npm install
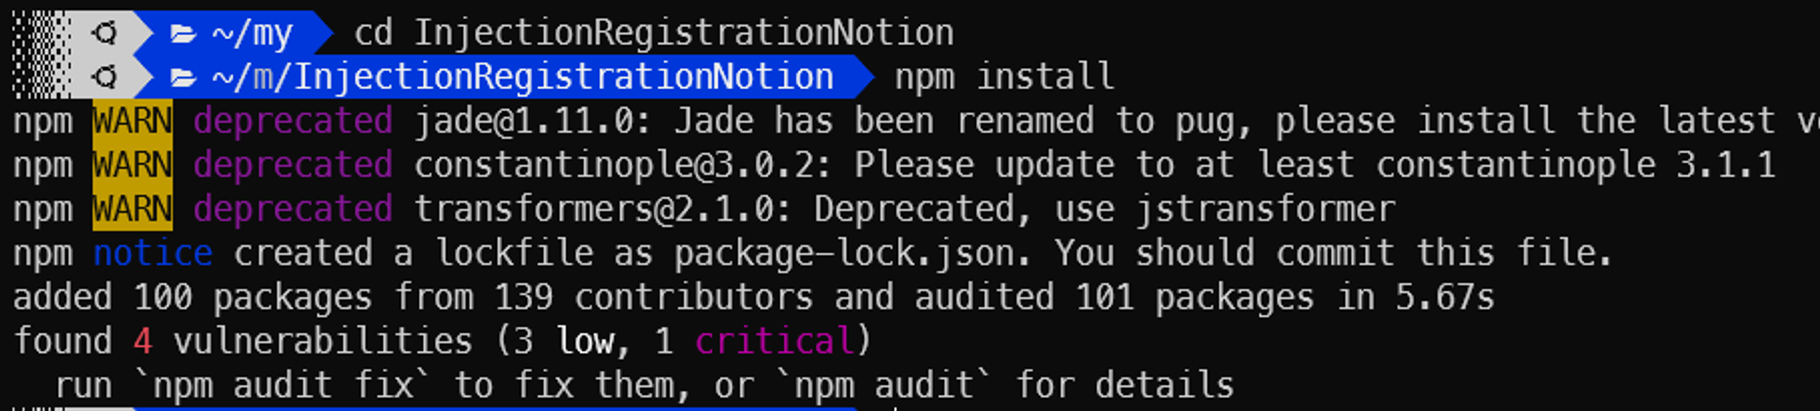
3/ Khởi chạy server bằng lệnh
npm start // for start server this project
Truy cập localhost:3000
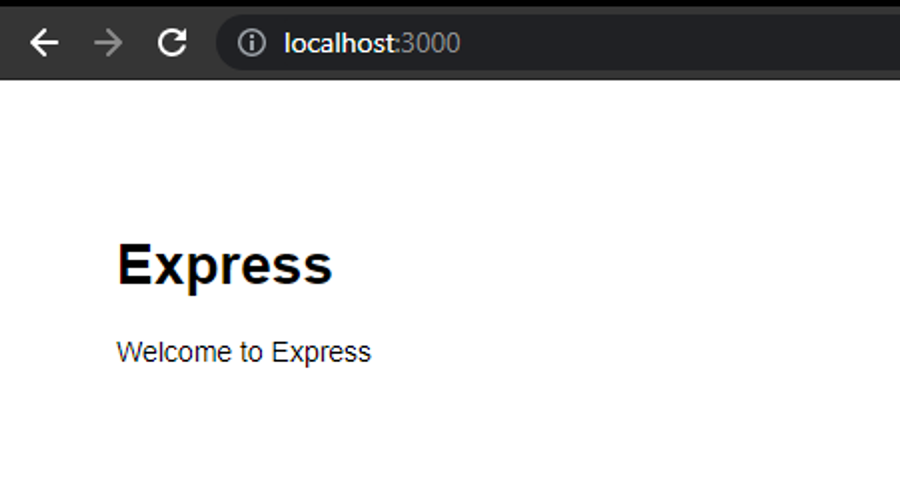
Màn hình xác nhận dự án đã hoạt động
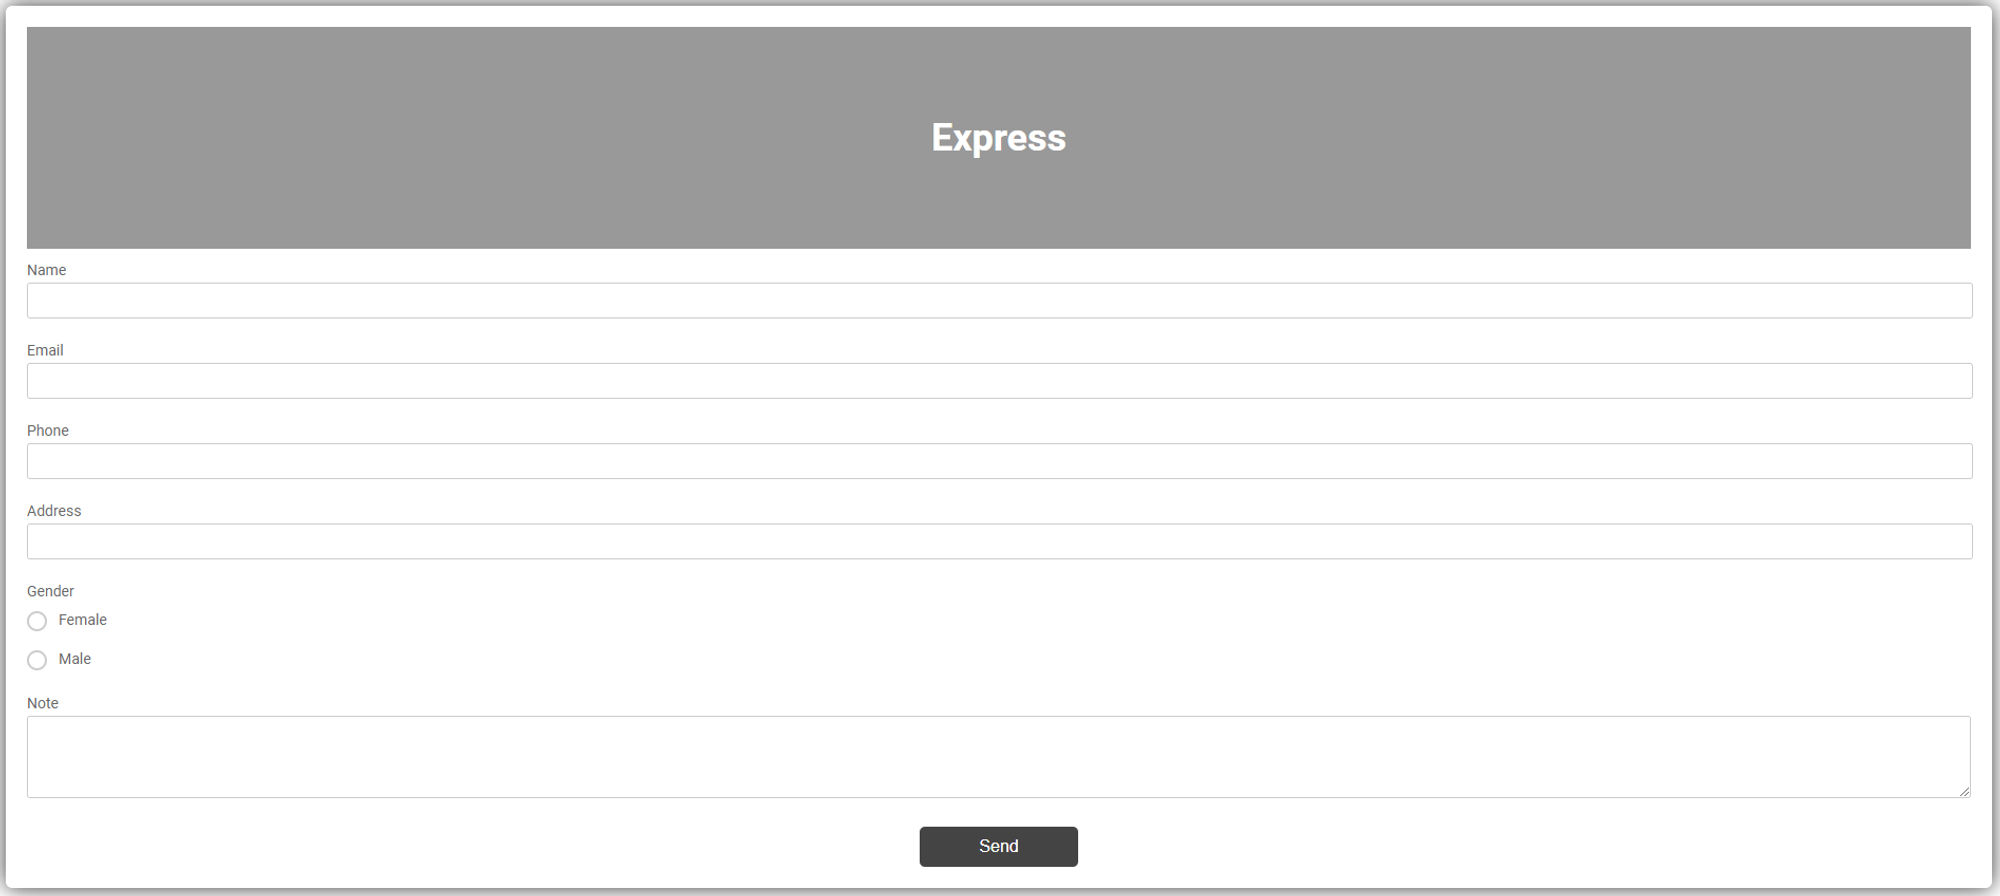
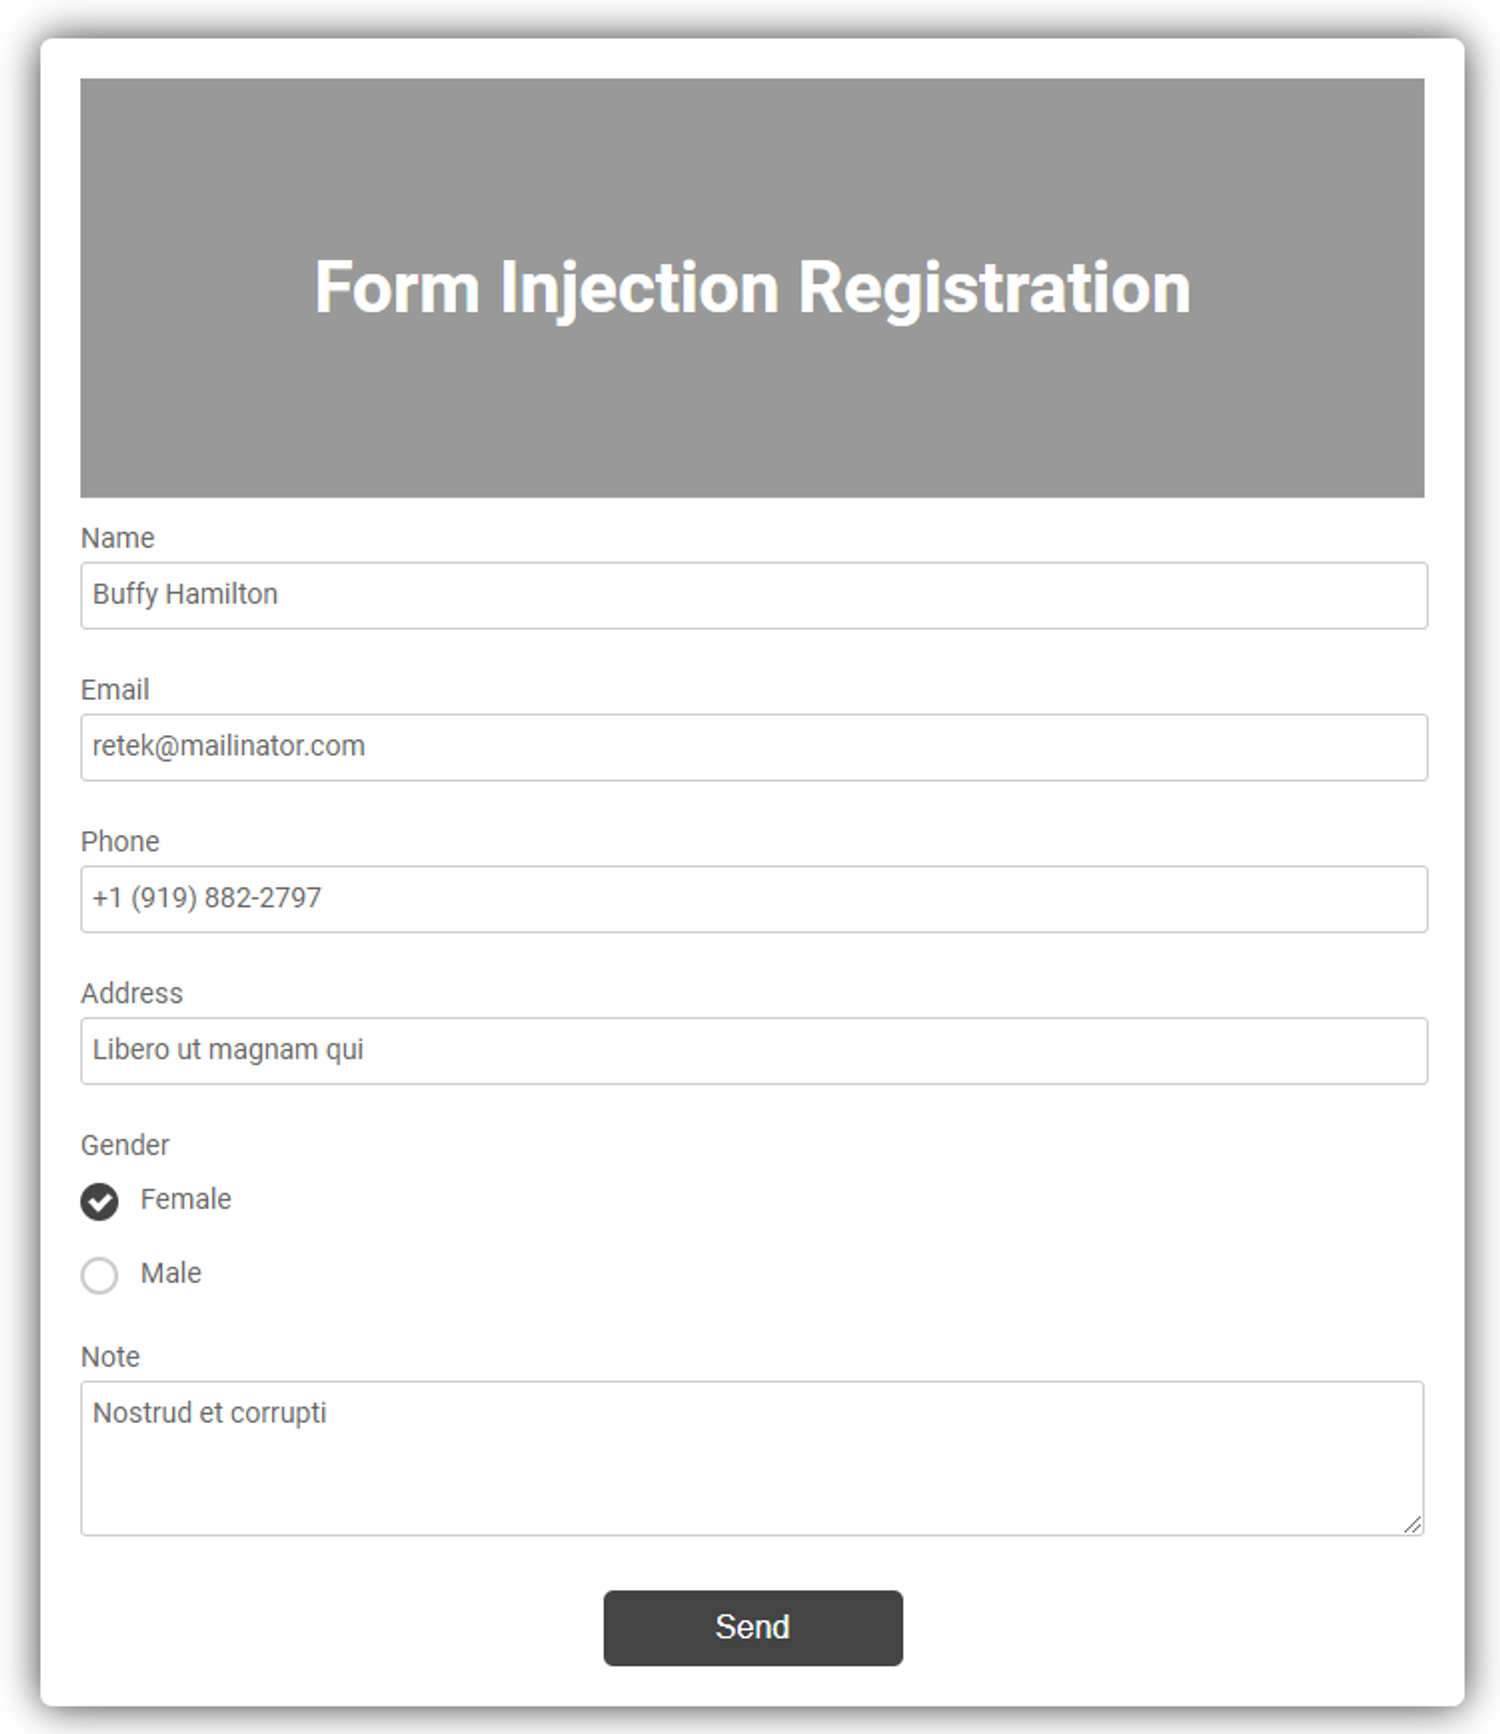
Tạo Form HTML đăng ký tim ngừa
Để làm giao diện mình sử dụng ejs engnie ví nó giống với HTML thuần nên dễ tiếp cận
Tại file index.jes trong thư mục views
<!DOCTYPE html>
<html>
<head>
  <title><%= title %></title>
  <link href="https://fonts.googleapis.com/css?family=Roboto:300,400,500,700" rel="stylesheet">
  <link rel="stylesheet" href="https://use.fontawesome.com/releases/v5.5.0/css/all.css">
  <link rel="stylesheet" href="./stylesheets/style.css">
</head>
<body>
<div class="testbox">
  <form action="/" method="post">
    <div class="banner">
      <h1><%= title %></h1>
    </div>
    <div class="item">
      <p>Name</p>
      <div class="name-item">
        <input type="text" name="name"/>
      </div>
    </div>
    <div class="item">
      <p>Email</p>
      <input type="text" name="email"/>
    </div>
    <div class="item">
      <p>Phone</p>
      <input type="text" name="phone"/>
    </div>
    <div class="item">
      <p>Address</p>
      <input type="text" name="address"/>
    </div>
    <div class="question">
      <p>Gender</p>
      <div class="question-answer">
        <div>
          <input type="radio" value="0" id="radio_2" name="sex"/>
          <label for="radio_2" class="radio"><span>Female</span></label>
        </div>
        <div>
          <input type="radio" value="1" id="radio_1" name="sex"/>
          <label for="radio_1" class="radio"><span>Male</span></label>
        </div>
      </div>
    </div>
    <div class="item">
      <p>Note</p>
      <textarea name="note" rows="3"></textarea>
    </div>

    <div class="btn-block">
      <button type="submit" href="/">Send</button>
    </div>
  </form>
</div>
</body>
</html>
Tại file "public/stylesheets/style.css"
html, body {
    min-height: 100%;
}

body, div, form, input, select, textarea, p {
    padding: 0;
    margin: 0;
    outline: none;
    font-family: Roboto, Arial, sans-serif;
    font-size: 14px;
    color: #666;
    line-height: 22px;
}

h1 {
    position: absolute;
    margin: 0;
    font-size: 36px;
    color: #fff;
    z-index: 2;
}

.testbox {
    display: flex;
    justify-content: center;
    align-items: center;
    height: inherit;
    padding: 20px;
}

form {
    width: 100%;
    padding: 20px;
    border-radius: 6px;
    background: #fff;
    box-shadow: 0 0 20px 0 #333;
}

.banner {
    position: relative;
    height: 210px;
    background-size: cover;
    display: flex;
    justify-content: center;
    align-items: center;
    text-align: center;
}

.banner::after {
    content: "";
    background-color: rgba(0, 0, 0, 0.4);
    position: absolute;
    width: 100%;
    height: 100%;
}

input, textarea, select {
    margin-bottom: 10px;
    border: 1px solid #ccc;
    border-radius: 3px;
}

input {
    width: calc(100% - 10px);
    padding: 5px;
}

select {
    width: 100%;
    padding: 7px 0;
    background: transparent;
}

textarea {
    width: calc(100% - 12px);
    padding: 5px;
}

.item:hover p, .item:hover i, .question:hover p, .question label:hover, input:hover::placeholder {
    color: #333;
}

.item input:hover, .item select:hover, .item textarea:hover {
    border: 1px solid transparent;
    box-shadow: 0 0 6px 0 #333;
    color: #333;
}

.item {
    position: relative;
    margin: 10px 0;
}

input[type="date"]::-webkit-inner-spin-button {
    display: none;
}

.item i, input[type="date"]::-webkit-calendar-picker-indicator {
    position: absolute;
    font-size: 20px;
    color: #a9a9a9;
}

.item i {
    right: 1%;
    top: 30px;
    z-index: 1;
}

[type="date"]::-webkit-calendar-picker-indicator {
    right: 0;
    z-index: 2;
    opacity: 0;
    cursor: pointer;
}

input[type="time"]::-webkit-inner-spin-button {
    margin: 2px 22px 0 0;
}

input[type=radio], input.other {
    display: none;
}

label.radio {
    position: relative;
    display: inline-block;
    margin: 5px 20px 10px 0;
    cursor: pointer;
}

.question span {
    margin-left: 30px;
}

label.radio:before {
    content: "";
    position: absolute;
    top: 2px;
    left: 0;
    width: 15px;
    height: 15px;
    border-radius: 50%;
    border: 2px solid #ccc;
}

#radio_5:checked ~ input.other {
    display: block;
}

input[type=radio]:checked + label.radio:before {
    border: 2px solid #444;
    background: #444;
}

label.radio:after {
    content: "";
    position: absolute;
    top: 7px;
    left: 5px;
    width: 7px;
    height: 4px;
    border: 3px solid #fff;
    border-top: none;
    border-right: none;
    transform: rotate(-45deg);
    opacity: 0;
}

input[type=radio]:checked + label:after {
    opacity: 1;
}

.btn-block {
    margin-top: 10px;
    text-align: center;
}

button {
    width: 150px;
    padding: 10px;
    border: none;
    border-radius: 5px;
    background: #444;
    font-size: 16px;
    color: #fff;
    cursor: pointer;
}

button:hover {
    background: #666;
}
F5 lại trình duyệt để xem kết quả
Xử lý Server với Notion API
Bới vị đây là một ví dụ đơn giản. Nên mình sẽ viết tất cả code trong "routers/index.js" để tiện theo dõi
Chung ta cần tạo mới route để nhận submit form
router.post("/", async function (req, res, next) {
//To be get parameter before Form submit and send data to server. We can use
const {name, email, phone, address, sex, note} = req.body;
//Just for debug
console.table({name, email, phone, address, sex, note});
//Redirect to form when before submit
res.redirect('/');
});
Kiểm tra dữ liệu submit
Trên giao diện
Trên terminal sau khi bấm button "Send"

Ở đây chúng ta đã thành công gửi dữ liệu từ Form HTML lên trên server Nodejs
Gửi dữ liệu đến Notion bằng API
Đầu tiên chung ta hay cài đặt package "@notionhq/client"
npm i @notionhq/client

Đăng ký sử dụng package
//Required package
const {Client} = require("@notionhq/client")
//Setup config
const notion = new Client({
    auth: process.env.NOTION_TOKEN,
})
Gửi dữ liệu lên Notion thông qua API
await notion.pages.create({
        parent: {
            database_id: process.env.NOTION_DATABASE_ID,
        },
        properties: {
            Name: {
                title: [
                    {
                        text: {
                            content: name,
                        },
                    },
                ],
            },
            Email: {
                email: email,
            },
            PhoneNumber: {
                rich_text: [
                    {
                        text: {
                            content: phone,
                        },
                    },
                ],
            },
            Address: {
                rich_text: [
                    {
                        text: {
                            content: address,
                        },
                    },
                ],
            },
            Gender: {
                select: {
                    name: gender
                },
            },
            Note: {
                rich_text: [
                    {
                        text: {
                            content: note,
                        },
                    },
                ],
            },
        },
    });
Cấu hình file .env chứa thông tin đã đăng ký API Notion
NOTION_TOKEN=secret_heBrP3242423424322iHM8UzmjnALYvJ4WoeLA
NOTION_DATABASE_ID=ccfe5824942343224aa20ec85e1c2f7e
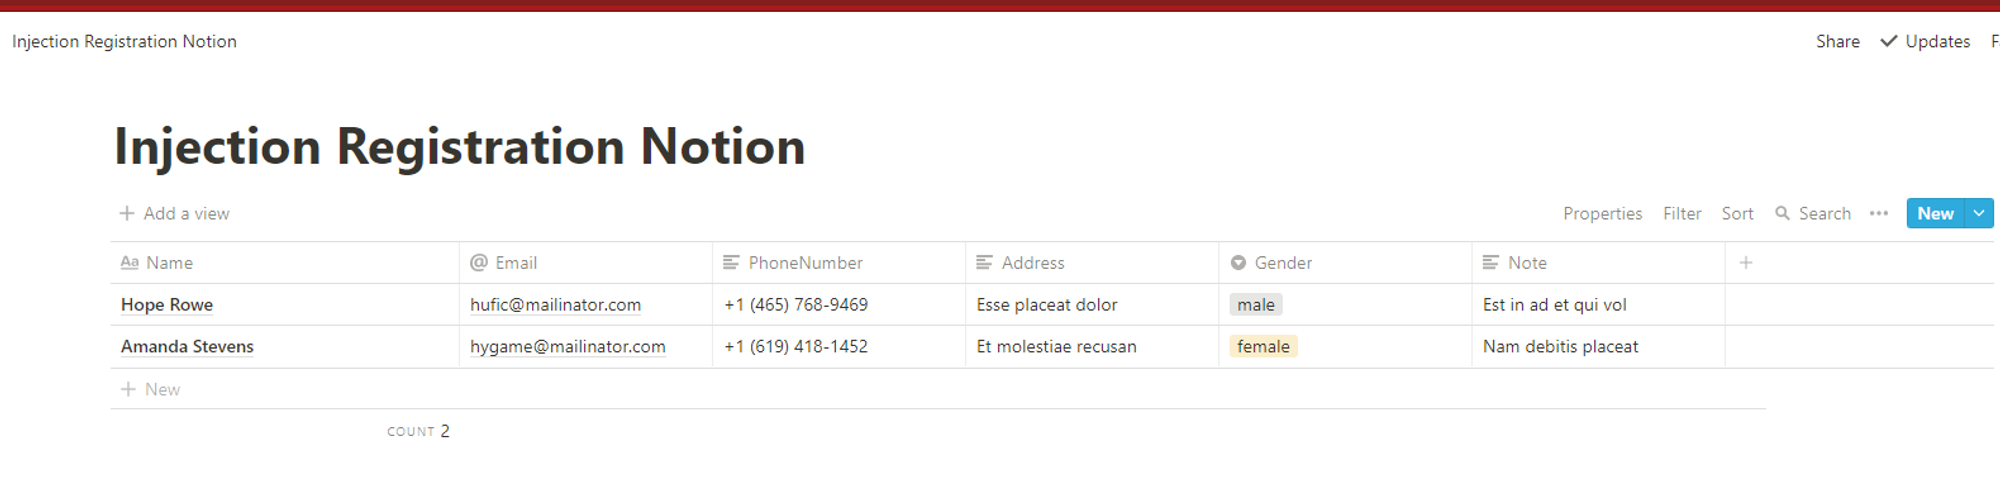
Sau khi thực hiện các bước trên, các bạn có thể kiểm tra kết quả
Truy cập http://localhost:3000/ điền thông tin và nhấn "Send"
Kết quá sẽ được gửi đến Notion như ảnh dưới
Kết bài
Thông qua bài viết này mình đã hướng dẫn các bạn cách cơ bản nhất để tương tác với Notion thông qua API mà nó cung cấp.
Dựa vào kiến thức trên các bạn có thể tìm hiểu thêm và áp dụng cho các mục đích phát triển của mình
Git repository
https://github.com/qt91/InjectionRegistrationNotion ( Đừng quên để lại cho mình 1* )
All rights reserved
