Hướng dẫn build User Authentication & Authorization với JWT bằng Node.js + MongoDB (Phần 2)
Bài đăng này đã không được cập nhật trong 3 năm
Ở phần trước mình đã giới thiệu cho các bạn về:
- Cách xác thực người dùng bằng token
- Xây dựng User Authentication bằng Node.js & MongoDB
- Flow cho Signup & Login với JWT Authentication
- Kiến trúc của Node.js Express với Authentication & Authorization
- Build cấu trúc project và giới thiệu các API sẽ làm.
- Setup Express web server Các nếu chưa được phần có thể đọc ở đây ạ
Ở phần này mình sẽ hướng dẫn các bạn:
- install mongoDB (bạn có thể cài thêm MongoDB compass để quản lý database cho tường minh).
- Connect server của mình vừa tạo với MongoDB, tạo các collection (user, role).
- Tạo Middlewares để xét quyền truy cập của các router.
1. Install mongoDB
- Phần này chắc các bạn có thể google sẽ hướng dẫn cài đặt chi tiết theo từng hệ điều hình nhé!
2. Connect server của mình vừa tạo với MongoDB:
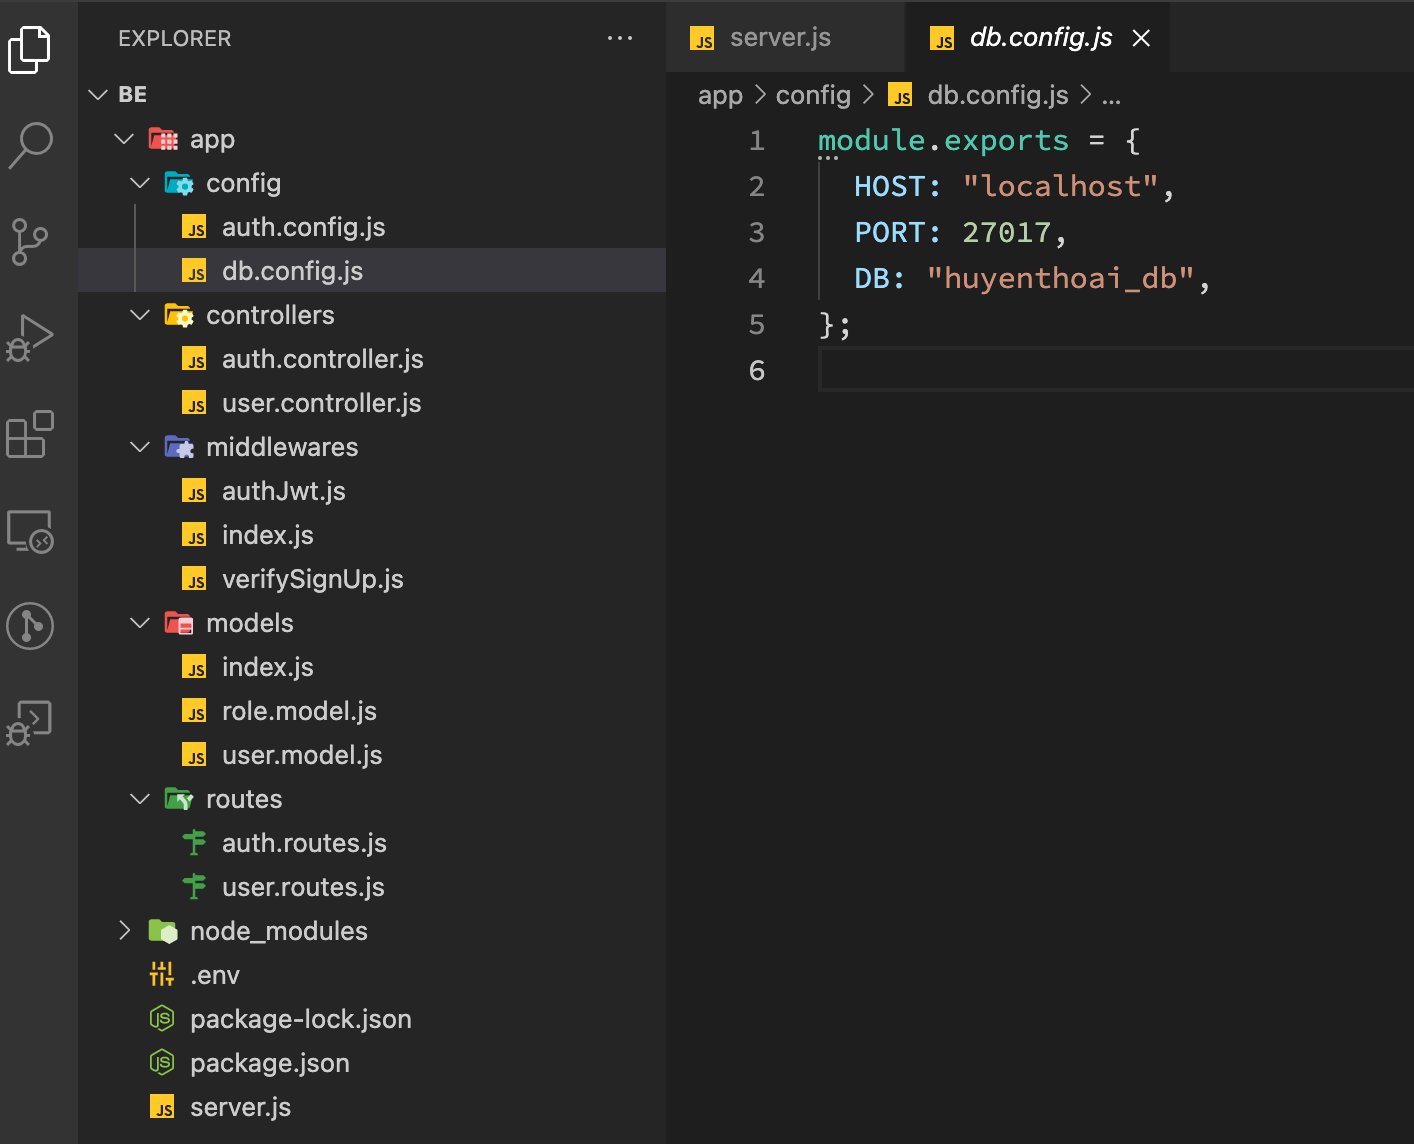
Configure MongoDB database
Vào folder app, tạo folder config. Sau đó tạo file db.config.js để set up MongoDB
 module.exports = {
  HOST: "localhost",
  PORT: 27017,
  DB: "huyenthoai_db",
};
Define the Mongoose Model
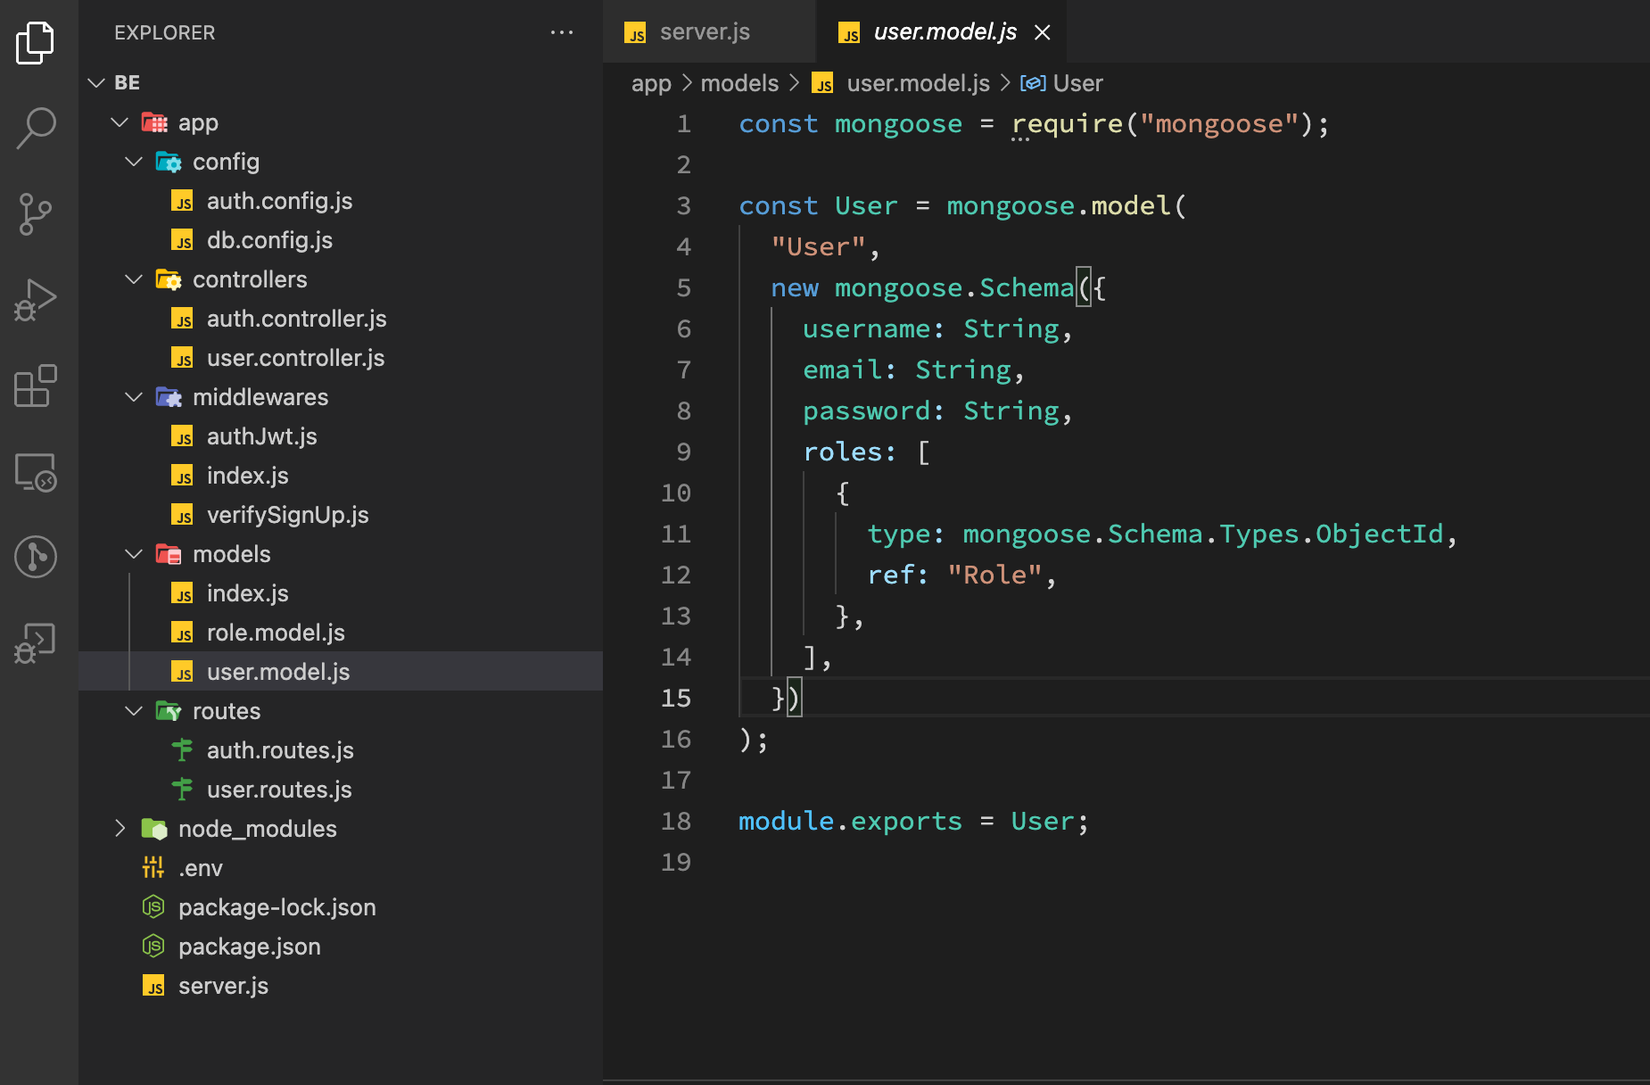
Trong folder model chúng ta tạo 2 data model là: User và Role.
- User gồm: username, email, password và roles. Và roles là array các id của roles collection được reference.
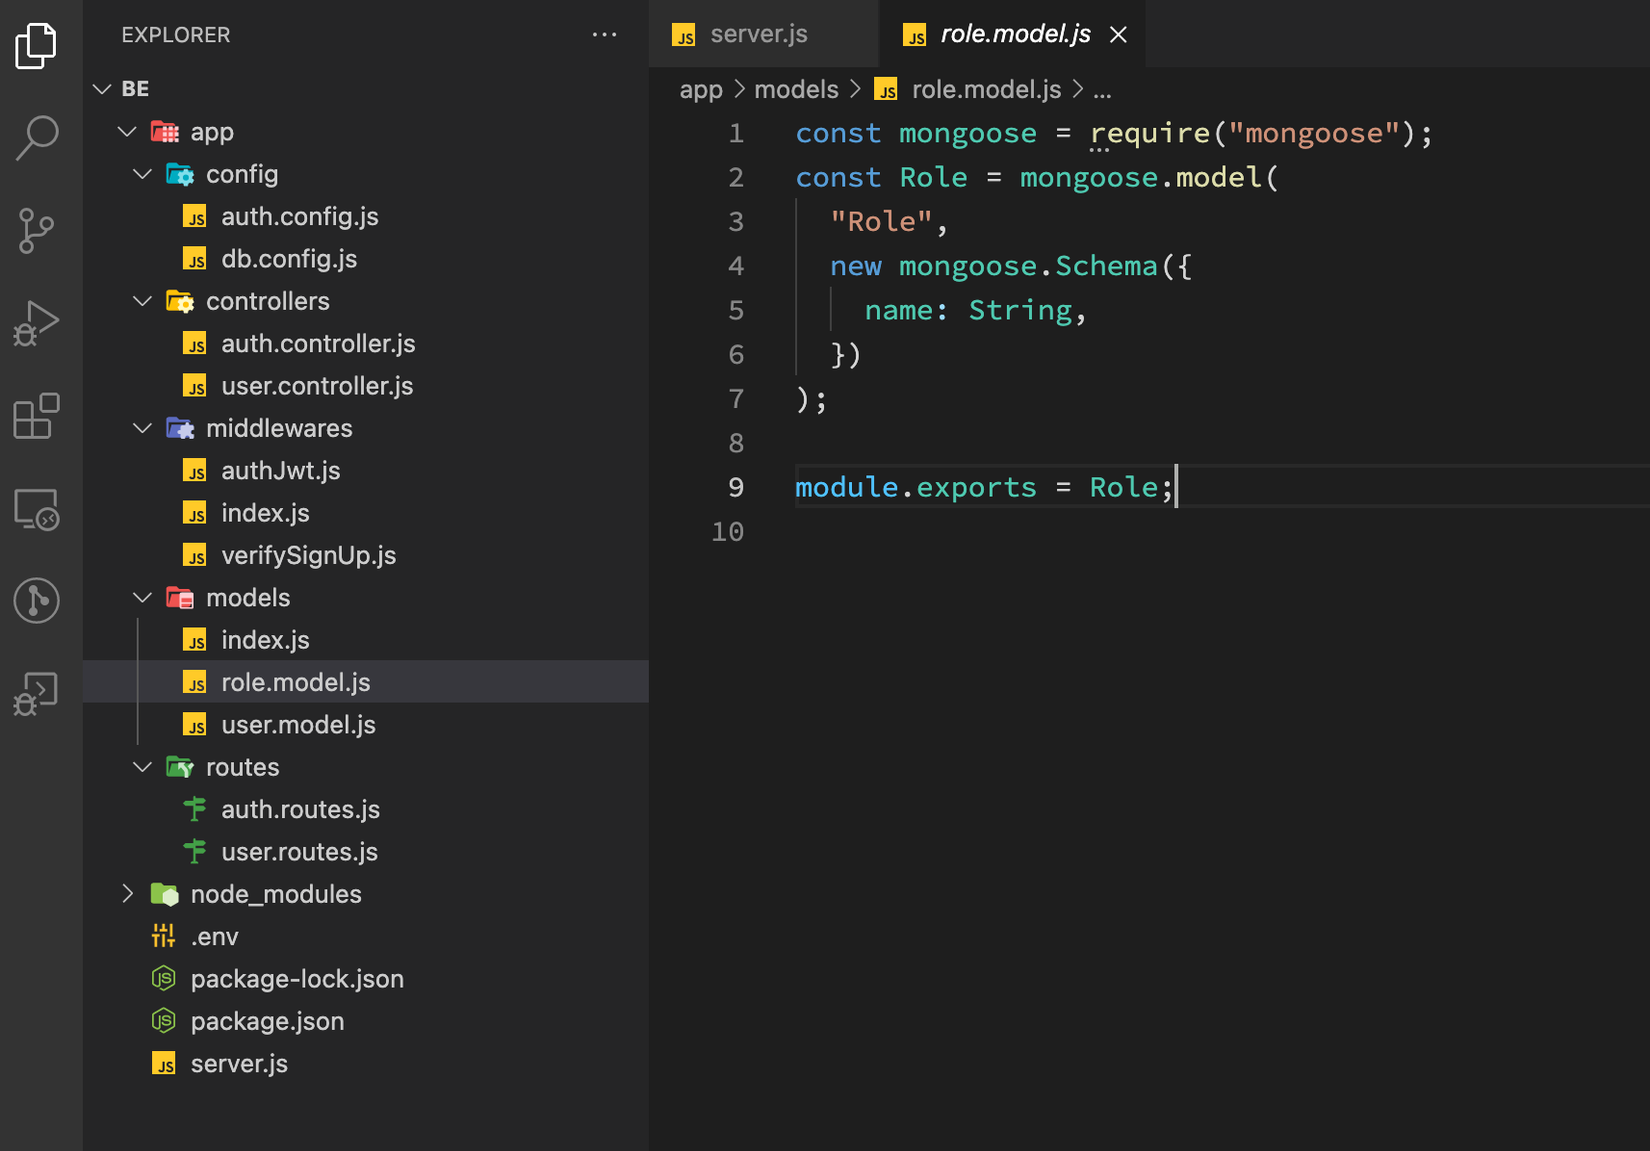
- Role gồm: name. Ở đây mình sẽ tạo 3 role: moderator, admin và user Nếu ai chưa biết qua Mongo hoặc chưa biết các Relationship trong Mongoose có thể kham khảo ở đây
Tạo file role.model.js
 const mongoose = require("mongoose");
const Role = mongoose.model(
  "Role",
  new mongoose.Schema({
    name: String,
  })
);

module.exports = Role;
Tạo file user.model.js
const mongoose = require("mongoose");

const User = mongoose.model(
  "User",
  new mongoose.Schema({
    username: String,
    email: String,
    password: String,
    roles: [
      {
        type: mongoose.Schema.Types.ObjectId,
        ref: "Role",
      },
    ],
  })
);

module.exports = User;
Initialize Mongoose
Tiếp theo, tạo app/models/index.js với nội dụng như sau:
const mongoose = require("mongoose");
mongoose.Promise = global.Promise;

const db = {};

db.user = require("./user.model");
db.role = require("./role.model");

db.ROLES = ["user", "admin", "moderator"];

module.exports = db;

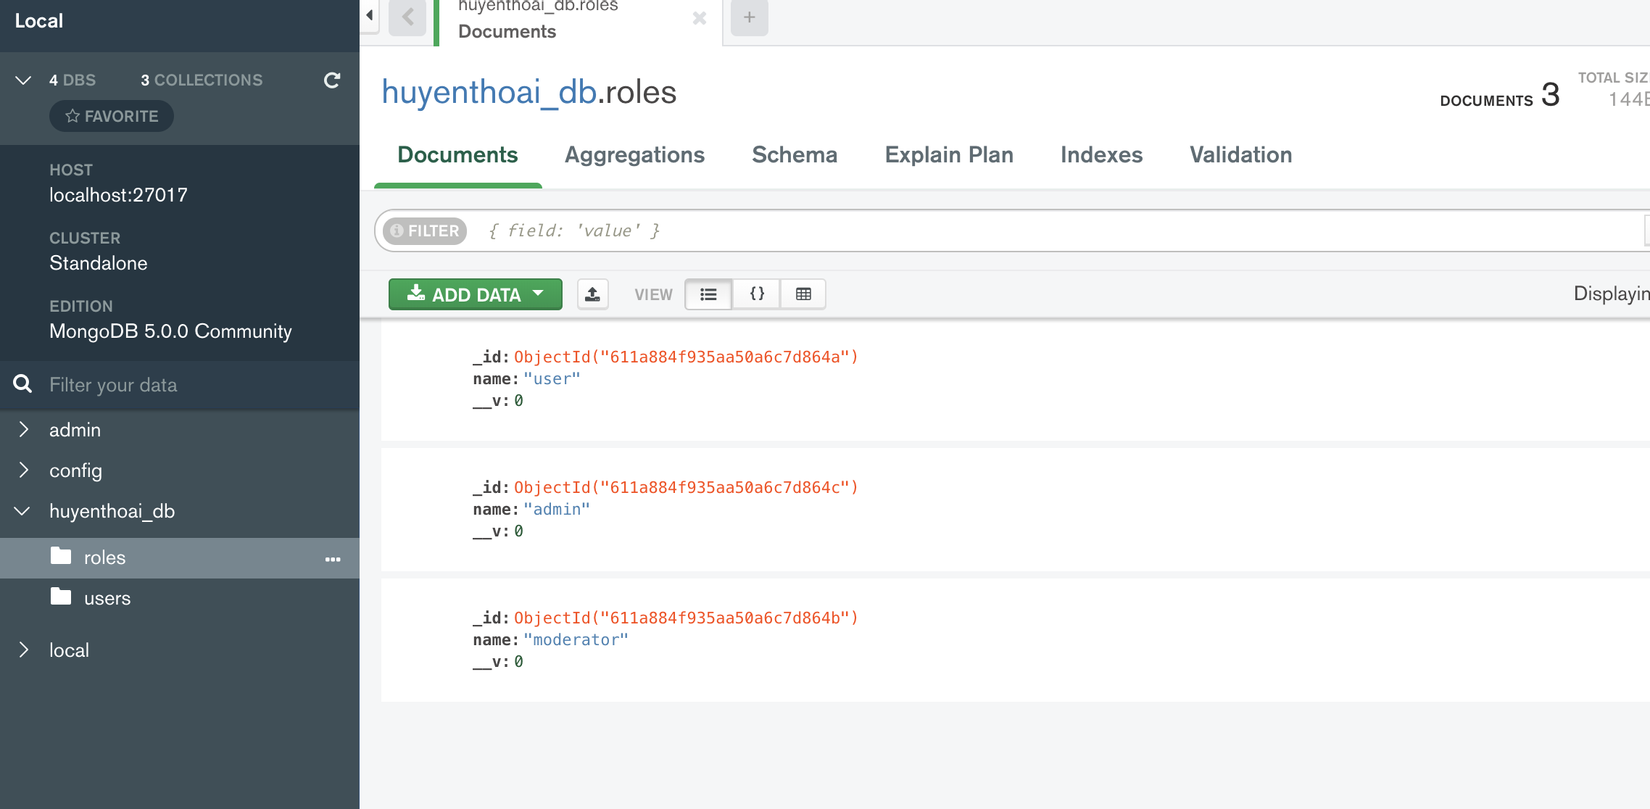
Connect Mongoose và tạo dữ liệu với CSDL MongoDB, trong file server.js thêm nội dung sau: Hàm initial() dùng để tạo 3 rows trong roles collection.
const express = require("express");
const bodyParser = require("body-parser");
const cors = require("cors");
const mongoose = require("mongoose");
const dbConfig = require("./app/config/db.config");

// set up server
const app = express();

const corsOptions = {
  origin: "http://localhost:3000",
};

app.use(cors(corsOptions));

app.use(bodyParser.json());

app.use(bodyParser.urlencoded({ extended: true }));

app.get("/", (req, res) => {
  res.json({ message: "Hello!" });
});

const PORT = process.env.PORT || 3000;

app.listen(PORT, () => {
  console.log(`server is runing on port ${PORT}`);
});

// connect database
const db = require("./app/models");
const Role = db.role;

mongoose
  .connect(`mongodb://${dbConfig.HOST}:${dbConfig.PORT}/${dbConfig.DB}`, {
    useNewUrlParser: true,
    useUnifiedTopology: true,
  })
  .then(() => {
    // console.log("Successfully connect to MongoDB.");
    initial();
  })
  .catch((err) => {
    console.error("Connection error", err);
    process.exit();
  });

// connect success create collection in database
function initial() {
  // The estimatedDocumentCount() function is quick as it estimates the number of documents in the MongoDB collection. It is used for large collections because this function uses collection metadata rather than scanning the entire collection.

  Role.estimatedDocumentCount((err, count) => {
    if (!err && count === 0) {
      new Role({
        name: "user",
      }).save((err) => {
        if (err) {
          console.log("error", err);
        }

        console.log("added 'user' to roles collection");
      });

      new Role({
        name: "moderator",
      }).save((err) => {
        if (err) {
          console.log("error", err);
        }

        console.log("added 'moderator' to roles collection");
      });

      new Role({
        name: "admin",
      }).save((err) => {
        if (err) {
          console.log("error", err);
        }

        console.log("added 'admin' to roles collection");
      });
    }
  });
}
initial;

require("./app/routes/auth.routes")(app);
require("./app/routes/user.routes")(app);
 Bạn có thể mở MongoDB Compass để check data đã được hay chưa nhé!
Configure Auth Key
Trong folder app/config, tạo auth.config.js:
module.exports = {
  secret: "huyenthoai-secret-key",
};
Bạn có thể tạo secret key tùy theo cá nhân.
3.Tạo Middlewares để xét quyền truy cập của các router.
Để verify Signup action, chúng ta cần 2 functions:
- Check username và email đã tồn tại hay chưa.
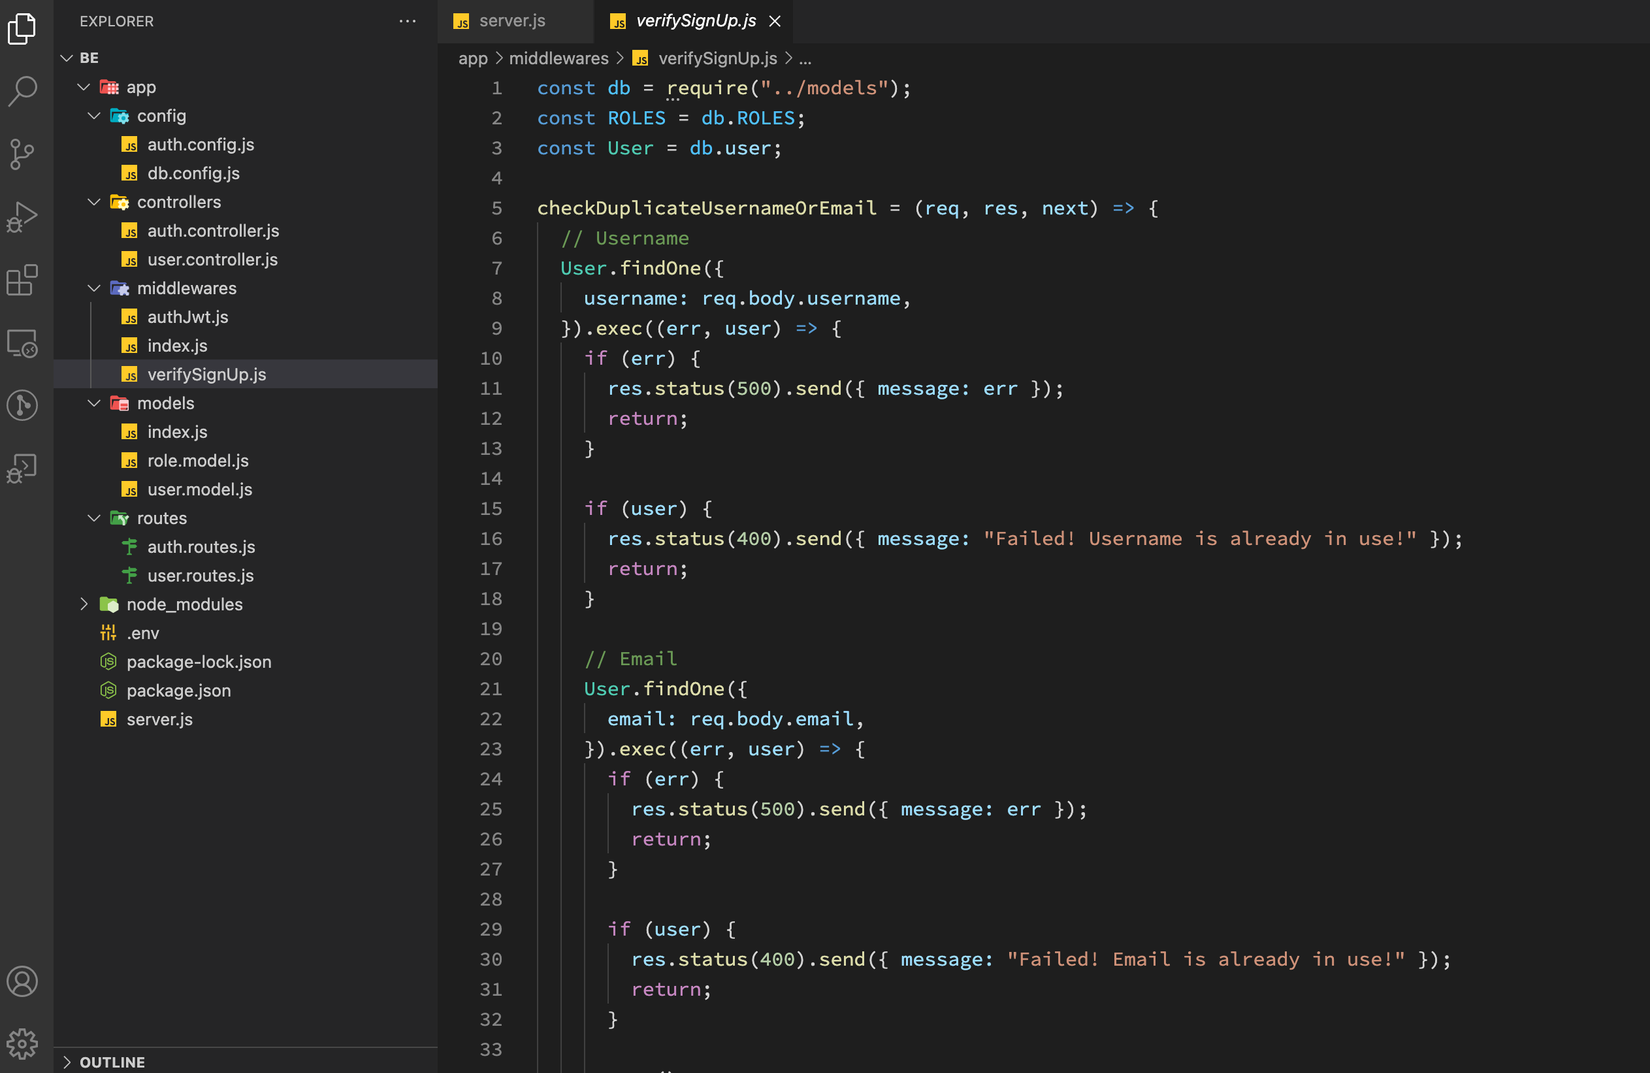
- Check roles có được request hay không. Tạo middlewares/verifySignUp.js
const db = require("../models");
const ROLES = db.ROLES;
const User = db.user;
checkDuplicateUsernameOrEmail = (req, res, next) => {
// Username
User.findOne({
username: req.body.username,
}).exec((err, user) => {
if (err) {
res.status(500).send({ message: err });
return;
}
if (user) {
res.status(400).send({ message: "Failed! Username is already in use!" });
return;
}
// Email
User.findOne({
email: req.body.email,
}).exec((err, user) => {
if (err) {
res.status(500).send({ message: err });
return;
}
if (user) {
res.status(400).send({ message: "Failed! Email is already in use!" });
return;
}
next();
});
});
};
checkRolesExisted = (req, res, next) => {
if (req.body.roles) {
for (let i = 0; i < req.body.roles.length; i++) {
if (!ROLES.includes(req.body.roles[i])) {
res.status(400).send({
message: `Failed! Role ${req.body.roles[i]} does not exist!`,
});
return;
}
}
}
next();
};
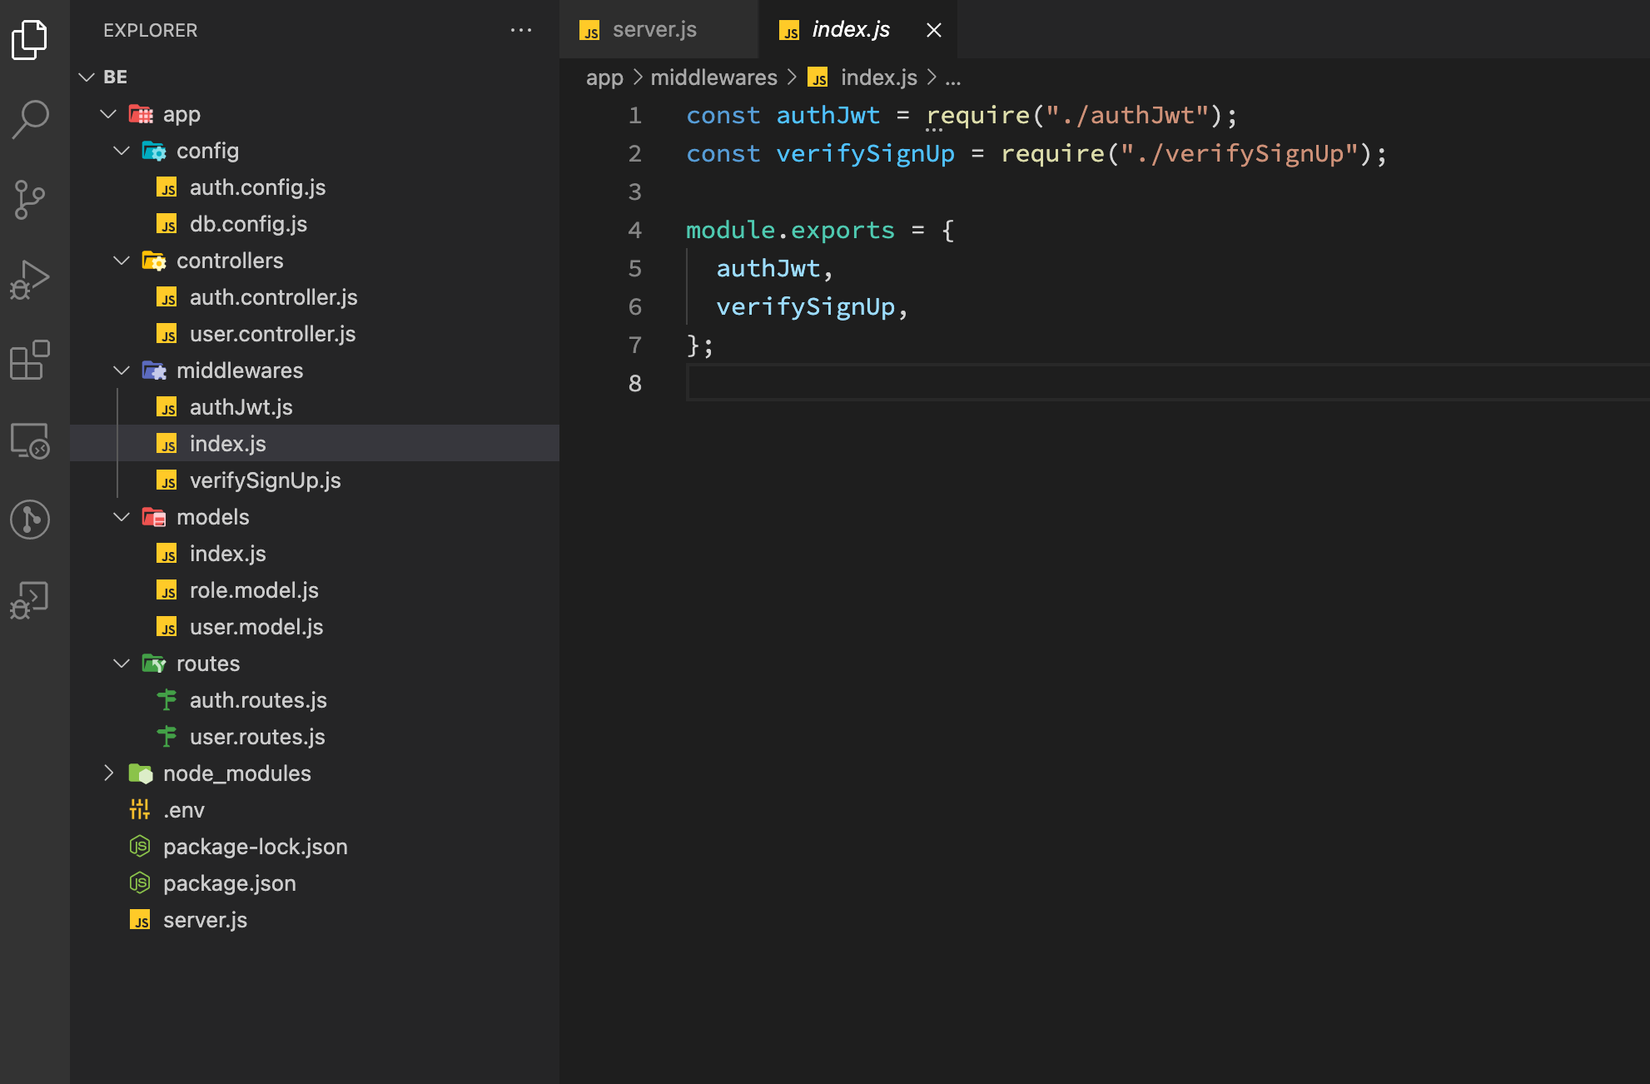
const verifySignUp = {
checkDuplicateUsernameOrEmail,
checkRolesExisted,
};
module.exports = verifySignUp;
Để tiến hành Authentication và Authorization , chúng ta cần following các functions:
- Check nếu token đã được cung cấp, và có hợp lệ hay không. Chúng ta get token từ x-access-token of HTTP headers, sau đó dùng jsonwebtoken's verify() function
- Check xem roles của user có bao gồm trong các roles mình có hay không. Tạo middlewares/authJwt.js
const jwt = require("jsonwebtoken");
const config = require("../config/auth.config.js");
const db = require("../models");
const User = db.user;
const Role = db.role;

verifyToken = (req, res, next) => {
  let token = req.headers["x-access-token"];

  if (!token) {
    return res.status(403).send({ message: "No token provided!" });
  }

  jwt.verify(token, config.secret, (err, decoded) => {
    if (err) {
      return res.status(401).send({ message: "Unauthorized!" });
    }
    req.userId = decoded.id;
    next();
  });
};

isAdmin = (req, res, next) => {
  User.findById(req.userId).exec((err, user) => {
    if (err) {
      res.status(500).send({ message: err });
      return;
    }

    Role.find(
      {
        _id: { $in: user.roles },
      },
      (err, roles) => {
        if (err) {
          res.status(500).send({ message: err });
          return;
        }

        for (let i = 0; i < roles.length; i++) {
          if (roles[i].name === "admin") {
            next();
            return;
          }
        }

        res.status(403).send({ message: "Require Admin Role!" });
        return;
      }
    );
  });
};

isModerator = (req, res, next) => {
  User.findById(req.userId).exec((err, user) => {
    if (err) {
      res.status(500).send({ message: err });
      return;
    }

    Role.find(
      {
        _id: { $in: user.roles },
      },
      (err, roles) => {
        if (err) {
          res.status(500).send({ message: err });
          return;
        }

        for (let i = 0; i < roles.length; i++) {
          if (roles[i].name === "moderator") {
            next();
            return;
          }
        }

        res.status(403).send({ message: "Require Moderator Role!" });
        return;
      }
    );
  });
};

const authJwt = {
  verifyToken,
  isAdmin,
  isModerator,
};
module.exports = authJwt;
Như vậy chúng ta đã connect được với MongoDB, tạo dữ liệu và tạo middleware để check Authentication và Authorization, phần tiếp theo mình sẽ hướng dẫn các bạn tạo các Controllers (Tạo controller để Authentication, Controller để testing Authorization) và define các Routes cho các api của mình các bạn nhé!.
4. Kết
Mong rằng bài viết của mình giúp ích phần nào cho các bạn. Cảm ơn các bạn. Hẹn gặp lại các bạn trong các bài viết tiếp theo nhé ! ❤️ Nguồn: https://www.bezkoder.com/node-js-mongodb-auth-jwt/
All rights reserved
