Let's fix Chat++ Emo - Part 2
Bài đăng này đã không được cập nhật trong 5 năm
Intro
Hãy xem qua Part 1 tại đây trước khi đọc bài này nhé.
Túm lại. nếu tắt được FeatureFlags.FRE2252, Chat++ emo sẽ về như cũ.
Ok let's go. Nhiệm vụ của chúng ta là tìm và chuyển flag này thành false.
The Webpack
Để có thể làm được việc này, chúng ta cần tìm hiểu một chút về cách mà React bunlde các script JS của mình, đó là sử dụng Webpack. Webpack sẽ bundle tất cả các thư viện, source code js do chúng ta viết thành một file JS và đảm bảo thứ tự load các module (dependcy tree) này hợp lý để có thể chạy trơn tru.

Khi phân tích source code frontend của Chatwork, ta có overview như sau, chỉ có duy nhất một function:
! function(e) {
    var t = {};

    function n(o) {
        if (t[o]) return t[o].exports;
        var r = t[o] = {
            i: o,
            l: !1,
            exports: {}
        };
        return e[o].call(r.exports, r, r.exports, n), r.l = !0, r.exports
    }
    n.m = e, n.c = t, n.d = function(e, t, o) {
        n.o(e, t) || Object.defineProperty(e, t, {
            enumerable: !0,
            get: o
        })
    }, n.r = function(e) {
        "undefined" != typeof Symbol && Symbol.toStringTag && Object.defineProperty(e, Symbol.toStringTag, {
            value: "Module"
        }), Object.defineProperty(e, "__esModule", {
            value: !0
        })
    }, n.t = function(e, t) {
        if (1 & t && (e = n(e)), 8 & t) return e;
        if (4 & t && "object" == typeof e && e && e.__esModule) return e;
        var o = Object.create(null);
        if (n.r(o), Object.defineProperty(o, "default", {
                enumerable: !0,
                value: e
            }), 2 & t && "string" != typeof e)
            for (var r in e) n.d(o, r, function(t) {
                return e[t]
            }.bind(null, r));
        return o
    }, n.n = function(e) {
        var t = e && e.__esModule ? function() {
            return e.default
        } : function() {
            return e
        };
        return n.d(t, "a", t), t
    }, n.o = function(e, t) {
        return Object.prototype.hasOwnProperty.call(e, t)
    }, n.p = "", n(n.s = 516)
}([function(e, t, n) {
... module 1
}, function(e, t, n) {
... module 2
}, function(e, t, n) {
... module n
}]);
Để có thể làm được việc này thì webpack có hàm bootstrap. Phía trên là phiên bản đã được minified, còn nếu nhìn vào phiên bản debug, kèm với comment, chúng ta sẽ thấy rõ hơn:
/******/ (function(modules) { // webpackBootstrap
/******/ 	// The module cache
/******/ 	var installedModules = {};

/******/ 	// The require function
/******/ 	function __webpack_require__(moduleId) {

/******/ 		// Check if module is in cache
/******/ 		if(installedModules[moduleId])
/******/ 			return installedModules[moduleId].exports;

/******/ 		// Create a new module (and put it into the cache)
/******/ 		var module = installedModules[moduleId] = {
/******/ 			i: moduleId,
/******/ 			l: false,
/******/ 			exports: {}
/******/ 		};

/******/ 		// Execute the module function
/******/ 		modules[moduleId].call(module.exports, module, module.exports, __webpack_require__);

/******/ 		// Flag the module as loaded
/******/ 		module.l = true;

/******/ 		// Return the exports of the module
/******/ 		return module.exports;
/******/ 	}


/******/ 	// expose the modules object (__webpack_modules__)
/******/ 	__webpack_require__.m = modules;

/******/ 	// expose the module cache
/******/ 	__webpack_require__.c = installedModules;

/******/ 	// identity function for calling harmony imports with the correct context
/******/ 	__webpack_require__.i = function(value) { return value; };

/******/ 	// define getter function for harmony exports
/******/ 	__webpack_require__.d = function(exports, name, getter) {
/******/ 		if(!__webpack_require__.o(exports, name)) {
/******/ 			Object.defineProperty(exports, name, {
/******/ 				configurable: false,
/******/ 				enumerable: true,
/******/ 				get: getter
/******/ 			});
/******/ 		}
/******/ 	};

/******/ 	// getDefaultExport function for compatibility with non-harmony modules
/******/ 	__webpack_require__.n = function(module) {
/******/ 		var getter = module && module.__esModule ?
/******/ 			function getDefault() { return module['default']; } :
/******/ 			function getModuleExports() { return module; };
/******/ 		__webpack_require__.d(getter, 'a', getter);
/******/ 		return getter;
/******/ 	};

/******/ 	// Object.prototype.hasOwnProperty.call
/******/ 	__webpack_require__.o = function(object, property) { return Object.prototype.hasOwnProperty.call(object, property); };

/******/ 	// __webpack_public_path__
/******/ 	__webpack_require__.p = "";

/******/ 	// Load entry module and return exports
/******/ 	return __webpack_require__(__webpack_require__.s = 516);
/******/ })
/************************************************************************/
/******/ ([...............])
Tóm tắt qua thì webpack sẽ:
- require module
- tạo module
- cache module
- execute module
- check export type (default hoặc chỉ định) . Tham khảo thêm ở đây.
như vậy tất cả các modules sẽ được truyền vào làm tham số cho hàm này, các module được load vào sẽ được lưu ở installedModules (chính là biến t), hàm n.o sẽ là hàm __webpack_require__ hay là require. Ví dụ như dưới đây là một loạt các require ở ngay đầu của một số module:
    var o = n(7),
        r = n(608),
        i = n(609),
        a = n(610),
        c = n(611),
        l = n(612),
        s = n(613);
Và cuối cùng, module đóng vai trò entry point sẽ là module có index 516 trong mảng tham số truyền vào.
Đến đây thì nếu các module này không được expose ra bằng cách gắn vào window thì sẽ không có cách nào chúng ta có thể truy cập được đến chúng cả vì tất cả đều là anonymous function và biến cache chứa toàn bộ module cũng vậy.
The Trick
Để có thể lấy được các module này ra chúng ta sẽ cần chú ý một chút. Ở đầu các ES module đều có đoạn code này:
}, function(e, t, n) {
    "use strict";
    Object.defineProperty(t, "__esModule", {
        value: !0
    });
...
đoạn code này sẽ define một thuộc tính __esModule với giá trị !0 (tương đương với true) dùng để đánh dấu module này thuộc kiểu ES module, và tham số t ở đây chính là module được load. Vậy nếu ta có thể overwrite hàm Object.defineProperty này, ta có thể xử lý và tham chiếu đến module.
The Proxy
Để overwrite, chúng ta sẽ sử dụng đến proxy
Proxy là một class được giới thiệu từ ES6, cho phép bạn can thiệp và thay đổi hành vi của một đối tượng (object). Các hành vi này bao gồm: truy xuất/thiết lập thuộc tính của một đối tượng, thay đổi prototype, gọi hàm, khởi tạo đối tượng bằng từ khóa new...
Hiểu đơn giản, proxy là một hàm bao bên ngoài, khi truy cập đến object, nếu có các trap function thì các trap function trong proxy này sẽ được gọi và bên trong đó ta có quyền thay đổi hoàn toàn hành vi của object. Xem thêm ví dụ sau:
const target = {
  message1: "hello",
  message2: "everyone"
};

const handler2 = {
  get: function(target, prop, receiver) {
    return "world";
  }
};

const proxy2 = new Proxy(target, handler2);

console.log(proxy2.message1); // world
console.log(proxy2.message2); // world
ở đây ta đã thay đổi hàm get thuộc tính của target bằng trap function ở get khiến cho dù được gán giá trị là gì đi chăng nữa thì vẫn bị return world.
Đối với việc gọi hàm thì chúng ta sẽ dùng trap function ở apply
apply_handler = {
    apply: function(target, thisArg, args) {
        r = target.apply(thisArg, args);
        if (args[1] == '__esModule') {
        	// console.log('module', r);
            window.esmodules.push(r);
        };
        return r;
    }
}
Object.defineProperty = new Proxy(Object.defineProperty, apply_handler);
ở đây ta sẽ kiểm tra, chỉ khi thuộc tính được set là __esModule thì ta sẽ log lại các module vào biếnesmodules. OK, còn một vấn đề nữa, chúng ta cần load được đoạn code này đầu tiên, trước khi javascript của Chatwork được load.
The Extension
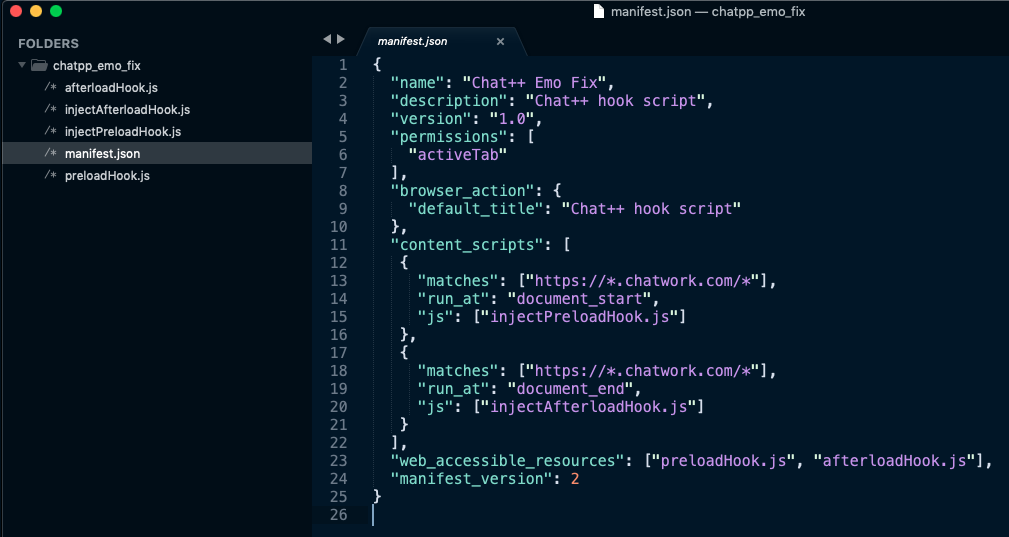
Để thực hiện được việc trên, chúng ta chỉ có thể làm được với Chrome exentsion. Ta xây dựng một exentsion với nội dung structure như sau:

File injectPreloadHook.js (và tương tự với injectAfterloadHook.js) sẽ được load tại document_start, khi mà HTML đã được load xong và js chưa được chạy, tại lúc này ta có thể inject một đoạn js vào phần <head> của trang:
var s = document.createElement('script');
s.src = chrome.runtime.getURL('preloadHook.js');
s.onload = function() {
    this.remove();
};
(document.head || document.documentElement).appendChild(s);
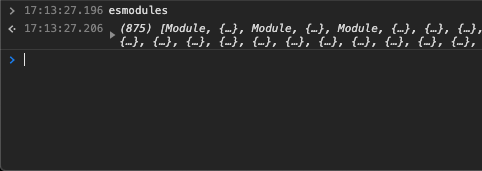
hàm này sẽ load thêm đoạn script preloadHook.js (chính là phần code ở trên) để rồi ở afterloadHook.js được load ở document_end chúng ta có thể lấy ra được biến esmodules:

Và viết một vòng lặp đơn giản, tìm xem module nào có thuộc tính FeatureFlags, chúng ta đã có cái cần tìm 

The Code
console.log("Afterload Hook STARTED !!!");
cw_timer = setInterval(() => {
    if (typeof CW !== "undefined" && typeof RM !== "undefined" && typeof CW.application !== "undefined" && typeof CW.application.domainLifecycleContext !== "undefined" && typeof CW.application.domainLifecycleContext.messageRepository !== "undefined" ) {
        window.clearInterval(cw_timer);

        // include to Chat++
        for (i in window.esmodules) {
            let m = window.esmodules[i];
            if (m.FeatureFlags) {
                window.featureModule = m;
            }
        }

        console.log('FOUND FeatureFlags module', window.featureModule);
        console.log('Disable feature render by AST');
        window.featureModule.FeatureFlags.FRE2252 = false;
        console.log('Clear htmlCache');

        for (i in CW.application.domainLifecycleContext.messageRepository.entities[RM.id]) {
             let msg = CW.application.domainLifecycleContext.messageRepository.entities[RM.id][i];
             console.log(msg.body.body);
             msg.body.body.htmlCache = null;
        }
        console.log('Reset buildtime');
        RL.rooms[RM.id].buildtime = 0;
        console.log('Wait for Chat++ load and rebuild room');
    }
}, 100);
Cùng điểm qua từng phần của hàm này:
- Chúng ta chờ cho đến khi Chatwork được load hoàn toàn bằng cách
setIntervalvà check biếnCW. - Lặp qua mảng
esmodulesvà tìm module nào có thuộc tínhFeatureFlagsrồi lưu vào biếnwindow.featureModule - Disable feature này
- Khi đoạn script này được chạy thì room hiện tại đã được load xong, vì vậy ta cần reset bằng cách
- Clear hết toàn bộ
htmlCachecủa room hiện tại - Xoá
buildtimevì tại hàm build củaRoomView.buildcó check biến này như sau:
if (0 != this.buildtime) return this.view.build(n), r.CW.application.getACL().changeSelectRoomFromOldCode(this.id, n.jumpTo), !0; this.load(n, (function() { t.view.build(n) })) - Clear hết toàn bộ
Rồi sau đó, chờ Chat++ load vào vào thôi  . Make Chat++ great again!
The Bonus
Niềm vui ngắn chẳng tày gang, được một thời gian thì lại lỗi. Render hoàn toàn ok, nhưng đến khi edit message thì bị lỗi:
Uncaught (in promise) TypeError: Cannot read property 'tokens' of null
    at t.searchUrlTokens (index.js:3534)
    at Function.e.from (index.js:3558)
    at n.createEditing (index.js:3558)
    at index.js:3630
    at e.mapMessage (index.js:3630)
    at e.editMessage (index.js:3630)
    at t.<anonymous> (index.js:3630)
    at index.js:3630
    at Object.next (index.js:3630)
    at index.js:3630
Cùng kiểm tra đoạn code gây lỗi:
t.prototype.getAST = function() {
    return u.FeatureFlags.FRE2252 ? i.ChatworkSyntax.tokenize(this.getValue()) : null
}
,
t.prototype.searchUrlTokens = function() {
    return function e(t) {
        return t.reduce((function(t, n) {
            var o = d.default(n)
              , r = p.isIncludesExternalLink(n);
            return o ? r ? t.concat([n], e(o)) : t.concat(e(o)) : r ? t.concat([n]) : t
        }
        ), [])
    }(this.getAST().tokens)
}
Holly shit, không còn check flag FeatureFlags.FRE2252 nữa mà sử dụng thẳng luôn hàm getAST và tokens, nhưng rõ ràng là khi bật FeatureFlags.FRE2252 thì hàm này sẽ trả về là null và dẫn đến lỗi.
Trong source code có rất nhiều hàm getAST nhưng hàm getAST chúng ta cần tìm nằm ở module ChatworkNotation. Kiểm tra hàm này:
t.prototype.getAST = function() {
    return d.FeatureFlags.FRE2252 ? i.ChatworkSyntax.tokenize(this.getValue()) : null
    return window.tokenizer.default(this.getValue());
}
Để fix lỗi này, chúng ta có thể dùng trick như sau: overwrite lại hàm getAST, bật FeatureFlags.FRE2252lên, call hàm getAST cũ để lấy ra tokens rồi sau đó lại tắt  . Code cần thêm vào Chat++ như sau:
// Get ChatworkNotation
if (m.ChatworkNotation) {
    window.notationModule = m;
}
để lấy ra module ChatworkNotation. Sử dụng cùng trick proxy để overwrite hàm getAST như sau:
console.log('Overwrite getAST');
getAST_handler = {
    apply: function(target, thisArg, args) {
        // temporary enable FeatureFlags.FRE2252 to make getAST() works then disable it
        window.featureModule.FeatureFlags.FRE2252 = true;
        r = target.apply(thisArg, args);
        window.featureModule.FeatureFlags.FRE2252 = false;
        return r;
    }
}
notationModule.ChatworkNotation.prototype.getAST = new Proxy(notationModule.ChatworkNotation.prototype.getAST, getAST_handler);
và thế là Chat++ emo lại works like a charm.
The End
Hi vọng không có part 3 nữa...
Đừng sửa code Chatwork nữa em mệt rồi
Vậy là mình cũng đã hoàn thành đủ 4 bài viết cho Viblo Mayfest. Bái bai.
All rights reserved