Bắt đầu với ReactJs (Phần 2)
Bài đăng này đã không được cập nhật trong 4 năm
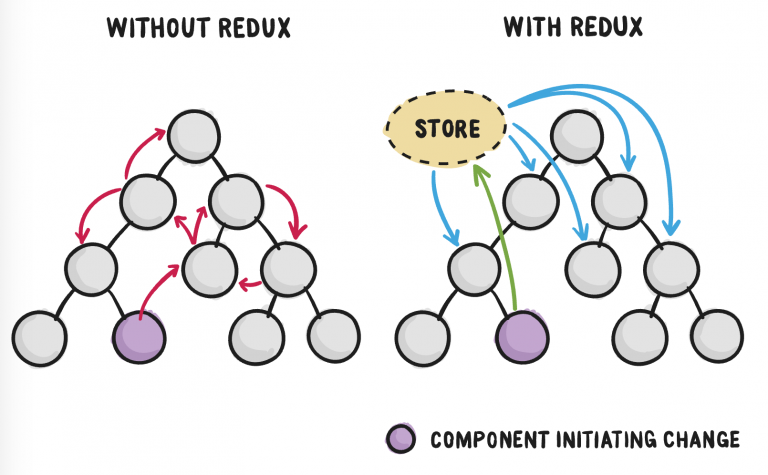
React chỉ là View, nên việc kết hợp với Redux, Flux, hay bất cứ mô hình luồng dữ liệu là cần thiết. Nên hôm nay mình sẽ tìm hiểu về redux, và kết hợp reactjs với redux.
Redux js là gì Là một thư viện javascript giúp tạo ra một lớp quản lý trạng thái của ứng dụng. Được dựa trên nền tảng tư tưởng của kiến trúc Flux do Facebook giới thiệu, do vậy Redux thường là bộ đôi kết hợp hoàn hảo với Reactjs,.
Các nguyên tắc cơ bản của Redux
Redux được xây dựng dựa trên 3 nguyên lý:
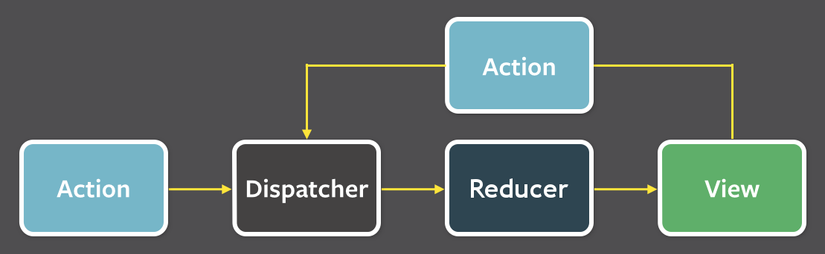
Nguồn dữ liệu tin cậy duy nhất: State của toàn bộ ứng được chứa trong một object tree nằm trong Store duy nhất Trạng thái chỉ được phép đọc: Cách duy nhất để thay đổi State của ứng dụng là phát một Action (là 1 object mô tả những gì xảy ra) Thay đổi chỉ bằng hàm thuần túy: Để chỉ ra cách mà State được biến đổi bởi Action chúng ta dùng các pure function gọi là Reducer
Về cơ bản Redux có 4 thành phần như sau:
1. Action: Trong Redux, cách duy nhất để thay đổi nội dung state là phải emit lên 1 cái mẫu tin. mà theo lí thuyết Redux là action. Đó là một đối tượng mô tả những gì đã diễn ra, và bạn send nó tới store bằng cách store.dispatch()
function addTodo(text) {
  return {
    type: ADD_TODO,
    text
  }
}
2. Reducer: là những pure function, – tức là nó sẽ không thay đổi giá trị của những tham số truyền vào. Ngoài ra, nó sẽ trả về 1 đói tượng khác không có những tham chiếu gì đến tham số truyền vào. Là nơi xác định State thay đổi như thế nào.
function todoApp(state = initialState, action) {
  switch (action.type) {
    case ADD_TODO:
      return Object.assign({}, state, {
        todos: [
          ...state.todos,
          {
            text: action.text,
            completed: false
          }
        ]
      })
    default:
      return state
  }
}
**3. Store: **Trong Redux, trạng thái của toàn bộ ứng dụng được lưu trữ bằng một cây đôi tượng thể hiện trạng thái hiện hành của dữ liệu trong ứng dụng và cây này được lưu trong 1 store.
Điều này giúp cho ta có thể phát triển những ứng dụng lớn vì trạng thái dữ liệu có thể đồng bộ từ tầng server đến tầng client mà không phải tốn nhiều công sức. Là nơi quản lý State, cho phép truy cập State qua getState(), update State qua dispatch(action), đăng kí listener qua subscribe(listener).
import { createStore } from 'redux'
import todoApp from './reducers'

let store = createStore(todoApp)
4. View: Hiển thị dữ liệu được cung cấp bởi Store
Kết hợp giữa Redux và Reactjs
 Chúng ta new một project reactjs-redux
create-react-app reat-redux-demo
Cài đặt redux
npm i redux --save
npm i react-redux --save
cd src && mkdir actions components reducers && touch store.js
Có nhiều cách chia cấu trúc project, tùy theo mục đích sử dụng, ở đây mình chia theo các thành phần của reactjs-redux.
Cấu trúc project sẽ như sau:
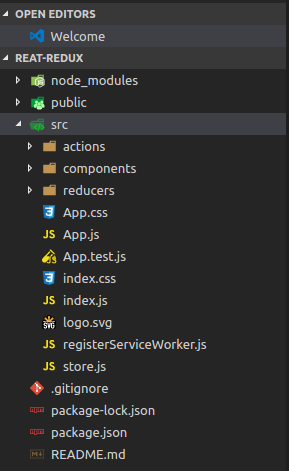
Tạo srtore src/store.js
import { createStore } from 'redux';
import rootReducer from  './reducers';

export default(initialState) => {
  return createStore(rootReducer, initialState);
}
Redux cung cấp cho chúng ta function createStore. Chúng ta chỉ cần function này với những combined reducer chúng ta đã tạo trước đó để tạo store.
src/reducers/cart.js
export default(state = [], payload) => {
    switch (payload.type) {
        case 'add':
            return [...state, payload.item];
        default:
            return state;
    }
};
src/reducers/index.js
import cart from './cart';
import { combineReducers } from 'redux';
const rootReducer = combineReducers({
    cart
});
export default rootReducer;
Tiếp theo, chúng ta sẽ tạo ra một action add to card: src/actions/cart.js
export const addToCart = (item) => {
  console.log('adding item:', item);
  return {
      type: 'add',
      item
  };
}
Chúng ta modify file index.js
import React from 'react';
import ReactDOM from 'react-dom';
import App from './App';
import './index.css';
import { Provider } from 'react-redux';
import Store from './store';

const StoreInstance = Store();

ReactDOM.render(
 <Provider store={StoreInstance}>
   <App />
 </Provider>,
 document.getElementById('root')
);import React from 'react';
import ReactDOM from 'react-dom';
import App from './App';
import './index.css';
import { Provider } from 'react-redux';
import Store from './store';

const StoreInstance = Store();

ReactDOM.render(
 <Provider store={StoreInstance}>
   <App />
 </Provider>,
 document.getElementById('root')
);
Bây giờ chúng ta đã có basic redux data, giờ chúng ta tạo các components.
src/components/shelf.js
import React, { Component } from 'react';
class Shelf extends Component {
  constructor(props) {
    super(props);
    this.onAddItemToCart = this.onAddItemToCart.bind(this);
    this.state = {
      shelfItems: [
        'Samsung',
        'Apple',
        'Nokia'
      ]
    }
  }
  onAddItemToCart(item) {
      this.props.addItem(item);
  }
  render() {
    const shelfItems = this.state.shelfItems.map((item, idx) => {
      return <li key={idx}><button onClick={() => this.onAddItemToCart(item)}>[+]</button>{item}</li>
    });
    return (
      <div>
          <h2>Store Shelf:</h2>
          <ul>
            {shelfItems}
          </ul>
      </div>
    );
  }
}
export default Shelf;
src/components/cart.js
import React, { Component } from 'react';
import { bindActionCreators } from 'redux';
import { connect } from 'react-redux';
import { addToCart } from './../actions/cart';

import Shelf from './shelf';
class Cart extends Component {
  constructor(props) {
    super(props);
    this.state = {
    }
  }
  render() {
    const cartList = this.props.cart.map((item, idx) => {
        return <li key={idx}>{item}</li>;
    });
    return (
      <div className="Cart">
        <Shelf addItem={this.props.addToCart}/>
        <h2>Shopping Bag</h2>
        <ol>
            {cartList}
        </ol>
      </div>
    );
  }
}

const mapStateToProps = (state) => {
  const cart = state.cart;
  return {
    cart
  };
};


const mapDispatchToProps = {
  addToCart,
};

export default connect(mapStateToProps, mapDispatchToProps)(Cart);
Chúng ta update lại file app.js
import Cart from './components/cart';
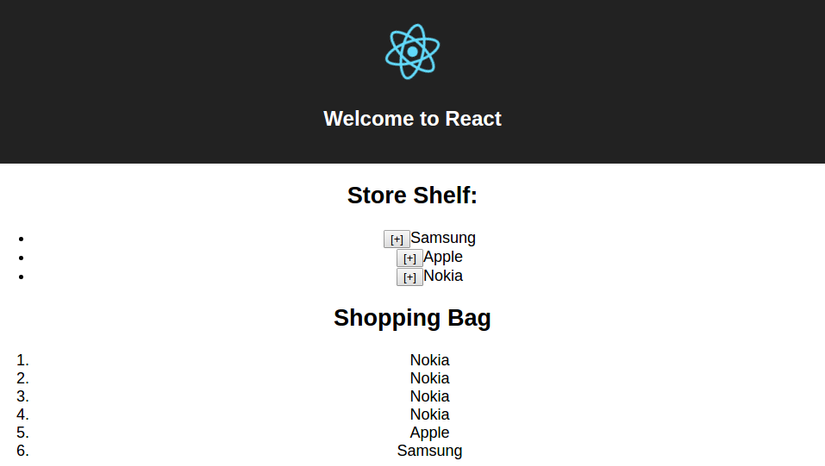
** kết quả:**
Chạy lệnh npm start ta sẽ thấy:
All rights reserved
