React App với Rails 5.1 API
Bài đăng này đã không được cập nhật trong 4 năm
Trong bài viết này tôi sẽ giới thiệu cách xây dựng 1 ứng dụng kết hợp Rails api làm server và reactjs làm app client. Có nhiều cách khác nhau để sử dụng React trong các ứng dụng Ruby on Rails nhưng kết hợp giữa rails API với Reactjs và tách riêng 2 phần back-end và front-end vào trong 2 app khác nhau để thấy được sức mạnh của Rails và Reacjs.
Tạo API server
Chúng ta tạo 1 server demo
rails new --api server-demo-react
tiếp teo tạo data model, chúng ta tạo 1 model post có title và body
rails generate model post title:string body:string
rails db:migrate
Chúng ta fake một ít data: db/seeds.rb
Post.create(
  [
    {
      title: "Title 1",
      body: "this is body 1"
    },
    {
      title: "Title 2",
      body: "this is body 2"
    },
    {
      title: "Title 4",
      body: "this is body 3"
    },
    {
      title: "Title 5",
      body: "this is body 4"
    }
  ])
và Run
rails db:seed
bây giờ tạo PostsController, chúng ta sẽ tạo actions index
rails g controller api/v1/posts_controller.rb

module Api::V1
  class PostsController < ApplicationController
    def index
      @posts = Post.all
      render json: @posts
    end
  end
end
Chúng ta thêm post vào config/routes.rb
Rails.application.routes.draw do
  namespace :api do
    namespace :v1 do
      resources :posts
    end
  end
end
chúng ta chạy server check thử file json có trả về không
rails s
chúng ta test bằng postman
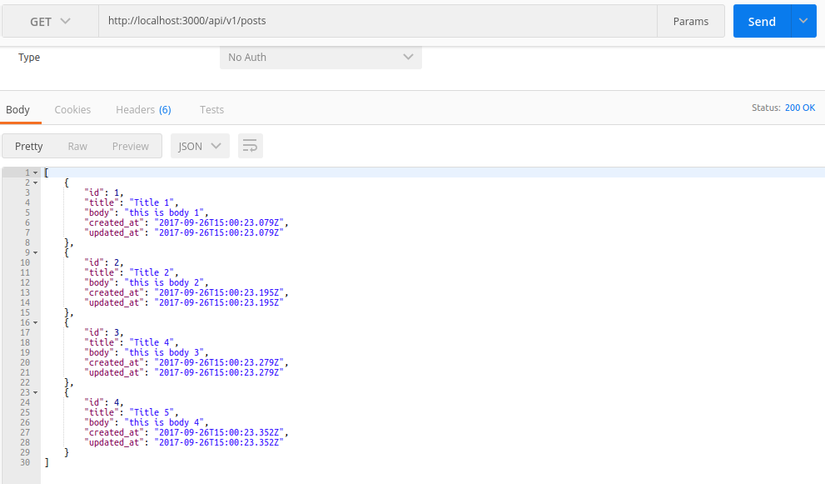 và bây giờ chúng ta đã có 1 api
Build React-App
create-react-app reat-demo
ta tạo file components/PostsContainer.js
import React, { Component } from 'react'

class PostsContainer extends Component {
  render() {
    return (
      <div>
        Posts
      </div>
    )
  }
}

export default PostsContainer
ta update lại App.js
import React, { Component } from 'react'

class PostsContainer extends Component {
  render() {
    return (
      <div>
        Posts
      </div>
    )
  }
}

export default PostsContainer
bây giờ chúng ta fetch data từ server rails với axios
npm install axios --save
ta sử dụng nó rất đơn giản,
import axios from 'axios' //syntax ES6
ta tạo 1 state array posts trong constructor
 constructor(props) {
    super(props)
    this.state = {
      posts: []
    }
  }
ta sẽ get data từ server trong componentWillMount
 componentWillMount() {
    axios.get('http://localhost:3000/api/v1/posts')
    .then(response => {
      console.log(response)
      this.setState({posts: response.data})
    })
    .catch(error => console.log(error))
  }
Ở đây sau khi get data từ server chúng ta set data vào posts state, và chúng ta render ra view
render() {
    return (
      <div>
        {this.state.posts.map((post) => (
            <div className="tile" key={post.id} >
              <h4>{post.title}</h4>
              <p>{post.body}</p>
            </div>
          )
        )}
      </div>
    );
  }
một cái quan trọng nữa là chúng ta phải Enabling Cross Origin Resource Sharing (CORS)
gem 'rack-cors'
bundle install
config.middleware.insert_before 0, Rack::Cors do
  allow do
    origins '*'
    resource '*', :headers => :any, :methods => [:get, :post, :put, :delete, :options]
  end
end
chúng ta update thêm một chút css
.App-header {
  text-align: center;
  height: 150px;
  padding: 20px;
}

.App-intro {
  font-size: large;
}

.tile {
  height: 150px;
  width: 150px;
  margin: 10px;
  background: lightyellow;
  float: left;
  font-size: 11px;
  text-align: left;
}
kết quả sẽ được như sau:
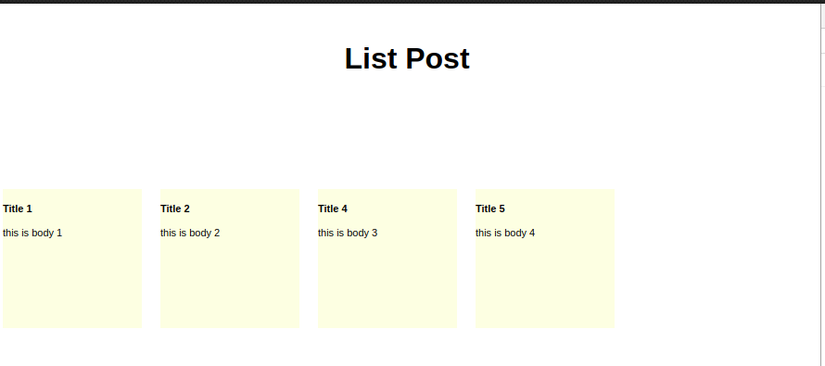 Ở đây chúng ta đã fetch data thành công
All rights reserved
