Xóa nền ảnh với Grabcut
Bài đăng này đã không được cập nhật trong 4 năm
Việc tách vùng ảnh (segmentation) là một bài toán lâu đời trong Computer Vision. Nó có thể được sử dụng để giúp tìm kiếm những vùng được quan tâm (Region of interest) hoặc loại bỏ những vùng chứa ít thông tin. Có nhiều phương pháp tiếp cận với những bài toán tách vùng, có thể kể đến như Watershed, Graph-based cuts,... Sau đây tôi xin trình bày cách phân vùng foreground và background sử dụng Grabcut (thuộc Graph-based cuts) trên Android:
Ở bài trước, tôi đã hướng dẫn các bạn việc cài đặt OpenCV trong Android (cùng vói jni) . GrabCut được xây dựng sẵn trên OpenCV:
cv::Mat result;
cv::Mat bgModel,fgModel;
// GrabCut segmentation
cv::grabCut(image,    // input image
        result,      // segmentation result
        rectangle,   // rectangle containing foreground
        bgModel,fgModel, // models
        iterCount,           // number of iterations
        mode); // use rectangle
Trong đó:
- iterCount: số vòng lặp mà giải thuật sẽ chạy cho đến khi nhận được kết quả.
- mode:
- GC_INIT_WITH_RECT: Hàm sẽ khởi tạo mask và trạng thái theo rectangle argument.
- GC_INIT_WITH_MASK: Hàm sẽ khởi tạo trạng thái theo mask argument.
Dưới đây là hàm jni của tôi giúp trả về foreground và background từ một ảnh:
JNIEXPORT void JNICALL Java_com_hci_hidefaces_MainActivity_removeBackground(JNIEnv *, jobject obj, jlong src, jlong background, jlong foreground) {
	Mat& image = *(Mat *)src;
	Mat& background_out = *(Mat *)background;
	Mat& foreground_out = *(Mat *)foreground;

	Rect rectangle(10, 10, image.cols -20, image.rows -20);

	Mat result;
	Mat bgModel, fgModel;
	Mat downsampledImage;

	if (image.cols >= MAX_INPUT_IMAGE_WIDTH || image.rows >= MAX_INPUT_IMAGE_HEIGHT) {
		cv::pyrDown(image, downsampledImage, cv::Size(image.cols/2, image.rows/2));
	} else {
		downsampledImage = image.clone();
	}
	// GrabCut segmentation
	grabCut(downsampledImage, result, rectangle, bgModel, fgModel, 1, GC_INIT_WITH_RECT);
	cv::compare(result,cv::GC_PR_FGD,result,cv::CMP_EQ);

	// Separate foreground and background images
	cv::Mat _foreground(downsampledImage.size(),CV_8UC3,cv::Scalar(0,0,0));
	downsampledImage.copyTo(_foreground,result); // bg pixels not copied

	Mat whiteImage(Mat(downsampledImage.rows, downsampledImage.cols, CV_8U));
	whiteImage = Scalar(255);
	Mat complementResult = whiteImage - result;

	cv::Mat _background(downsampledImage.size(),CV_8UC3,cv::Scalar(0,0,0));
	downsampledImage.copyTo(_background, complementResult);
	background_out = _background;
	foreground_out = _foreground;
}
Ở hàm MainActivity, tôi định nghĩa hàm tương ứng chiếu đến hàm jni đó.
public native void removeBackground(long src, long background, long foreground);
Tôi tạo thêm hàm ApplyFilter để làm mờ, hoặc contourize background để giúp phân biệt 2 vùng bằng mắt dễ hơn như sau:
JNIEXPORT void JNICALL Java_com_hci_hidefaces_MainActivity_applyFilter(JNIEnv *, jobject obj, jlong background, jlong foreground, jlong dst, jint type) {
	Mat& _background = *(Mat *)background;
	Mat& _foreground = *(Mat *)foreground;
	Mat& image_out = *(Mat *)dst;
	Mat _image_out;
	Mat contourBackground;
	Mat blurBackground;
	// Post processing
	switch(type) {
	case TYPE_CONTOUR:
		contourBackground = contourImage(_background);
		_image_out = contourBackground + _foreground;
		break;
	case TYPE_BLUR:
		blurBackground = blurImage(_background, 25);
		_image_out = blurBackground + _foreground;
		break;
	default:
		contourBackground = contourImage(_background);
		_image_out = contourBackground + _foreground;
		break;
	}

	//convert to RGB
	cvtColor(_image_out, image_out, CV_BGR2RGB);
}
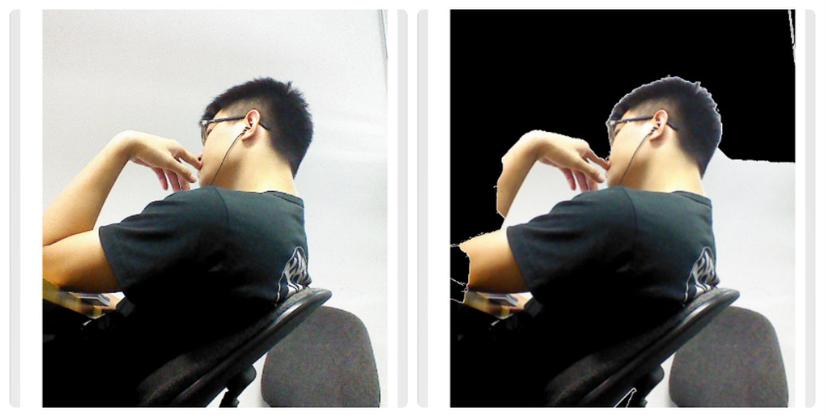
Dưới đây là kết quả của chương trình:

Kết luận
Dựa vào kết quả chúng ta thấy, 2 vùng nhận được chưa thực sự theo ý muốn, nhưng thuật toán GrabCut đã đưa ra kết quả đáng ghi nhận.
All rights reserved