Xây dựng ứng dụng Chat đơn giản từ Spring Boot và React Native - Phần 4: Xây dựng giao diện Chat đơn giản
Bài đăng này đã không được cập nhật trong 5 năm
[Góc tâm sự] Lại tiếp tục vã lên vã xuống trong tuần vừa qua các bác ạ! Mình được giao bảo trì cho 1 module khá lớn. Vật vã ở chỗ đụng tới đâu cũng là “smell code”, thúi không thể ngửi được. Đặc biệt là cách đặt tên biến vô cùng tối nghĩa và khó hiểu. Mình bị nhũn não cả một tuần liền vì cố gắng hiểu được luồng đi của nó. Kết quả là phải đập hết và viết một luồng mới, sạch sẽ và dễ hiểu hơn rất nhiều. Theo mình, Title (Senior hay Junior) không quan trọng mà hơn nhau là viết code có dễ hiểu, dễ bảo trì và tái sử dụng được không (cuối cùng là tới hiệu năng  ). Người ta gọi đó là một Developer Chuyên nghiệp.
Bài viết này gồm có 4 phần:
- Dựng Database với Heroku PostgreSql
- Xây dựng API cho ứng dụng Chat với Spring Boot
- Deploy API lên Heroku
- Xây dựng giao diện Chat đơn giản trên điện thoại với React Native
Kết quả thu được

Kiến thức nền cho phần này:
- Cài đặt Notepad++
- Các kiến thức nền trong React Native. Bản thân React Native có một bộ document rất tốt với các example rất dễ hiểu (Chú ý vọc ở phần The Basics, Design, Connectivity)
- Cài đặt môi trường cho React Native, bao gồm Nodejs và JDK8
- Môi trường để chạy ứng dụng: cái này thì mình khuyến khích các bạn sử dụng Expo do React Native support luôn. Nó có ưu điểm là tuy dựng ứng dụng trên windows, nhưng có thể chạy ứng dụng trên cả Android hoặc IOS (không cần phải dùng máy ảo để chạy Android hoặc Macbook để chạy IOS), thậm chí là publish ứng dụng ra ngoài, và trong bài viết này mình cũng hướng dẫn build project bằng Expo.
Bắt đầu thôi!
Bước 1: Cài đặt Expo Client, Expo – CLI và chạy Ứng dụng đầu tiên
Hãy chắc chắn là cài được Nodejs trước nhé 
- Cài đặt Expo Client
Hiện tại Expo Client đều có trên Google Play và App Store, tải về máy của bạn nhé

Sau đó Đăng ký cho bản thân một tài khoản Expo và sign in vào hệ thống
- Cài đặt Expo – CLI
Có hai cách để các bạn chạy câu lệnh command
- Run cmd và trỏ vào đường dẫn muốn cài đặt project
- Các bạn vào thẳng đường dẫn folder muốn cài đặt project, nhấn giữ phím Shift và nhấp nút phải chuột, chọn OpenPowerShell (cách này thì mình hay thường dùng, do mình rất lười viết lệnh trỏ tới đường dẫn mong muốn ở cách 1
 )
)

Chạy câu lệnh sau để cài đặt Expo – CLI
npm install -g expo-cli
Chạy câu lệnh sau để tạo một project Expo mới
expo init ChitChatApp
Dùng các mũi tên lên, xuống và chọn minimal rồi nhấn Enter.

Lưu ý: hiện tại project tạo bằng Expo – CLI và project tạo bằng React Native – CLI sẽ khác nhau về mặt config và cấu trúc project, và vẫn chưa có cách tốt nhất để hai loại project này convert cho nhau. Nên tốt nhất hãy cứ trung thành 1 cách ban đầu.
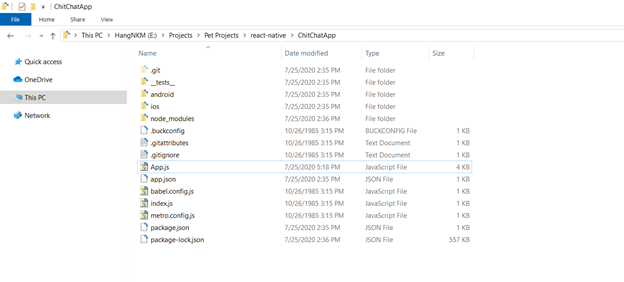
Sau khi tạo project thành công, sẽ có một folder của Project xuất hiện trong đường dẫn bạn muốn cài đặt lúc đầu.
Bước 2: Thêm các hình ảnh vào folder assets
Trong folder assets, tạo một folder là Images. Trong folder này cần ít nhất có 2 hình: background.jpg và icon send.png

Lưu ý: với hình background nên có độ phân giải cao để có thể tràn màn hình mà không bị bể
Bước 3: Tạo Styles
Tạo thêm một folder với tên là common, và thêm một file styles.js như sau:
import { StyleSheet } from 'react-native';

const styles = StyleSheet.create({
  container: {
    flex: 1,
    flexDirection: 'column',
    justifyContent: 'flex-end'
  },
  imgBackground: {
    flex: 9 / 10,
    backgroundColor: '#f2f2f2',
    flexDirection: 'column',
    justifyContent: 'center'
  },
  chatTextboxView: {
    flexDirection: 'row',
    backgroundColor: '#FFF',
    width: '100%',
    height: '100%',
    justifyContent: 'space-around',
    alignItems: 'center',
    marginLeft: 2
  },
  touchText: {
    color: '#0099ff',
    fontSize: 14
  },
  chatLineView: {
    flex: 1,
    flexDirection: 'column',
    width: '50%',
    alignItems: 'flex-start',
    padding: 8,
    backgroundColor: '#ffffff',
    borderRadius: 8,
    marginBottom : 10,
    marginTop : 10,
    marginLeft : 5,
    marginRight : 5
  },
  itemUserName: {
    color:"#3399ff",
    padding:5,
    fontSize:14
  },
  itemText: {
    color:"#000000",
    padding:5,
    fontSize:14
  },
  inputIcon:{
        width:26,
        height:26,
        tintColor:'#ffffff',
        marginRight:5,
        justifyContent: 'center'
  },
  button:{
	height:46,
	width: 50,
	borderRadius:10,
	marginRight:20,
	backgroundColor:'#0082c8',
	justifyContent:'center',
	alignItems:'center'
  },

});

export default styles;
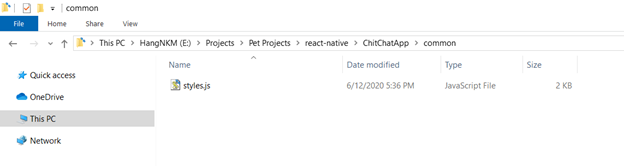
Ở bước này ta sẽ có cấu trúc project như sau:

Đây là bố cục màn hình chúng ta chuẩn bị xây dựng:

Bước 4: Tạo class NodeChat
Các bạn mở file App.js bằng Notepad++ và xóa hết nội dung trong đó. Chúng ta sẽ đi từng bước ở đây.
- Import các thư viện cần thiết cho ứng dụng
import React,{Component} from 'react';
import {View, Text,Image,TextInput, FlatList, StyleSheet,TouchableOpacity, Keyboard, ImageBackground} from 'react-native';
import styles from './common/styles.js';
- Tạo class NodeChat
import React,{Component} from 'react';
import {View, Text,Image,TextInput, FlatList, StyleSheet,TouchableOpacity, Keyboard, ImageBackground} from 'react-native';
import styles from './common/styles.js';

class NodeChat extends Component{
    render(){
        return(
          <View style={styles.chatLineView} >
              <Text style={styles.itemUserName}>{this.props.sender}</Text>
              <Text style={styles.itemText}>{this.props.chatContent}</Text>
          </View>
        );
    }
}
- Tạo class ChatList và constructor
import React,{Component} from 'react';
import {View, Text,Image,TextInput, FlatList, StyleSheet,TouchableOpacity, Keyboard, ImageBackground} from 'react-native';
import styles from './common/styles.js';

class NodeChat extends Component{
    render(){
        return(
          <View style={styles.chatLineView} >
              <Text style={styles.itemUserName}>{this.props.sender}</Text>
              <Text style={styles.itemText}>{this.props.chatContent}</Text>
          </View>
        );
    }
}

export default class ChatList extends Component{
	//constructor
    constructor(props){
        super(props);
        this.state = {
            chatData:[],
            username: 'bienthaikieusa', //thay đổi username khi cài vào một máy khác
            chatInputContent: ''
        };

    }


}
Lưu ý: Bạn thay đổi Username khi cài ứng dụng vào máy của đối diện.
Bước 5: Các hàm xử lý dữ liệu
Vẫn tiếp tục với file App.js, thêm các hàm xử lý dữ liệu trong class ChatList.
Lưu ý: các bạn hãy lấy đường dẫn dự án heroku ở phần 3: Deploy API lên Heroku để sử dụng trong bước này
- Hàm _getMessages(): lấy tất cả tin nhắn từ database
export default class ChatList extends Component{
    constructor(props){
        super(props);
        this.state = {
            chatData:[],
            username: 'bienthaikieusa', //thay đổi username khi cài vào một máy khác
            chatInputContent: ''
        };

    }

    _getMessages = () => {
      fetch('https://chitchatapi-app.herokuapp.com/messages')
        .then((response) => response.json())
        .then((json) => {
          this.setState({ chatData: json });
        })
        .catch((error) => console.error(error));
    }

}
- Hàm _sendMessage(): thêm tin nhắn vào database
export default class ChatList extends Component{
    constructor(props){
        super(props);
        this.state = {
            chatData:[],
            username: 'bienthaikieusa', //thay đổi username khi cài vào một máy khác
            chatInputContent: ''
        };

    }

    _getMessages = () => {
      fetch('https://chitchatapi-app.herokuapp.com/messages')
        .then((response) => response.json())
        .then((json) => {
          this.setState({ chatData: json });
        })
        .catch((error) => console.error(error));
    }

	_sendMessage = () => {
        let chatContent = this.state.chatInputContent;
        let username = this.state.username;

        fetch('https://chitchatapi-app.herokuapp.com/message/chat', {
          method: 'POST',
          headers: {
            'Content-Type': 'application/json'
          },
          body: JSON.stringify({
            username: username,
            password: '123',
            messages: chatContent,
            status: 1
          })
        })
        .then((response) => response.json())
        .then((json) => {
          console.log(json);
		  this.setState({chatInputContent: ''});
		  Keyboard.dismiss();
        })
        .catch((error) => console.error(error));
    }

}
- Hàm _renderChatLine(): xử lý tin nhắn của user nào gửi về mặt giao diện, vd nếu là bạn gửi thì mặc định tin nhắn sẽ nằm ở bên phải, người đối diện ở bên trái
export default class ChatList extends Component{
    constructor(props){
        super(props);
        this.state = {
            chatData:[],
            username: 'bienthaikieusa', //thay đổi username khi cài vào một máy khác
            chatInputContent: ''
        };

    }

    _getMessages = () => {
      fetch('https://chitchatapi-app.herokuapp.com/messages')
        .then((response) => response.json())
        .then((json) => {
          this.setState({ chatData: json });
        })
        .catch((error) => console.error(error));
    }

	_sendMessage = () => {
        let chatContent = this.state.chatInputContent;
        let username = this.state.username;

        fetch('https://chitchatapi-app.herokuapp.com/message/chat', {
          method: 'POST',
          headers: {
            'Content-Type': 'application/json'
          },
          body: JSON.stringify({
            username: username,
            password: '123',
            messages: chatContent,
            status: 1
          })
        })
        .then((response) => response.json())
        .then((json) => {
          console.log(json);
		  this.setState({chatInputContent: ''});
		  Keyboard.dismiss();
        })
        .catch((error) => console.error(error));
    }

	 _renderChatLine = (item) =>
    {
        if(item.username === this.state.username)
        {
            return(
                <View style= { { alignItems: 'flex-end'}} >
                        <NodeChat sender="You" chatContent={item.messages} />
                </View>
            );
        }
        return(
            <NodeChat sender={item.username} chatContent={item.messages} />
        );
    };

}
- Hàm _onChangeChatInput(): xử lý tin nhắn nhập vào state
export default class ChatList extends Component{
    constructor(props){
        super(props);
        this.state = {
            chatData:[],
            username: 'bienthaikieusa', //thay đổi username khi cài vào một máy khác
            chatInputContent: ''
        };

    }

    _getMessages = () => {
      fetch('https://chitchatapi-app.herokuapp.com/messages')
        .then((response) => response.json())
        .then((json) => {
          this.setState({ chatData: json });
        })
        .catch((error) => console.error(error));
    }

	_sendMessage = () => {
        let chatContent = this.state.chatInputContent;
        let username = this.state.username;

        fetch('https://chitchatapi-app.herokuapp.com/message/chat', {
          method: 'POST',
          headers: {
            'Content-Type': 'application/json'
          },
          body: JSON.stringify({
            username: username,
            password: '123',
            messages: chatContent,
            status: 1
          })
        })
        .then((response) => response.json())
        .then((json) => {
          console.log(json);
		  this.setState({chatInputContent: ''});
		  Keyboard.dismiss();
        })
        .catch((error) => console.error(error));
    }

	 _renderChatLine = (item) =>
    {
        if(item.username === this.state.username)
        {
            return(
                <View style= { { alignItems: 'flex-end'}} >
                        <NodeChat sender="You" chatContent={item.messages} />
                </View>
            );
        }
        return(
            <NodeChat sender={item.username} chatContent={item.messages} />
        );
    };

	 _onChangeChatInput = (text) => {
      this.setState({chatInputContent: text});
    }

}
- Các hàm xử lý để reload dữ liệu
export default class ChatList extends Component{
    constructor(props){
        super(props);
        this.state = {
            chatData:[],
            username: 'bienthaikieusa', //thay đổi username khi cài vào một máy khác
            chatInputContent: ''
        };

    }

    _getMessages = () => {
      fetch('https://chitchatapi-app.herokuapp.com/messages')
        .then((response) => response.json())
        .then((json) => {
          this.setState({ chatData: json });
        })
        .catch((error) => console.error(error));
    }

	_sendMessage = () => {
        let chatContent = this.state.chatInputContent;
        let username = this.state.username;

        fetch('https://chitchatapi-app.herokuapp.com/message/chat', {
          method: 'POST',
          headers: {
            'Content-Type': 'application/json'
          },
          body: JSON.stringify({
            username: username,
            password: '123',
            messages: chatContent,
            status: 1
          })
        })
        .then((response) => response.json())
        .then((json) => {
          console.log(json);
		  this.setState({chatInputContent: ''});
		  Keyboard.dismiss();
        })
        .catch((error) => console.error(error));
    }

	 _renderChatLine = (item) =>
    {
        if(item.username === this.state.username)
        {
            return(
                <View style= { { alignItems: 'flex-end'}} >
                        <NodeChat sender="You" chatContent={item.messages} />
                </View>
            );
        }
        return(
            <NodeChat sender={item.username} chatContent={item.messages} />
        );
    };

	 _onChangeChatInput = (text) => {
      this.setState({chatInputContent: text});
    }

	componentDidMount() {
	   this.refresh = setInterval(() => this._getMessages(),2000); //reload lại list tin nhắn sau mỗi 2s
    }

	componentWillUnmount() {
		clearInterval(this.refresh);
	}

}
Bước 6: Tạo giao diện Chat
- Hàm render(): bao gồm xây dựng Chat List và render các Node Chat vào trong Chat List
export default class ChatList extends Component{

	//constructor

    //các hàm xử lý dữ liệu

	//render
    render(){
        return (
            <View style={styles.container}>
              <ImageBackground imageStyle= { {  opacity: 0.4 }} source={require('./assets/Images/background.jpg')} style={styles.imgBackground} >
                    <FlatList data={this.state.chatData} keyExtractor={(item) => item.id.toString()} renderItem={({item},index) => this._renderChatLine(item)} />
              </ImageBackground>

                <View style= { {  flex: 1 / 10 }} >
                    <View style={styles.chatTextboxView}>
                        <View style= { { flex : 8/10}} >
                          <TextInput placeholder="Typing..." value={this.state.chatInputContent} onChangeText={(text) => this._onChangeChatInput(text)}
                            style= { {  height: 100, fontSize: 18 }} />
                        </View>
                        <View style= { { flex : 2/10}} >
							<TouchableOpacity onPress={() => this._sendMessage()}>
								<View style={styles.button}>
									<Text style={styles.touchText}>Send</Text>
								</View>
							</TouchableOpacity>
                        </View>
                    </View>
                </View>

            </View>
        );
    }

}
Bước 7: Chạy ứng dụng
Đi tới đường dẫn của ứng dụng và chạy câu lệnh sau:
expo start

Chạy lệnh thành công thì hệ thống sẽ tự động mở browser mặc định trong máy bạn như sau:
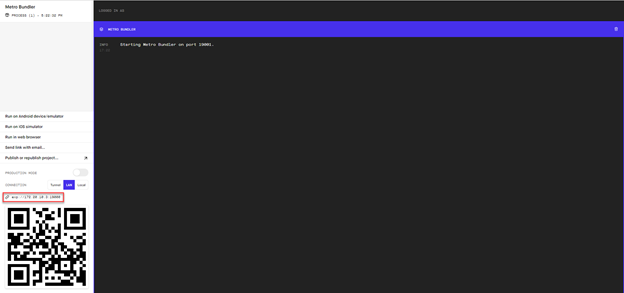
Bạn cũng có thể lấy đường dẫn qua console sau khi chúng ta gõ lệnh expo start

Nhập đường dẫn trong khung vào trình duyệt bất kỳ trên điện thoại. Hệ thống trong điện thoại sẽ yêu cầu bạn cấp quyền mở ứng dụng bằng Expo, ta sẽ được thành quả như sau.
Lưu ý: đường dẫn trong khung sẽ thay đổi dựa vào IP của đường truyền internet. Nếu bạn tắt console đi thì ứng dụng sẽ tắt. Vì vậy để không bị phụ thuộc vào, bạn nên publish ứng dụng lên expo.
Có thể kiểm tra những tin nhắn đã được gửi đi qua Database như đã giới thiệu ở phần 1

Các bạn có thể clone project từ github tại đây để tham khảo
Mở rộng thêm
Đây chỉ mới là những bước cơ bản để tạo nên cái xương sống của một ứng dụng Chat. Nếu được, bạn hãy tự mình vọc thêm một số chức năng mới như sau, cái nào dễ làm trước:
- Đăng nhập Username/Password mới vào được phòng Chat (nên làm tính năng này trước rồi hãy publish lên Expo bạn nhé
 )
) - Hiển thị ngày giờ trong NodeChat
- Nhấn giữ NodeChat và cho phép Xóa tin nhắn đó
- Timeout cho một tài khoản (vd tầm 15’ không có sự tương tác từ người dùng thì ứng dụng tự động thoát)
- Hiển thị chức năng Đã gửi và Đã…khinh =))) (Đã xem bạn nhé
 )
)
Trong quá trình vọc, có bước nào chưa làm được, đừng ngần ngại comment bên dưới, chúng ta sẽ cùng nhau debug
All rights reserved
