Xây dựng ứng dụng chat sử dụng Rails và Server-Sent Events
Bài đăng này đã không được cập nhật trong 10 năm
Như mọi người cũng biết, hiện nay có khá nhiều kỹ thuật để xây dựng 1 app chat, ví dụ như sử dụng Nodejs, Websocket hay cũ hơn nữa là AJAX polling. Bài viết dưới dây sẽ hướng dẫn cách xây dựng 1 ứng dụng chat bằng cách sử dụng 1 kỹ thuật khá mới mà HTML 5 cung cấp đó là Server-Sent Event trên Rails.
Vậy trước tiên ta cần tìm hiểu chút về Server-Sent Event.
Server-Sent Event là gì ?
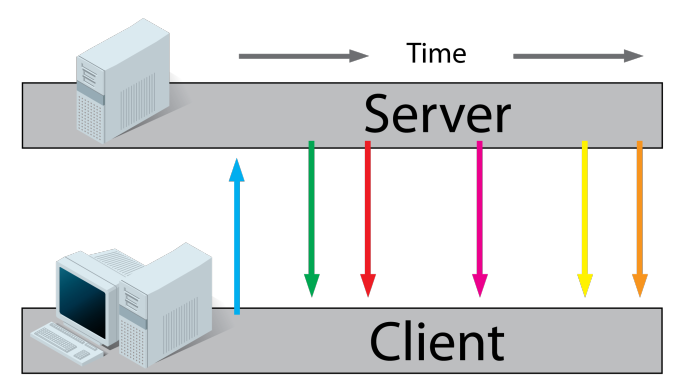
Nói ngắn gọn, Server-Sent-Event(SSE) là 1 thư viện HTML 5 cho phép ta lấy những dữ liệu cập nhật từ server xuống máy trạm. Nó rất tốt trong trường hợp trang web muốn liên tục cập nhật các thông tin mới từ server theo thời gian thực. Và hiện nay hầu hết trình duyệt đều hỗ trợ Server-Sent Events, ngoại trừ IE.
Xây dựng 1 app chat sử dụng SSE và Rails
Trong ứng dụng chat này, dưới đây ta sẽ tập trung vào SSE tuy nhiên ta cũng sẽ thực hiện một số bước sau:
- Chỉ có member đã đăng ký mới được gửi và đọc message
- Authentice bằng Facebook
- Hiển thị Avatar, nickname ( lấy thông tin từ facebook ) và ngày giờ post comment
- bắt validate cho message
- Dùng SSE để gửi và nhận message mà ko cần load lại trang.
Trước tiên ta sẽ thực hiên nhanh việc xâu dựng 1 ứng dụng rails thông thường bao gồm các bảng User, Comment.
Khởi tạo project và thực hiên Authenticate
Ứng dụng của chúng ta sẽ dùng Puma Web Server, nó không hỗ trợ cho sqlite nên ta sẽ dùng postgres :
$ rails new sse-chat --database=postgresql
Tiếp đến ta tạo bảng user để lưu các thông tin của user bao gồm:
provider: tên của social network dùng để authenticate, ở đây ta dùng facebookname: tên hiển thị của user, ở đây ta cũng lấy từ facebookprofile_url: đường dẫn profile của useravatar_urluid: id của user trên facebook
$ rails g model User name:string avatar_url:string provider:string profile_url:string uid:string
Add index cho bảng User, mở xxx_create_users.rb , ta thêm vào cuối hàm change
  add_index :users, :uid
  add_index :users, :provider
  add_index :users, [:uid, :provider], unique: true
Migrate db:
$ rake db:migrate
Ứng dụng của ta sẽ authentica bằng Facebook thông qua omniauth-facebook, ta đăng ký 1 app facebook để lấy App_id và App_secret.
Thêm vào Gemfile:
gem 'omniauth-facebook'
Cài đặt Gem
$ bundle install
Trong Facebook app, đổi giá trị Site URL thành http://localhost:3000
Tạo file omniauth.rb trong config/initializers để thiết lập các thông tin truy cập app facebook
Rails.application.config.middleware.use OmniAuth::Builder do
  provider :facebook, 'Your Facebook Key', 'Your Facebook Secret',
           scope: 'public_profile', display: 'page', image_size: 'square'
end
Khai báo routes trong config/routes.rb
get '/auth/:provider/callback', to: 'sessions#create'
get '/auth/failure', to: 'sessions#auth_fail'
get '/sign_out', to: 'sessions#destroy', as: :sign_out
Bây giờ ta sẽ tiến hành viết hàm trong SessionsController để thực hiện authenticate như sau ( Bài này ta sẽ không đi vào giải thích chi tiết chức năng này và code cũng khá dễ hiểu )
class SessionsController < ApplicationController
  def create
    user = User.from_omniauth(request.env['omniauth.auth'])
    cookies[:user_id] = user.id
    flash[:success] = "Hello, #{user.name}!"
    redirect_to root_url
  end

  def destroy
    cookies.delete(:user_id)
    flash[:success] = "See you!"
    redirect_to root_url
  end

  def auth_fail
    render text: "You've tried to authenticate via #{params[:strategy]}, but the following error occurred: #{params[:message]}", status: 500
  end
end
Và trong User model, ta khai báo hàm from_omniauth để lấy thông tin user từ facebook và lưu vào db.
 class << self
    def from_omniauth(auth)
      provider = auth.provider
      uid = auth.uid
      info = auth.info.symbolize_keys!
      user = User.find_or_initialize_by(uid: uid, provider: provider)
      user.name = info.name
      user.avatar_url = info.image
      user.save!
      user
    end
  end
Đến đây ta đã thực hiện xong việc authenticate cho user. Cần nói thêm là ứng dụng này ta dùng style bootstrap cho đơn giản, trong bài viết này sẽ ko đề cập cụ thể đến view và style ( Bạn có thể xem chi tiết và tham khảo trong source code )
Thêm 1 bước quan trọng trong hầu hết các app là ta khai báo biến @current_user. ta thực hiện trong applications_controller
def current_user
  @current_user ||= User.find_by(id: cookies[:user_id]) if cookies[:user_id]
end

helper_method :current_user
Tạo bảng comment
Bảng comment ta tạo đơn giản chỉ gồm 2 trường body và user_id (trường id, created_at, updated_at là mặc định)
rails g model Comment body:text user:references
rake db:migrate
Trong model User tạo quan hệ bảng
has_many :comments, dependent: :delete_all
Thêm validate cho comment, nội dung mesage không được để trống và quá 2000 ký tự
validates :body, presence: true, length: {maximum: 2000}
và 1 hàm để format lại thời gian post comment, ta sẽ gọi nó trong view.
def timestamp
  created_at.strftime('%-d %B %Y, %H:%M:%S')
end
Và function để save comment trong controller
def create
  if current_user
    @comment = current_user.comments.build(comment_params)
    @comment.save
  end
end
Bây giờ ta sẽ thiết lập 1 web server hỗ trợ multithread để dùng SSE. Ứng dụng rails của chúng ta hiện đang sử dụng web sẻver default WEBrick tuy nhiên nó lại ko hỗ trợ multithread nên ta sẽ sử dụng 1 web servẻ khác, ở đây ta dùng puma. Ta vào Gèmile và thay thế gem 'thin' bằng gem 'puma' và bundle install.
Tiếp đó ta sẽ config 1 chút ( để tìm hiểu kỹ về puma và cách config ta có thể xem chi tiết tại đây
Tạo file config/puma.rb
workers Integer(ENV['PUMA_WORKERS'] || 3)
threads Integer(ENV['MIN_THREADS']  || 1), Integer(ENV['MAX_THREADS'] || 16)

preload_app!

rackup      DefaultRackup
port        ENV['PORT']     || 3000
environment ENV['RACK_ENV'] || 'development'

on_worker_boot do
  # worker specific setup
  ActiveSupport.on_load(:active_record) do
    config = ActiveRecord::Base.configurations[Rails.env] ||
        Rails.application.config.database_configuration[Rails.env]
    config['pool'] = ENV['MAX_THREADS'] || 16
    ActiveRecord::Base.establish_connection(config)
  end
end
Ở đây chỉ là ứng dụng demo nên ta thiết lập các thông số như trên, khi lượng user truy cập lớn hơn ta cần phải update lại chúng.
Và để load được file này, ta cần tạo 1 Procfile ở thư mục gốc của ứng dụng
Procfile
web: bundle exec puma -C config/puma.rb
Tiếp đến ta cần thay đổi giá trị config.eager_load và config.cache_classes để sự dụng streaming và SSE. Sau khi thay đổi các giá trị này, ta cần khởi động lại server.
config/environments/development.rb
config.cache_classes = true
config.eager_load = true
Streaming
bây giờ ta sẽ thêm hàm streaming cho web server. ta cần update 1 chút trong routes và controller. Để thực hiện stream, ta cần thêm hàm index trong CommentController và Rails 4 có ActionController::Live hỗ trợ việc dùng streaming SSE. Ta chỉ việc add module này vào controller
class CommentsController < ApplicationController
  include ActionController::Live
Ta cần set kiểu response trả về là text/event-stream :
def index
  response.headers['Content-Type'] = 'text/event-stream'
Bây giờ hàm index của ta đã khai báo function streaming, ta cần thêm cơ chế gọi hàm này mỗi khi có bất kỳ 1 comment mới.
def index
  response.headers['Content-Type'] = 'text/event-stream'
  sse = SSE.new(response.stream)
  begin
    Comment.on_change do |data|
      sse.write(data)
    end
  rescue IOError
    # Client Disconnected
  ensure
    sse.close
  end
  render nothing: true
end
Trong hàm trên, ta khai báo biến sse để khởi tạo stream. on_change dùng để bắt sự kiện mỗi khi có bất kỳ 1 comment mới nào (ta sẽ khai báo trong comment model).rescue IOError sẽ raise lên lỗi mỗi khi user bị đisconnect.
ensure luôn luôn được gọi để đóng kết nỗi giải thread khi thực hiện xong việc đọc ghi dữ liệu.
Tiếp theo ta cần thực hiện NOTIFY messages. Để làm việc đó ta khai báo after_create callback.
after_create :notify_comment_added
.
.
.
private

def notify_comment_added
  Comment.connection.execute "NOTIFY comments, 'data'"
end
Bây giờ ta tiến hành viết hàm on_change đã gọi ở trên.
models/comment.rb
class << self
  def on_change
    Comment.connection.execute "LISTEN comments"
    loop do
      Comment.connection.raw_connection.wait_for_notify do |event, pid, comment|
        yield comment
      end
    end
  ensure
    Comment.connection.execute "UNLISTEN comments"
  end
end
wait_for_notify được dùng để chờ thông báo từ channel, khi thông báo xuất hiện kèm theo data thì ta truyền nó đến hàm index trong controller.
Comment.on_change do |data|
  sse.write(data)
end
data ở đây chính là comment.
Subscribing Event Source
Ta thực hiên trong comments.coffee
source = new EventSource('/comments')
event listener onmessage được gọi và thực hiện khi 1 dữ liệu mà không có sự kiện có tên được gửi đến. Ta thêm 1 số login trong comment.coffee. Disable nút submit khi user đã gửi tin.
source.onmessage = (event) ->
  $('#comments').find('.media-list').prepend($.parseHTML(event.data))
  $('.media-body').emoticonize()

jQuery ->
  $('#new_comment').submit ->
    $(this).find("input[type='submit']").val('Sending...').prop('disabled', true)

  return
Ở đây ta sẽ sử dụng việc truyền data dưới dạng HTML. Ta sẽ truyền comment ID để get dữ liệu và cho hiển thị lên view.
private

def notify_comment_added
  Comment.connection.execute "NOTIFY comments, '#{self.id}'"
end
Và controller
def index
  response.headers['Content-Type'] = 'text/event-stream'
  sse = SSE.new(response.stream)
  begin
    Comment.on_change do |id|
      comment = Comment.find(id)
      t = render_to_string(partial: 'comment', formats: [:html], locals: {comment: comment})
      sse.write(t)
    end
  rescue IOError
    # Client Disconnected
  ensure
    sse.close
  end
  render nothing: true
end
Ở đây ta dùng render_to_string để lưu kết quả dưới dạng string, ta cũng cần khai báo format.
Như vậy ta đã xây dựng xong 1 ứng dụng chat sử dụng Rails và Server Sent Event .Vì đây là 1 kỹ thuật khá mới và mạnh nên hi vọng nó sẽ được áp dụng trong nhiều ứng dụng sau này.
Source code tham khảo: https://github.com/ngocthang/sse-chat
Bạn cũng có thể xem Demo
All rights reserved
