Xây dựng Authentication provider với gem OPro
Bài đăng này đã không được cập nhật trong 4 năm
I. Mở đầu
Xin chào các bạn (honho)
Chắc hẳn các bạn đã từng sử dụng tới OAuth2 để login vào trang web bằng tài khoản Facebook hoặc Google. (để biết chi tiết hơn, các bạn hãy đọc ở đây (yaoming))
Đại loại nó là phương thức chứng thực, cho phép các ứng dụng của bên thứ ba có quyền truy cập tới một HTTP Service, thay mặt chủ sở hữu sử dụng tài nguyên của mình (tất nhiên cần phải có sự cho phép của người đó). Yêu cầu truy cập có thế đến từ website, mobile app,...
Ở bài viết trước, tôi có demo một app nho nhỏ, dùng OAuth2 để login bằng tài khoản Twitter.
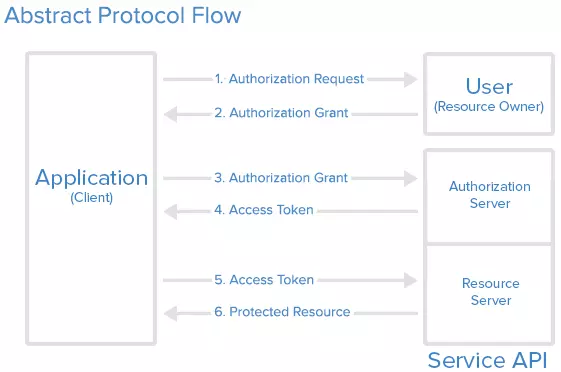
theo mô hình trên, có thể hiểu phần code đó là ở phía bên trái hình - Application(client).
Hôm nay tôi sẽ tạo một App có chức năng giống như phần phía bên phải hình - Service API, với sự hỗ trợ của gem OPro và Devise.
Tôi sẽ tạo ra một Server để lưu trữ các thông tin của User, cung cấp các token để xác thực quyền truy cập.
Cùng với đó là một Client để tạo request yêu cầu truy cập và lấy thông tin tới Server ta vừa tạo. (dance2)
II. Demo
1. Workflow
- Bước 1: Register application
Giống như sử dụng OAuth để login thông qua các ông lớn khác (Facebook, google), ta cũng có công đoạn đăng ký thông tin.
Sau khi sign_up bằng gem Devise, OPro sẽ dẫn tới trang đăng ký.
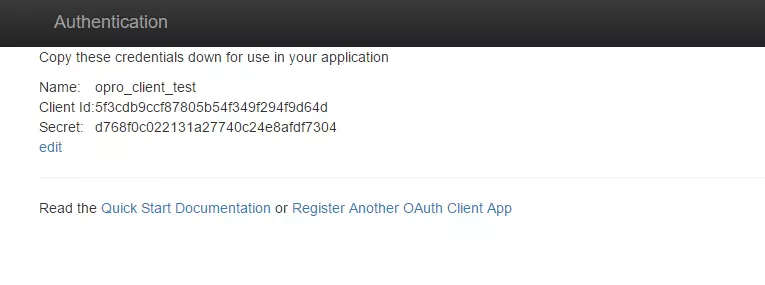
Sau khi đăng ký thành công, server sẽ trả về cho chúng ta key là: Client id và Secret.
Ta sử dụng key được cấp để build app client.
VD:
|*Name:*| Opro_client_test|
|*Client_id:*| abcdef123456789|
|*Secret:*| 987654321fedcba|
- Bước 2: User tạo request yêu cầu truy cập tới server
Từ Client app, muốn truy cập tới user account trên server, ta login và truy cập tới url sau:
http://domain/oauth/new?client_id=abcdef123456789&client_secret=987654321fedcba&redirect_uri=%2F
Url này sẽ dẫn tới page 'hỏi bạn có muốn cấp quyền truy cập không' ?
Nếu đồng ý, sẽ được redirect về trang ban đầu có kèm theo param code trên url, params được sử dụng để lấy access_token
http://domain/?code=qwerty123456
- Bước 3: Get access token
Có được đủ các params client_id, client_secret, code, ta tạo request tới server bằng POST.
Response trả về dưới dạng json
{"access_token":"accesstoken123123123","refresh_token":"refreshtoken321654","expires_in":null}
- Bước 4: Sử dụng access token
Có được access_token cũng giống như việc ta đã được cấp cho 1 chiếc chìa khóa.
Dựa vào nó, có thể truy cập và lấy về dữ liệu của tài khoản đặt trên server.
Truy cập url như sau:
http://domain/oauth_tests/show_me_the_money.json?access_token=accesstoken123123123
Server sẽ trả về successful result
Các công cụ sử dụng:
- Rails 4.2.1
- MySQL2 0.3.18
- Ruby 2.1.5
Let's start (honho)
2. Khởi tạo Server
Bắt đầu từ phần server trước, khởi tạo web application
rails new oproserver
Add thêm gem cần thiết
gem "opro"
gem "devise"
Gem Devise được add vào để giải quyết công đoạn đăng ký app và check quyền. Tất nhiên ta có thể tự check bằng tay nhưng ... tội gì không dùng (yaoming)
Sau khi chạy bundle install xong, tiến hành generate cho gem devise
rails g devise:install
rails g devise User
Tiến hành generate các file cho gem opro
rails g opro:install
Khi generate cho gem opro, ngoài file config và routes, nó sẽ generate ra thêm 2 file migrate table
Table opro_auth_grants: lưu trữ các token, expires time, permission.
Table opro_client_apps: lưu trữ các api key cung cấp phía app client sử dụng.
Sau khi có đủ các table cơ bản, ta chạy lệnh
rake db:migrate
Config xong gem, giờ xử lý view và controller.
Trước khi thiết lập layout, ta thêm bootstrap cho đẹp trai (yaoming)
gem "bootstrap-sass"
Nhớ import
# stylesheets/application.scss
@import "bootstrap-sprockets";
@import "bootstrap";
@import 'bootstrap/theme';
Xây dựng layout bên ngoài
# views/layouts/application.html.erb
<nav class="nav navbar-inverse">
  <div class="container" >
    <div class="navbar-header">
      <%= link_to "Authentication", root_path, class: "navbar-brand" %>
    </div>
    <div id="navbar">
      <ul class="nav navbar-nav">
      </ul>
    </div>
  </div>
</nav>

<div class="container">
  <% flash.each do |message_type, message| %>
    <div class="alert alert-<%= message_type %>">
      <%= message %>
    </div>
  <% end %>

  <%= yield %>

</div>
Tạo controller và view để điều hướng tới trang đăng ký API key
rails g controller pages index
# views/pages/index.html.erb

<h1> Welcome Kappa </h1>
<%= link_to 'Register client app', new_oauth_client_app_path %>
Kết quả
Trang chủ
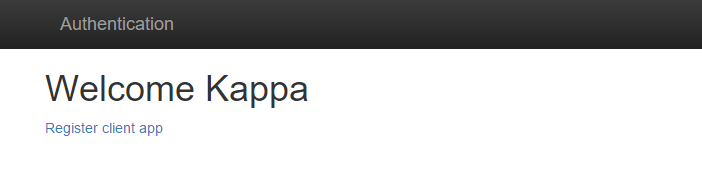
Sau khi ấn vào link "Register client app", browser sẽ redirect tới trang để login và sign_up của devise tạo ra. Ta sign_up như bình thường
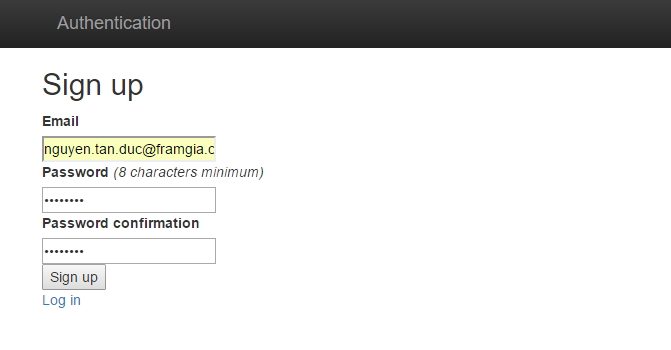
Sign up hoàn tất, thông tin về user sẽ được lưu vào DB. Tiếp theo, ta sẽ được chuyển đến trang để đăng ký Oauth client application
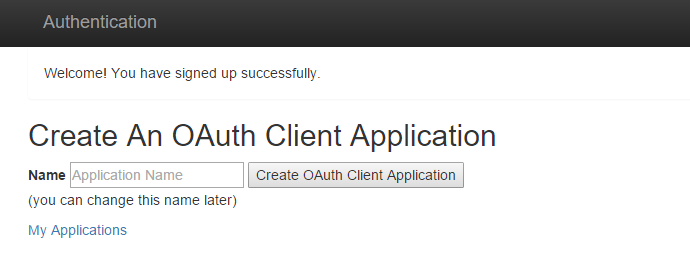
Sau khi đăng ký, server sẽ cung cấp client_id và client_secret key cho bên phía client app sử dụng, ta nhớ lưu lại
Về cơ bản phía server đã xong (dance2)
3. Khởi tạo Client
Tạo web app cho client
rails new oproclient
Như đã trình bày ở workflow bên trên, sau khi có được client_id và secret cấp từ server, ta bắt đầu tạo url để truy cập tới đúng đường dẫn, lấy về access_token
Vì url khá dài, nên ta đặt nó bên trong method ở application_controller.rb
private
def new_opro_token_path
  "#{ENV['opro_base_url']}/oauth/new?client_id=#{ENV['opro_client_id']}&client_secret=#{ENV['opro_client_secret']}&redirect_uri=%2F%2Flocalhost%3A3001%2Foauth%2Fcallback"
end

helper_method :new_opro_token_path
Trong đó các biến env
-
ENV["opro_base_url"]: Chứa domain của server (ở trường hợp đang test là localhost:3000) -
ENV["opro_client_id"]: Chứaclient_idmà server cấp cho ở mục trên. -
ENV["opro_client_secret"]: Chứaclient_secretmà server cấp cho ở mục trên -
params
redirect_uri: url dẫn tới methodcallbackđể xử lý dữ liệu server trả về cho client (ở trường hợp này là localhost:3001/oauth/callback)
Tạo views cho trang index
<h1>Welcome!</h1>
<%= link_to "Authenticate via oPRO", new_opro_token_path %>
Khi truy cập tới new_opro_token_path
bên phía server sẽ trả về params code theo url redirect
http://localhost:3001/?code=qwewqeqwe
Có được code rồi, ta sẽ có đủ điều kiện để lấy access_token trên server.
Tạo controller tên SessionsController để xử lý việc này
rails g controller sessions
Thêm routes tương ứng với callback
get "/oauth/callback", to: "sessions#create"
Vì request gửi lên server để lấy access_token phải ở dạng POST, cho nên ta add thêm gem rest-client để giúp xử lý việc này dễ dàng.
gem "rest-client"
# sessions_controller.rb
class SessionsController < ApplicationController
  def create
    response = JSON.parse RestClient.post("#{ENV['opro_base_url']}/oauth/token.json",
                    {
                        client_id: ENV['opro_client_id'],
                        client_secret: ENV['opro_client_secret'],
                        code: params[:code]
                    },
                    accept: :json)
    session[:access_token] = response['access_token']
    session[:refresh_token] = response['refresh_token']
    redirect_to root_path
  end
end
Với việc sử dụng RestClient, ta dễ dàng gửi một POST request tới server theo url
http://localhost:3000/oauth/token.json
cùng với 3 params: client_id, client_secret và code
access_token trả về được lưu vào session[:access_token] (dance2)
4. Sample API request
Cái quan trọng nhất là access_token đã lấy được, giờ ta tiếp tục tạo thử một request đính kèm access_token đến server xem đã được chấp thuận chưa.
Tạo một ApiTestsController với nội dung như sau:
class ApiTestsController < ApplicationController
  def index
    redirect_to root_path and return unless session[:access_token]
    @response = JSON.parse RestClient.get("#{ENV['opro_base_url']}/oauth_tests/show_me_the_money.json",
                                          params: {
                                              access_token: session[:access_token]
                                          },
                                          accept: :json)
  end
end
Add thêm routes
resourses :api_tests, only: :index
Vì phía server chưa thiết lập trả về nội dung gì cụ thể, nên ở view ta chỉ cho hiển thị messages response.
# views/api_tests/index.html.erb

<%= @response['message'] %>
OK, done.
Giờ ta chạy rails server cho oproserver ở port 3000, cho oproclient ở port 3001.
Truy cập vào trang chủ của client ( locahost:3001 ) ta được như sau.

Click vào link, nó sẽ dẫn ta tới trang hỏi kiểu 'hỏi bạn có muốn cấp quyền truy cập không' ?
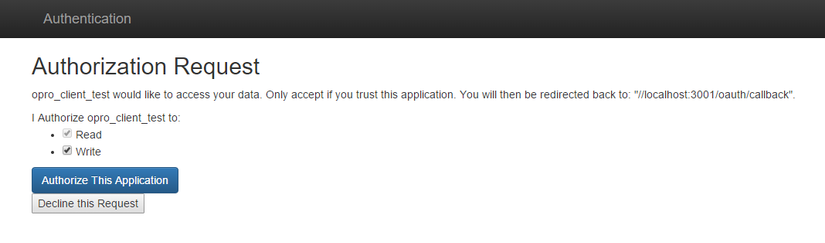
Sau khi ấn đồng ý, nó sẽ redirect về trang chủ.
access_token đã lấy được, ta thử truy cập vào url api_tests xem sao.

Vì bên phía server ta chưa thiết lập trả về nội dung gì, nên phía client chỉ hiển thị vỏn vẹn 1 messages xác nhận rằng đã access thành công tới server và được response dữ liệu.
GGWP! (dance2)
To be continue!!
Phần tiếp theo sẽ thiết lập thông tin User phía bên server, và response lại cho Client khi có request
Github
Client: https://github.com/NguyenTanDuc/opro_client
Server: https://github.com/NguyenTanDuc/opro_server
Nguồn tham khảo
https://viblo.asia/tungshooter/posts/3OEqGjDpR9bL
http://www.sitepoint.com/authenticate-all-the-things-with-opro-the-basics/
All rights reserved
