Xây base project api bằng flask
Bài đăng này đã không được cập nhật trong 5 năm
Bài viết này mình sẽ hướng dẫn các bạn xây dựng một base project api bằng python sử dụng framework Flask, project đồng thời sẽ sinh ra document cho api luôn
Cài đặt
Đầu tiền kiểm tra xem máy bạn đã cài đặt pip chưa:
pip --version
Nếu chưa cài đặt bạn có thể xem link này để cài đặt pip vào máy của bạn: https://pip.pypa.io/en/latest/installing/
Cài đặt python và virtualenv :
sudo apt-get install python3-pip
sudo pip install virtualenv
sudo pip3 install virtualenvwrapper
Build base project
Tạo thư mục
mkproject base_flask_api
Trong thư mục vừa tạo bạn tạo các folder vào init file theo cấp sau:
.
├── app
│   ├── __init__.py
│   ├── main
│   │   ├── controller
│   │   │   └── __init__.py
│   │   ├── __init__.py
│   │   ├── model
│   │   │   └── __init__.py
│   │   └── service
│   │       └── __init__.py
│   └── test
│       └── __init__.py
└── requirements.txt
Trong đó file __init__.py bạn để trống, file này để cho flask hiểu rằng nó là 1 module thôi
Tiếp theo cài đặt flask framework và các package cần thiết
pip install flask-bcrypt

pip install flask-restplus

pip install Flask-Migrate

pip install pyjwt

pip install Flask-Script

pip install flask_testing
sau khi cài xong cần update file requirements.txt để lưu lại những package đã cài đặt
pip freeze > requirements.txt
Sau khi chạy lệnh thì requirements.txt sẽ có nội dung thế này
alembic==0.9.8
aniso8601==3.0.0
bcrypt==3.1.4
cffi==1.11.5
click==6.7
Flask==0.12.2
Flask-Bcrypt==0.7.1
Flask-Migrate==2.1.1
flask-restplus==0.10.1
Flask-Script==2.0.6
Flask-SQLAlchemy==2.3.2
Flask-Testing==0.7.1
itsdangerous==0.24
Jinja2==2.10
jsonschema==2.6.0
Mako==1.0.7
MarkupSafe==1.0
pycparser==2.18
PyJWT==1.6.0
python-dateutil==2.7.0
python-editor==1.0.3
pytz==2018.3
six==1.11.0
SQLAlchemy==1.2.5
Werkzeug==0.14.1
Trong folder main tạo 1 file config.py với nội dung như sau:
import os

# uncomment the line below for postgres database url from environment variable
# postgres_local_base = os.environ['DATABASE_URL']

basedir = os.path.abspath(os.path.dirname(__file__))

class Config:
    SECRET_KEY = os.getenv('SECRET_KEY', 'my_precious_secret_key')
    DEBUG = False


class DevelopmentConfig(Config):
    # uncomment the line below to use postgres
    # SQLALCHEMY_DATABASE_URI = postgres_local_base
    DEBUG = True
    SQLALCHEMY_DATABASE_URI = 'sqlite:///' + os.path.join(basedir, 'flask_boilerplate_main.db')
    SQLALCHEMY_TRACK_MODIFICATIONS = False


class TestingConfig(Config):
    DEBUG = True
    TESTING = True
    SQLALCHEMY_DATABASE_URI = 'sqlite:///' + os.path.join(basedir, 'flask_boilerplate_test.db')
    PRESERVE_CONTEXT_ON_EXCEPTION = False
    SQLALCHEMY_TRACK_MODIFICATIONS = False


class ProductionConfig(Config):
    DEBUG = False
    # uncomment the line below to use postgres
    # SQLALCHEMY_DATABASE_URI = postgres_local_base


config_by_name = dict(
    dev=DevelopmentConfig,
    test=TestingConfig,
    prod=ProductionConfig
)

key = Config.SECRET_KEY
File này để setting môi trường và database, trong phần này database mặc định là sqlite, nếu bạn sử dụng mysql hay postgree thì cần cài đặt thêm packages PyMySQL hoặc psycopg2. rồi chỗ dòng SQLALCHEMY_DATABASE_URI bạn cần thay đổi nội dung cho nó, giả sử mysql sẽ đổi thành SQLALCHEMY_DATABASE_URI=mysql+pymysql://root:123456@localhost/flask_test (root là users, 123456 là password, localhost là host url, flask_test là tên của database), postgree cũng tương tự chỉ cần đổi mysql+pymysql thành postgresql+psycopg2 là được.
Trong thư mục main bạn thêm nội dung sau vào file __init__.py
from flask import Flask
from flask_sqlalchemy import SQLAlchemy
from flask_bcrypt import Bcrypt

from .config import config_by_name

db = SQLAlchemy()
flask_bcrypt = Bcrypt()


def create_app(config_name):
    app = Flask(__name__)
    app.config.from_object(config_by_name[config_name])
    db.init_app(app)
    flask_bcrypt.init_app(app)

    return app
Trong thư mục gỗ của project bạn tạo 1 file có tên là manage.py có nội dung như sau:
import os
import unittest

from flask_migrate import Migrate, MigrateCommand
from flask_script import Manager

from app.main import create_app, db

app = create_app(os.getenv('BOILERPLATE_ENV') or 'dev')

app.app_context().push()

manager = Manager(app)

migrate = Migrate(app, db)

manager.add_command('db', MigrateCommand)

@manager.command
def run():
    app.run()

@manager.command
def test():
    """Runs the unit tests."""
    tests = unittest.TestLoader().discover('app/test', pattern='test*.py')
    result = unittest.TextTestRunner(verbosity=2).run(tests)
    if result.wasSuccessful():
        return 0
    return 1

if __name__ == '__main__':
    manager.run()
Cuối cùng chạy lệnh sau để khởi tạo server python
python manage.py run
mỗi mọi thứ đều ổn nó sẽ show thế này

Như vậy chúng ta đã xong phần create app cho flask, tiếp theo sẽ xử lý đến các phần tiếp theo như model, controller, service hay unit test
Database Models and Migration
Trong package model bạn tạo 1 file user.py có nội dung sau
from .. import db, flask_bcrypt

class User(db.Model):
    """ User Model for storing user related details """
    __tablename__ = "user"

    id = db.Column(db.Integer, primary_key=True, autoincrement=True)
    email = db.Column(db.String(255), unique=True, nullable=False)
    registered_on = db.Column(db.DateTime, nullable=False)
    admin = db.Column(db.Boolean, nullable=False, default=False)
    public_id = db.Column(db.String(100), unique=True)
    username = db.Column(db.String(50), unique=True)
    password_hash = db.Column(db.String(100))

    @property
    def password(self):
        raise AttributeError('password: write-only field')

    @password.setter
    def password(self, password):
        self.password_hash = flask_bcrypt.generate_password_hash(password).decode('utf-8')

    def check_password(self, password):
        return flask_bcrypt.check_password_hash(self.password_hash, password)

    def __repr__(self):
        return "<User '{}'>".format(self.username)
Trong file manage.py bạn cần import file user.py này vào để có thể chạy migration
...
from app.main.model import user
...
Tiếp theo chạy migration
python manage.py db init
python manage.py db migrate --message 'initial database migration'
python manage.py db upgrade
Test
Trong module test bạn tạo một file có nội dung như sau:
import os
import unittest

from flask import current_app
from flask_testing import TestCase

from manage import app
from app.main.config import basedir


class TestDevelopmentConfig(TestCase):
    def create_app(self):
        app.config.from_object('app.main.config.DevelopmentConfig')
        return app

    def test_app_is_development(self):
        self.assertFalse(app.config['SECRET_KEY'] is 'my_precious')
        self.assertTrue(app.config['DEBUG'] is True)
        self.assertFalse(current_app is None)
        self.assertTrue(
            app.config['SQLALCHEMY_DATABASE_URI'] == 'sqlite:///' + os.path.join(basedir, 'flask_boilerplate_main.db')
        )


class TestTestingConfig(TestCase):
    def create_app(self):
        app.config.from_object('app.main.config.TestingConfig')
        return app

    def test_app_is_testing(self):
        self.assertFalse(app.config['SECRET_KEY'] is 'my_precious')
        self.assertTrue(app.config['DEBUG'])
        self.assertTrue(
            app.config['SQLALCHEMY_DATABASE_URI'] == 'sqlite:///' + os.path.join(basedir, 'flask_boilerplate_test.db')
        )


class TestProductionConfig(TestCase):
    def create_app(self):
        app.config.from_object('app.main.config.ProductionConfig')
        return app

    def test_app_is_production(self):
        self.assertTrue(app.config['DEBUG'] is False)


if __name__ == '__main__':
    unittest.main()
File này có mục đích test file config bạn vừa tạo ở phía trên
Chạy test bằng lệnh sau: python manage.py test

Controller
Trong folder service bạn tạo mới một file user_service.py có nội dung như sau:
import uuid
import datetime

from app.main import db
from app.main.model.user import User


def save_new_user(data):
    user = User.query.filter_by(email=data['email']).first()
    if not user:
        new_user = User(
            public_id=str(uuid.uuid4()),
            email=data['email'],
            username=data['username'],
            password=data['password'],
            registered_on=datetime.datetime.utcnow()
        )
        save_changes(new_user)
        response_object = {
            'status': 'success',
            'message': 'Successfully registered.'
        }
        return response_object, 201
    else:
        response_object = {
            'status': 'fail',
            'message': 'User already exists. Please Log in.',
        }
        return response_object, 409


def get_all_users():
    return User.query.all()


def get_a_user(public_id):
    return User.query.filter_by(public_id=public_id).first()


def save_changes(data):
    db.session.add(data)
    db.session.commit()
Phần service này khá đơn giản, nó có các hàm như create users, get all users hay get detail một users
Trong package main bạn tạo mới một package tên là util
trong util bạn tạo một file là dto.py có nội dung như sau:
from flask_restplus import Namespace, fields


class UserDto:
    api = Namespace('user', description='user related operations')
    user = api.model('user', {
        'email': fields.String(required=True, description='user email address'),
        'username': fields.String(required=True, description='user username'),
        'password': fields.String(required=True, description='user password'),
        'public_id': fields.String(description='user Identifier')
    })
để hiểu hơn về DTO là gì bạn tham khảo link sau https://en.wikipedia.org/wiki/Data_transfer_object File này sẽ giúp ta response api, validate hay viết docs
Tạo user_controller.py trong controller
from flask import request
from flask_restplus import Resource

from ..util.dto import UserDto
from ..service.user_service import save_new_user, get_all_users, get_a_user

api = UserDto.api
_user = UserDto.user


@api.route('/')
class UserList(Resource):
    @api.doc('list_of_registered_users')
    @api.marshal_list_with(_user, envelope='data')
    def get(self):
        """List all registered users"""
        return get_all_users()

    @api.response(201, 'User successfully created.')
    @api.doc('create a new user')
    @api.expect(_user, validate=True)
    def post(self):
        """Creates a new User """
        data = request.json
        return save_new_user(data=data)


@api.route('/<public_id>')
@api.param('public_id', 'The User identifier')
@api.response(404, 'User not found.')
class User(Resource):
    @api.doc('get a user')
    @api.marshal_with(_user)
    def get(self, public_id):
        """get a user given its identifier"""
        user = get_a_user(public_id)
        if not user:
            api.abort(404)
        else:
            return user
Controller này sẽ function get list users hay get detail users, đồng thời cũng có những phần để viết docs cho api luôn trong code, cái này lúc ban đầu nhìn có vẻ hơi rối code một chút.
Thêm vào file __init__.py bên trong app nội dung sau:
# app/__init__.py

from flask_restplus import Api
from flask import Blueprint

from .main.controller.user_controller import api as user_ns

blueprint = Blueprint('api', __name__)

api = Api(blueprint,
          title='FLASK RESTPLUS API BOILER-PLATE WITH JWT',
          version='1.0',
          description='a boilerplate for flask restplus web service'
          )

api.add_namespace(user_ns, path='/user')
file này như kiểu đăng ký route cho các api sử dụng packages blueprint
bạn cần update file manage.py với nội dung sau để đăng ký route
from app import blueprint
...

app = create_app(os.getenv('BOILERPLATE_ENV') or 'dev')
app.register_blueprint(blueprint)

app.app_context().push()

...
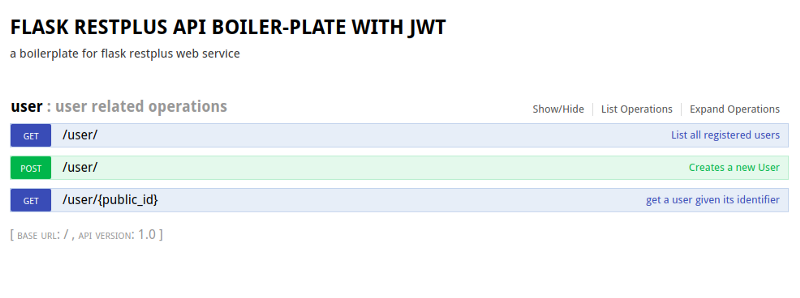
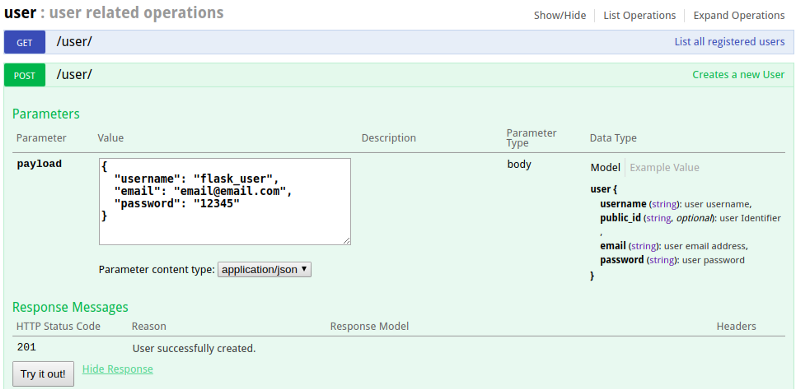
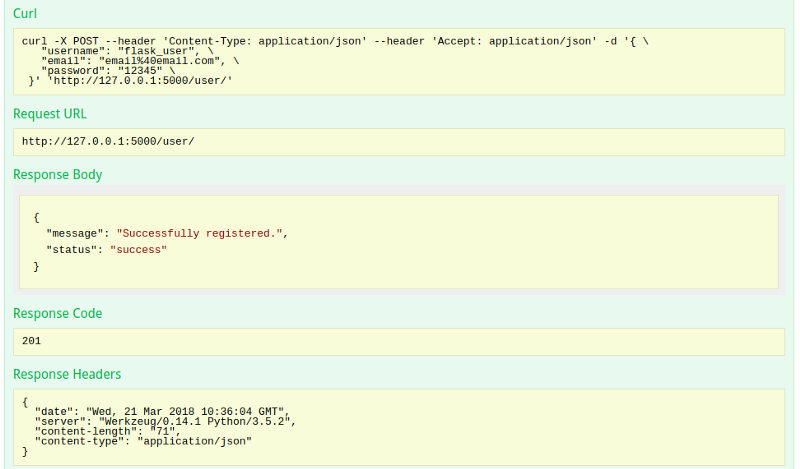
Bạn chạy lại server: python manage.py run và vào link http://127.0.0.1:5000/ sẽ show ra docs cho api bạn vừa viết hay có thể test nhưng api get list users ở trên


Phần tiếp theo mình sẽ dịch nốt bài viết.
Tài liệu
Bài viết được dịch từ
All rights reserved