Sử dụng ActiveRecord trong project Ruby của bạn
Bài đăng này đã không được cập nhật trong 5 năm
Giới thiệu

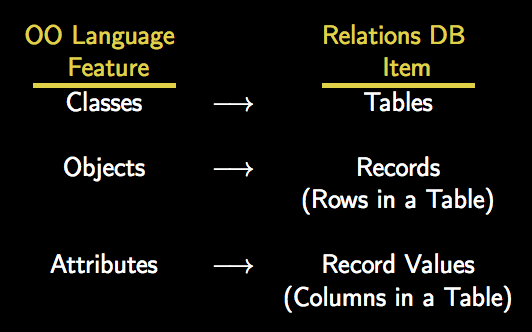
Gem ActiveRecord là một phần của Ruby on Rails framework. Nó chính là ORM - thư viện dùng để map object với bảng trong database. Nói cách khác, nó là một thư viện Ruby cho phép chúng ta sử dụng Ruby class để truy cập dữ liệu được lưu trong cơ sở dữ liệu quan hệ (RDBMS) như là MySQL, PostgreSQL hay SQLite,...

Ruby on Rails và ActiveRecord phối hợp với nhau rất tuyệt vời. Nhưng khi chúng ta muốn phát triển một ứng dụng Ruby đơn giản cần truy cập database ở phía backend, mà không phải là ứng dụng Web bằng Ruby on Rails thì phải làm như thế nào? Liệu có thể dùng ActiveRecord được nữa không?
Và câu trả lời ở đây là có. Cùng code thử xem nào!

Nội dung
1. Khởi tạo Ruby project
Hãy bắt đầu khởi tạo một project thôi nào. Ở đây mình lấy ví dụ là mình sẽ tạo một project để quản lí choker, hãy gọi nó là chokers_app
1. Tạo một gemset bằng RVM
➜  ~ rvm use 2.6.3@chokers_app --create
ruby-2.6.3 - #gemset created /home/manhnd/.rvm/gems/ruby-2.6.3@chokers_app
ruby-2.6.3 - #generating chokers_app wrappers - please wait
Using /home/manhnd/.rvm/gems/ruby-2.6.3 with gemset chokers_app
2. Tạo thư mục gốc cho project. Mình sẽ đặt tên là chokers_app
➜  ~ mkdir chokers_app
➜  ~ cd chokers_app
➜  chokers_app
3. Tạo file .ruby-version và .ruby-gemset
Mục đích của việc tạo 2 files này là để đảm bảo rằng chúng ta sẽ sử dụng đúng gemset mỗi khi cd vào thư mục gốc
➜  chokers_app echo "2.6.3" > .ruby-version
➜  chokers_app echo "chokers_app" > .ruby-gemset
➜  chokers_app
4. Cài đặt bundler
Để download những gem cần thiết, chúng ta cần đến bundler
➜  chokers_app gem install bundler
Fetching bundler-2.1.4.gem
Successfully installed bundler-2.1.4
Parsing documentation for bundler-2.1.4
Installing ri documentation for bundler-2.1.4
Done installing documentation for bundler after 4 seconds
1 gem installed
➜  chokers_app
2. Tạo Gemfile và cài đặt gems
Chúng ta sẽ tạo Gemfile và thêm gem activerecord vào. Hơn nữa, chúng ta sẽ thêm gem standalone_migrations - một gem rất hữu ích, bởi vì nó sẽ cho phép chúng ta chạy rake tasks liên quan đến migrations, như cách chúng ta làm với Rails.
Vì mình sẽ dùng MySQL làm cơ sở dữ liệu nên sẽ thêm gem mysql2 vào.
# Gemfile

source 'https://rubygems.org'

gem 'activerecord'
gem 'standalone_migrations'
gem 'mysql2'
Chạy bundle thôi!
3. Tạo Rakefile
Tiếp theo chúng ta tạo Rakefile tại thư mục gốc. Nó sẽ có nội dung như sau:
# Rakefile

require 'standalone_migrations'
StandaloneMigrations::Tasks.load_tasks
Nó sẽ load tất cả các tasks giúp chúng ta có thể tạo / quản lí migrations. Để kiểm tra xem rằng nó đã hoạt động hay chưa:
➜  chokers_app bundle exec rake --tasks
rake about                           # List versions of all Rails frameworks and the environment
rake app:template                    # Applies the template supplied by LOCATION=(/path/to/tem...
rake app:update                      # Update configs and some other initially generated files...
rake db:create                       # Creates the database from DATABASE_URL or config/databa...
rake db:drop                         # Drops the database from DATABASE_URL or config/database...
rake db:environment:set              # Set the environment value for the database
rake db:fixtures:load                # Loads fixtures into the current environment's database
...
It's working, it's workingggg !

4. Config và khởi tạo database
Tạo file database.yml trong thư mục db có nội dung như sau:
default: &default
  adapter: mysql2
  encoding: utf8
  pool: <%= ENV.fetch("RAILS_MAX_THREADS") { 5 } %>
  username: root
  password: "zimzalabim"
  socket: /var/run/mysqld/mysqld.sock

development:
  <<: *default
  database: chokers_app_development

test:
  <<: *default
  database: chokers_app_test

production:
Hãy sửa nội dung của file theo database của bạn nhé. Câu lệnh để tạo ra database giống y chang với Rails luôn:
➜  chokers_app bundle exec rake db:create
Created database 'chokers_app_development'
Created database 'chokers_app_test
5. Tạo migration
Cùng tạo một migration đầu tiên nào. Nó sẽ hơi khác một chút so với Rails. Ở Rails, câu lệnh để tạo migration là rails g migration. Ở đây chúng ta sẽ dùng rake task:
➜  chokers_app bundle exec rake db:new_migration[create_chokers]
      create  db/migrate/20200422173334_create_chokers.rb
Mình sẽ tạo một bảng đơn giản có 2 cột chính: name và price.
class CreateChokers < ActiveRecord::Migration[5.2]
  def change
    create_table :chokers do |t|
      t.string :name
      t.float :price

      t.timestamps
    end
  end
end
Chạy migrate:
➜  chokers_app bundle exec rake db:migrate
== 20200422173334 CreateChokers: migrating ====================================
-- create_table(:chokers)
   -> 0.6768s
== 20200422173334 CreateChokers: migrated (0.6769s) ===========================
Ngon! Migration của chúng ta đã chạy thành công. Như các bạn có thể thấy, output của nó cũng giống như bên Rails.
6. Khởi tạo Model
Để xem hiện tại chúng ta có thể tạo một ActiveRecord Model cho phép chúng ta quản lí choker không nào. Hãy tạo file app/models/choker.rb:
class Choker < ActiveRecord::Base
  validates :name, presence: true
  validates :price, presence: true
end
7. Khởi tạo Main Application
Tạo file app/main/rb:
require 'active_record'
require_relative './models/choker'

# Load database connection configuration data from db/config.yml
# and picks up development part
def db_configuration
 db_configuration_file = File.join(File.expand_path('..', __FILE__), '..', 'db', 'config.yml')
 YAML.load(File.read(db_configuration_file))
end

ActiveRecord::Base.establish_connection(db_configuration["development"])

print "Input name of the choker: "
name = gets.chomp

print "Input price of the choker: "
price = gets.chomp

choker = Choker.new(name: name, price: price)
choker.save!

puts "Number of chokers in your database: #{Choker.count}"
Chạy thử xem nào:
➜  chokers_app bundle exec ruby app/main.rb
Input name of the choker: Striped
Input price of the choker: 1402
Number of chokers in your database: 1
Kết luận!
Project ở trên là một ví dụ nho nhỏ giới thiệu cho bạn cách kết hợp ActiveRecord vào trong ứng dụng Ruby của bạn. Sự trợ giúp của gem standalone_migrations rất có giá trị, giúp chúng ta sử dụng ActiveRecord Migrations API như cách chúng ta làm ở Rails thông thường, Cảm ơn mọi người đã đọc bài viết của mình. Nếu có thắc mắc, trao đổi hãy để lại bình luận ở phía dưới nhé.
Tham khảo
https://www.rubydoc.info/gems/activerecord/5.0.0.1 https://github.com/thuss/standalone-migrations
.
All rights reserved