Streamlining Approver Fields with Jira Automation
Bài đăng này đã không được cập nhật trong 2 năm
Approvers are crucial for efficient and seamless workflow management. If the right individuals or teams can review and approve requests quickly, requests will be processed and completed on time.
This article explores two commonly used approaches: letting customers choose approvers and setting default approvers. We also introduce our own preferred method, which leverages project roles, automation, and APIs to configure approvers. By understanding the benefits and limitations of each approach, organizations can make informed decisions to enhance their approval processes.
Loose: Letting customers choose approvers
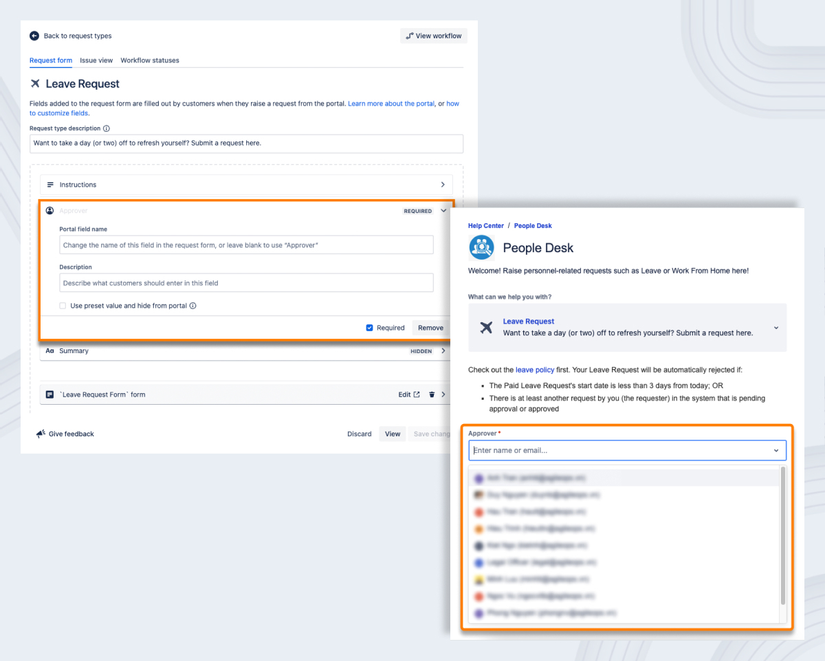
This approach allows customers to select the approvers for their requests. When submitting a request, customers can specify who they believe should approve their request. See this article for the how.
Pros
- Flexibility: Customers have control over the approval process and can choose the appropriate approvers based on their requirements and preferences.
- Customization: Allows for specific approvers to be selected for different types of requests, enabling a more tailored and dynamic approval workflow.
- Improved communication: Customers can directly involve the relevant stakeholders in the approval process, promoting collaboration and transparency.
Cons
- Potential delays: If customers are not familiar with the appropriate approvers or if there are too many choices, the selection process may introduce delays as customers try to make decisions.
- Inconsistent choices: Different customers may choose different approvers for similar requests, leading to inconsistency in the approval process.
- Risk of inappropriate choices: Customers may lack knowledge about the appropriate approvers, potentially selecting individuals who are not actually qualified or relevant to the request.
Tight: Defaulting the Approvers
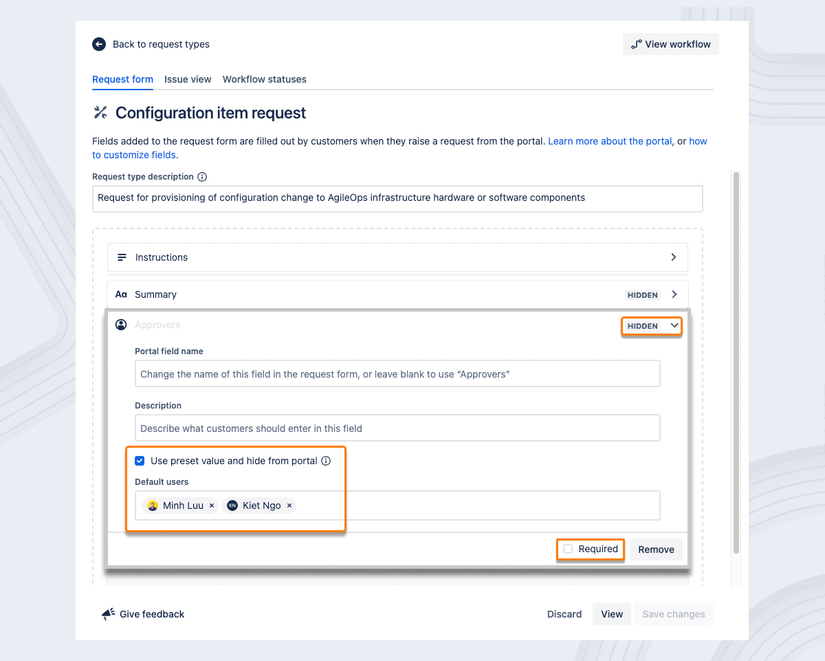
Alternatively, you can set default approvers in advance for certain request types or categories. With this approach, you define a predefined set of approvers for specific types of requests. Whenever a customer submits a request falling under a particular category, the default approvers are automatically assigned. See this article for the how.
Pros
- Streamlined process: By setting default approvers, the approval workflow can be standardized, saving time and effort for both customers and service teams.
- Consistency: With predefined approvers, there is a consistent and predictable approach to approvals, ensuring that the appropriate individuals or groups are involved.
- Reduced decision-making burden: Customers don't need to spend time selecting approvers, as the defaults are already established.
Cons
- Limited customization: The default approvers may not always align with specific customer requirements, resulting in less flexibility for tailoring the approval process.
- Lack of transparency: Customers may not be aware of who the default approvers are, which could lead to questions or concerns about the approval process.
- Difficulty accommodating exceptions: If a request requires a deviation from the default approvers, additional steps may be needed to override the predefined settings.
Dynamically: Setting Approvers using project roles, automation, and APIs
At AgileOps, we actually configure approvers the third way, using project roles, automation, and APIs.
With this solution, the final result will be:
- The customer raises a request
- Jira automatically pulls a pre-defined set of users from the "Approvers" project role and sets them as the approvers of the request
- (Optional) The request’s approvers are notified on the company communication platform (e.g. Slack) that there is a request pending their approval
- Whenever the approvers are changed (there is a new approver or an existing approver leaves the company), the project admin just needs to edit users in the "Approvers" project role
Here is how it’s set up:
Step 1: Create the “Approvers” project role
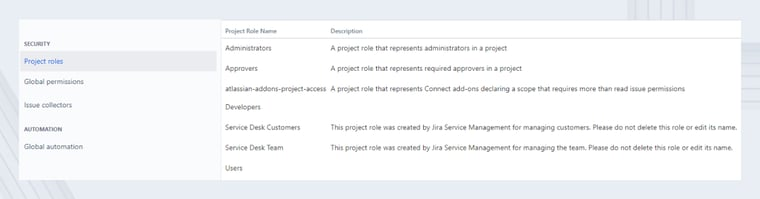
- Go to System > Project roles (under the Security section)
- Click Add Project Role
- In the Name field, enter Approvers
- In the Description field, enter a brief description of the role
- Click Add Project Role
Step 2: Add users to the “Approvers” project role
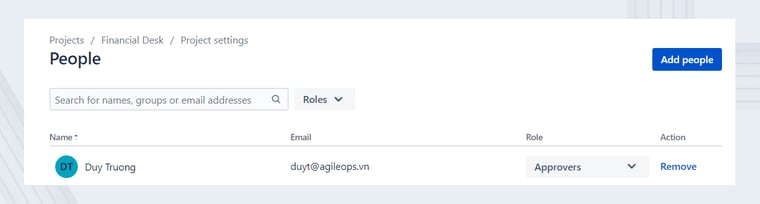
- Go to your project settings and open the People section
- Click on Add people
- Enter the usernames of the users you want to add as approvers
- Choose the role Approvers
- Click on Add
Step 3: Retrieve the approvers when a new ticket is raised
- Go to your project settings and open the Automation section
- Click on Create rule
- Set the trigger to be Issue created
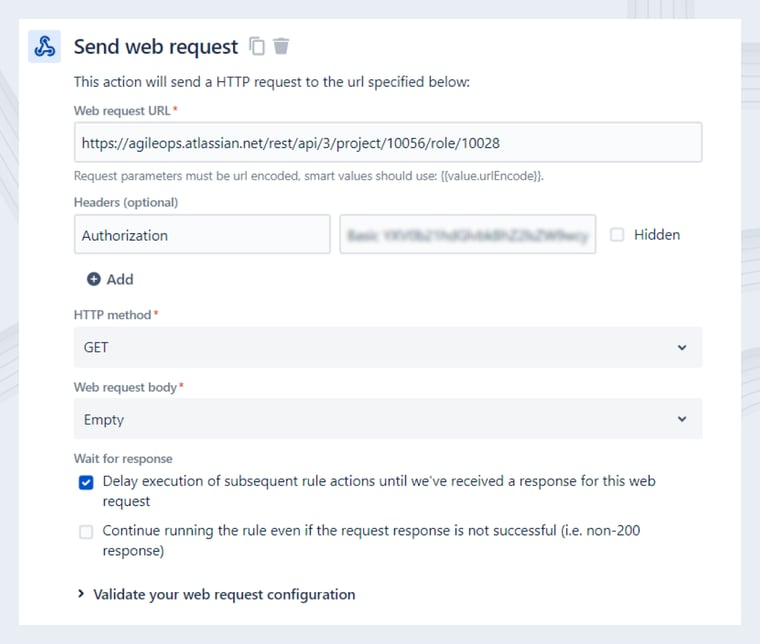
- Set an action to Send web request
- Configure the web request to retrieve users currently having the project role “Approvers” through Jira API (see here for detailed documentation)
Step 4: Format the web request response
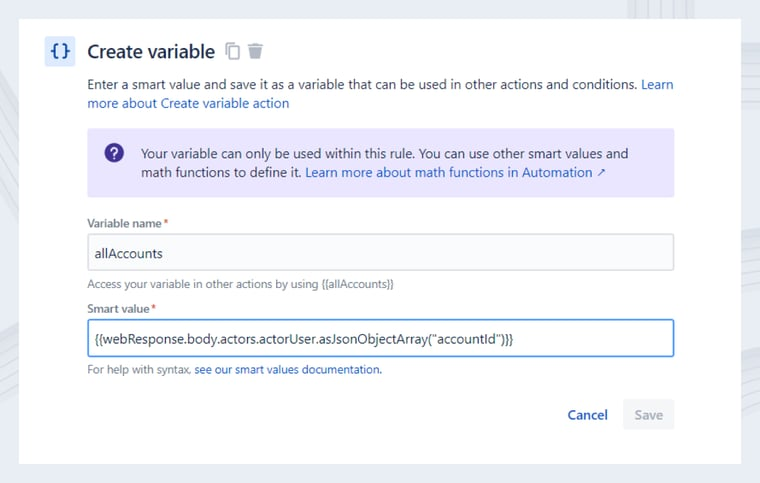
- Add an action to Create variable
- Set a Variable name (in this case is allAccounts)
- Define the smart value to format the web request response: {{webResponse.body.actors.actorUser.asJsonObjectArray("accountId")}}
Step 5: Edit Approvers field of the ticket
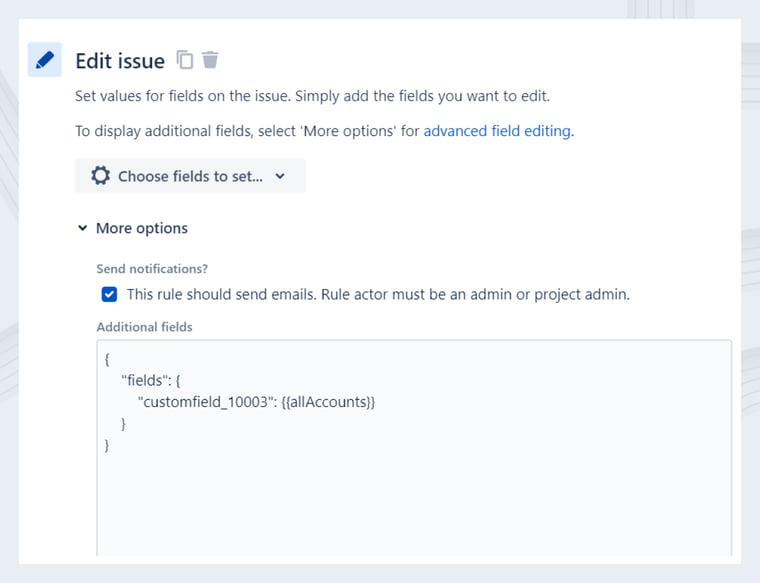
- Add an action to Edit issue
- Edit the field Approvers (custom field with the ID 10003) with the smart value allAccounts
Step 6: Notify Approver through Slack
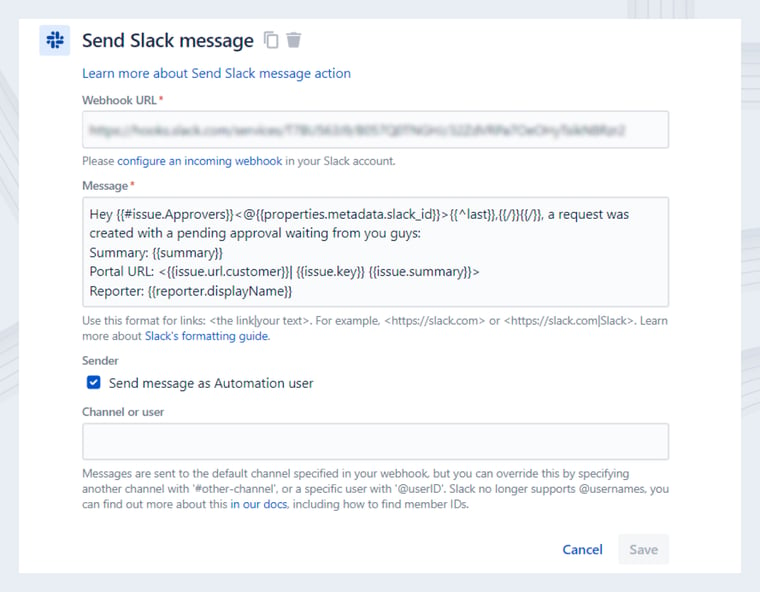
- Add an action to Send Slack message
- Configure the message to notify the approver(s) that there is a request pending their approval using the syntax: {{#issue.Approvers}}<@{{properties.metadata.slack_id}}>{{^last}},{{/}}{{/}}
- Save the rule and turn it on
Step 7: Action - Approver for ticket is set and notified

Now, when a new ticket is created, the Approvers field is automatically populated with users with the Approvers project role. They will also receive a notification on Slack.

The biggest cons of this approach is, you guessed it, the complexity of setup: It requires configuring automation rules and custom scripting, which may require technical expertise and effort. But the advantages are well worth it.
Here’s how it's better than both previous approaches:
- Consistency and scalability: Using project roles ensures that the appropriate individuals or teams are consistently assigned as approvers for requests across the project. It also allows for easy scaling and management of approvers as project roles can be easily modified.
- Streamlined process: With automation and project roles, the approval assignment happens automatically, saving time and effort for both customers and service teams.
- Reduced manual errors: By automating the assignment of approvers based on predefined project roles, the likelihood of manual errors or oversight is reduced.
The three approaches to defining request approvers - customer choice, default approvers, and project roles with automation and APIs - offer varying benefits and drawbacks.
- Customer choice: Flexible, but can lead to consistent and timely approvals.
- Default approvers: Streamlined, limiting and challenging to accommodate exceptions.
- Project roles with automation and APIs: Balanced approach that combines flexibility, consistency, and reduced manual errors; requires technical knowledge for setup but offers efficiency and scalability benefits.
Organizations can achieve a consistent and efficient approval workflow by using automation rules and APIs to populate the "Approvers" project role. This can boost productivity and collaboration among teams and help organizations reach their goals faster and better.
👉 Read full article at AgileOps Blog
☎️ Or contact AgileOps - Atlassian Solutions Partner in Vietnam for more ITSM, ESM consultants
All rights reserved
