
[MaskRCNN] Các bước triển khai training model MaskRCNN cho bài toán segmentation
Bài đăng này đã không được cập nhật trong 6 năm
I. Introduction
Xin chào các bạn, để tiếp nối chuỗi bài về Segmentation thì hôm nay mình xin giới thiệu tới các bạn cách để custom dataset và train lại model Mask RCNN cho bài toán segmentation. Trong bài trước mình có giới thiệu tới các bạn về các bước triển khai Mask RCNN cho bài toán segmentation khá chi tiết, các bạn có thể tham khảo thêm theo đường dẫn dưới đây:
https://viblo.asia/p/maskrcnn-cac-buoc-trien-khai-mask-r-cnn-cho-bai-toan-image-segmentation-6J3Zg4VPlmB
Nội dung bài viết
- Hướng dẫn annotate data để tự tạo thêm dữ liệu training
- Các bước triển khai training model segmentation
II. Giới thiệu về một số tool annotate
Đây là bước khá quan trọng vì sẽ đánh giá mô hình chúng ta làm việc tốt hay không! Đánh nhãn sai dữ liệu sẽ làm cho model dự đoán và đánh giá sai -> tốn nhiều thời gian và công sức bỏ ra cho quá trình training. Làm thế nào để đánh nhãn dữ liệu? Trước tiên cần phải xác định bài toán mà mình đặt ra, mỗi bài toán sẽ có một hướng tiếp cận ví dụ: detection, segmentation.. từ đó tiến hành preprocess data gắn nhãn cho phù hợp. Trong bài toán mình đang đề cập là segmentation cần có nhãn cho từng pixel của ảnh. Lúc này chúng ta cần phải sử dụng tools để tiến hành image annotation (tức là set label và metadata cho ảnh). Các tools phổ biến có thể kể đến là CVAT, VIA, Comma Coloring, Annotorious, LabelMe… Các tool này sẽ hỗ trợ GUI cho việc đánh label từng segment của ảnh. Như mình thì mình dùng VIA vì việc dùng nó khá dễ sử dụng và nó là 1 tool online. Mình có để đường dẫn dưới bài viết các bạn có thể tham khảo còn về cách sử dụng tool thì nó khá dễ các bạn có thể xem trên youtube hoặc đọc document của nó. Như hình trên thì mình annotate với 6 class và các class có id theo thứ tự từ 1 đến 6 mình chọn shape là polygon như hình mảu đỏ mà các ban có thể mình thấy trong phần region shape. Sau khi vẽ xong được line cho các object mà các bạn quan tâm thì ban chỉ cần kích chuột vào tùng object sau đó chọn object đó thuộc class nào là xong
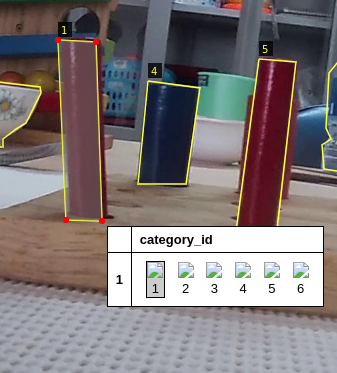
III. Các bước triên khai training model
Sau bước chuẩn bị data cho bài toán thì bước tiếp theo là việc setup môi trường để training. Các bước chuẩn bị cho việc setup môi trường thì mình đã nói ở bài viết trước đó các bạn có thể tham khảo thêm ở link trên đầu bài viết. Sau khi annotate xong thì mình được 1 file json  Trước tiên bạn cần import các thư việc cần thiết :
import logging
import warnings
import os
logging.getLogger("tensorflow").setLevel(logging.ERROR)
warnings.filterwarnings('ignore')
os.environ['TF_CPP_MIN_LOG_LEVEL'] = '2'

import os
import sys
import json
import datetime
import numpy as np
import skimage.draw
from skimage import io
import skimage
from mrcnn.config import Config
from mrcnn import model as modellib, utils
from mrcnn import visualize
import random
import cv2
from sklearn.model_selection import StratifiedKFold, KFold, train_test_split
import matplotlib.pyplot as plt
from imgaug import augmenters as iaa
Sau đó sẽ config các thông số cần thiết cho moddel training:
class Config(Config):
    """Configuration for training on the toy  dataset.
    Derives from the base Config class and overrides some values.
    """
    # Give the configuration a recognizable name
    BACKBONE = 'resnet50'
    NAME = "mica"

    # We use a GPU with 12GB memory, which can fit two images.
    # Adjust down if you use a smaller GPU.
    IMAGES_PER_GPU = 2

    # Number of classes (including background)
    NUM_CLASSES = 1 + 5  # Background + 6 other classes

    # Number of training steps per epoch
    STEPS_PER_EPOCH = 10
    VALIDATION_STEPS = 10
    # Skip detections with < 90% confidence
    DETECTION_MIN_CONFIDENCE = 0.9
config = MicaConfig()
config.display()
def resize_image(image_path):
    img = cv2.imread(image_path)
    img = cv2.cvtColor(img, cv2.COLOR_BGR2RGB)
    img = cv2.resize(img, (IMAGE_SIZE, IMAGE_SIZE), interpolation=cv2.INTER_AREA)
    return img
Sau đó bạn cần định nghĩa ra 1 class data set với các hàm load_image, load_mask và load_inference để lấy thông tin của data đầu vào của data.
class Dataset(utils.Dataset):
   def __init__(self, subset):
       super().__init__(self)

       self.add_class("data", 1, "ball")
       self.add_class("data", 2, "cup")
       self.add_class("data", 3, "bottle")
       self.add_class("data", 4, "bowl")
       self.add_class("data", 5, "cylinder")
       self.add_class("data", 6, "square")
       annotations = []
       FOLD = 0
       N_FOLDS = 5
       dataset = "path_to_data" # đường dẫn tới dataset của bạn
       assert subset in  ["train", "val"]
       dataset_dir = os.path.join(dataset, "train")
       annotation = json.load(open("path_to_json")) # đường dẫn tới file json của bạn
       annotation = list(annotation.values())
       kf = KFold(n_splits = N_FOLDS, random_state=42, shuffle=True)
       for i, (train, val) in enumerate(kf.split(annotation)):
           if subset == "train" and FOLD == i:
               for index in train:
                   annotations.append(annotation[index])
           elif subset == "val" and FOLD == i:
               for index in val:
                   annotations.append(annotation[index])
       annotations = [a for a in annotations if a['regions']]
       #print(annotations)
       for annotation_img in annotations:
           polygons = [a['shape_attributes'] for a in annotation_img['regions']]
           region_attributes =[a['region_attributes'] for a in annotation_img['regions']]
           class_ids = [int(a['category_id']) for a in region_attributes]
           #class_id.append(class_ids)
           #print(annotation_img)
           image_path = os.path.join(dataset_dir, annotation_img['filename'])
           if os.path.exists(image_path):
               image = skimage.io.imread(image_path)
               height, width = image.shape[:2]
               self.add_image(
                   "data",
                   image_id=annotation_img['filename'],  # use file name as a unique image id
                   path=image_path,
                   width=width, height=height,
                   polygons=polygons,
                   class_ids=class_ids)

   ## luu y voi image_id la ten anh
   def load_image(self, image_id):
       image_path = self.image_info[image_id]['path']
       return resize_image(image_path)

   def image_reference(self, image_id):
       info = self.image_info[image_id]
       return info['path'], [label_names[int(x)-1] for x in info['class_ids']]
   ## label_name tru 1 la vi class_ids tu 1 den 6 nen phai tru di 1 de tu 0 den 5
   def load_mask(self, image_id):
       image_info = self.image_info[image_id]
       if image_info["source"] != "mica":
           return super(self.__class__, self).load_mask(image_id)
       class_ids = image_info['class_ids']

       # Convert polygons to a bitmap mask of shape
       # [height, width, instance_count]
       info = self.image_info[image_id]
       mask = np.zeros([info["height"], info["width"], len(info["polygons"])],
                       dtype=np.uint8)
       for i, p in enumerate(info["polygons"]):
           # Get indexes of pixels inside the polygon and set them to 1
           rr, cc = skimage.draw.polygon(p['all_points_y'], p['all_points_x'])
           mask[rr, cc, i] = 1

       # Return mask, and array of class IDs of each instance. Since we have
       # five class ID only, we return an array of 5s
       # print("info['class_ids']=", info['class_ids'])
       class_ids = np.array(class_ids, dtype=np.int32)
       # return mask.astype(np.bool), np.ones([mask.shape[-1]], dtype=np.int32)
       return mask, class_ids
Visualize mask lên xem qua hàm visualize:
dataset = Dataset("train")
dataset.prepare()
for i in range(4):
    image_id = random.choice(dataset.image_ids)
    print(image_id)
    print(dataset.image_reference(image_id))

    image = dataset.load_image(image_id)
    print(image.shape[0])
    mask, class_ids = dataset.load_mask(image_id)
    visualize.display_top_masks(image, mask, class_ids, dataset.class_names, limit=4)
 Và tiếp theo là config model, load weight được tải từ coco mình đã giải thích ở bài viết trước để vào training
config = Config()
model = modellib.MaskRCNN(mode='training', config=config, model_dir=ROOT_DIR)
model.load_weights(COCO_WEIGHTS_PATH, by_name=True, exclude=[
    'mrcnn_class_logits', 'mrcnn_bbox_fc', 'mrcnn_bbox', 'mrcnn_mask'])
và bắt đàu vào việc training và tận hưởng thành quả
EPOCH = [2,8,30]
%%time
model.train(dataset_train, dataset_val,
            learning_rate=LR*2, # train heads with higher lr to speedup learning
            epochs=EPOCHS[2],
            layers='heads',
            augmentation=None)

history = model.keras_model.history.history
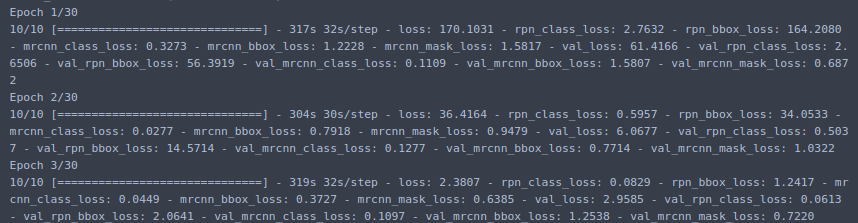
Các bạn có thể vẽ hàm loss của model training và tính ra epoch nào có giá trị tốt nhất sau đó load weight lên và test thì mình đã trình bày rất rõ ở bài trước các bạn có thể tham khảo thêm ở link phía trên bài viết. BÌa viết của mình tới đây là kết thúc hẹn gặp lại các bạn ở các bài viết sắp tới, đừng quên cho mình 1 upvote nhé =)) =)) cảm ơn các bạn.
'
' '
'
' '
All rights reserved
