[Linux] Hướng dẫn cài đặt Two-Factor Authentication Ubuntu 18.04
Bài đăng này đã không được cập nhật trong 5 năm
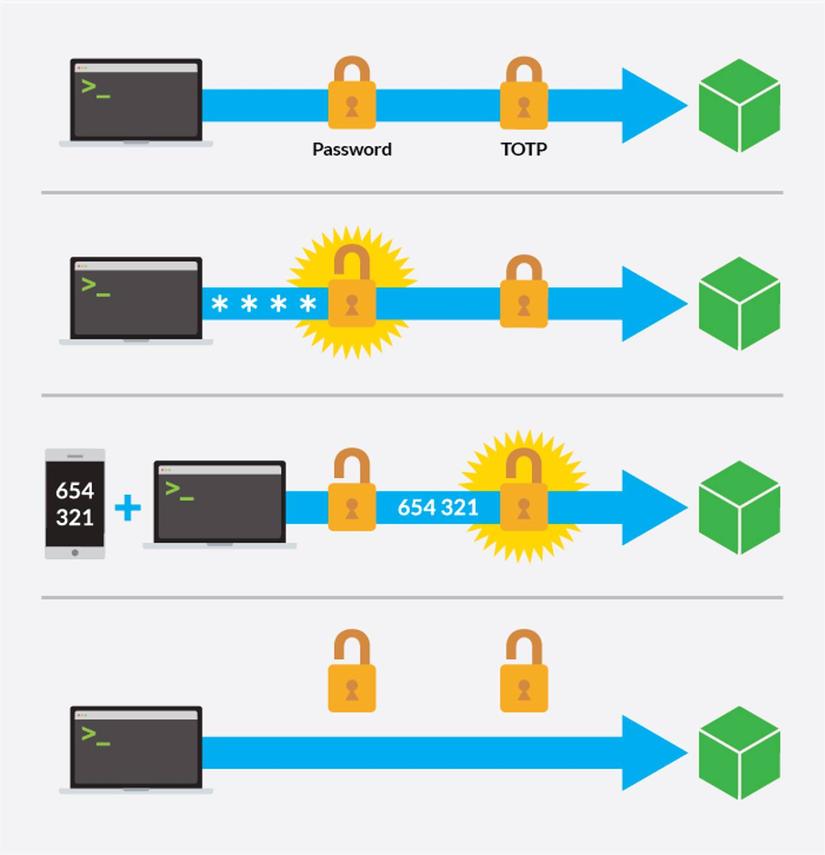
Trong bài viết mình chia sẻ cách kích hoạt xác thực SSH sử dụng app OATH- TOTP để thêm vào SSH key. Quá trình đăng nhập qua SSH sẽ yêu cầu 2 yếu tố bảo mật thông qua 2 kênh truyền khác nhau, làm tăng tính bảo mật của hệ thống.
1. Cài đặt thư viện cho Google Authenticator
sudo apt-get update
sudo apt-get install libpam-google-authenticator
2. Cấu hình Google Authenticator cho user
Chạy lệnh sau:
google-authenticator
Do you want authentication tokens to be time-based (y/n)
chọn Y
You may have noticed the giant QR code that appeared during the process, underneath are your emergency scratch codes to be used if you don’t have access to your phone: write them down on paper and keep them in a safe place.
Do you want me to update your “/home/user/.google_authenticator” file? (y/n)
chọn Y
Do you want to disallow multiple uses of the same authentication token? This restricts you to one login about every 30s, but it increases your chances to notice or even prevent man-in-the-middle attacks (y/n)
chọn Y
By default, a new token is generated every 30 seconds by the mobile app. In order to compensate for possible time-skew between the client and the server, we allow an extra token before and after the current time. This allows for a time skew of up to 30 seconds between authentication server and client. If you experience problems with poor time synchronization, you can increase the window from its default size of 3 permitted codes (one previous code, the current code, the next code) to 17 permitted codes (the 8 previous codes, the current code, and the 8 next codes). This will permit for a time skew of up to 4 minutes between client and server. Do you want to do so? (y/n)
chọn Y
If the computer that you are logging into isn’t hardened against brute-force login attempts, you can enable rate-limiting for the authentication module. By default, this limits attackers to no more than 3 login attempts every 30s. Do you want to enable rate-limiting? (y/n)
chọn Y
Hoàn thành phần cài đặt Google Authenticator
3. Cấu hình SSH sử dụng password
Mở file cấu hình pam
sudo vim /etc/pam.d/sshd
Tìm dòng @include common-auth và comment # đầu dòng
#Standard Un*x authentication.
#@include common-auth
Sau đó, thêm 2 dòng này cuối file
auth    required      pam_unix.so   no_warn try_first_pass

auth    required      pam_google_authenticator.so
Lưu lại và thoát.
Mở fie cấu hình SSH
sudo vim /etc/ssh/sshd_config
Tìm ChallengeResponseAuthentication đổi lại yes.
ChallengeResponseAuthentication yes
Thêm dòng này cuối file
AuthenticationMethods keyboard-interactive
Nếu muốn áp dụng cho user cụ thể thì thêm như sau:
Match User example-user
    AuthenticationMethods keyboard-interactive
Lưu lại và thoát.
Khởi động lại service SSH để nhận cấu hình mới.
sudo service ssh restart
Đăng nhập user và kiểm tra
ssh user@10.100.210.171
Password: nhập mật khẩu
Verification code: nhập mã code 6 số trên app
4. Cấu hình SSH sử dụng keyfile
Mở file cấu hình /etc/ssh/sshd_config và chỉnh lại như sau:
PasswordAuthentication no
AuthenticationMethods publickey,keyboard-interactive
Mở file cấu hình /etc/pam.d/sshd chỉnh lại:
#@include common-auth

#auth    required     pam_unix.so   no_warn try_first_pass

auth    required      pam_google_authenticator.so
Khởi động lại service SSH server
sudo service ssh restart
Chúc các bạn thành công!
All rights reserved
