Intro to Feathers.js
Bài đăng này đã không được cập nhật trong 6 năm
Feathers.js
Feathers is a web-framework for creating real-time applications and REST APIs using JavaScript or TypeScript with Node.JS, React Native and the browser.
It works with any backend supporting many databases out of the box and with any frontend technology like React, VueJS, Angular, Android or iOS.
Build prototypes in minutes and production-ready apps in days. Seriously.
quote taken from https://feathersjs.com/
The focus of this framework is to reduce boilerplates for the developer, so we can focus more on logic. This is similar to the philosophy of Rails, so if you're from a RoR background, you'll fit in here just fine.
One big plus point of the Feathers framework is it's consistancy. It's library is always backward compatible and never comes with any breaking features. Now, without talking more, lets jump straight in.
Creating a project
first you need the feathers-cli installed in your system.
npm install -g @feathersjs/cli
Now we need to generate the app we want to expirement with.
mkdir feathers-messages
cd feathers-messages
feathers generate app
You'll be shown a number of options you can choose from. For this example, we'll not be using any fully fledged database service, we'll use NeDB to store the data. Here are the options selected for the project.


Application architecture
Lets inspect what we got as our app architecture.
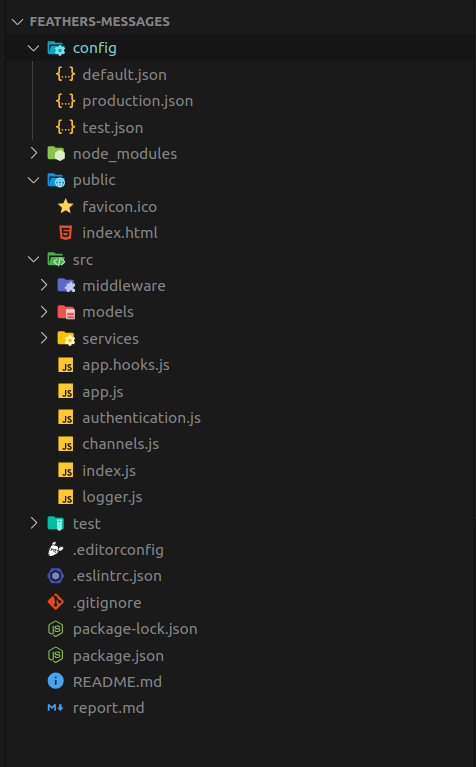
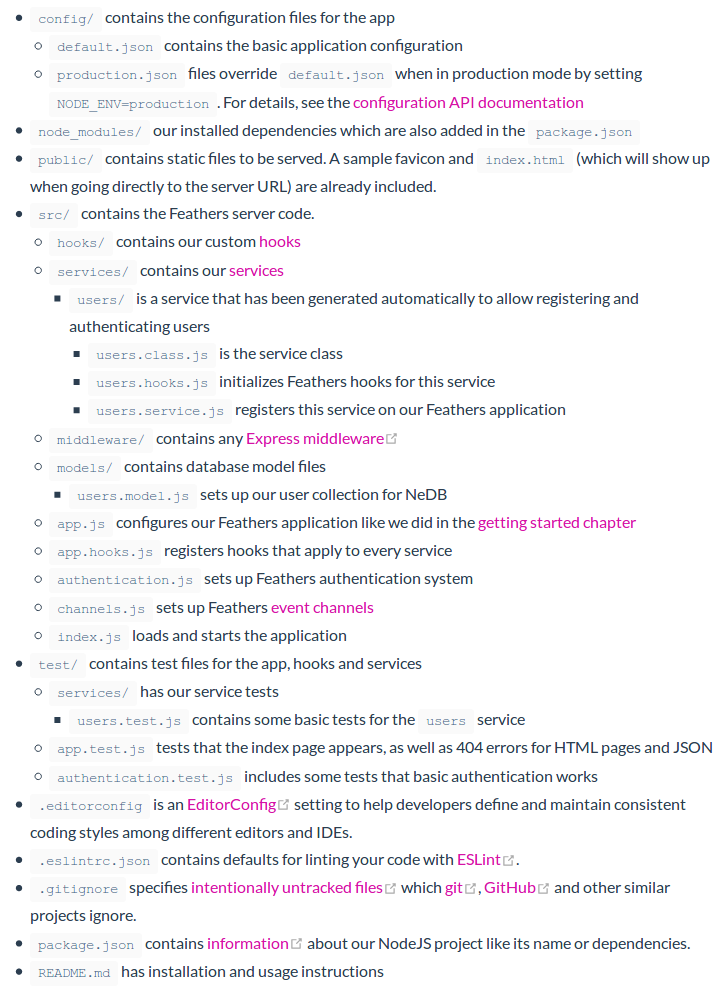
The feathers.js official guide explains with great detail what each file and directory does. You can read more from here
Services
Services are at the core of a feathersjs projecct. We use services to interact with data like:
Reading or writing on the database
Calling another API
Working with 3rd party services (processing payment, sending mail, or getting data from any external api)
you can read more about services here
To create a service we have this nifty generate command
feathers generate service
again, it will ask you some details about the service.
lets name our service messages. Heres the options we choose.
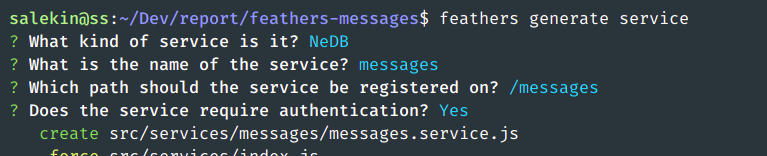
now let's see what did the generator made for us.
git status

On branch master
Changes not staged for commit:
  (use "git add <file>..." to update what will be committed)
  (use "git checkout -- <file>..." to discard changes in working directory)

        modified:   src/services/index.js

Untracked files:
  (use "git add <file>..." to include in what will be committed)

        src/models/messages.model.js
        src/services/messages/
        test/services/messages.test.js
so, it has modified the services/index.js
const users = require('./users/users.service.js');
const messages = require('./messages/messages.service.js');
// eslint-disable-next-line no-unused-vars
module.exports = function (app) {
  app.configure(users);
  app.configure(messages);
};
and created a messages.model.js
const NeDB = require('nedb');
const path = require('path');

module.exports = function (app) {
  const dbPath = app.get('nedb');
  const Model = new NeDB({
    filename: path.join(dbPath, 'messages.db'),
    autoload: true
  });

  return Model;
};
along with messages.service.js
// Initializes the `messages` service on path `/messages`
const { Messages } = require('./messages.class');
const createModel = require('../../models/messages.model');
const hooks = require('./messages.hooks');

module.exports = function (app) {
  const Model = createModel(app);
  const paginate = app.get('paginate');

  const options = {
    Model,
    paginate
  };

  // Initialize our service with any options it requires
  app.use('/messages', new Messages(options, app));

  // Get our initialized service so that we can register hooks
  const service = app.service('messages');

  service.hooks(hooks);
};
Now, let's run and see the demo.
First, we download a api request collection for postman from here.
After that, we create a new user.
Creating a new user
POST: http://localhost:3030/users

# body
{
  "email": "voda@example.com",
  "password": "secret"
}

# response
{
    "email": "voda@example.com",
    "_id": "LMDiTvAt3WTMP9WY"
}
Creating auth
Now, we need to get the auth token for the generated user.
POST: http://localhost:3030/authentication

# body
{
	"strategy": "local",
	"email": "voda@example.com",
    "password": "secret"
}

# response
{
    "accessToken": "eyJhbGciOiJIUzI1NiIsInR5cCI6ImFjY2VzcyJ9.eyJpYXQiOjE1NjkzMzY5OTEsImV4cCI6MTU2OTQyMzM5MSwiYXVkIjoiaHR0cHM6Ly95b3VyZG9tYWluLmNvbSIsImlzcyI6ImZlYXRoZXJzIiwic3ViIjoiTE1EaVR2QXQzV1RNUDlXWSIsImp0aSI6IjdmMjUxMjcxLTk0ZDMtNDBjMy1hMWQyLTFiOWFiYTc5ZjVhYSJ9.wuIdYSo01hl19062e1bA45kLaWhby239FZGeQsKZRks",
    "authentication": {
        "strategy": "local"
    },
    "user": {
        "email": "voda@example.com",
        "_id": "LMDiTvAt3WTMP9WY"
    }
}

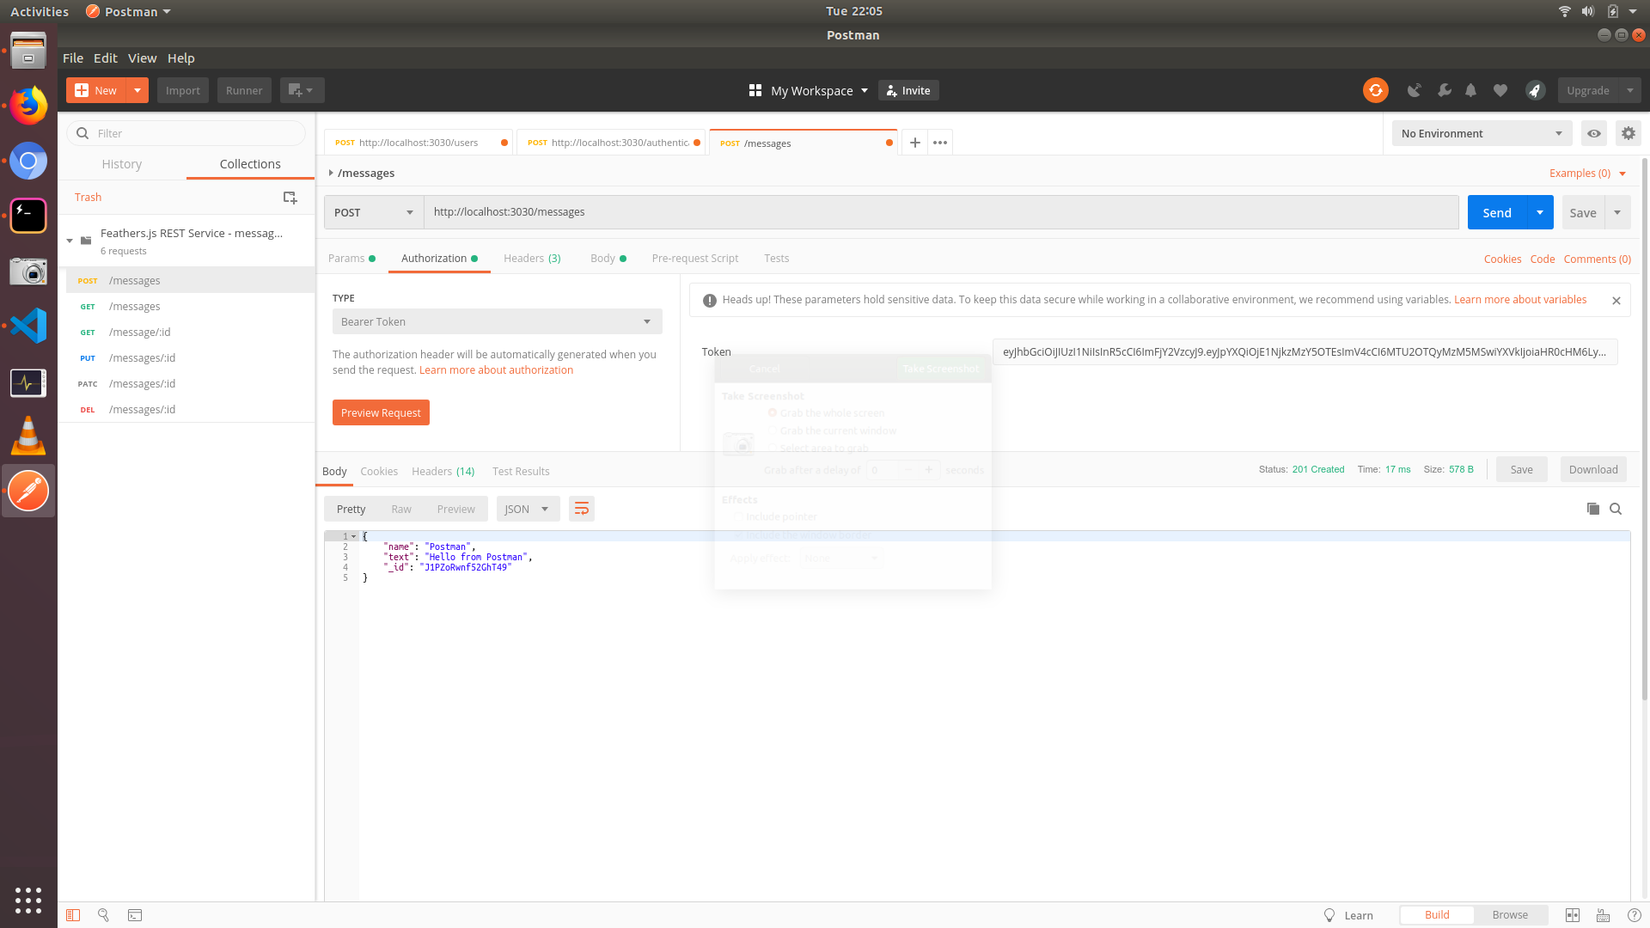
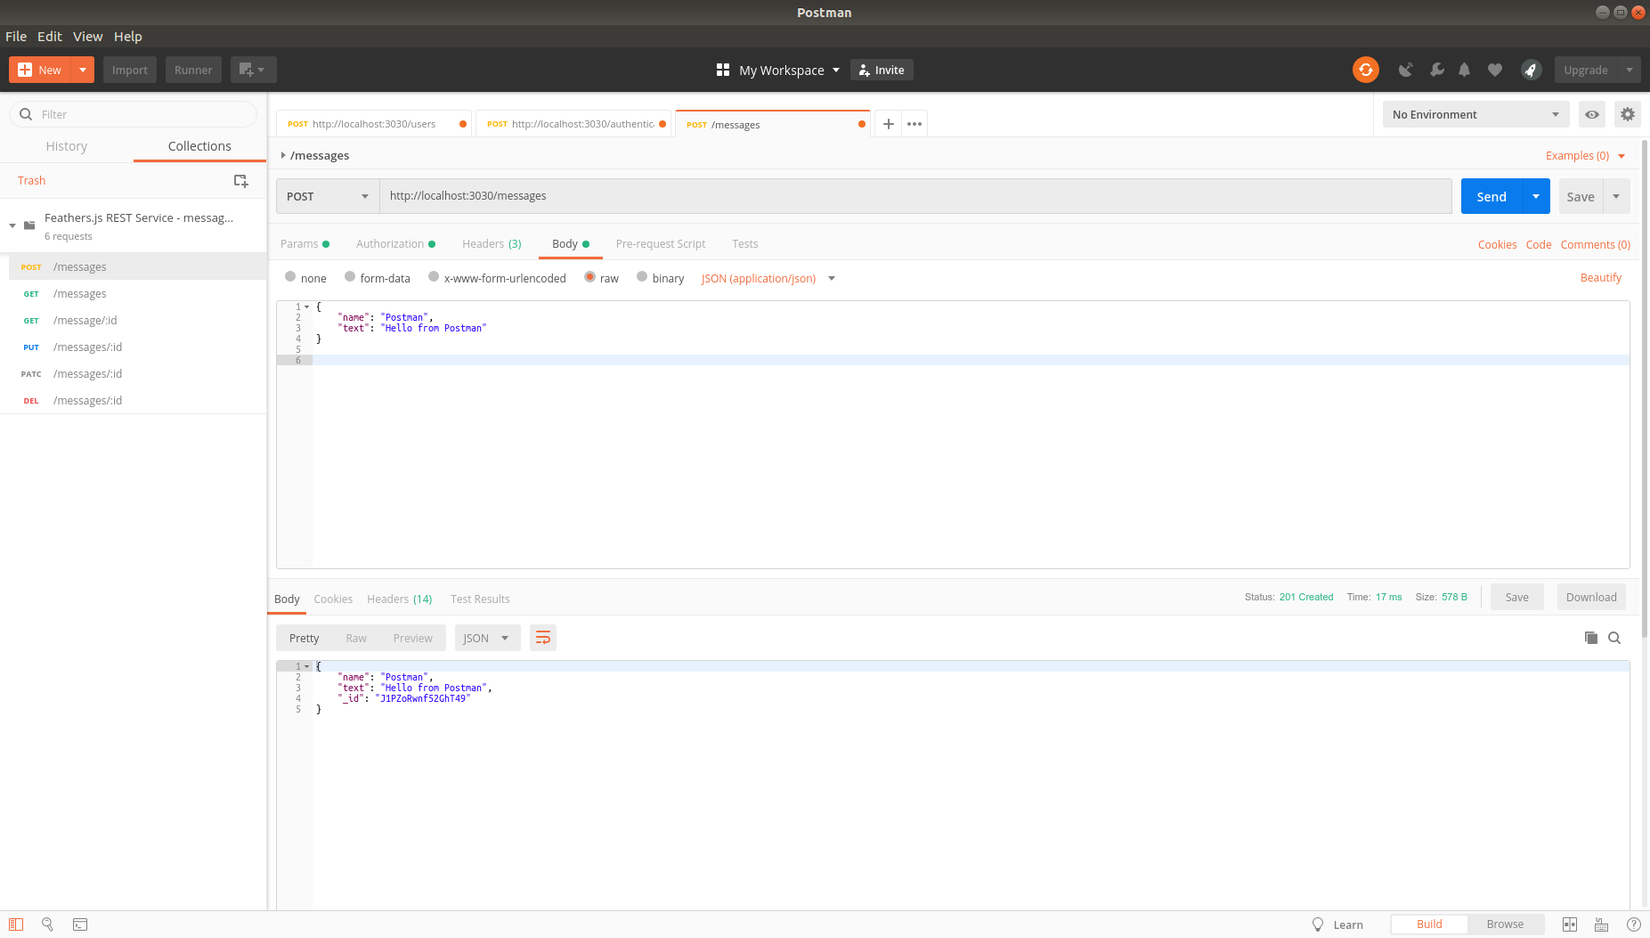
Create a new message
Using the auth token we just received, we'll create a new message
POST: http://localhost:3030/messages

# body
{
	"name": "Postman",
	"text": "Hello from Postman"
}

# response
{
    "name": "Postman",
    "text": "Hello from Postman",
    "_id": "J1PZoRwnf52GhT49"
}
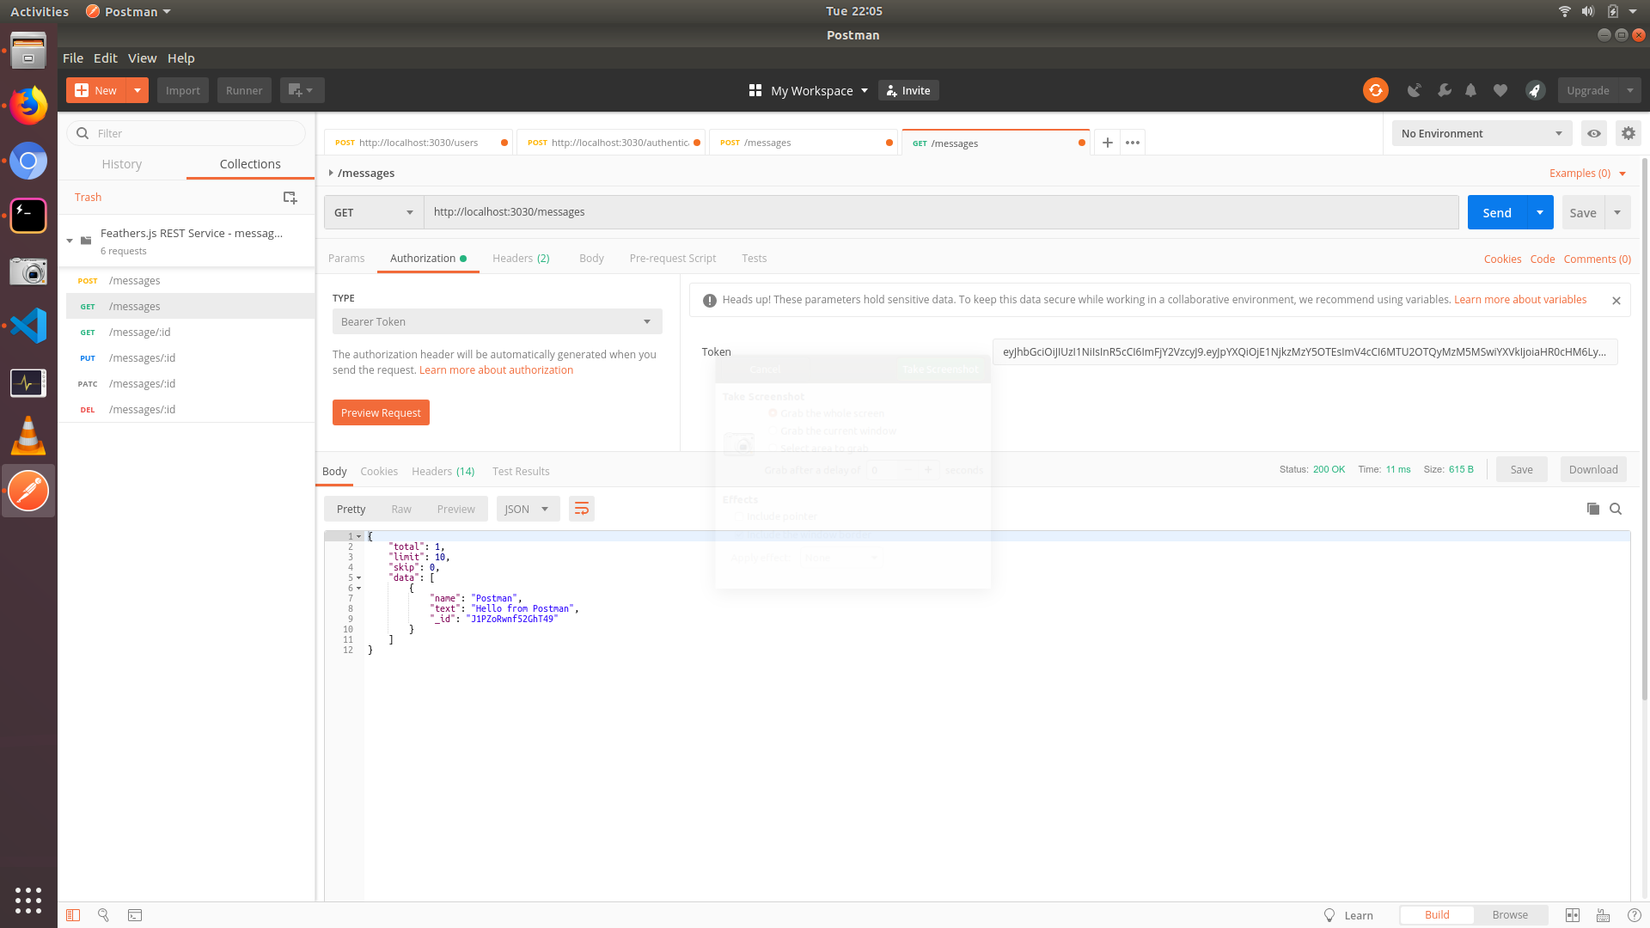
Get messages
same as above
GET: http://localhost:3030/messages

# response
{
    "total": 1,
    "limit": 10,
    "skip": 0,
    "data": [
        {
            "name": "Postman",
            "text": "Hello from Postman",
            "_id": "J1PZoRwnf52GhT49"
        }
    ]
}
To read more about Services and creating custom services, you can read the official docs.
What's next
We will discuss more about custom services and Hooks on the next part of this series. Stay tuned.
Source code
I highly suggest you code alomg, but if you want you can just pull this source code too https://github.com/SSalekin/Intro-to-feathers
Resources
All rights reserved
