Gọi Weather API với Retrofit2 và Coroutines - Phần 1: Get API
Bài đăng này đã không được cập nhật trong 5 năm
Hi mọi người, hôm nay mình sẽ làm một bài post cơ bản về cách Get Api bằng Retrofit2 cùng với Coroutines. Trong bài viết này mình chỉ hướng dẫn các bạn cơ bản về cách để lấy được API bằng Retrofit thôi chứ không nói sâu về lý thuyết nhé, về lý thuyết Retrofit bạn có thể vào link này để tìm hiểu thêm
1. weather API
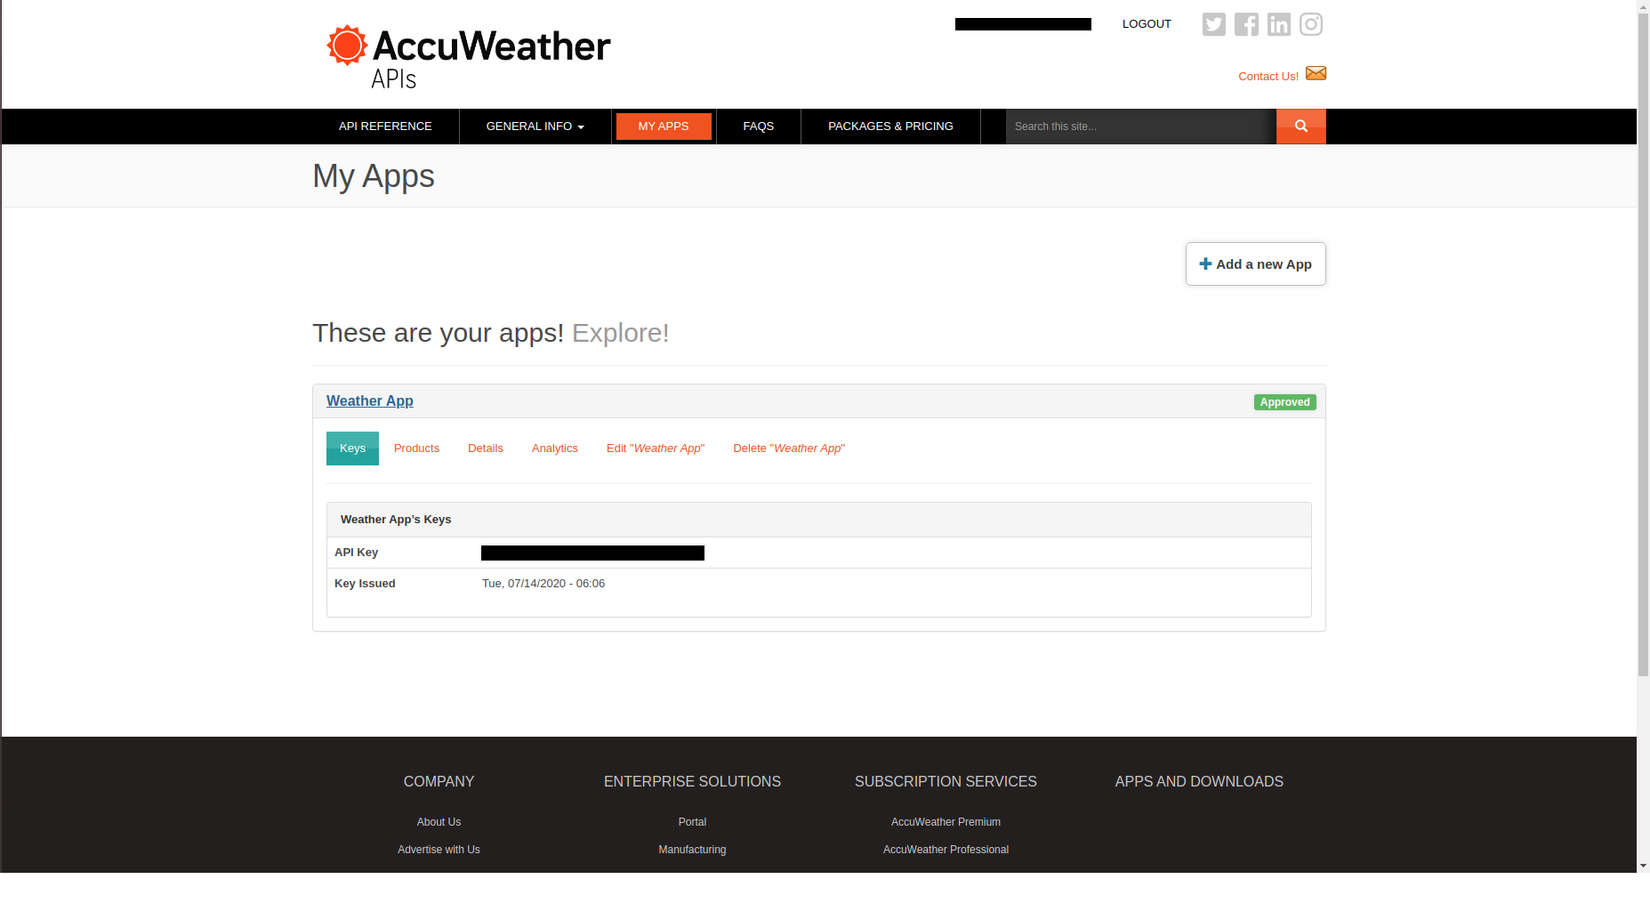
Về API thì mình sẽ dùng AccuWeather API để get nhé, Accuweather sẽ gọi được 50 lần một ngày với 1 key khi mình xài free nhé  , đây là link để mình lấy API Key.
2. Get API với Retrofit2
Bật ViewBinding
android {
    ...
    buildFeatures{
        viewBinding = true
    }
}
Implementation các thư viện vào
Version của retrofit bạn có thể vào link này để xem nhé. còn đây là version của Gson, và cuối cùng là OkHttp3
    implementation 'com.squareup.retrofit2:retrofit:2.9.0'
    // Thư viện này được dùng để parse dữ liệu từ json sang model nhé
    implementation 'com.squareup.retrofit2:converter-gson:2.3.0'
    implementation 'com.squareup.okhttp3:logging-interceptor:3.4.1'
Sau đó bấm Sync và chờ đợi project sync, sau khi đã sync xong thì bắt tay vào chiến thôi =D.
Setup Project
Đầu tiên thì cần cấp quyền internet trong file AndroidManifest.xml, vì gọi api thì cần mạng mà 
<uses-permission android:name="android.permission.INTERNET"/>
Tiếp theo là vào đây để lấy cái url của accuweather, đây sẽ là base url của mình nhé.
http://dataservice.accuweather.com/
Sau đó thì copy base url với api key vào app/buildGradle thôi
    android {
        ...
        buildTypes {
            ...

            debug {
                debuggable true
                applicationIdSuffix ".debug"
                buildConfigField("String", "BASE_URL", "\"http://dataservice.accuweather.com/\"")
                buildConfigField("String", "API_KEY", "\"xxxxxxxxxxxxxxxxxxxxx\"")
            }
        }
    }
Sau khi Sync thì bạn vào file BuildConfig để check xem 2 biến trên đã được add vào hay chưa nhé
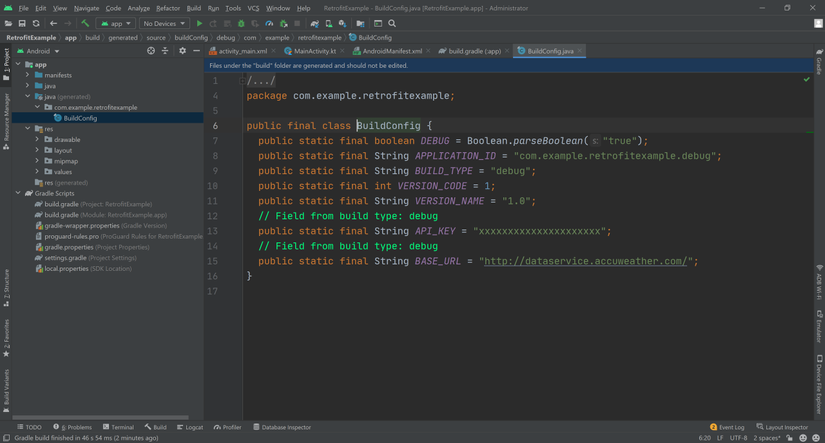
Nếu Sync xong không thấy file này thì bạn vào Build -> Rebuild Project là sẽ có.
Tạo Model
Ok bây giờ tới phần tạo model để chứa dữ liệu được lấy về từ server, vào lại cái link api ở trên copy api key vào, nhập tên một thành phố mà mình muốn lấy dữ liệu và nhấn Send this request
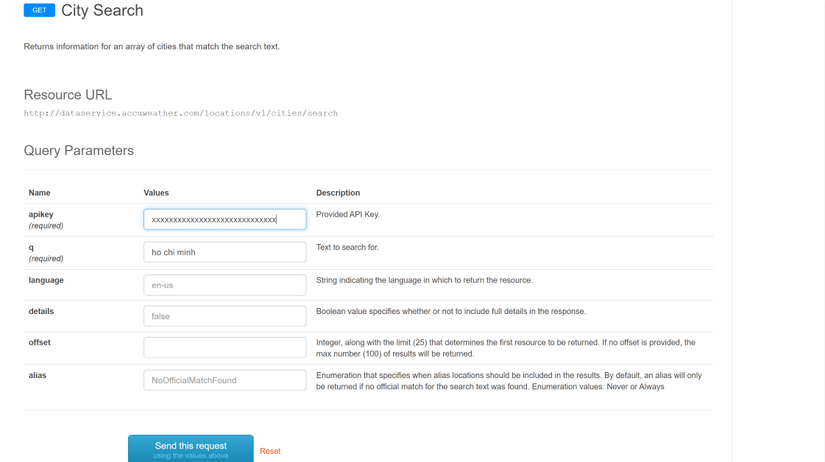
và đây là dữ liệu được trả về
[
  {
    "Version": 1,
    "Key": "4-353981_1_AL",
    "Type": "City",
    "Rank": 11,
    "LocalizedName": "Ho Chi Minh",
    "EnglishName": "Ho Chi Minh City",
    "PrimaryPostalCode": "",
    "Region": {
      "ID": "ASI",
      "LocalizedName": "Asia",
      "EnglishName": "Asia"
    },
    "Country": {
      "ID": "VN",
      "LocalizedName": "Vietnam",
      "EnglishName": "Vietnam"
    },
    "AdministrativeArea": {
      "ID": "SG",
      "LocalizedName": "Ho Chi Minh",
      "EnglishName": "Ho Chi Minh",
      "Level": 1,
      "LocalizedType": "Municipality",
      "EnglishType": "Municipality",
      "CountryID": "VN"
    },
    "TimeZone": {
      "Code": "ICT",
      "Name": "Asia/Ho_Chi_Minh",
      "GmtOffset": 7,
      "IsDaylightSaving": false,
      "NextOffsetChange": null
    },
    "GeoPosition": {
      "Latitude": 10.775,
      "Longitude": 106.702,
      "Elevation": {
        "Metric": {
          "Value": 7,
          "Unit": "m",
          "UnitType": 5
        },
        "Imperial": {
          "Value": 22,
          "Unit": "ft",
          "UnitType": 0
        }
      }
    },
    "IsAlias": true,
    "ParentCity": {
      "Key": "353981",
      "LocalizedName": "Ho Chi Minh City",
      "EnglishName": "Ho Chi Minh City"
    },
    "SupplementalAdminAreas": [],
    "DataSets": [
      "AirQualityCurrentConditions",
      "AirQualityForecasts",
      "Alerts"
    ]
  }
]
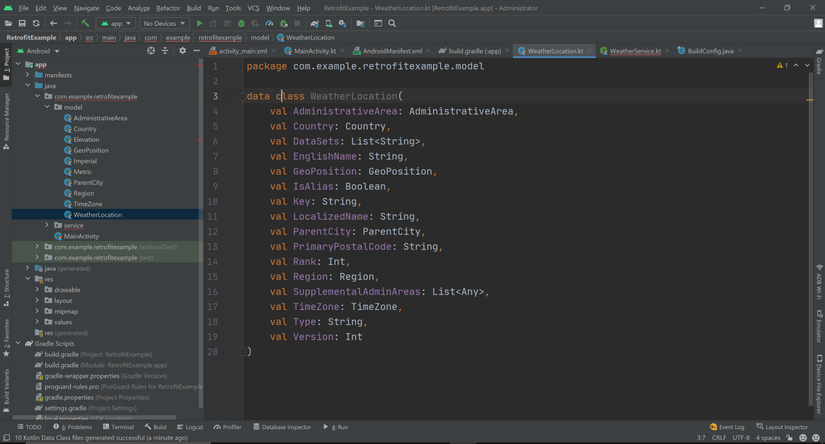
rồi bước tiếp theo là tạo class model để chứa dữ liệu trên, nếu bạn là người đủ kiên nhẫn thì bạn có thể tạo model để chứa dữ liệu ở trên bằng cơm, nhưng riêng mình, mình sẽ dùng tool mình xài tool này nhé, bạn vào File -> Settings -> Plugins rồi kiếm tên tool -> install là xong.
Kết quả sau khi xài tool =) bạn nhớ bỏ 2 dấu [ ] này trong đoạn json khi mà copy vào nhé.
Setup Retrofit
Bây giờ đã có url, model bước tiếp theo sẽ là tạo retrofit để gọi API thôi.
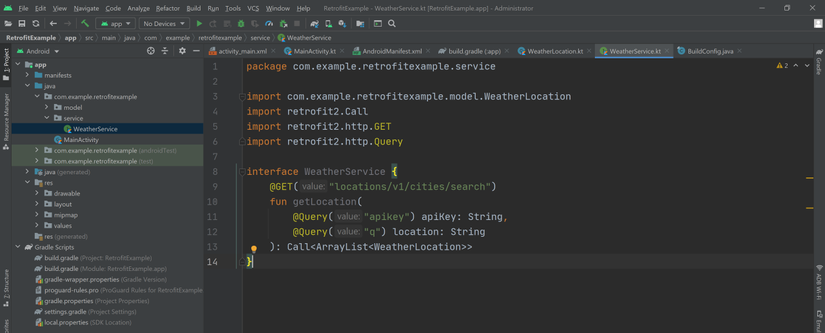
Tạo 1 interface để định nghĩa các http request, cụ thể ở đây là mình sẽ Get API City Search
    interface WeatherService {
        @GET("locations/v1/cities/search")
        fun getLocation(
            @Query("apikey") apiKey: String,
            @Query("q") location: String
        ): Call<ArrayList<WeatherLocation>>
    }
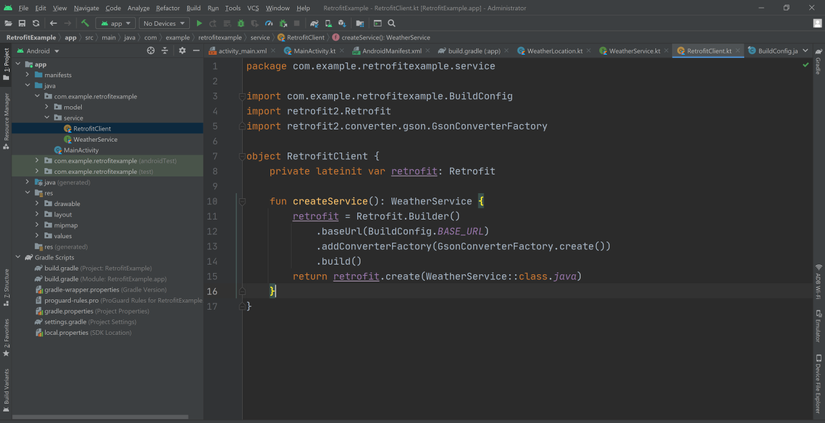
 Bây giờ chúng ta sẽ tạo 1 instance Retrofit để sử dụng.
    object RetrofitClient {
    private lateinit var retrofit: Retrofit

    fun createService(): WeatherService {
        retrofit = Retrofit.Builder()
            .baseUrl(BuildConfig.BASE_URL)
            .addConverterFactory(GsonConverterFactory.create())
            .build()
        return retrofit.create(WeatherService::class.java)
    }
}
và đây là code trong MainActivity.kt
    lateinit var weatherService: WeatherService
    lateinit var binding: ActivityMainBinding

    override fun onCreate(savedInstanceState: Bundle?) {
        super.onCreate(savedInstanceState)
        //View binding
        binding = ActivityMainBinding.inflate(layoutInflater)
        setContentView(binding.root)

        //create Retrofit instance
        weatherService = RetrofitClient.createService()

        binding.apply {
            btnGetApi.setOnClickListener {
                val cityName = edtCitySearch.text.toString()
                if(cityName.trim().isNotBlank()) {
                    textInputCity.error = null
                    getLocation(cityName)
                } else {
                    textInputCity.error = "This field is required"
                }
            }
        }
    }

    private fun getLocation(cityName: String) {
        weatherService.getLocation(BuildConfig.API_KEY, cityName)
            .enqueue(object : Callback<ArrayList<WeatherLocation>> {
                override fun onResponse(
                    call: Call<ArrayList<WeatherLocation>>,
                    response: Response<ArrayList<WeatherLocation>>
                ) {
                    Toast.makeText(this@MainActivity, "Successed", Toast.LENGTH_SHORT).show()
                }

                override fun onFailure(call: Call<ArrayList<WeatherLocation>>, t: Throwable) {
                    Toast.makeText(this@MainActivity, "Failed", Toast.LENGTH_SHORT).show()
                }
            })
    }
enqueue() trong code được dùng để gọi api theo dạng bất đồng bộ nên api sẽ không block main thread của bạn và kết quả sẽ được trả về trong CallBack.
Bước tiếp theo là build app và chạy thôi
All rights reserved
