Có thể hay Không thể thực hành photoshop với Deep Learning?
Bài đăng này đã không được cập nhật trong 6 năm
Xin chào tất cả các bạn, ở bài trước mình đã hướng dẫn sử dụng TensorFlow API cho bài toán Object Detection và ở bài viết này mình sẽ đề cập đến bài toán thứ 2 là Image Segmentation. Bên cạnh đó, mình cũng cảm thấy khá là hứng thú với dữ liệu về ảnh nên hôm nay mình sẽ thử tập tành photoshop với Deep Learning xem như thế nào. Thực chất chỉ cần dùng Opencv là có thể xử lý được rồi. Tuy nhiên, mình muốn thử ứng dụng với bài toán Segmentation cho việc chuyển màu xá cho Background và giữ nguyên màu cho mèo. Bây giờ các app dùng để chỉnh ảnh cũng đang rất phổ biến chỉ cần hỏi mấy em 2k là bạn có ngay một list app chỉnh sửa ảnh hay chụp ảnh rồi =)).
Vì sự tò mò về việc pts nên mình quyết định tìm hiểu xem có thể dùng Deep Learning mà sửa ảnh được không. Bây giờ thì chúng ta bắt đầu nào. Những nội dung mình sẽ trình bày ở trong bài viết này:
- Image Segmentation là gì?
- Data
- Kiến trúc mạng Unet
- Xây dựng model
- Training
- Kết Quả
- Kết Luận
- Reference
Image Segmentation là gì?
Image Segmentation
Image Segmentation là một quá trình chia một bức ảnh số thành nhiều phần khác nhau (tập hợp các điểm ảnh, hay có thể gọi là superpixels) dựa trên labels để tìm được đúng hình dạng đối tượng. Có 2 loại Image segmentation:
- Semantic segmentation: Mục tiêu của Semantic segmentation là gán nhãn từng pixel của hình ảnh với một lớp tương ứng. Ví dụ như ở Hình 1: chỉ chia thành các class khác nhau như : 'person', 'bicycle'.
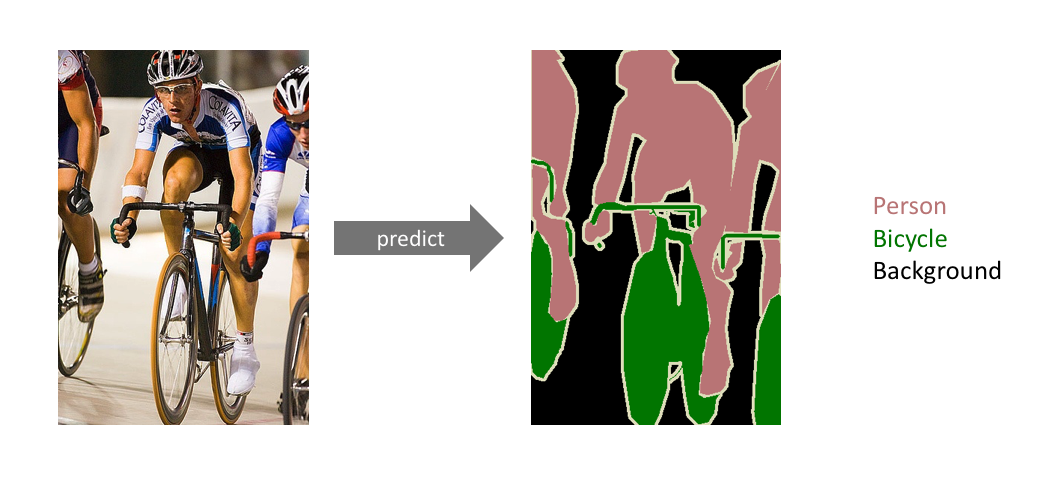
Hình 1: Semantic segmentation
- Instance segmentation: Instance segmentation bước đầu giống như Semantic segmentation là gán nhãn từng pixel của hình ảnh với một class tương ứng, sau đó phân loại riêng biệt từng đối tượng ví dụ như Hình 2: ở đây phân biệt thành 3 người khác nhau được thể hiện bởi màu sắc khác nhau.
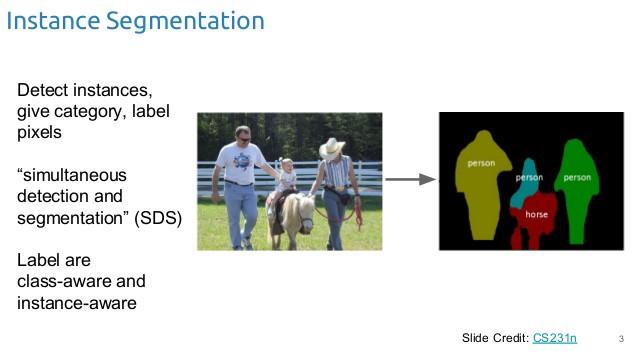
Hình 2: Instance segmentation
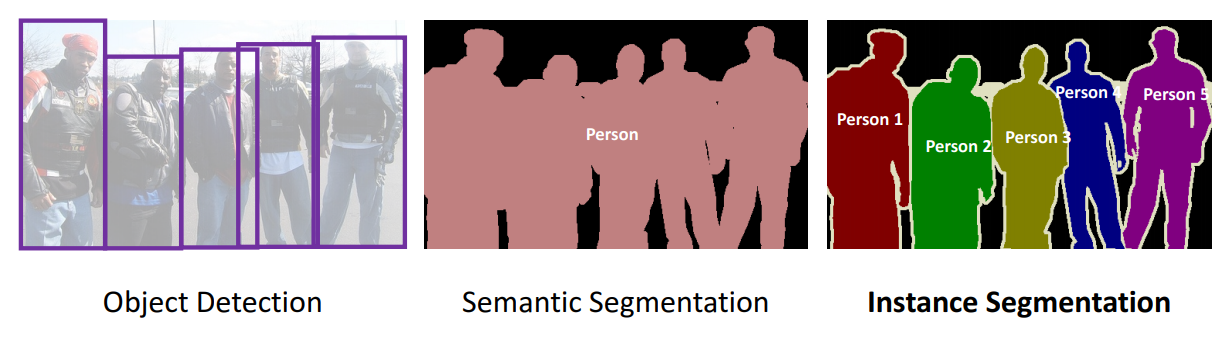
Hình 3: Object Detection vs Semantic Segmentation vs Instance Segmentation
Ứng dụng
Có rất nhiều ứng dụng sử dụng image segmentation ví dụ như Ô tô tự lái, chẩn đoán bệnh trong y tế, trong nông nghiệp, ....
Kiến trúc mạng Unet
Trong bài này của Ông Toằn cũng đã giải thích rất kỹ về mạng Unet. Unet là một kiến trúc mạng rất phổ biến trong bài toán Image Segmentation với đặc thù của dữ liệu đầu vào và đầu ra có kích thước giống như nhau. Đối với bài toán này của mình cũng vậy đầu vào của mình là một ảnh màu và đầu ra mong muốn là con mèo sẽ được giữ nguyên màu còn phần background sẽ chuyển về grayscale. Kiến trúc Unet được thể hiện như trong hình sau:
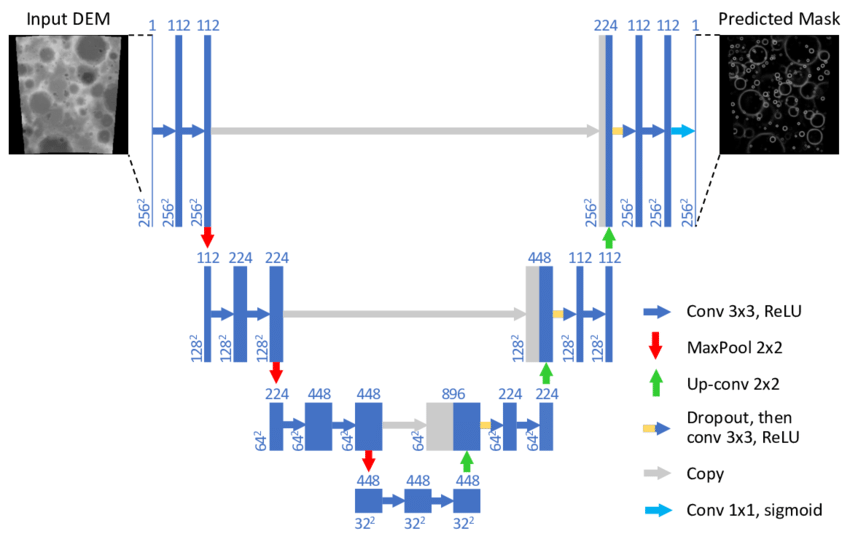
Kĩ thuật chung khi ta xây dựng mạng cho bài toán này sẽ khá giống với mạng autoencoder là ta sẽ xây dựng mạng gồm 2 thành phần encoder và decoder (encoder và decoder là đối xứng nhau.
Xây dựng model
Ok, bây giờ sẽ đến phần xây dựng model, mình sẽ xây dựng model dựa trên kiến trúc mạng unet. Đầu tiên là bước import thư viện.
from skimage import io
import os
import pandas as pd
import numpy as np
import matplotlib.pyplot as plt
import matplotlib.patches as patches
from PIL import Image

from keras.models import Model, load_model
from keras.layers import Input
from keras.layers.core import Lambda
from keras.layers.convolutional import Conv2D, Conv2DTranspose
from keras.layers.pooling import MaxPooling2D
from keras.layers.merge import concatenate
from keras.callbacks import EarlyStopping, ModelCheckpoint
from keras import backend as K
import tensorflow as tf
BATCH_SIZE = 4
EDGE_CROP = 2
NB_EPOCHS = 20
GAUSSIAN_NOISE = 0.1
UPSAMPLE_MODE = 'DECONV'
# downsampling inside the network
NET_SCALING = None
# downsampling in preprocessing
IMG_SCALING = (1, 1)
# number of validation images to use
VALID_IMG_COUNT = 400
# maximum number of steps_per_epoch in training
MAX_TRAIN_STEPS = 200
AUGMENT_BRIGHTNESS = False
IMG_SIZE = 256
Bước tiếp theo là định nghĩa hàm loss ở đây mình dùng hàm loss mean_iou
def mean_iou(y_true, y_pred):
    prec = []
    for t in np.arange(0.5, 1.0, 0.05):
        y_pred_ = tf.to_int32(y_pred > t)
        score, up_opt = tf.metrics.mean_iou(y_true, y_pred_, 2)
        K.get_session().run(tf.local_variables_initializer())
        with tf.control_dependencies([up_opt]):
            score = tf.identity(score)
        prec.append(score)
    return K.mean(K.stack(prec), axis=0)
Xây dựng model ở đây mình xây dựng model theo mạng kiến trúc Unet bao gồm encoder và decoder đối xứng nhau:
inputs = Input((IMG_SIZE, IMG_SIZE, 3))

c1 = Conv2D(8, (3, 3), activation='relu', padding='same') (inputs)
c1 = Conv2D(8, (3, 3), activation='relu', padding='same') (c1)
p1 = MaxPooling2D((2, 2)) (c1)

c2 = Conv2D(16, (3, 3), activation='relu', padding='same') (p1)
c2 = Conv2D(16, (3, 3), activation='relu', padding='same') (c2)
p2 = MaxPooling2D((2, 2)) (c2)

c3 = Conv2D(32, (3, 3), activation='relu', padding='same') (p2)
c3 = Conv2D(32, (3, 3), activation='relu', padding='same') (c3)
p3 = MaxPooling2D((2, 2)) (c3)

c4 = Conv2D(64, (3, 3), activation='relu', padding='same') (p3)
c4 = Conv2D(64, (3, 3), activation='relu', padding='same') (c4)
p4 = MaxPooling2D(pool_size=(2, 2)) (c4)

c5 = Conv2D(128, (3, 3), activation='relu', padding='same') (p4)
c5 = Conv2D(128, (3, 3), activation='relu', padding='same') (c5)

u6 = Conv2DTranspose(64, (2, 2), strides=(2, 2), padding='same') (c5)
u6 = concatenate([u6, c4])
c6 = Conv2D(64, (3, 3), activation='relu', padding='same') (u6)
c6 = Conv2D(64, (3, 3), activation='relu', padding='same') (c6)

u7 = Conv2DTranspose(32, (2, 2), strides=(2, 2), padding='same') (c6)
u7 = concatenate([u7, c3])
c7 = Conv2D(32, (3, 3), activation='relu', padding='same') (u7)
c7 = Conv2D(32, (3, 3), activation='relu', padding='same') (c7)

u8 = Conv2DTranspose(16, (2, 2), strides=(2, 2), padding='same') (c7)
u8 = concatenate([u8, c2])
c8 = Conv2D(16, (3, 3), activation='relu', padding='same') (u8)
c8 = Conv2D(16, (3, 3), activation='relu', padding='same') (c8)

u9 = Conv2DTranspose(8, (2, 2), strides=(2, 2), padding='same') (c8)
u9 = concatenate([u9, c1], axis=3)
c9 = Conv2D(8, (3, 3), activation='relu', padding='same') (u9)
c9 = Conv2D(8, (3, 3), activation='relu', padding='same') (c9)

outputs = Conv2D(1, (1, 1), activation='sigmoid') (c9)

model = Model(inputs=[inputs], outputs=[outputs])
model.compile(optimizer='adam', loss='binary_crossentropy', metrics=[mean_iou])
model.summary()
Data
Ở trong bài này mình sử dụng tập ảnh mèo gồm có khoảng 80 ảnh đã được annotation ở đây. Bạn có thể sử dụng tập ảnh khác và tự annotation dựa theo các Tool có sẵn và mình đã đề cập ở đây. Dữ liệu để training của mình bao gồm 2 folder: input (là ảnh gốc), mask(là labels đã được gán nhãn bằng tool). Khi training mình có chia thành 2 tập train và val bằng train_test_split
 Hình 4: Tập dữ liệu training
montage_rgb = lambda x: np.stack([montage(x[:, :, :, i]) for i in range(x.shape[3])], -1)
data_dir = 'project/Cat-Segmentation/Data'
train_image_dir = os.path.join(data_dir, 'Train_Data')
import gc; gc.enable()
from skimage.morphology import label
Xây dựng hàm load data:
def get_all_imgs():
    img_path = os.path.join(train_image_dir,'input')
    images = glob.glob(os.path.join(img_path,'*.*'))
    return [os.path.basename(image) for image in images]
Chia tập train và test:
TRAIN_IMGS, TEST_IMGS = train_test_split(get_all_imgs())
tiếp theo, tăng độ sáng cho image và gen data. Mọi người cũng có thể tham khảo thêm cách viết data generator theo bài viết này:
def cv2_brightness_augment(img):
    hsv = cv2.cvtColor(img,cv2.COLOR_RGB2HSV)
    v = hsv[:,:,2]
    seed = random.uniform(0.5,1.2)
    v = (( v/255.0 ) * seed)*255.0
    hsv[:,:,2] = np.array(np.clip(v,0,255),dtype=np.uint8)
    rgb_final = cv2.cvtColor(hsv,cv2.COLOR_HSV2RGB)
    return rgb_final

def make_image_gen(img_file_list=TRAIN_IMGS, batch_size = BATCH_SIZE):
    all_batches = TRAIN_IMGS
    out_rgb = []
    out_mask = []
    img_path = os.path.join(train_image_dir,'input')
    mask_path = os.path.join(train_image_dir,'mask')
    while True:
        np.random.shuffle(all_batches)
        for c_img_id in all_batches:
            c_img = imread(os.path.join(img_path,c_img_id))
            c_mask_id = 'mask_'+ c_img_id
            c_img = cv2_brightness_augment(c_img)
            c_mask = imread(os.path.join(mask_path,c_mask_id))
            if IMG_SCALING is not None:
                c_img = cv2.resize(c_img,(256,256),interpolation = cv2.INTER_AREA)
                c_mask = cv2.resize(c_mask,(256,256),interpolation = cv2.INTER_AREA)
            c_mask = np.reshape(c_mask,(c_mask.shape[0],c_mask.shape[1],-1))
            c_mask = c_mask > 0
            out_rgb += [c_img]
            out_mask += [c_mask]
            if len(out_rgb)>=batch_size:
                yield np.stack(out_rgb, 0)/255.0, np.stack(out_mask, 0)
                out_rgb, out_mask=[], []
Cùng thử xem kết quả thu được:
train_gen = make_image_gen()
train_x, train_y = next(train_gen)
print('x', train_x.shape, train_x.min(), train_x.max())
print('y', train_y.shape, train_y.min(), train_y.max())
![]()
train_y có shape là (4, 256, 256, 1) bởi vì ở đây mình chỉ có 2 nhãn cat và background thôi 
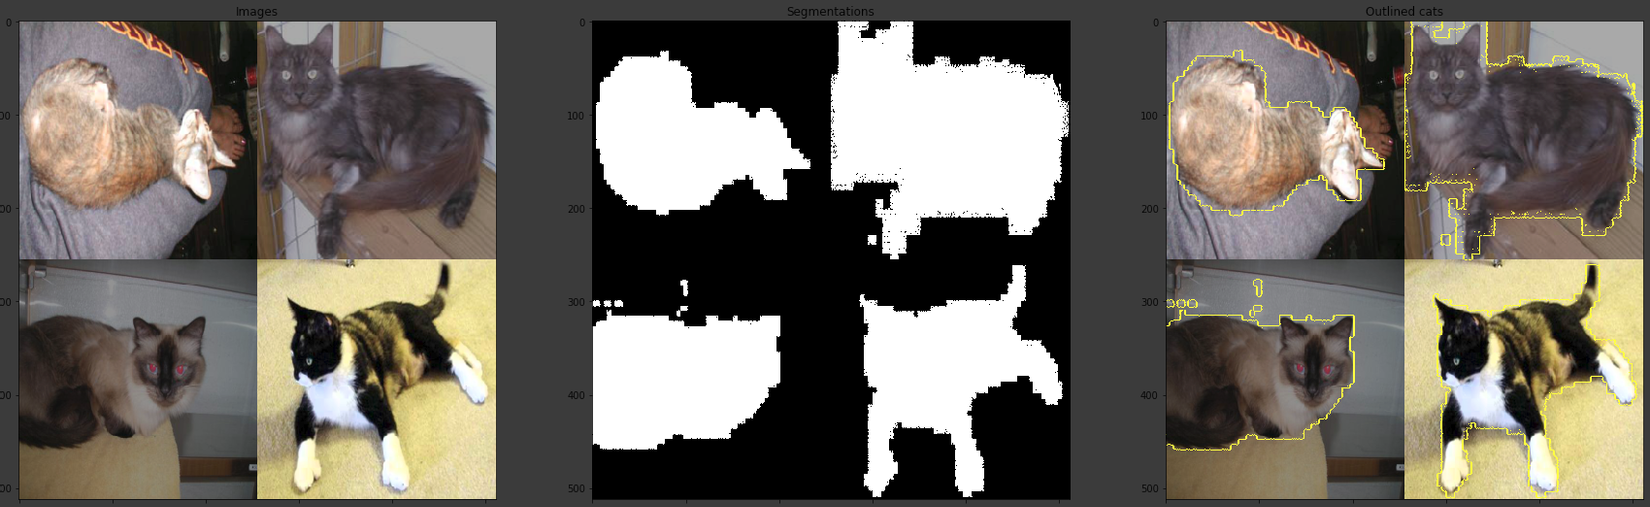
Thử show nào:
fig, (ax1, ax2, ax3) = plt.subplots(1, 3, figsize = (30, 10))
batch_rgb = montage_rgb(train_x)
batch_seg = montage(train_y[:, :, :, 0])
ax1.imshow(batch_rgb)
ax1.set_title('Images')
ax2.imshow(batch_seg, cmap='gray')
ax2.set_title('Segmentations')
ax3.imshow(mark_boundaries(batch_rgb,
                           batch_seg.astype(int)))
ax3.set_title('Outlined cats')
fig.savefig('overview.png')
Chúng ta sẽ tăng thêm data cho training bằng cách augument
from keras.preprocessing.image import ImageDataGenerator
dg_args = dict(featurewise_center = False,
                  samplewise_center = False,
                  rotation_range = 15,
                  width_shift_range = 0.1,
                  height_shift_range = 0.1,
                  shear_range = 0.01,
                  zoom_range = [0.9, 1.25],
                  horizontal_flip = True,
                  vertical_flip = False,
                  fill_mode = 'reflect',
                   data_format = 'channels_last')
# brightness can be problematic since it seems to change the labels differently from the images
if AUGMENT_BRIGHTNESS:
    dg_args[' brightness_range'] = [0.5, 1.5]
image_gen = ImageDataGenerator(**dg_args)

if AUGMENT_BRIGHTNESS:
    dg_args.pop('brightness_range')
label_gen = ImageDataGenerator(**dg_args)

def create_aug_gen(in_gen, seed = None):
    np.random.seed(seed if seed is not None else np.random.choice(range(9999)))
    for in_x, in_y in in_gen:
        seed = np.random.choice(range(9999))
        # keep the seeds syncronized otherwise the augmentation to the images is different from the masks
        g_x = image_gen.flow(255*in_x,
                             batch_size = in_x.shape[0],
                             seed = seed,
                             shuffle=True)
        g_y = label_gen.flow(in_y,
                             batch_size = in_x.shape[0],
                             seed = seed,
                             shuffle=True)

        yield next(g_x)/255.0, next(g_y)
Training
Thực chất mình dựa vào ý tưởng của repo này sử dụng pretrain mask-rcnn. Nếu mọi người muốn đơn giản và kết quả tốt có thể làm theo repo này dễ như mì ăn liền chỉ mất công tải pretrain về và chạy theo file jupyter notebook thôi. Bây giờ chúng ta sẽ bắt tay vào training model thôi, mình đã chia thành 2 tập train và test ở trên rồi nên giờ chỉ việc gen data và train thôi.
step_count = min(MAX_TRAIN_STEPS, len(TRAIN_IMGS)//BATCH_SIZE)
train_gen = create_aug_gen(make_image_gen())
val_gen = make_image_gen(TEST_IMGS, len(TEST_IMGS)//BATCH_SIZE)
model.fit_generator(train_gen, validation_data=val_gen, steps_per_epoch=step_count, validation_steps=len(TEST_IMGS)//BATCH_SIZE,
                    epochs=epochs)

Predict và kết quả
Đọc ảnh gốc:
import cv2
img = cv2.imread('project/Cat-Segmentation/Data/test.jpg')
Sau đó mình sẽ chuyển về gray:
gray_image = cv2.cvtColor(img, cv2.COLOR_BGR2GRAY, 0)
gray_image = cv2.resize(gray_image,(256,256))
Resize image:
img_resize = cv2.resize(img,(256,256))
Predict :
def predict(model, X):
    X = X.reshape(1, 256, 256, 3)
    Y = model.predict(X).reshape(256, 256, 1)
    Y *= 255.
    return Y

mask = predict(model, img_resize)
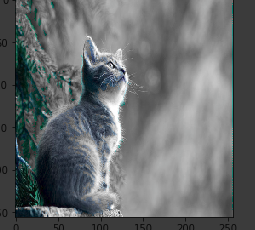
Sau khi đã predict ra mask chúng ta cùng đến bước cuối cùng nào.
def apply_mask(image, mask, gray_image):
    image[:, :, 0] = np.where(
        mask == 0,
        gray_image[:, :],
        image[:, :, 0]
    )
    image[:, :, 1] = np.where(
        mask == 0,
        gray_image[:, :],
        image[:, :, 1]
    )
    image[:, :, 2] = np.where(
        mask == 0,
        gray_image[:, :],
        image[:, :, 2]
    )
    return image
img_result = apply_mask(c_img, mask.squeeze(), gray_image)
plt.imshow(img_result)
Kết Luận
Chúng ta nếu không thạo pts có thể thử vọc vạch code để tự chỉnh ảnh theo ý mình cũng đc mà nhỉ =))). Tuy kết quả của mình không được chính xác lắm và có thể improve bằng cách thêm data. Nhưng dù sao cũng cảm ơn mọi người đã theo dõi bài viết của mình. Rất mong nhận được sự góp ý của mọi người ạ!
Reference
https://nttuan8.com/bai-12-image-segmentation-voi-u-net/ https://towardsdatascience.com/understanding-semantic-segmentation-with-unet-6be4f42d4b47
All rights reserved
