
Những vấn đề liên quan đến dữ liệu ảnh trong Computer Vision
Bài đăng này đã không được cập nhật trong 5 năm
Như mọi người cũng biết data cực kỳ quan trọng đối với Machine learning vì vậy hôm nay mình sẽ chia sẻ xung quanh vấn đề ảnh. Bài viết bao gồm các phần:
- Lưu trữ Image
- Các tool annotate data
Lưu trữ image
Khi chúng ta nói về deep learning, thường thì điều đầu tiên xuất hiện là một lượng dữ liệu khổng lồ hoặc một số lượng lớn hình ảnhViệc lưu trữ cực kì đơn giản trong khi tập data của chúng ta chỉ có vài chục cho đến vài nghìn ảnh. Tuy nhiên khi lượng ảnh của bạn càng lớn thì việc lưu trữ trên máy tính sẽ làm tốn diện tích bộ nhớ. ImageNet là một cơ sở dữ liệu hình ảnh nổi tiếng được tập hợp để training các mô hình về các nhiệm vụ như classification, detection, và segmentation và nó bao gồm hơn 14 triệu hình ảnh.
Sau đây mình sẽ chia sẻ cho các bạn 3 cách lưu trữ hình ảnh.
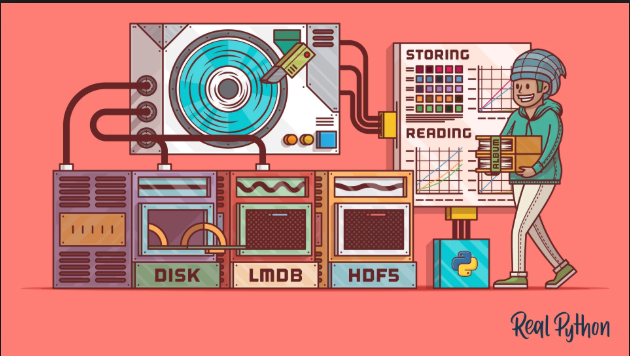
Hình 1: Lưu trữ hình ảnh
Lưu ở file .png trên disk
Với việc lưu trữ ở trên disk này bạn nên cài đặt pillow để đơn giản và hiệu quả hơn
$pip install pillow
Cách lưu trữ
from PIL import Image
import csv

def store_single_disk(image, image_id, label):

    Image.fromarray(image).save(disk_dir / f"{image_id}.png")

    with open(disk_dir / f"{image_id}.csv", "wt") as csvfile:
        writer = csv.writer(
            csvfile, delimiter=" ", quotechar="|", quoting=csv.QUOTE_MINIMAL
        )
        writer.writerow([label])
khi xử lý data được lưu ở trong disk chúng ta nên lưu trữ một file label riêng ra một file .csv để tránh hiện tượng phải mở hết tất cả các file mỗi lần chỉ cần đọ vài bức ảnh thôi.
Lưu trong lightning memory-mapped databases (LMDB)
LMDB là một hệ thống lưu trữ giá trị khóa trong đó mỗi mục được lưu trữ dưới dạng mảng byte. Khóa sẽ là một định danh duy nhất cho mỗi hình ảnh và giá trị sẽ là chính hình ảnh đó. LMDB được ánh xạ bộ nhớ. Điều này có nghĩa là nó trả về con trỏ trực tiếp đến địa chỉ bộ nhớ của cả khóa và giá trị, mà không cần sao chép bất cứ thứ gì trong bộ nhớ như hầu hết các cơ sở dữ liệu khác. Cùng cài đặt LMDB và thử thôi nào
$ pip install lmdb
Ở đây chúng ta sẽ thử với tập CIFAR nhé
class CIFAR_Image:
    def __init__(self, image, label):
        # Dimensions of image for reconstruction - not really necessary
        # for this dataset, but some datasets may include images of
        # varying sizes
        self.channels = image.shape[2]
        self.size = image.shape[:2]

        self.image = image.tobytes()
        self.label = label

    def get_image(self):
        """ Returns the image as a numpy array. """
        image = np.frombuffer(self.image, dtype=np.uint8)
        return image.reshape(*self.size, self.channels)
Lưu trữ:
import lmdb
import pickle

def store_single_lmdb(image, image_id, label):

    map_size = image.nbytes * 10

    # Create a new LMDB environment
    env = lmdb.open(str(lmdb_dir / f"single_lmdb"), map_size=map_size)

    # Start a new write transaction
    with env.begin(write=True) as txn:
        # All key-value pairs need to be strings
        value = CIFAR_Image(image, label)
        key = f"{image_id:08}"
        txn.put(key.encode("ascii"), pickle.dumps(value))
    env.close()
Lưu dưới dạng (HDF5)
Với HDF5 bạn có thể lưu trữ nhiều hơn 1 tập dữ liệu, bạn có thể chia nhỏ data rồi lưu trữ. Cài đặt với pip trước nào:
$ pip install h5py
Tạo file hdf5:
import numpy as np
import h5py
data_order = 'tf'  #  'tf' for Tensorflow
# check the order of data and chose proper data shape to save image
train_shape = (len(train_addrs), 224, 224, 3)
val_shape = (len(val_addrs), 224, 224, 3)
test_shape = (len(test_addrs), 224, 224, 3)
# open a hdf5 file and create earrays
hdf5_file = h5py.File(hdf5_path, mode='w')
hdf5_file.create_dataset("train_img", train_shape, np.int8)
hdf5_file.create_dataset("val_img", val_shape, np.int8)
hdf5_file.create_dataset("test_img", test_shape, np.int8)
hdf5_file.create_dataset("train_mean", train_shape[1:], np.float32)
hdf5_file.create_dataset("train_labels", (len(train_addrs),), np.int8)
hdf5_file["train_labels"][...] = train_labels
hdf5_file.create_dataset("val_labels", (len(val_addrs),), np.int8)
hdf5_file["val_labels"][...] = val_labels
hdf5_file.create_dataset("test_labels", (len(test_addrs),), np.int8)
hdf5_file["test_labels"][...] = test_label
Cách load và lưu
mean = np.zeros(train_shape[1:], np.float32)
# loop over train addresses
for i in range(len(train_addrs)):
    # print how many images are saved every 1000 images
    if i % 1000 == 0 and i > 1:
        print 'Train data: {}/{}'.format(i, len(train_addrs))
    # read an image and resize to (224, 224)
    # cv2 load images as BGR, convert it to RGB
    addr = train_addrs[i]
    img = cv2.imread(addr)
    img = cv2.resize(img, (224, 224), interpolation=cv2.INTER_CUBIC)
    img = cv2.cvtColor(img, cv2.COLOR_BGR2RGB)
    # add any image pre-processing here
    # if the data order is Theano, axis orders should change
    if data_order == 'th':
        img = np.rollaxis(img, 2)
    # save the image and calculate the mean so far
    hdf5_file["train_img"][i, ...] = img[None]
    mean += img / float(len(train_labels))
# loop over validation addresses
for i in range(len(val_addrs)):
    # print how many images are saved every 1000 images
    if i % 1000 == 0 and i > 1:
        print 'Validation data: {}/{}'.format(i, len(val_addrs))
    # read an image and resize to (224, 224)
    # cv2 load images as BGR, convert it to RGB
    addr = val_addrs[i]
    img = cv2.imread(addr)
    img = cv2.resize(img, (224, 224), interpolation=cv2.INTER_CUBIC)
    img = cv2.cvtColor(img, cv2.COLOR_BGR2RGB)
    # add any image pre-processing here
    # if the data order is Theano, axis orders should change
    if data_order == 'th':
        img = np.rollaxis(img, 2)
    # save the image
    hdf5_file["val_img"][i, ...] = img[None]
# loop over test addresses
for i in range(len(test_addrs)):
    # print how many images are saved every 1000 images
    if i % 1000 == 0 and i > 1:
        print 'Test data: {}/{}'.format(i, len(test_addrs))
    # read an image and resize to (224, 224)
    # cv2 load images as BGR, convert it to RGB
    addr = test_addrs[i]
    img = cv2.imread(addr)
    img = cv2.resize(img, (224, 224), interpolation=cv2.INTER_CUBIC)
    img = cv2.cvtColor(img, cv2.COLOR_BGR2RGB)
    # add any image pre-processing here
    # if the data order is Theano, axis orders should change
    if data_order == 'th':
        img = np.rollaxis(img, 2)
    # save the image
    hdf5_file["test_img"][i, ...] = img[None]
# save the mean and close the hdf5 file
hdf5_file["train_mean"][...] = mean
hdf5_file.close()
Trên đây mình đã nêu ra 3 cách lưu trữ data, tiếp theo sẽ tiếp tục đến phần mới.
Các Tool annotated data
Trong bài toán Học máy phần xử lý và phân tích dữ liệu là cực kỳ quan trọng vì vậy mình sẽ giới thiệu cho mọi người một số tool annotated data giúp cho công việc làm dữ liệu trở nên đơn giản hơn.
PixelAnnotationTool
Với tool này phù hợp với các bài toán segmentation như tìm xe ô tô, đường, các tế bào trong y học để hỗ trợ chẩn đoán.
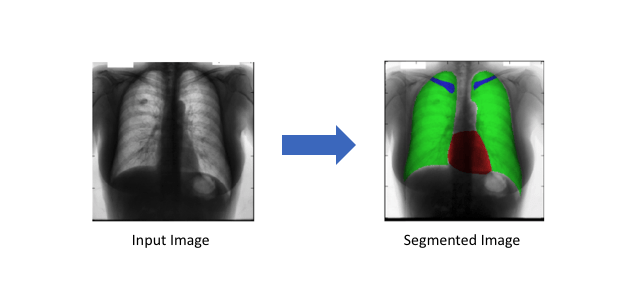
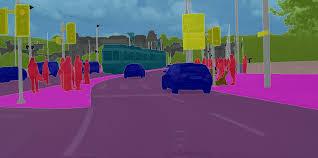
Hình 2: Hai hình ảnh này là những ví dụ về hình ảnh segment (internet)
Tool này được sử dụng thuật toán watershed marked của OpenCV. Mọi người có thể vào link binary để tải tool về và dùng.
 Hình 3: Giao diện của Tool
Cách dùng: bạn có thể đổi màu sắc ở file config trong source code và sau đó để số lượng màu tương ứng với các vùng bạn muốn segmentation khác nhau. Sau đó bạn chỉ cần dùng chuột "chấm" màu và nhấn phím "enter" theo từng vùng màu của bạn mong muốn.
Tool sinh dữ liệu
Text Recognition Data Generator là một tool dùng để sinh ra text.
Với tool này bạn có thể sinh ra các kiểu chữ và màu sắc khác nhau để phục vụ cho bài toán text detection của mình. Bạn chỉ cần lưu các file cn.txt ở trong dicts và font chữ cũng lưu ở thư mục cn luôn và chạy code theo dòng code như sau:
python run.py -l cn -c 1000 -w 1 -t 6 -k 3 -rk -b 3 -bl 1 -rbl
để tự sinh data đúng theo yêu cầu bài toán bạn nên tìm hiểu kỹ ở documentation
Tool LabelImg
LabelImg cũng là một tool dùng để annotated dữ liệu nhưng khác hơn Pixeltool ở chỗ LabelImg dùng để lấy ra 4 góc xung quanh. Để cài đặt tool bạn có thể Clone github về hoặc sử dụng pip
pip3 install pyqt5 lxml # Install qt and lxml by pip
make qt5py3
python3 labelImg.py
python3 labelImg.py [IMAGE_PATH] [PRE-DEFINED CLASS FILE]
Bài viết của mình có phần lủng củng mong mọi người đọc cho góp ý để mình viết tốt hơn của các bài về sau ạ. Mình cảm ơn ạ!
Tham Khảo
https://realpython.com/storing-images-in-python/ https://github.com/abreheret/PixelAnnotationTool https://github.com/Belval/TextRecognitionDataGenerator https://github.com/tzutalin/labelImg
All rights reserved
