Cats vs Dogs Classification using CNN Keras
Bài đăng này đã không được cập nhật trong 3 năm
English version can be read at Eng-Ver
 Image from analyticsindiamag.com
Trong bài viết truớc Spark - Distributed ML model with Pandas UDFs mình có sử dụng model CNN keras để classify Dogs vs Cats vì bài viết quá dài nên phần hướng dẫn train model mình viết ở đây nhé. Toàn bộ code được upload tại Github Nếu bạn chỉ quan tâm đến notebook thì ở đây nhé
Steps to build Cats vs Dogs classifier
Vào việc chính lun nhé. full Notebook có thể tìm thấy ở Notebook nếu chưa có jupyter để chạy thử code thì clone repo và start lab bằng docker-compsoe Github
git clone https://github.com/dnguyenngoc/lab-spark.git \
    && cd lab-spark \
    && docker-compose -f docker-compose-only-lab.yaml up
Sau khi thực hiện lệnh docker-compose up, các dịch vụ sẽ khởi động. Có thể mất một khoảng thời gian trước khi mọi thứ bắt đầu và chạy.
| Service | URL | Password |
|---|---|---|
| Lab | http://localhost:8888 | 1q2w3e4r |
Truy cập vào http://localhost:8888 và dùng pass 1q2w3e4r để đăng nhập nhé. Notebook chứa toàn bộ code cho bài viết này đặt tại Cats vs Dogs Classification using CNN Keras.ipynb
1. Import Libraries
import os
import cv2
import zipfile
import random
import glob
import shutil
import tensorflow as tf
from tqdm import tqdm
import numpy as np
from os import makedirs
from matplotlib import pyplot as plt
from tensorflow.keras import Sequential
from tensorflow.keras.layers import Dense
from tensorflow.keras.layers import Flatten
from tensorflow.keras.layers import Dropout
from tensorflow.keras.layers import Conv2D
from tensorflow.keras.layers import MaxPooling2D
from tensorflow.keras.optimizers import Adam
from tensorflow.keras.preprocessing.image import ImageDataGenerator

print("Now Dir:", os.getcwd())
print("Tensorflow:", tf.__version__)
print("Num GPUs Available: ", len(tf.config.experimental.list_physical_devices('GPU')))
Now Dir: /usr/local/share_storages/lab
Tensorflow: 2.8.0
Num GPUs Available:  0
2. Dowload, Unzip and Verify dataset
Đầu tiên bạn cần tải xuống dataset Cats&Dogs từ https://www.kaggle.com/c/dogs-vs-cats/data lưu nó vào trong folder ở đây đường dẩn mình lưu là /usr/local/share_storages/data/dataset/dogs-vs-cats.zip
- Sau đó unzip file. Cấu trúc folder sau khi unzip như bên dưới với train và test1 folder chứa image dogs và cats định dạng .jpg.
    # 1. Unzip datasets
    DATASET_PATH = '/usr/local/share_storages/data/dataset/dogs-vs-cats'
    DATASET_ZIP_PATH = DATASET_PATH + '.zip'

    zip_ref = zipfile.ZipFile(DATASET_ZIP_PATH, "r").extractall(DATASET_PATH)
    zip_ref = zipfile.ZipFile(DATASET_PATH + '/train.zip', "r").extractall(DATASET_PATH)
    zip_ref = zipfile.ZipFile(DATASET_PATH + '/test1.zip', "r").extractall(DATASET_PATH)
    # Folder structure after unzip
    share_storages
      ├── data
         ├── dataset
            ├── dogs-vs-cats
               ├── train
               ├── test1
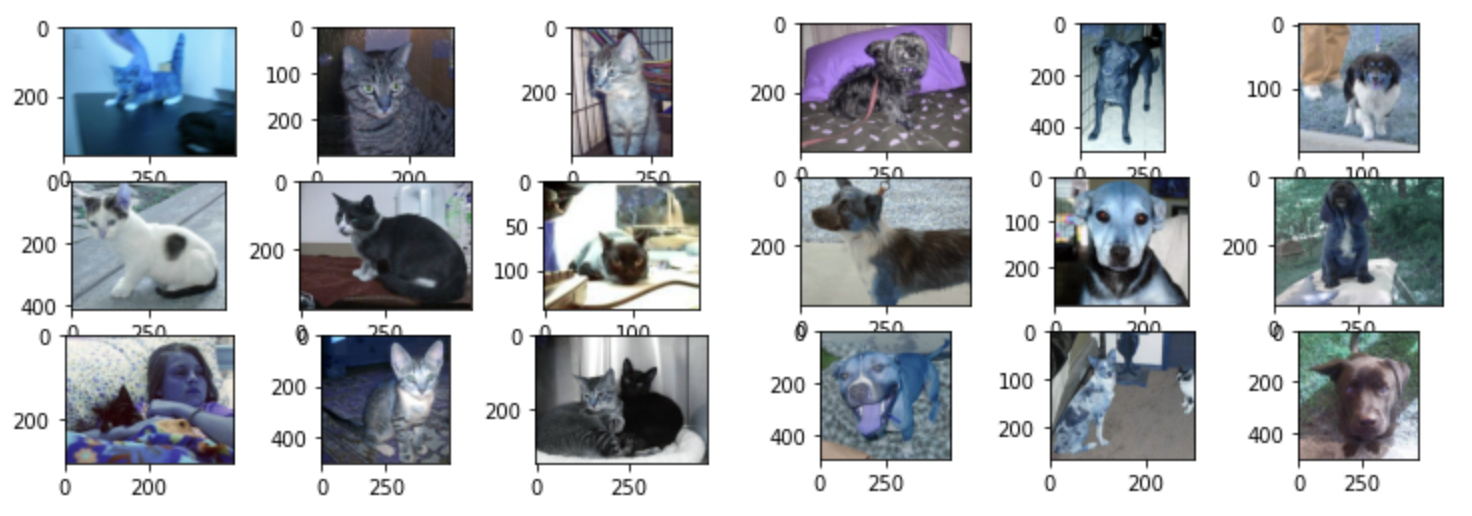
- Visualization một vài hình ảnh lên nào.
    # 2. Show sample dataset
    folder = '/usr/local/share_storages/data/dataset/dogs-vs-cats/train/'
    for i in range(9):
        plt.subplot(330 + 1 + i)
        filename = folder + 'cat.' + str(i) + '.jpg'
        image = cv2.imread(filename)
        plt.imshow(image)
    plt.show()
    print('         ==============================')
    for i in range(9):
        plt.subplot(330 + 1 + i)
        filename = folder + 'dog.' + str(i) + '.jpg'
        image = cv2.imread(filename)
        plt.imshow(image)
    plt.show()
3. Prepare (train, val, test) dataset
Có 2 folder train và test1 như vậy sẽ sử dụng train folder cho việc huấn luyền còn folder test1 sẽ giữ lại để lấy dữ liệu kiểm tra model sau khi train xong.
- Cấu trúc lại folder train để thuận tiện cho việc sử dụng ImageDataGenerator
    train_dataset_path = '/usr/local/share_storages/data/dataset/dogs-vs-cats/train/'
    train_ratio = 0.75
    sub_dirs = ['train/', 'test/']
    class_dirs = ['dogs/', 'cats/']

    # restructure for easy create dataset with ImageDataGenerator
    for sub in sub_dirs:
        for class_dir in class_dirs:
            makedirs(train_dataset_path + sub + class_dir, exist_ok=True)
    ├── dataset
       ├── dogs-vs-cats
          ├── test1 -> using for benchmark model.
          ├── train -> using for training model (have been restructure for easy using ImageDataGenerator).
             ├── train
                ├── dogs
                ├── cats
             ├── test
                ├── dogs
                ├── cats
- Cắt dataset từ train folder thành 2 phần 25% cho val và 75% cho train.
    # Random 75% to train and 25% to test
    cats = glob.glob(train_dataset_path + 'cat.*')
    dogs = glob.glob(train_dataset_path + 'dog.*')
    random.shuffle(dogs)
    random.shuffle(cats)
    cat_trains = cats[:int((len(cats)+1)*train_ratio)]
    dog_trains = dogs[:int((len(dogs)+1)*train_ratio)]
    cat_tests = cats[int((len(cats)+1)*train_ratio):]
    dog_tests = dogs[int((len(dogs)+1)*train_ratio):]
    print("Train with Dog: {}, Cat: {}".format(len(dog_trains), len(cat_trains)))
    print("Test with Dog: {}, Cat: {}".format(len(dog_tests), len(cat_tests)))
    Train with Dog: 9375, Cat: 9375
    Test with Dog: 3125, Cat: 3125
- Cuối cùng là move hình ảnh từ folder train đến sub folder đã được tạo.
    # Move data to new structure
    for path in tqdm(cat_trains): shutil.move(path, train_dataset_path + sub_dirs[0] + class_dirs[1] + path.split("/")[-1])
    for path in tqdm(dog_trains): shutil.move(path, train_dataset_path + sub_dirs[0] + class_dirs[0] + path.split("/")[-1])
    for path in tqdm(cat_tests): shutil.move(path, train_dataset_path + sub_dirs[1] + class_dirs[1] + path.split("/")[-1])
    for path in tqdm(dog_tests): shutil.move(path, train_dataset_path + sub_dirs[1] + class_dirs[0] + path.split("/")[-1])
    100%|██████████| 9375/9375 [00:14<00:00, 634.46it/s]
    100%|██████████| 9375/9375 [00:19<00:00, 492.49it/s]
    100%|██████████| 3125/3125 [00:05<00:00, 599.48it/s]
    100%|██████████| 3125/3125 [00:06<00:00, 485.41it/s]
4. Define CNN Model by Keras
# Set the default optimizer
default_opt = Adam(learning_rate=0.001)

#  VGG-3, dropout, and image data augmentation
def get_model():
    model = Sequential()
    model.add(Conv2D(32, (3, 3), activation='relu', kernel_initializer='he_uniform', padding='same', input_shape=(200, 200, 3)))
    model.add(MaxPooling2D((2, 2)))
    model.add(Dropout(0.2))
    model.add(Conv2D(64, (3, 3), activation='relu', kernel_initializer='he_uniform', padding='same'))
    model.add(MaxPooling2D((2, 2)))
    model.add(Dropout(0.3))
    model.add(Conv2D(128, (3, 3), activation='relu', kernel_initializer='he_uniform', padding='same'))
    model.add(MaxPooling2D((2, 2)))
    model.add(Dropout(0.4))
    model.add(Flatten())
    model.add(Dense(128, activation='relu', kernel_initializer='he_uniform'))
    model.add(Dropout(0.5))
    model.add(Dense(1, activation='sigmoid'))
    model.compile(optimizer=default_opt, loss='binary_crossentropy', metrics=['accuracy'])
    return model
5. Training, Evaluate and Save model
# load model
model = get_model()

# create data generators
train_datagen = ImageDataGenerator(rescale=1.0/255.0, width_shift_range=0.1, height_shift_range=0.1, horizontal_flip=True)
test_datagen = ImageDataGenerator(rescale=1.0/255.0)

# prepare iterators
train_it = train_datagen.flow_from_directory('/usr/local/share_storages/data/dataset/dogs-vs-cats/train/train/', class_mode='binary', batch_size=64, target_size=(200, 200))
test_it = test_datagen.flow_from_directory('/usr/local/share_storages/data/dataset/dogs-vs-cats/train/test/', class_mode='binary', batch_size=64, target_size=(200, 200))

# fit model
history = model.fit(train_it, steps_per_epoch=len(train_it),
    validation_data=test_it, validation_steps=len(test_it), epochs=50, verbose=1)

# evaluate model
_, acc = model.evaluate(test_it, steps=len(test_it), verbose=0)
print('> %.3f' % (acc * 100.0))
model.save('/usr/local/share_storages/data/model/cat-dog.h5')
...
Epoch 47/50
293/293 [==============================] - 803s 3s/step - loss: 0.2493 - accuracy: 0.8997 - val_loss: 0.2465 - val_accuracy: 0.9005
Epoch 48/50
293/293 [==============================] - 701s 2s/step - loss: 0.2411 - accuracy: 0.8997 - val_loss: 0.2225 - val_accuracy: 0.9134
Epoch 49/50
293/293 [==============================] - 654s 2s/step - loss: 0.2425 - accuracy: 0.8995 - val_loss: 0.2161 - val_accuracy: 0.9162
Epoch 50/50
293/293 [==============================] - 785s 3s/step - loss: 0.2380 - accuracy: 0.9017 - val_loss: 0.2153 - val_accuracy: 0.9158
> 91.584
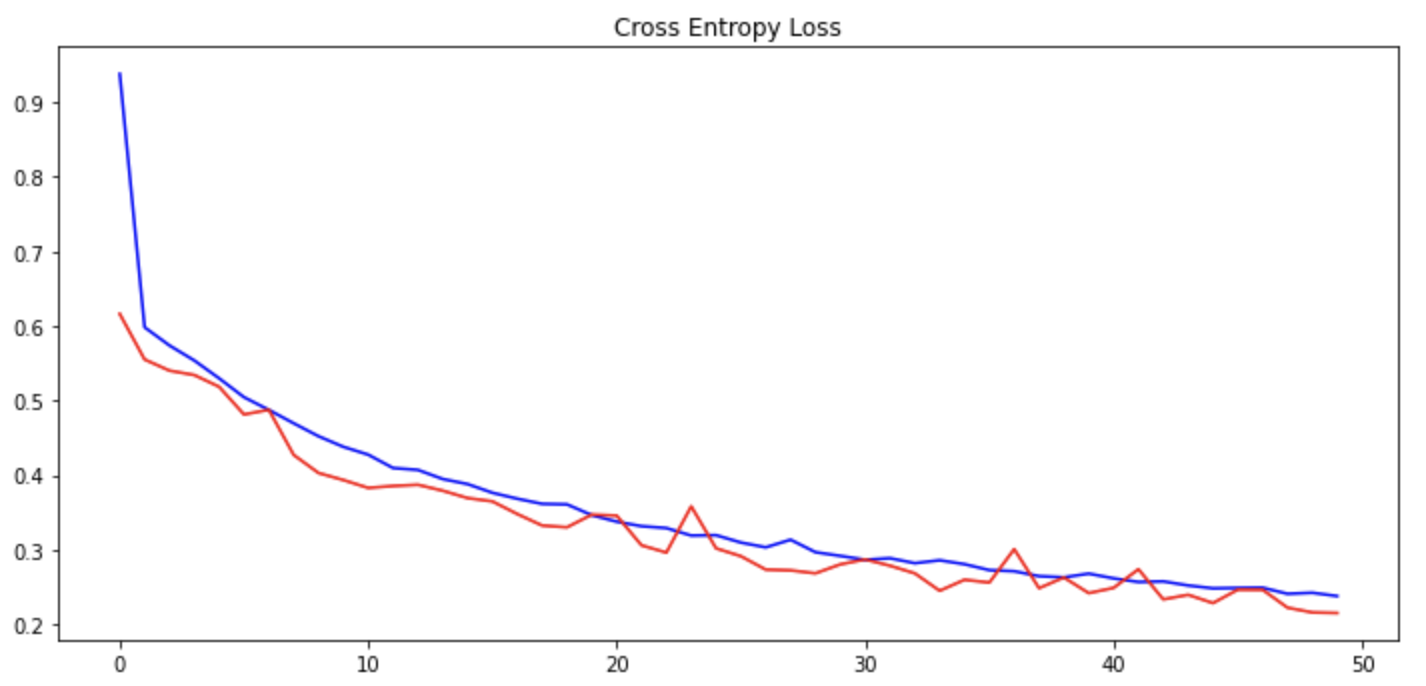
6. Sumarize Diagnostics
# plot diagnostic learning curves
def summarize_diagnostics(history):
fig, axs = plt.subplots(2, 1, figsize=(12,12))
# plot loss
plt.subplot(211)
plt.title('Cross Entropy Loss')
plt.plot(history.history['loss'], color='blue', label='train')
plt.plot(history.history['val_loss'], color='red', label='test')
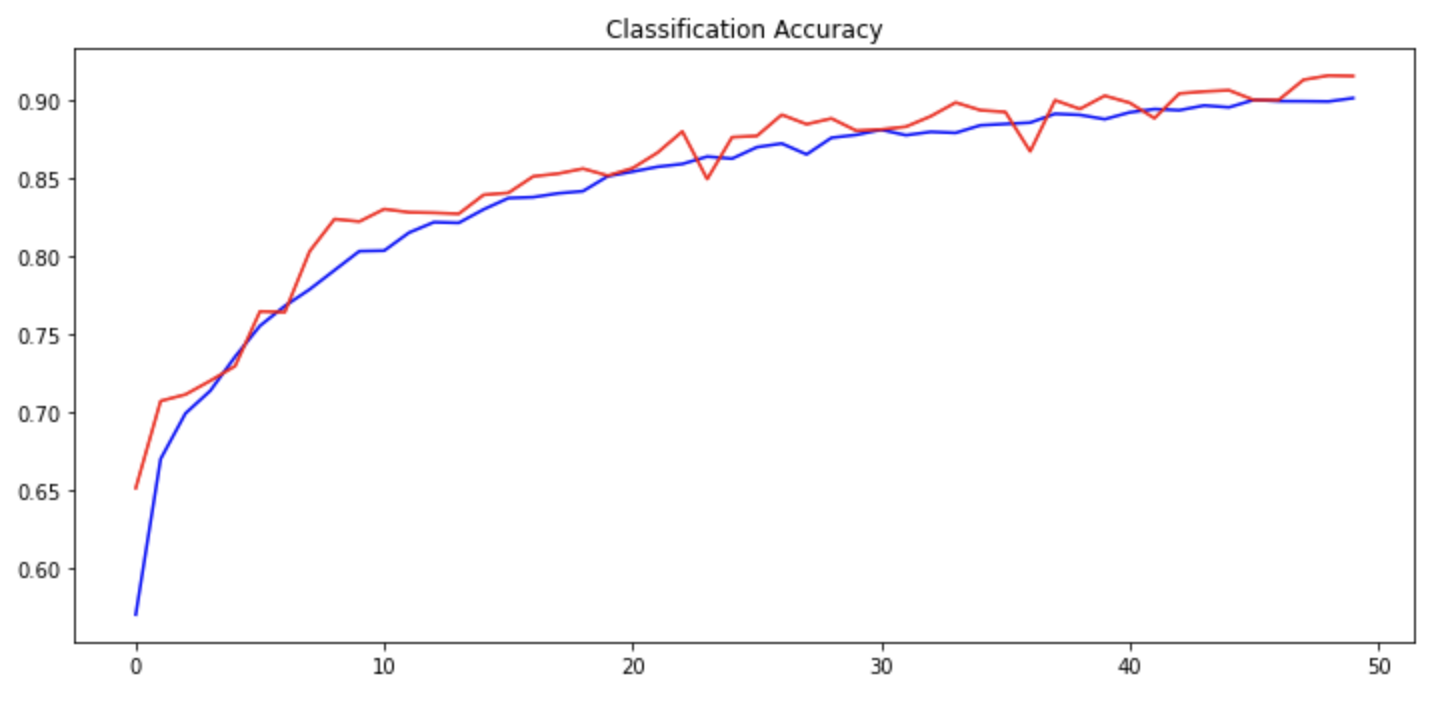
# plot accuracy
plt.subplot(212)
plt.title('Classification Accuracy')
plt.plot(history.history['accuracy'], color='blue', label='train')
plt.plot(history.history['val_accuracy'], color='red', label='test')
plt.show()
# learning curves
summarize_diagnostics(history)
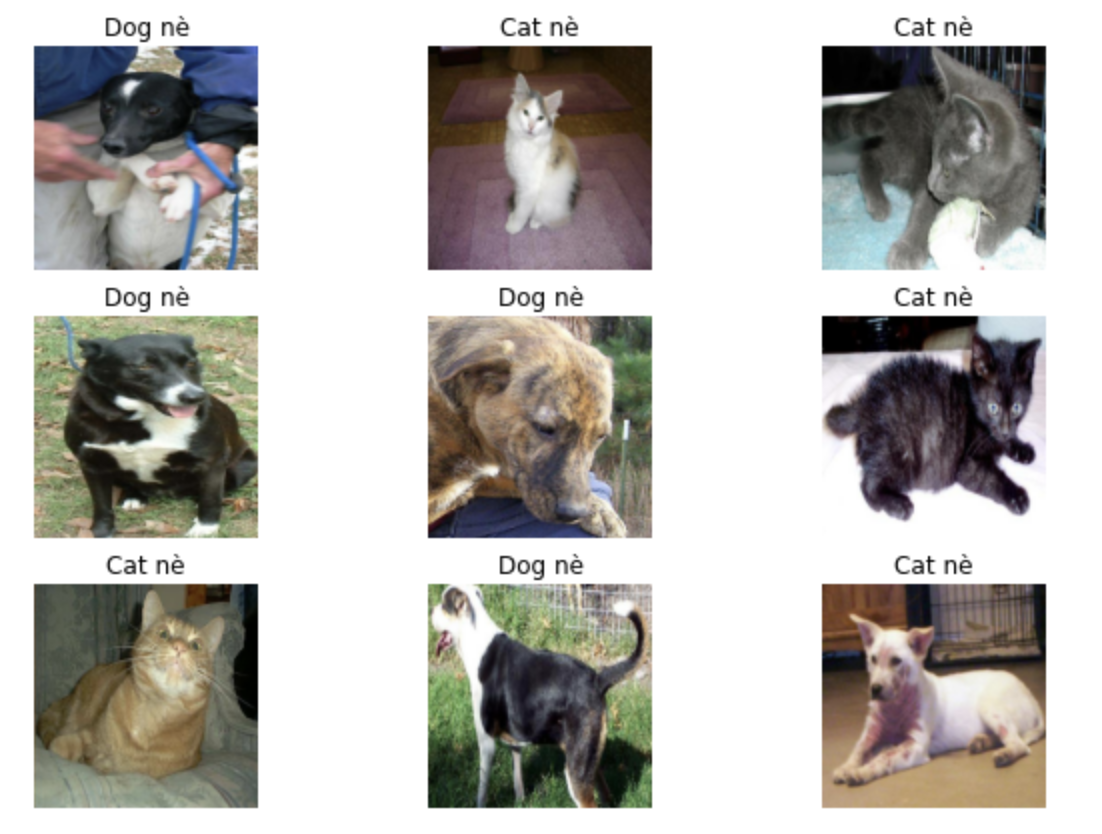
7. Test model
Sử dụng folder /usr/local/share_storages/data/dataset/dogs-vs-cats/test1 không sử dụng trong quá trình train để test nhé.
IMAGE_SIZE = 200

# Preprocess an image
def preprocess_image(image):
    image = tf.image.decode_jpeg(image, channels=3)
    image = tf.image.resize(image, [IMAGE_SIZE, IMAGE_SIZE])
    image /= 255.0  # normalize to [0,1] range
    return image

# Read the image from path and preprocess
def load_and_preprocess_image(path):
    image = tf.io.read_file(path)
    return preprocess_image(image)

images_paths = glob.glob("/usr/local/share_storages/data/dataset/dogs-vs-cats/test1/*.jpg")

rows = 3
plt.figure(figsize=(10,7))
for num, x in enumerate(images_paths[0:9]):
    image = load_and_preprocess_image(x)
    pred = model.predict(np.array([image]))
    if pred[0] > 0.5: class_name = 'Dog nè'
    else: class_name = 'Cat nè'
    plt.subplot(rows,3, num+1)
    plt.title(class_name)
    plt.axis('off')
    plt.imshow(image)
plt.show()
What next?
Tiếp theo là làm sao để triển khai model trong dự án bạn có thể tham khảo bài viết Serving ML Models in Production with FastAPI and Celery. Hi vọng thông tin mình chia sẽ là hữu ích.
All rights reserved
