Unit Test in Swift
Bài đăng này đã không được cập nhật trong 4 năm
What is Unit Test?
Unit test is awesome as it improves the overall quality of our code. A good unit test works on a particular function in isolation. For example, if there is a functionality which adds two numbers and gives total, then we must write unit test to check if the total result is correct. Unit tests should be automated and it should run fast. That way it can easily track regressions, which means if the app has gone backwards in terms of functionality. So, if some code changes breaks any existing functionality unit test can be very effective in this case. Unit test can efficiently test output in terms of given test inputs.
Usability
It can test pretty much everything. For example, all the IBOutlets are properly hooked up in the Storyboard so that it does not unexpectedly crash when the ViewController shows up. Or Making sure a tableview has a cell registered for a nib file that is external to it, and that it won’t cause the app to crash when the tableview tries to get the cell. If any of those scenarios sound familiar, wouldn’t it be nice to have a way to know with near 100% certainty that there won’t be any problems before we run the app?
Adding Unit Test
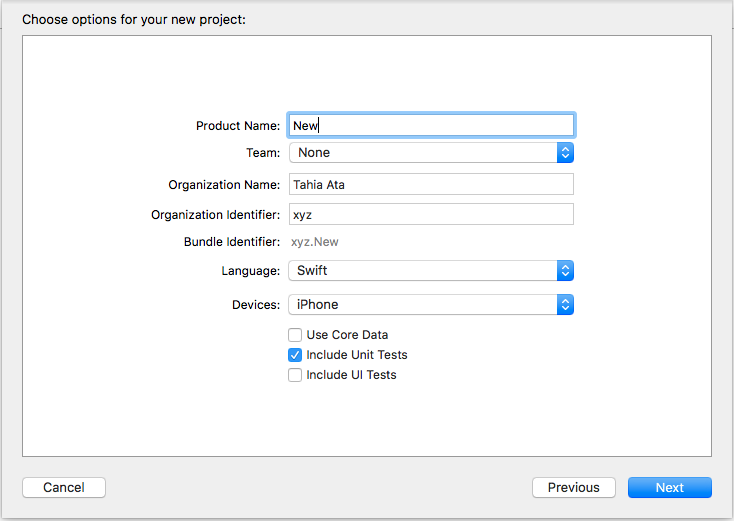
For adding unit test in your project, first we have to open a new xcode project and check the box Include Unit Tests. This does all of the work of setting up unit tests, and a unit test target, for us.
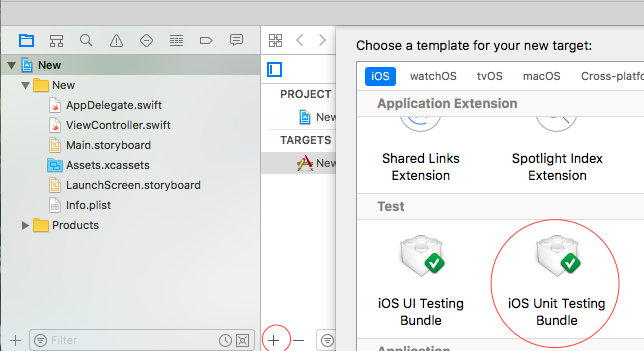
If we want to add manually we can go to File -> New -> Target -> IOS Unit Testing Bundle or we can do it by clicking "+" sign and select IOS Unit Testing Bundle like the screen shot given below:
A Closer Look at the Functions
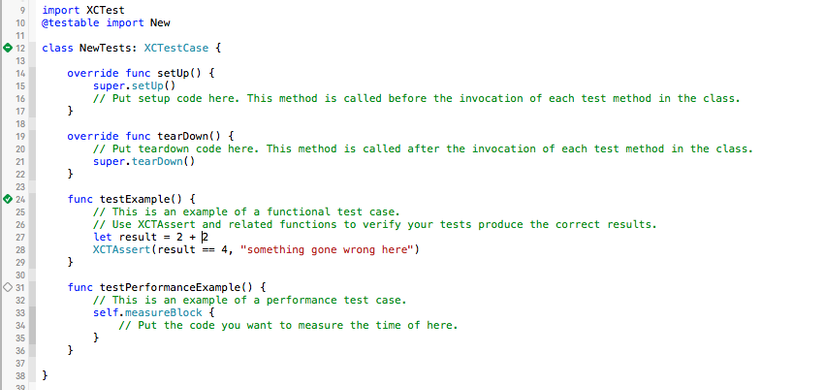
At the top of the test File created for example, in my case inside NewTests file we see
import XCTest
@testable import New
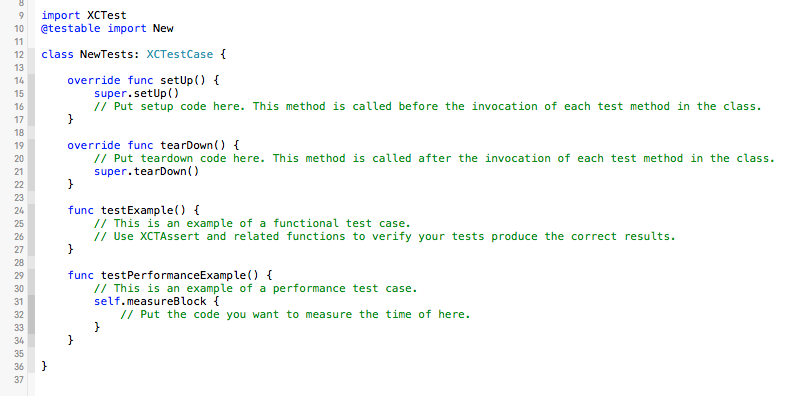
All unit tests rely on Apple’s XCTest framework. Every test case we write will import it. It uses the @testable swift command to tell the compiler that we want to test against the "New" module.

The class is called NewTests and it extends XCTestCase.There are 4 stub methods auto created, setUp() and tearDown() which run before and after every test, testExample(), which is a unit test stub and testPerformanceExample(), which we use when we want to know how long something takes to run. Note that all test methods in XCTest need to start with the word test. We get all this without having to write any code.
What are those diamond thingies? Try putting the mouse cursor over them. They are an inline button that runs your test. Apple has setup an example test. If we hover over the diamond next to it, we can click to run the test. Our app and its test target will get built, the test will run, and we will see the test succeeded notification. Cool! If we want to run all of the tests in this test case, click the button next to the class declaration.
While we’re here let’s add an assertion to the testExample() method. Change the testExample() to following code so we can see how the tests run in Xcode.
func testExample() {
        let result = 2 + 3
        XCTAssert(result == 4, "something gone wrong here")
    }
Now if we run the inline test we can see that it goves us an error-
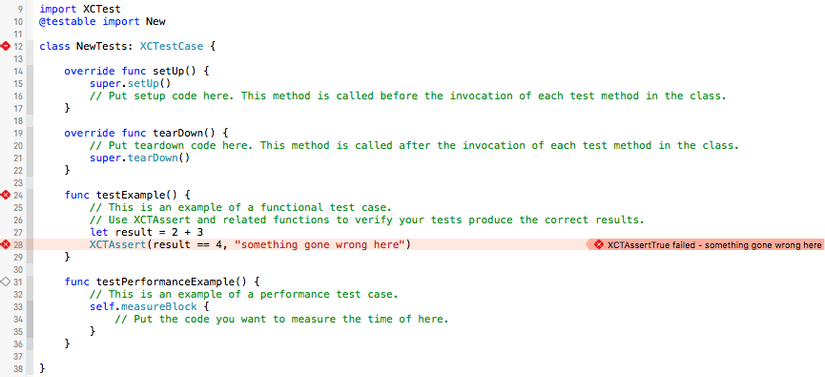
As the correct answer is suppose to be 5 but we tested against the condition result == 4, so the test failed. The string after the test is typically used to give us a hint on what test failed. But in this example, it’s just a simple “something gone wrong here” catch all error message.
Now If we change let result = 2 + 2 the test will pass as it should.
Although a developer could get away with only using XCTAssert, the following helper assertions provide some useful semantics to help clarify what exactly is being tested. When possible, use the most specific assertion available, falling back to XCTAssert only in cases where it better expresses the intent.
-
Boolean Tests
For Bool values, or simple boolean expressions, use XCTAssertTrue & XCTAssertFalse:
XCTAssertTrue(expression, format...)
XCTAssertFalse(expression, format...)
P.S XCTAssert is equivalent to XCTAssertTrue.
-
Equality Tests
When testing whether two values are equal, use XCTAssert[Not]Equal for scalar values and XCTAssert[Not]EqualObjects for objects:
XCTAssertEqual(expression1, expression2, format...)
XCTAssertNotEqual(expression1, expression2, format...)
When specifically testing whether two Double, Float, or other floating-point values are equal, use XCTAssert[Not]EqualWithAccuracy, to account for any issues with floating point accuracy:
XCTAssertEqualWithAccuracy(expression1, expression2, accuracy, format...)
XCTAssertNotEqualWithAccuracy(expression1, expression2, accuracy, format...)
P.S XCTAssert[Not]EqualObjects is not necessary in Swift, since there is no distinction between scalars and objects.In addition to the aforementioned equality assertions, there are XCTAssertGreaterThan[OrEqual] & XCTAssertLessThan[OrEqual], which supplement == with >, >=, <, & <= equivalents for comparable values.
-
Nil Tests
Use XCTAssert[Not]Nil to assert the existence (or non-existence) of a given value:
XCTAssertNil(expression, format...)
XCTAssertNotNil(expression, format...)
-
Unconditional Failure
Finally, the XCTFail assertion will always fail:
XCTFail(format...)
XCTFail is most commonly used to denote a placeholder for a test that should be made to pass. It is also useful for handling error cases already accounted by other flow control structures, such as the else clause of an if statement testing for success.
-
Performance Testing
The measured block is executed ten times and the test output shows the average execution time as well as individual run times and standard deviation.
func testPerformanceExample() {
        let dateFormatter = NSDateFormatter()
        dateFormatter.dateStyle = .LongStyle
        dateFormatter.timeStyle = .ShortStyle

        let date = NSDate()

        measureBlock() {
            let string = dateFormatter.stringFromDate(date)
            print(string)
        }
    }
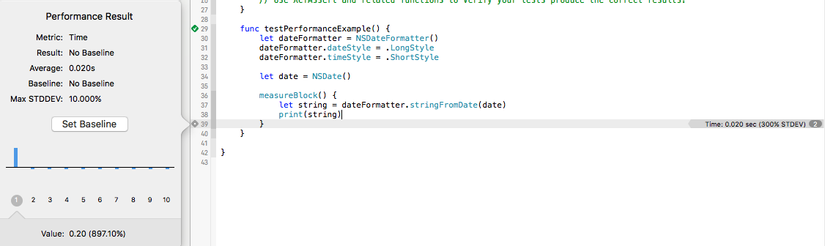
Performance tests help establish a per-device baseline of performance for hot code paths and will fail if execution time becomes significantly slower. Sprinkle them into test cases to ensure that significant algorithms and procedures remain performant as time goes on.
-
XCTestExpectation
Say that we have a class that perform an asynchronous operation and executes a closure callback closure passed as a method parameter.
class SomeService {
  func doSomethingAsync(completion: (success: Bool) -> ()) { ...  }
}

let service = SomeService()
service.doSomethingAsync { success in
  // ...
}
Writing tests for code like doSomethingAsync in the traditional way will result in unexpected behaviours and false positives.
The reason this happens is because by default XCTest is synchronous, like most of the application code we usually write, while what we are trying to test is asynchronous. This means that the execution of the tests goes to the next line of code right after the async method is called, and the whole test finishes before the callback closure is run.
The XCTest framework provides us with an handy API to test the behaviour of asynchronous code: XCTestExpectation.Let's have a look at how to test doSomethingAsync using XCTestExpectation.
class CallbackTest: XCTestCase {

  func testAsyncCalback() {
    let service = SomeService()

    // 1. Define an expectation
    let expectation = expectationWithDescription("SomeService does stuff and runs the callback closure")

    // 2. Exercise the asynchronous code
    service.doSomethingAsync { success in
      XCTAssertTrue(success)

      // Don't forget to fulfill the expectation in the async callback
      expectation.fulfill()
    }

    // 3. Wait for the expectation to be fulfilled
    waitForExpectationsWithTimeout(1) { error in
      if let error = error {
        XCTFail("waitForExpectationsWithTimeout errored: \(error)")
      }
    }
  }
}
As we can see there are three steps in the process.
- Define an expectation with a meaningful description.
- Go on with the test setup and exercise phases, calling the asynchronous method and fulfilling the expectation at the end of the callback closure.
- Make the test runner wait for you expectation to be fulfilled, so that the asynchronous operations can be completed and you assertions verified.
It is important to provide a meaningful description because such description is reported in the failure message of an unfulfilled expectation:
error: -[PracticalTestingTests.CallbackTest testAsyncCalback] : Asynchronous wait failed: Exceeded timeout of 1 seconds, with unfulfilled expectations: "SomeService does stuff and succeeds".
When testing having descriptive failure messages is very important to make future self and the rest of the team identify the failure reason as soon as possible.
All rights reserved
