Introduction to Realm Database
Bài đăng này đã không được cập nhật trong 4 năm
What is Realm?
Realm is the first database built from scratch for mobile devices (both iOS and android). Realm is extremely simple to integrate in projects, and most common functions – such as querying the database – consist of a single line! Unlike wrappers around Core Data such as MagicalRecord, Realm does not rely on Core Data or even a SQLite backend. Its simplicity lies in the fact that only 3 classes are needed to start persisting data:
RLMObject - represents your data. You can persist data by simply sublassing RMLObject and adding properties you want to be persisted.
RLMArray - the primary container class in Realm. It’s used for one-to-many relationships and for storing query results. Its main difference from NSArray is that RLMArray can only store objects of one class.
RLMRealm - is basically your database. It contains information about the persistent store and it’s in charge of reading and writing data from it. You can use the default Realm or create one at the path you specify. The default Realm has the option to be used in-memory only, without data persistence.
Installation
Installation is very simple.
CocoaPods
- Install CocoaPods 0.39.0 or later.
- In your Podfile, add pod 'Realm' to your app target and pod 'Realm/Headers' to your test target.
- From the command line, run pod install.
- Use the .xcworkspace file generated by CocoaPods to work on your project!
Manual integration
- you can Download the latest release of Realm and extract the zip.
- Drag Realm.framework from the ios/static/ directory to the File Navigator of your Xcode project.
- Make sure Copy items if needed is selected and click Finish.
- Click on your project in the Xcode File Navigator.
- Select your app’s target and go to the Build Phases tab.
- Under Link Binary with Libraries click + and add libc++.tbd.
For more details and various options please refer to documentation
Demo
Let's go through a small example of realm- basically the CRUD operations. Suppose we want to save information about 'Users' like name and the city where he belongs. So we create a class named User subclassing RLMObject and add the properties as following:
#import <Realm/Realm.h>

@interface User : RLMObject

@property (strong, nonatomic) NSString *name;
@property (strong, nonatomic) NSString *city;

@end
Now we dragdrop and connect textfields for user inputs and buttons for insert, update and delete actions. We will use tableview for showing fetched data and dataArray as datasource like given below.
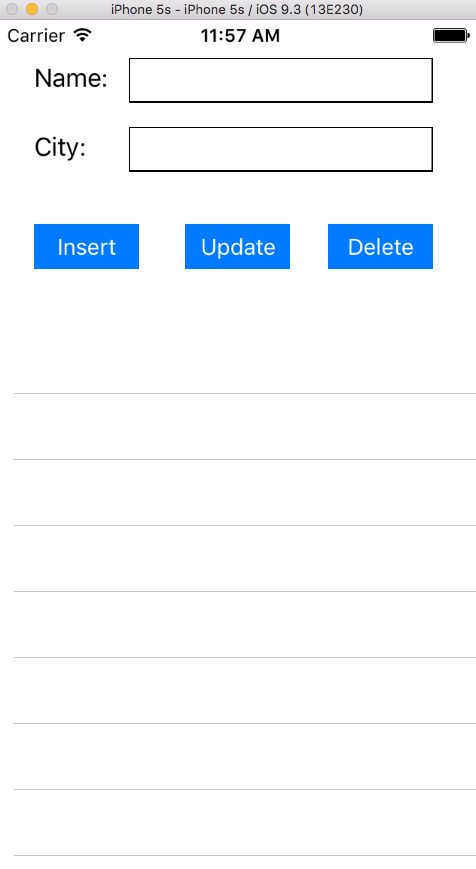
Then we connect the IBOutlets and IBActions in .h file -
#import <UIKit/UIKit.h>
#import <Realm/Realm.h>
#import "User.h"

@interface ViewController : UIViewController <UITableViewDataSource, UITableViewDelegate, UITextFieldDelegate> {
    RLMResults *dataArray;
    User *selectedObject;
}

@property (weak, nonatomic) IBOutlet UITableView *tableView;
@property (weak, nonatomic) IBOutlet UITextField *nameField;
@property (weak, nonatomic) IBOutlet UITextField *cityField;

- (IBAction)insertButton:(id)sender;
- (IBAction)updateButton:(id)sender;
- (IBAction)deleteButton:(id)sender;

@end
Here RLMResults is an auto-updating container type in Realm returned from object queries. RLMResults can be queried with the same predicates as RLMObject and RLMArray and you can chain queries to further filter query results. RLMResults cannot be created directly.
For inserting data we use insertDataIntoDataBaseWithName method. We use defaultRealm which keeps information of the persistent datastore.
- (IBAction)insertButton:(id)sender {
    if (self.nameField.text.length > 0 && self.cityField.text.length > 0) {
        [self insertDataIntoDataBaseWithName:self.nameField.text WithCity:self.cityField.text];
        return;
    }
    [self showAlert];
}

- (void)insertDataIntoDataBaseWithName:(NSString *)name WithCity:(NSString *)city {
    RLMRealm *realm = [RLMRealm defaultRealm];
    [realm beginWriteTransaction];
    User *information = [[User alloc] init];
    information.name = name;
    information.city = city;
    [realm addObject:information];
    [realm commitWriteTransaction];
    [self.tableView reloadData];
    [self cleardFields];
}
- (void)showAlert {
    UIAlertController *alert = [UIAlertController alertControllerWithTitle:@"Error!"
                                                                   message:@"Name & City can not be empty"
                                                              preferredStyle:UIAlertControllerStyleAlert];
    UIAlertAction *ok = [UIAlertAction actionWithTitle:@"OK"
                                                 style:UIAlertActionStyleDefault
                                               handler:^(UIAlertAction * action) {
                                                   [self dismissViewControllerAnimated:YES completion:nil];
                                               }];
    [alert addAction:ok];
    [self presentViewController:alert animated:YES completion:nil];
}

- (BOOL)textFieldShouldReturn:(UITextField *)textField {
    [textField resignFirstResponder];
    return YES;
}

- (void)cleardFields {
    self.nameField.text = @"";
    self.cityField.text = @"";
}
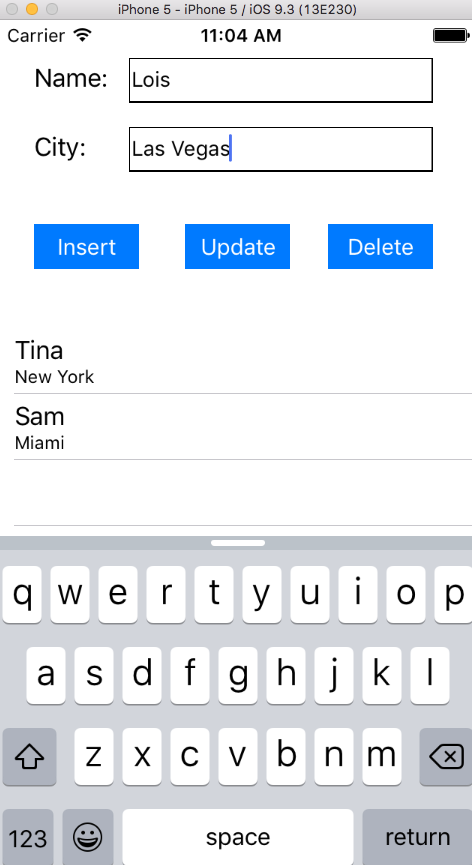
Now we show inserted data in tableView as it gets added.
- (NSInteger)tableView:(UITableView *)tableView numberOfRowsInSection:(NSInteger)section {
    return dataArray.count;
}

- (UITableViewCell *)tableView:(UITableView *)tableView cellForRowAtIndexPath:(NSIndexPath *)indexPath {
    static NSString *cellIdentifier = @"Cell";
    UITableViewCell *cell = [tableView dequeueReusableCellWithIdentifier:cellIdentifier];
    if (cell == nil) {
        cell = [[UITableViewCell alloc] initWithStyle:UITableViewCellStyleSubtitle reuseIdentifier:cellIdentifier];
    }
    User *information = [dataArray objectAtIndex:indexPath.row];
    cell.textLabel.text=information.name;
    cell.detailTextLabel.text=information.city;
    cell.backgroundColor=[UIColor clearColor];
    cell.contentView.backgroundColor=[UIColor clearColor];
    return cell;
}
In viewDidLoad() we add the following lines to fetch data as the app starts.
 - (void)viewDidLoad {
    [super viewDidLoad];
    dataArray = [User allObjects];
    [self.tableView reloadData];
 }
For updating data we simply click the cell, change in fields and update click to save the changes. updateDataInDataBase is the main method same as insert. We just need the RLMObject to edit the property values.
- (void)tableView:(UITableView *)tableView didSelectRowAtIndexPath:( NSIndexPath *)indexPath {
    selectedObject = dataArray[indexPath.row];
    self.nameField.text = selectedObject.name;
    self.cityField.text = selectedObject.city;
}

- (IBAction)updateButton:(id)sender {
    if (self.nameField.text.length > 0 && self.cityField.text.length > 0) {
        [self updateDataInDataBase:self.nameField.text WithCity:self.cityField.text];
        return;
    }
    [self showAlert];
}

- (void)updateDataInDataBase:(NSString *)name WithCity:(NSString *)city {
    RLMRealm *realm = [RLMRealm defaultRealm];
    [realm beginWriteTransaction];
    selectedObject.name=name;
    selectedObject.city=city;
    [realm commitWriteTransaction];
    [self.tableView reloadData];
    [self cleardFields];
}
For delete option we click delete button to select row one by one for deletion.
- (IBAction)deleteButton:(id)sender {
    [self.tableView setEditing:YES animated:YES];
}

- (UITableViewCellEditingStyle)tableView:(UITableView *)tableView editingStyleForRowAtIndexPath:(NSIndexPath *)indexPath {
    return UITableViewCellEditingStyleDelete;
}

- (void)tableView:(UITableView *)tableView commitEditingStyle:(UITableViewCellEditingStyle) editingStyle forRowAtIndexPath:(NSIndexPath *)indexPath {
    if (editingStyle == UITableViewCellEditingStyleDelete) {
        [[RLMRealm defaultRealm] beginWriteTransaction];
        [[RLMRealm defaultRealm] deleteObject:[dataArray objectAtIndex:indexPath.row]];
        [[RLMRealm defaultRealm] commitWriteTransaction];
        dataArray=[User allObjects];

        [self.tableView deleteRowsAtIndexPaths:[NSMutableArray arrayWithObject:indexPath] withRowAnimation:UITableViewRowAnimationFade];
        [self.tableView setEditing:NO animated:YES];
    }
}
Finally we have implemented basic CRUD operations with Realm.
P.S If you’re looking to use Realm purely from Swift, you should consider using Realm Swift instead. The Realm Objective‑C and Realm Swift APIs are not interoperable and using them together is not supported.
All rights reserved
