Tương Tác Với Cơ Sở Dữ Liệu Lớn Mà Không Lãng Phí Tài Nguyên Của Thiết Bị
Bài đăng này đã không được cập nhật trong 7 năm
Khi chúng ta làm việc với cơ sở dữ liệu lớn thường hay gặp phải tình trạng ứng dụng bị crash, not responding hay thiếu RAM tự động close app. Trên thực tế, đa phần tất cả những dữ liệu lớn đó người dùng chỉ mong muốn dùng 1 phần rất nhỏ tại 1 thời điểm mà thôi.
Mình sẽ lấy ra 2 ví dụ về dữ liệu lớn: Các message đã chat và Album ảnh. Với mỗi cá nhân thông tin này có thể từ vài nghìn đến hàng trăm nghìn message và ảnh đúng không nào? Người dùng muốn xem lại họ sẽ thực hiện thao tác vuốt trên danh sách lần lượt để hiển thị nội dung theo thời gian(dữ liệu được lưu trên back-end server). Cách làm là sử dụng phân trang , điều này rất đúng và các components của Android cho phép thực hiện điều này. Nhưng hôm nay chúng ta sẽ xử lý với cách làm mới tốt hơn với Paging Library, nào hãy xem có gì khác biệt và ưu điểm như nào các bạn nhé 
Để hiểu nhanh hơn về Paging library, chúng ta làm một ứng dụng Search Repository Github và sắp xếp theo star mà cộng đồng đã vote. Trước khi muốn áp dụng được thì ta cần phải hiểu xem Paging library là gì chứ nhỉ ?
1. Giới thiệu Paging Library
Paging Library làm cho việc bạn tải dữ liệu một cách từ từ và nhẹ nhàng trở lên dễ dàng hơn.
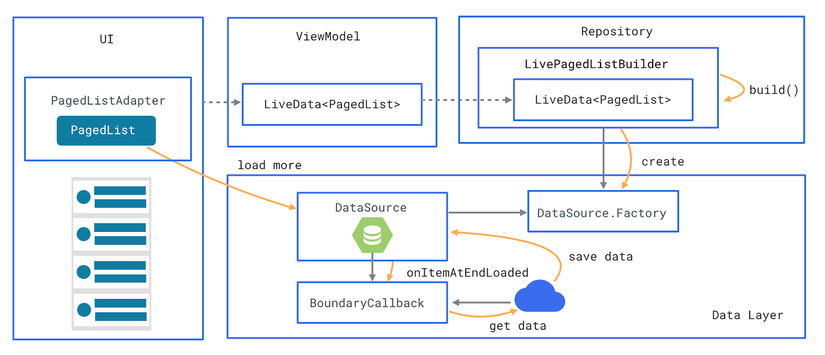
Cấu trúc thư viện:
Thành phần chính của Paging Library là class PagedList, một tập hợp những đoạn hay trang dữ liệu của ứng dụng được tải một cách bất đồng bộ. Class này làm nhiệm vụ như một người điều phối các phần nhỏ khác trong cấu trúc app.
- Data:
Mỗi thành phần PagedList tải một ảnh chụp nhanh từ chính nguồn dữ liệu(DataSource) của nó. Dữ liệu này sẽ đi từ back-end server hoặc database của app vào trong PagedList. Vì thế nó hỗ trợ cả local database và remote database. Các bạn xem thêm ở mục những thành phần (phía dưới).
- UI:
Class PagedList làm việc với một PagedListAdapter để tải những item vào RecyclerView. Những class này làm việc cùng nhau để lấy và hiển thị nội dung khi tải xong, việc lấy trước nội dung hiển thị và làm hiệu ứng khi thay đổi.
2. Các thành phần của Paging Library

- Local database : đóng vai trò như một nguồn dữ liệu duy nhất hiển thị tới người dùng.
- Web API service
- Repository: làm việc với database và API service, cung cấp 1 dữ liệu thống nhất
- ViewModel: cung cấp dữ liệu cụ thể cho UI
- UI: Hiển thị dữ liệu trực quan tới user
3. Hiện thực ứng dụng
Vừa rồi chúng ta đã biết các thành phần của Paging Library, giờ sẽ tạo các thành phần đó 1 cách tuần tự thôi nào.
Đầu tiên sẽ tạo một Local DB, mình dùng Room Database (nếu bạn nào chưa biết có thể đọc luôn tại đây nhé). Class này làm nhiệm vụ lưu lại nhưng Repo đã được tải về lần đầu tiên khi điện thoại được kết nối mạng. Vì vậy mà dù cho lần sau không còn kết nối nữa thì ứng dụng đã có sẵn local data để hiển thị rồi phải không nào.
RepoDatabase.kt
@Database(
        entities = [Repo::class],
        version = 1,
        exportSchema = false
)
abstract class RepoDatabase : RoomDatabase() {

    abstract fun reposDao(): RepoDao

    companion object {

        @Volatile
        private var INSTANCE: RepoDatabase? = null

        fun getInstance(context: Context): RepoDatabase =
                INSTANCE ?: synchronized(this) {
                    INSTANCE
                            ?: buildDatabase(context).also { INSTANCE = it }
                }

        private fun buildDatabase(context: Context) =
                Room.databaseBuilder(context.applicationContext,
                        RepoDatabase::class.java, "Github.db")
                        .build()
    }
}
Tiếp theo là một web API service, chắc chắn rồi để tìm kiếm được repo của github ta phải nhờ đến API support bởi github. Cài đặt một chút thôi là được:
GithubService.kt
Mình viết luôn method searchRepos trong class này luôn nha.
@GET("search/repositories?sort=stars")
    fun searchRepos(@Query("q") query: String,
                    @Query("page") page: Int,
                    @Query("per_page") itemsPerPage: Int): Call<RepoSearchResponse>


    companion object {
        private const val BASE_URL = "https://api.github.com/"

        fun create(): GithubService {
            val logger = HttpLoggingInterceptor()
            logger.level = Level.BASIC

            val client = OkHttpClient.Builder()
                    .addInterceptor(logger)
                    .build()
            return Retrofit.Builder()
                    .baseUrl(BASE_URL)
                    .client(client)
                    .addConverterFactory(GsonConverterFactory.create())
                    .build()
                    .create(GithubService::class.java)
        }
    }

    fun searchRepos(
        service: GithubService,
        query: String,
        page: Int,
        itemsPerPage: Int,
        onSuccess: (repos: List<Repo>) -> Unit,
        onError: (error: String) -> Unit) {
    Log.d(TAG, "query: $query, page: $page, itemsPerPage: $itemsPerPage")

    val apiQuery = query + IN_QUALIFIER

    service.searchRepos(apiQuery, page, itemsPerPage).enqueue(
            object : Callback<RepoSearchResponse> {
                override fun onFailure(call: Call<RepoSearchResponse>?, t: Throwable) {
                    Log.d(TAG, "fail to get data")
                    onError(t.message ?: "unknown error")
                }

                override fun onResponse(
                        call: Call<RepoSearchResponse>?,
                        response: Response<RepoSearchResponse>
                ) {
                    Log.d(TAG, "got a response $response")
                    if (response.isSuccessful) {
                        val repos = response.body()?.items ?: emptyList()
                        onSuccess(repos)
                    } else {
                        onError(response.errorBody()?.string() ?: "Unknown error")
                    }
                }
            }
    )
}
Tiếp đến là Repository class này quản lý local DB và web service
GithubRepository.kt
class GithubRepository(
        private val service: GithubService,
        private val cache: GithubLocalCache
) {

    // keep the last requested page. When the request is successful, increment the page number.
    private var lastRequestedPage = 1

    // LiveData of network errors.
    private val networkErrors = MutableLiveData<String>()

    // avoid triggering multiple requests in the same time
    private var isRequestInProgress = false

    /**
     * Search repositories whose names match the query.
     */
    fun search(query: String): RepoSearchResult {
        Log.d("GithubRepository", "New query: $query")
        lastRequestedPage = 1
        requestAndSaveData(query)

        // Get data from the local cache
        val data = cache.reposByName(query)

        return RepoSearchResult(data, networkErrors)
    }

    fun requestMore(query: String) {
        requestAndSaveData(query)
    }

    private fun requestAndSaveData(query: String) {
        if (isRequestInProgress) return

        isRequestInProgress = true
        searchRepos(service, query, lastRequestedPage, NETWORK_PAGE_SIZE, { repos ->
            cache.insert(repos, {
                lastRequestedPage++
                isRequestInProgress = false
            })
        }, { error ->
            networkErrors.postValue(error)
            isRequestInProgress = false
        })
    }

    companion object {
        private const val NETWORK_PAGE_SIZE = 50
    }
}
Tiếp đến là ViewModel(link dành cho bạn nào chưa biết về Architecture ViewModel) để cung cấp và lắng nghe khi dữ liệu có sự thay đổi, mình đặt tên là SearchRepositoriesViewModel vì dữ liệu của chúng ta có được bởi thao tác search.
SearchRepositoriesViewModel.kt
class SearchRepositoriesViewModel(private val repository: GithubRepository) : ViewModel() {

    companion object {
        private const val VISIBLE_THRESHOLD = 5
    }

    private val queryLiveData = MutableLiveData<String>()
    private val repoResult: LiveData<RepoSearchResult> = Transformations.map(queryLiveData, {
        repository.search(it)
    })

    val repos: LiveData<List<Repo>> = Transformations.switchMap(repoResult,
            { it -> it.data })
    val networkErrors: LiveData<String> = Transformations.switchMap(repoResult,
            { it -> it.networkErrors })

    /**
     * Search a repository based on a query string.
     */
    fun searchRepo(queryString: String) {
        queryLiveData.postValue(queryString)
    }

    fun listScrolled(visibleItemCount: Int, lastVisibleItemPosition: Int, totalItemCount: Int) {
        if (visibleItemCount + lastVisibleItemPosition + VISIBLE_THRESHOLD >= totalItemCount) {
            val immutableQuery = lastQueryValue()
            if (immutableQuery != null) {
                repository.requestMore(immutableQuery)
            }
        }
    }

    /**
     * Get the last query value.
     */
    fun lastQueryValue(): String? = queryLiveData.value
}
Vậy là sắp hoàn thiện rồi, còn một phần cuối cùng là tạo UI :
activity_search_repositories.xml
<android.support.constraint.ConstraintLayout
    xmlns:android="http://schemas.android.com/apk/res/android"
    xmlns:app="http://schemas.android.com/apk/res-auto"
    xmlns:tools="http://schemas.android.com/tools"
    android:layout_width="match_parent"
    android:layout_height="match_parent"
    tools:context=".ui.SearchRepositoriesActivity">
    <android.support.design.widget.TextInputLayout
        android:id="@+id/input_layout"
        android:layout_width="0dp"
        android:layout_height="wrap_content"
        android:layout_marginEnd="8dp"
        android:layout_marginStart="8dp"
        android:layout_marginTop="8dp"
        android:layout_marginLeft="8dp"
        android:layout_marginRight="8dp"
        app:layout_constraintEnd_toEndOf="parent"
        app:layout_constraintStart_toStartOf="parent"
        app:layout_constraintTop_toTopOf="parent">
        <EditText
            android:id="@+id/search_repo"
            android:layout_width="match_parent"
            android:layout_height="wrap_content"
            android:hint="@string/search_hint"
            android:imeOptions="actionSearch"
            android:inputType="textNoSuggestions"
            tools:text="Android"/>
    </android.support.design.widget.TextInputLayout>

    <android.support.v7.widget.RecyclerView
        android:id="@+id/list"
        android:layout_width="0dp"
        android:layout_height="0dp"
        android:paddingVertical="@dimen/row_item_margin_vertical"
        android:scrollbars="vertical"
        app:layoutManager="LinearLayoutManager"
        app:layout_constraintBottom_toBottomOf="parent"
        app:layout_constraintEnd_toEndOf="parent"
        app:layout_constraintStart_toStartOf="parent"
        app:layout_constraintTop_toBottomOf="@+id/input_layout"
        tools:ignore="UnusedAttribute"/>

    <TextView android:id="@+id/emptyList"
              android:layout_width="0dp"
              android:layout_height="match_parent"
              android:gravity="center"
              android:text="@string/no_results"
              android:textSize="@dimen/repo_name_size"
              android:visibility="gone"
              app:layout_constraintBottom_toBottomOf="parent"
              app:layout_constraintEnd_toEndOf="parent"
              app:layout_constraintStart_toStartOf="parent"
              app:layout_constraintTop_toTopOf="parent"/>

</android.support.constraint.ConstraintLayout>
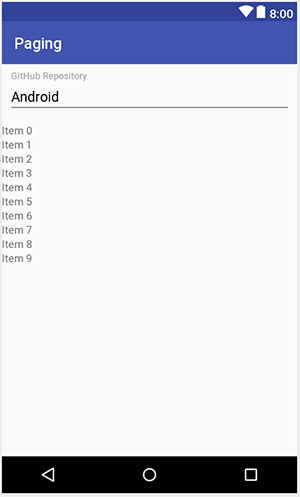
UI của chúng ta có preview như này:

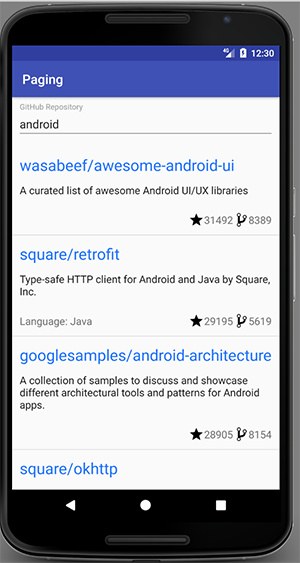
Kết quả:
Sau khi chạy ứng dụng và kiểm tra có được kết quả như sau:

4. Tổng kết
Việc tìm hiểu thông qua ứng dụng thực tế có lẽ dễ dàng hơn nhiều phải không các bạn? Hy vọng rằng với những thông tin ở trên và trải qua luyện tập từ các bạn sẽ đem lại kết quả nhanh chóng, ứng dụng Paging Library vào dự án của mỗi bạn. Mình sẽ rất vui nếu như bài viết thực sự có hữu ích cho ai đó. Nếu còn điều gì thắc mắc các bạn vui lòng comment ở dưới nhé! Keep coding !^^
All rights reserved