Tìm hiểu về testNG framework (Phần 5)
Bài đăng này đã không được cập nhật trong 4 năm
15. Multi Browser, Cross Browser & Parallel Testing using TestNG
Khi đến thời điểm để biến trang web của bạn thành môt chức năng đầy đủ, bạn sẽ muốn đảm bảo rằng nó hoạt động tốt cho tất cả mọi người truy cập trang web của bạn cho dù họ đang sử dụng Internet Explorer, Firefox hay bất kỳ trình duyệt nào khác. Thử nghiệm trang web của bạn với nhiều kết hợp của các trình duyệt được gọi là thử nghiệm Cross Browser.
Trang web của bạn sẽ trông khác nhau trong các trình duyệt khác nhau. Đó là bởi vì các trình duyệt hiểu một số mã hơi khác nhau. Các Designer của bạn nên thử nghiệm để đảm bảo rằng trang web của bạn hoạt động tốt trong tất cả các trình duyệt hiện đại. Nhưng với tư cách là người kiểm thử, chúng ta cần đảm bảo rằng chức năng ít nhất nên được kiểm tra trên trình duyệt Internet Explorer, Firefox, Safari và Google Chrome.
A. Kiểm thử nhiều trình duyệt bằng cách sử dụng Selenium TestNG.
Trong mỗi dự án, yêu cầu phải thực hiện kiểm thử đa trình duyệt để đảm bảo rằng chức năng này hoạt động như mong đợi với mọi trình duyệt để mang lại trải nghiệm người dùng bình đẳng cho tất cả các đối tượng. Phải mất một thời gian đáng kể để kiểm tra mọi thứ trên mỗi trình duyệt và khi chúng tôi đã sử dụng tự động hóa để giảm nỗ lực thử nghiệm thì tại sao chúng tôi không thực hiện thử nghiệm nhiều trình duyệt bằng tự động hóa. TestNG cung cấp cho chúng tôi chức năng để thực hiện cùng một thử nghiệm trên các trình duyệt khác nhau một cách đơn giản và dễ dàng.
Làm thế nào để làm nó?
Bước 1: Tạo Script của bạn để kiểm tra một ứng dụng LogIn sử dụng lớp TestNG.
Bước 2: Truyền 'Browser Type' như các thông số sử dụng các chú thích TestNG vào phương thức trước của lớp TestNG. Phương pháp này sẽ khởi chạy chỉ trình duyệt, nó sẽ được cung cấp như là tham số.
package automationFramework;
import org.openqa.selenium.By;
import org.openqa.selenium.WebDriver;
import org.openqa.selenium.firefox.FirefoxDriver;
import org.openqa.selenium.ie.InternetExplorerDriver;
import org.testng.annotations.AfterClass;
import org.testng.annotations.BeforeClass;
import org.testng.annotations.Parameters;
import org.testng.annotations.Test;
public class MultiBrowser {
public WebDriver driver;
@Parameters("browser")
// Passing Browser parameter from TestNG xml
public void beforeTest(String browser) {
// If the browser is Firefox, then do this
if(browser.equalsIgnoreCase("firefox")) {
driver = new FirefoxDriver();
// If browser is IE, then do this
}else if (browser.equalsIgnoreCase("ie")) {
  // Here I am setting up the path for my IEDriver

  System.setProperty("webdriver.ie.driver", "D:\ToolsQA\OnlineStore\drivers\IEDriverServer.exe");

  driver = new InternetExplorerDriver();
}
// Doesn't the browser type, lauch the Website
driver.get("http://www.store.demoqa.com");
}
// Once Before method is completed, Test method will start
@Test public void login() throws InterruptedException {
driver.findElement(By.xpath(".//*[@id='account']/a")).click();

driver.findElement(By.id("log")).sendKeys("testuser_1");

driver.findElement(By.id("pwd")).sendKeys("Test@123");

driver.findElement(By.id("login")).click();

}
@AfterClass public void afterTest() {
	driver.quit();

}
}
Bước 3: Tạo một TestNG XML để chạy thử nghiệm của bạn. Định cấu hình TestNG XML để chuyển các tham số, tức là để cho biết trình duyệt nào nên được sử dụng để chạy thử nghiệm.
<?xml version="1.0" encoding="UTF-8"?> <!DOCTYPE suite SYSTEM "http://testng.org/testng-1.0.dtd"> <suite name="Suite" parallel="none"> <test name="FirefoxTest"><classes> <class name="automationFramework.MultiBrowser" /> </classes> </test> <test name="IETest"> <parameter name="browser" value="ie" /> <classes> <class name="automationFramework.MultiBrowser" /> </classes> </test> </suite>
*** Note: You can set any number of Browsers here and just for the example purpose I have set up only two main browsers.***
Bước 4: Now it’s time to run the xml. Run the test by right click on the testng.xml file and select Run As > TestNG Suite.
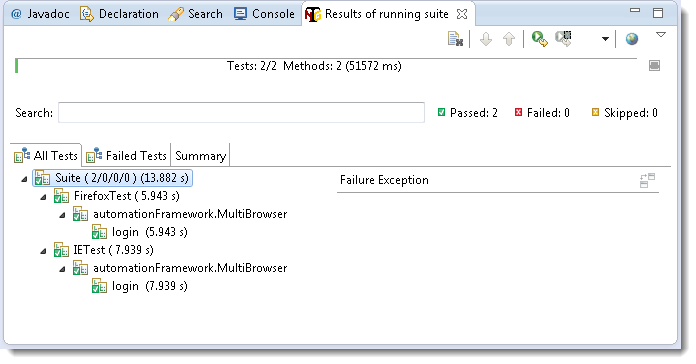
Note: TestNg will execute the test one by one. You may like to perform parallel tests, next topic will cover that.
B. Parallel Tests using TestNG
Sử dụng tính năng được cung cấp bởi TestNG for Parallel Executions. Chỉ cần lấy ví dụ trên cho đăng nhập ứng dụng với hai trình duyệt khác nhau. Lần này tất cả chúng ta muốn là thực hiện thử nghiệm trong cả hai trình duyệt cùng một lúc.
Bây giờ chỉ cần đặt thuộc tính 'parallel' thành 'tests' trong xml được sử dụng ở trên và cho chạy một lần nữa. Lần này bạn sẽ nhận thấy rằng cả hai trình duyệt của bạn sẽ mở gần như đồng thời và thử nghiệm của bạn sẽ chạy song song.
<?xml version="1.0" encoding="UTF-8"?> <!DOCTYPE suite SYSTEM "http://testng.org/testng-1.0.dtd"> <suite name="Suite" parallel="tests"> <test name="FirefoxTest"> <parameter name="browser" value="firefox" /> <classes> <class name="automationFramework.MultiBrowser" /> </classes> </test> <test name="IETest"> <parameter name="browser" value="ie" /> <classes> <class name="automationFramework.MultiBrowser" /> </classes> </test> </suite>Lưu ý: Bạn có thể thấy một số vấn đề không liên tục bằng cách sử dụng thử nghiệm song song. Tôi sẽ không khuyên bạn này thay vì chạy một. Để biết thêm thông tin về Tes
16. TestNG Listeners
Nó là khá quan trọng và là chương cuối cùng của hướng dẫn của tôi về TestNG. Tôi mất nhiều thời gian để tìm ra ví dụ đơn giản hoàn hảo cho người xem của tôi, vì tôi không phải là kỹ thuật và tôi đã tập trung rất nhiều trang web để có được ví dụ hoàn hảo về người nghe nhưng tôi không thể tìm thấy. Mọi người đã dán cùng một ví dụ trên internet. Đủ nói, chúng ta hãy bắt đầu ngay bây giờ.
Trong thời gian không có kỹ thuật, TestNG quản lý tất cả mọi thứ thông qua Suite, Test và Methods và Listeners cho chúng ta khả năng hành động trước và sau mỗi bộ Suite, Test và Methods.
A. Các đối tượng sử dụng trong TestNG Listeners
Có rất nhiều loại nghe có sẵn trong TestNG ví dụ IAnnotationTransformer, IAnnotationTransformer2, IConfigurable, IConfigurationListener, IConfigurationListener2, IExecutionListener, IHookable, IInvokedMethodListener, IInvokedMethodListener2, IMethodInterceptor, IReporter, ISuiteListener, ITestListener.
Về vấn đề kiểm thử, chỉ có một số ít được sử dụng có hiệu quả như:
ISuiteListener: Nó có hai phương pháp trong nó onStart () & onFinish (). Bất cứ khi nào một lớp thực hiện nghe này, TestNG đảm bảo người dùng cuối rằng nó sẽ gọi các phương pháp onStart () và onFinish () trước và sau khi chạy một bộ phần mềm TestNG. Vì vậy, trước khi TestNG chọn gói của bạn để thực hiện, nó đầu tiên thực hiện cuộc gọi đến onStart () phương pháp và chạy bất cứ điều gì đã được scripted trong phương pháp này. Theo một cách tương tự, nó lại thực hiện cuộc gọi đến phương thức onFinish () sau khi bộ phần mềm đã được chạy.
ITestListener: Việc làm của người nghe này cũng chính xác giống như ISuiteListerner nhưng sự khác biệt duy nhất là nó thực hiện cuộc gọi trước và sau khi Kiểm tra không phải là Suite. Nó có bảy phương pháp trong đó.
onFinish (): Được gọi sau khi tất cả các phép thử đã chạy và tất cả các phương thức Cấu hình của chúng đã được gọi.
onStart (): Được gọi sau khi lớp test đã được khởi tạo và trước khi bất kỳ phương thức cấu hình nào được gọi.
onTestFailedButWithinSuccessPercentage (ITestResult result): Gọi mỗi lần một phương pháp không thành công nhưng đã được chú thích với successPercentage và lỗi này vẫn giữ nó trong phần trăm yêu cầu thành công.
onTestFailure (Kết quả ITestResult): Được gọi mỗi khi một bài kiểm tra thất bại.
onTestSkipped (Kết quả ITestResult): Được gọi mỗi khi một bài kiểm tra bị bỏ qua
onTestStart (ITestResult result): Được gọi mỗi lần trước khi một bài kiểm tra được gọi.
onTestSuccess(ITestResult result): Được gọi mỗi lần thử nghiệm thành công.
IInvokedMethodListener: Việc làm của trình nghe này cũng giống hệt với ISuiteListerner & ITestListerner và sự khác biệt duy nhất là nó thực hiện cuộc gọi trước và sau mỗi Phương thức. Nó chỉ có hai phương pháp trong đó.
afterInvocattion (): Gọi sau mỗi phương thức
beforeInvocation (): Gọi trước mỗi phương thức
Ok, vì vậy bây giờ tôi đoán rằng bạn phải nhận thức được khá rõ về những gì người nghe là tất cả về và chúng tôi cũng thấy làm thế nào để viết một người nghe. Bây giờ là câu hỏi lớn.
Làm thế nào để làm nó?
Bước 1: Tạo tệp ‘New Class’ và đặt tên là 'Listener', bằng cách nhấp chuột phải vào Package và chọn New> Class.
Bước 2: Bây giờ Thực hiện ISuiteListener, ITestListener và IInvokedMethodListener đến lớp mới tạo. Để thực hiện class listener, class phải thực hiện giao diện org.testng.ITestListener. Các class này được thông báo tại thời gian chạy bởi TestNG khi bắt đầu starts, finishes, fails, skips, or passes.
package utility;
import org.testng.IInvokedMethod;
import org.testng.IInvokedMethodListener;
import org.testng.ISuite;
import org.testng.ISuiteListener;
import org.testng.ITestContext;
import org.testng.ITestListener;
import org.testng.ITestNGMethod;
import org.testng.ITestResult;
import org.testng.Reporter;
public class Listener implements ITestListener, ISuiteListener, IInvokedMethodListener {
// This belongs to ISuiteListener and will execute before the Suite start

@Override

public void onStart(ISuite arg0) {

	Reporter.log("About to begin executing Suite " + arg0.getName(), true);

}

// This belongs to ISuiteListener and will execute, once the Suite is finished

@Override

public void onFinish(ISuite arg0) {

	Reporter.log("About to end executing Suite " + arg0.getName(), true);

}

// This belongs to ITestListener and will execute before starting of Test set/batch

public void onStart(ITestContext arg0) {

	Reporter.log("About to begin executing Test " + arg0.getName(), true);

}

// This belongs to ITestListener and will execute, once the Test set/batch is finished

public void onFinish(ITestContext arg0) {

	Reporter.log("Completed executing test " + arg0.getName(), true);

}

// This belongs to ITestListener and will execute only when the test is pass

public void onTestSuccess(ITestResult arg0) {

	// This is calling the printTestResults method

	printTestResults(arg0);

}

// This belongs to ITestListener and will execute only on the event of fail test

public void onTestFailure(ITestResult arg0) {

	// This is calling the printTestResults method

	printTestResults(arg0);

}

// This belongs to ITestListener and will execute before the main test start (@Test)

public void onTestStart(ITestResult arg0) {

	System.out.println("The execution of the main test starts now");

}

// This belongs to ITestListener and will execute only if any of the main test(@Test) get skipped

public void onTestSkipped(ITestResult arg0) {

	printTestResults(arg0);

}

// This is just a piece of shit, ignore this

public void onTestFailedButWithinSuccessPercentage(ITestResult arg0) {

}

// This is the method which will be executed in case of test pass or fail

// This will provide the information on the test

private void printTestResults(ITestResult result) {

	Reporter.log("Test Method resides in " + result.getTestClass().getName(), true);

	if (result.getParameters().length != 0) {

		String params = null;

		for (Object parameter : result.getParameters()) {

			params += parameter.toString() + ",";

		}

		Reporter.log("Test Method had the following parameters : " + params, true);

	}

	String status = null;

	switch (result.getStatus()) {

	case ITestResult.SUCCESS:

		status = "Pass";

		break;

	case ITestResult.FAILURE:

		status = "Failed";

		break;

	case ITestResult.SKIP:

		status = "Skipped";

	}

	Reporter.log("Test Status: " + status, true);

}

// This belongs to IInvokedMethodListener and will execute before every method including @Before @After @Test

public void beforeInvocation(IInvokedMethod arg0, ITestResult arg1) {

	String textMsg = "About to begin executing following method : " + returnMethodName(arg0.getTestMethod());

	Reporter.log(textMsg, true);

}

// This belongs to IInvokedMethodListener and will execute after every method including @Before @After @Test

public void afterInvocation(IInvokedMethod arg0, ITestResult arg1) {

	String textMsg = "Completed executing following method : " + returnMethodName(arg0.getTestMethod());

	Reporter.log(textMsg, true);

}

// This will return method names to the calling function

private String returnMethodName(ITestNGMethod method) {

	return method.getRealClass().getSimpleName() + "." + method.getMethodName();

}
}
Bước 3: Tạo tệp 'New Class' và đặt tên 'TestListener', bằng cách nhấp chuột phải vào Gói và chọn New > Class.###
package automationFramework;
import org.testng.annotations.AfterMethod;
import org.testng.annotations.BeforeMethod;
import org.testng.annotations.Test;
public class TestListener {
public void main() {
System.out.println("Execution of Main test is carring on");
}
public void beforeMethod() {
System.out.println("Execution of Before method is carring on");
}
public void afterMethod() {
System.out.println("Execution of After method is carring on");
}
}
B. Làm thế nào để cho TestNG biết rằng tôi có một listener mà nó nên gọi khi nó được thực hiện các xét nghiệm của tôi?
Về cơ bản, có hai cách thêm listener vào một lớp cụ thể.
Bước 1: Thực hiện TestNG Listener đến lớp kiểm tra của bạn
package automationFramework;
import org.testng.annotations.AfterMethod;
import org.testng.annotations.BeforeMethod;
import org.testng.annotations.Test;
// This code will implement TestNG listeners
@Listeners(PackageName.ListenerClassName)
// For e.g. @Listeners(utility.Listener.class)
public class TestListener {
public void main() {
}
}
Bước 2: Listener tag in TestNG xml: Although approach 1 is more than enough to get you started, it’s not an “elegant” way of using Listeners, because you are forced to add this @Listeners section to each of your classes, which you perhaps won’t want. So what you do is, you create a TestNG Suite xml and then add up the listeners section to this suite xml file. That way, all of your tests would essentially leverage the listener that you wrote.
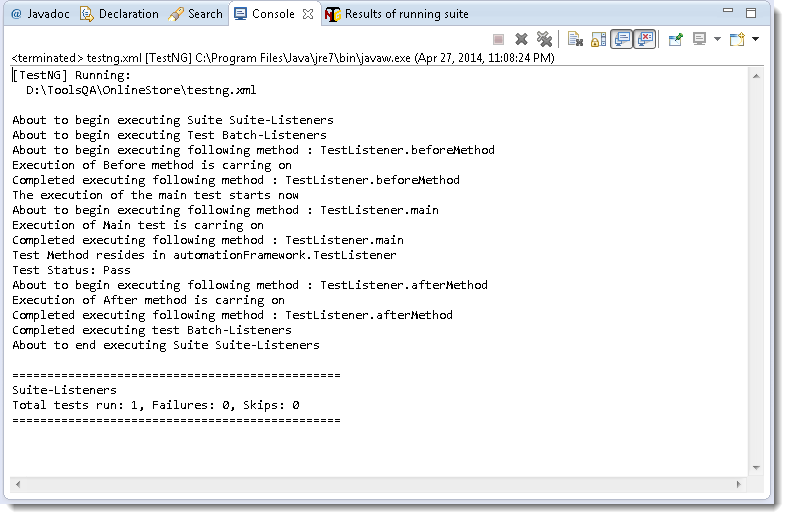
<suite name="Suite-Listeners" parallel="none"> <listeners><listener class-name="utility.Listener"></listener>
</listeners> <test name="Batch-Listeners"> <classes> <class name="automationFramework.TestListener" /> </classes> </test> </suite>Kết quả của test case sẽ như sau:
Chúng ta sẽ tiếp tục tìm hiểu về Retry Failed Tests in TestNG và Implement IRetryAnalyzer to Retry Failed Test in TestNG Framework trong phần tiếp theo.
***Các phần đã tìm hiểu trước đây: *** https://viblo.asia/p/tim-hieu-ve-testng-framework-phan-1-aWj53Vyol6m https://viblo.asia/p/tim-hieu-ve-testng-framework-phan-2-gGJ59X6PlX2 https://viblo.asia/p/tim-hieu-ve-testng-framework-phan-3-1VgZvByYZAw https://viblo.asia/p/tim-hieu-ve-testng-framework-phan-4-YWOZreG7KQ0
Nguồn bài dịch: http://toolsqa.com/selenium-webdriver/testng-multi-browser-cross-browser/
All rights reserved
