Tìm hiểu về testNG framework (Phần 4)
Bài đăng này đã không được cập nhật trong 4 năm
12. TestNG Parameters & Data Provider
A. TestNG Parameters
Mọi người đều biết tầm quan trọng của Parameterization trong thử nghiệm và trong kiểm thử tự động hóa. Nó cho phép chúng ta tự động chạy một trường hợp thử nghiệm nhiều lần với các giá trị đầu vào và xác nhận khác nhau. Vì Selenium Webdriver là một khuôn khổ thử nghiệm tự động hơn là một công cụ đã sẵn sàng sử dụng, bạn sẽ phải nỗ lực để hỗ trợ kiểm tra dữ liệu theo các bài kiểm tra tự động của bạn. Tôi thường thích sử dụng Microsoft Excel như là định dạng để lưu trữ các thông số của tôi nhưng rất nhiều người theo tôi đã yêu cầu viết bài về TestNG Data Provider.
TestNG một lần nữa cho chúng ta một tính năng thú vị khác được gọi là TestNG Parameters . TestNG cho phép bạn chuyển các thông số trực tiếp đến các phương pháp kiểm tra bằng testng.xml của bạn.
Làm thế nào để làm nó?
Hãy để tôi lấy một ví dụ rất đơn giản của ứng dụng LogIn, nơi mà tên người dùng và mật khẩu là cần thiết để xác thực rõ ràng.
-
Tạo một bài kiểm tra về ứng dụng OnlineStore của tôi để thực hiện LogIn mà lấy hai đối số chuỗi như tên người dùng và mật khẩu.
-
Cung cấp Tên đăng nhập và Mật khẩu dưới dạng tham số bằng TestNG Annotation.
package automationFramework;
import java.util.concurrent.TimeUnit;
import org.openqa.selenium.By;
import org.openqa.selenium.WebDriver;
import org.openqa.selenium.firefox.FirefoxDriver;
import org.testng.annotations.Test;
import org.testng.annotations.Parameters;
public class TestngParameters {
private static WebDriver driver;
@Parameters({ "sUsername", "sPassword" })
public void test(String sUsername, String sPassword) {
  driver = new FirefoxDriver();

  driver.manage().timeouts().implicitlyWait(10, TimeUnit.SECONDS);

  driver.get("http://www.store.demoqa.com");

  driver.findElement(By.xpath(".//*[@id='account']/a")).click();

  driver.findElement(By.id("log")).sendKeys(sUsername);

  driver.findElement(By.id("pwd")).sendKeys(sPassword);

  driver.findElement(By.id("login")).click();

  driver.findElement(By.xpath(".//*[@id='account_logout']/a")).click();

  driver.quit();
}
}
- Tham số này sẽ được truyền các giá trị từ testng.xml mà chúng ta sẽ thấy trong bước tiếp theo.
<test name="ToolsQA">

<parameter name="sUsername" value="testuser_1"/>

<parameter name="sPassword" value="Test@123"/>

	<classes>

	    <class name="automationFramework.TestngParameters" />

	</classes>

</test>
Bây giờ chạy testng.xml, nó sẽ chạy phương thức parameterTest. TestNG sẽ cố gắng tìm một tham số có tên sUsername & sPassword.
B. TestNG DataProviders
Khi bạn cần thông qua các tham số phức tạp hoặc các tham số cần được tạo ra từ Java (các đối tượng phức tạp, các đối tượng đọc từ tệp thuộc tính hoặc cơ sở dữ liệu, v.v ...), trong những trường hợp đó, các thông số có thể được chuyển qua Dataproviders. Một Data Provider là một phương pháp được chú thích với @DataProvider. Data Provider trả về một mảng các đối tượng.
Hãy kiểm tra cùng một ví dụ LogIn sử dụng Dataproviders.
Làm thế nào để làm nó?
-
Xác định phương thức credentials() được định nghĩa là một Dataprovider sử dụng annotation. Phương thức này trả về mảng của mảng đối tượng.
-
Thêm phương thức test() vào lớp DataProviderTest của bạn. Phương pháp này lấy hai chuỗi như các tham số đầu vào.
-
Thêm chú thích @Test (dataProvider = "Authentication") vào phương thức này. Thuộc tính dataProvider được ánh xạ tới "Authentication".
Sẽ giống như sau:
package automationFramework;
import java.util.concurrent.TimeUnit;
import org.openqa.selenium.By;
import org.openqa.selenium.WebDriver;
import org.openqa.selenium.firefox.FirefoxDriver;
import org.testng.annotations.DataProvider;
import org.testng.annotations.Test;
public class DataProviderTest {
private static WebDriver driver;
@DataProvider(name = "Authentication")
public static Object[][] credentials() {
return new Object[][] { { "testuser_1", "Test@123" }, { "testuser_1", "Test@123" }};
}
// Here we are calling the Data Provider object with its Name
@Test(dataProvider = "Authentication")
public void test(String sUsername, String sPassword) {
  driver = new FirefoxDriver();

  driver.manage().timeouts().implicitlyWait(10, TimeUnit.SECONDS);

  driver.get("http://www.store.demoqa.com");

  driver.findElement(By.xpath(".//*[@id='account']/a")).click();

  driver.findElement(By.id("log")).sendKeys(sUsername);

  driver.findElement(By.id("pwd")).sendKeys(sPassword);

  driver.findElement(By.id("login")).click();

  driver.findElement(By.xpath(".//*[@id='account_logout']/a")).click();

  driver.quit();
}
}
Chạy thử bằng cách nhấp chuột phải vào kịch bản lệnh test và chọn Run As > TestNG Test . Cung cấp cho nó vài phút để hoàn thành việc thực hiện, một khi nó được hoàn thành kết quả sẽ như thế này trong cửa sổ TestNg Result .
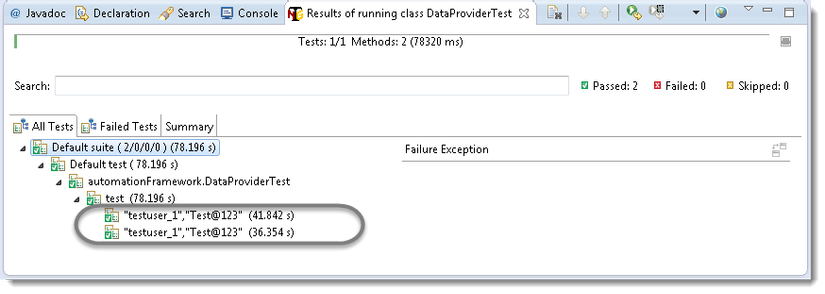
Lưu ý: Khi dữ liệu thử nghiệm được cung cấp hai lần, thử nghiệm trên thực hiện hai lần hoàn toàn.
14. TestNG Data Provider with Excel
A. Data Driven Testing
Một lợi ích quan trọng của tự động kiểm tra chức năng là khả năng kiểm tra khối lượng lớn dữ liệu trên hệ thống một cách nhanh chóng. Nhưng bạn phải có khả năng thao tác các bộ dữ liệu, thực hiện tính toán, và nhanh chóng tạo ra hàng trăm lặp đi lặp lại thử nghiệm và hoán vị với nỗ lực tối thiểu. Test Automation Frameworks phải có khả năng tích hợp với bảng tính và cung cấp tính năng tính toán mạnh mẽ.
B. Apache POI (Excel)
Hầu hết các công cụ phần mềm tự động thương mại trên thị trường hỗ trợ một số loại kiểm tra dữ liệu, cho phép bạn tự động chạy một trường hợp thử nghiệm nhiều lần với các giá trị đầu vào và xác nhận khác nhau. Vì Selenium Webdriver là một khuôn khổ thử nghiệm tự động hơn là một công cụ đã sẵn sàng sử dụng, bạn sẽ phải nỗ lực để hỗ trợ kiểm tra dữ liệu theo các bài kiểm tra tự động của bạn. Tôi thường thích sử dụng Microsoft Excel làm định dạng để lưu trữ các thông số của tôi. Một lợi thế khác của việc sử dụng Excel là bạn có thể dễ dàng thuê ngoài quản lý dữ liệu thử nghiệm cho người khác ngoài chính mình, người có thể có kiến thức tốt hơn về các trường hợp thử nghiệm cần chạy và các thông số cần thiết để thực hiện chúng.
C. TestNG Data Providers
Khi bạn cần thông qua các tham số phức tạp hoặc các tham số cần được tạo ra từ Java (các đối tượng phức tạp, các đối tượng đọc từ tệp thuộc tính hoặc cơ sở dữ liệu, v.v ...), trong những trường hợp đó, các thông số có thể được chuyển qua Dataproviders. Data Provider là một phương pháp được chú thích với @DataProvider. Data Provider liệu trả về một mảng các đối tượng.
Hãy để chúng tôi kiểm tra cùng một ví dụ LogIn sử dụng Data Provider với bảng dữ liệu Excel.
Làm thế nào để làm nó?
Ở đây chúng ta sẽ làm theo một bước đơn giản để thực hiện Excel với Nhà cung cấp Dữ liệu TestNg.
Bước 1: Tạo một trường hợp thử nghiệm Login Application với TestNG Data Provider.
Bước 2: Tạo một bảng dữ liệu thử nghiệm.
Bước 3: Tạo các hàm để mở và đọc dữ liệu từ Excel
Bước 4: Tạo một trường hợp thử nghiệm TestNg để chấp nhận dữ liệu từ Excel bằng cách sử dụng Data Provider.
Bước 5: Khởi động kiểm tra đối với trường hợp Test Case trong tệp Test Data.
Bước 1: Tạo một trường hợp thử nghiệm Login Application với TestNG Data Provider.
-
Tạo một class TestNG 'DataProviderTest' bằng cách nhấn Ctrl + N, chọn 'Create TestNG Class' dưới dạng TestNG category và Under Annotations, kiểm tra 'DataProvider' và nhấn Finish.
-
Theo mặc định, tên DataProvider là 'dp', thay đổi nó thành 'Authentication'. Phương thức này trả về mảng của mảng đối tượng.
-
Thêm một method Registration_data () vào class Test của bạn. Phương pháp này lấy hai chuỗi như các tham số đầu vào.
-
Viết kịch bản choLogIn Application theo method @Test.
Test Case sẽ giống như sau:
package automationFramework;
import java.util.concurrent.TimeUnit;
import org.openqa.selenium.By;
import org.openqa.selenium.WebDriver;
import org.openqa.selenium.firefox.FirefoxDriver;
import org.testng.annotations.DataProvider;
import org.testng.annotations.Test;
public class DataProviderTest {
private static WebDriver driver;
@DataProvider(name = "Authentication")
public static Object[][] credentials() {
    // The number of times data is repeated, test will be executed the same no. of times

    // Here it will execute two times

    return new Object[][] { { "testuser_1", "Test@123" }, { "testuser_1", "Test@123" }};
}
// Here we are calling the Data Provider object with its Name
@Test(dataProvider = "Authentication")
public void test(String sUsername, String sPassword) {
  driver = new FirefoxDriver();

  driver.manage().timeouts().implicitlyWait(10, TimeUnit.SECONDS);

  driver.get("http://www.store.demoqa.com");

  driver.findElement(By.xpath(".//*[@id='account']/a")).click();

  // Argument passed will be used here as String Variable

  driver.findElement(By.id("log")).sendKeys(sUsername);

  driver.findElement(By.id("pwd")).sendKeys(sPassword);

  driver.findElement(By.id("login")).click();

  driver.findElement(By.xpath(".//*[@id='account_logout']/a")).click();

  driver.quit();
}
}
Bước 2: Tạo một bảng dữ liệu thử nghiệm.
-
Tạo một tệp 'New Package' và đặt tên nó là ' testData', bằng cách nhấp chuột phải vào Project và chọn New > Package . Luôn luôn đặt Test Data file dưới thư mục dữ liệu thử nghiệm riêng biệt.
-
Đặt một tệp Excel trong vị trí gói đã tạo ở trên và lưu nó dưới dạng TestData.xlsx . Điền vào dữ liệu trong excel như dưới đây:

Bước 3: Tạo các hàm để mở và đọc dữ liệu từ Excel
Chúng ta cần một cách để mở bảng tính Excel này và đọc dữ liệu từ nó trong tập lệnh kiểm tra Selenium của chúng tôi. Với mục đích này, tôi sử dụng thư viện Apache POI, cho phép bạn đọc, tạo và chỉnh sửa các tài liệu Microsoft Office bằng Java. Các class và method chúng ta sẽ sử dụng để đọc dữ liệu từ bảng tính Excel được đặt trong gói org.apache.poi.hssf.usermodel.
Để xem quy trình từng bước để thiết lập Apache POI Excel, hãy truy cập vào Data Driven Framework.
package utility;
    import java.io.FileInputStream;

	import java.io.FileNotFoundException;

	import java.io.FileOutputStream;

	import java.io.IOException;

	import org.apache.poi.xssf.usermodel.XSSFCell;

	import org.apache.poi.xssf.usermodel.XSSFRow;

	import org.apache.poi.xssf.usermodel.XSSFSheet;

	import org.apache.poi.xssf.usermodel.XSSFWorkbook;

public class ExcelUtils {

		private static XSSFSheet ExcelWSheet;

		private static XSSFWorkbook ExcelWBook;

		private static XSSFCell Cell;

		private static XSSFRow Row;

	public static Object[][] getTableArray(String FilePath, String SheetName) throws Exception {

	   String[][] tabArray = null;

	   try {

		   FileInputStream ExcelFile = new FileInputStream(FilePath);

		   // Access the required test data sheet

		   ExcelWBook = new XSSFWorkbook(ExcelFile);

		   ExcelWSheet = ExcelWBook.getSheet(SheetName);

		   int startRow = 1;

		   int startCol = 1;

		   int ci,cj;

		   int totalRows = ExcelWSheet.getLastRowNum();

		   // you can write a function as well to get Column count

		   int totalCols = 2;

		   tabArray=new String[totalRows][totalCols];

		   ci=0;

		   for (int i=startRow;i<=totalRows;i++, ci++) {

			  cj=0;

			   for (int j=startCol;j<=totalCols;j++, cj++){

				   tabArray[ci][cj]=getCellData(i,j);

				   System.out.println(tabArray[ci][cj]);

					}

				}

			}

		catch (FileNotFoundException e){

			System.out.println("Could not read the Excel sheet");

			e.printStackTrace();

			}

		catch (IOException e){

			System.out.println("Could not read the Excel sheet");

			e.printStackTrace();

			}

		return(tabArray);

		}

	public static String getCellData(int RowNum, int ColNum) throws Exception {

		try{

			Cell = ExcelWSheet.getRow(RowNum).getCell(ColNum);

			int dataType = Cell.getCellType();

			if  (dataType == 3) {

				return "";

			}else{

				String CellData = Cell.getStringCellValue();

				return CellData;

			}catch (Exception e){

			System.out.println(e.getMessage());

			throw (e);

			}

		}

}
Bước 4: Tạo một trường hợp thử nghiệm TestNg để chấp nhận dữ liệu từ Excel bằng cách sử dụng Data Provider.
-
Tạo một lớp TestNG 'DataProviderWithExcel' bằng cách nhấn tổ hợp phím Ctrl + N, chọn 'Create TestNG Class' thuộc TestNG category và Under Annotations, hãy chọn ' @BeforeMethod ', ' @AfterMethod ' & ' DataProvider ' và nhấn Finish.
-
Thêm một method Registration_data () vào Test class của bạn. Phương pháp này lấy hai chuỗi như các tham số đầu vào.
-
Bây giờ phân chia các trường hợp thử nghiệm thành ba phần:
@BeforeMethod: Khởi động Firefox và chỉ đạo nó vào URL cơ sở
@Test: Nhập Tên đăng nhập & Mật khẩu để Đăng nhập, In bảng điều khiển tin nhắn và Đăng xuất
@AfterMethod: Đóng trình duyệt Firefox
Test Case sẽ giống như sau:
package practiceTestCases;
	import java.util.concurrent.TimeUnit;

	import org.openqa.selenium.By;

	import org.openqa.selenium.WebDriver;

	import org.openqa.selenium.firefox.FirefoxDriver;

	import org.testng.annotations.AfterMethod;

	import org.testng.annotations.BeforeMethod;

	import org.testng.annotations.Test;

	import org.testng.annotations.DataProvider;

	import utility.ExcelUtils;

public class DataProviderWithExcel_001 {

	WebDriver driver;

    @BeforeMethod

    public void beforeMethod() throws Exception {

	    driver = new FirefoxDriver();

        driver.manage().timeouts().implicitlyWait(10, TimeUnit.SECONDS);

        driver.get("http://www.store.demoqa.com");

	}

@Test(dataProvider="Authentication")

public void Registration_data(String sUserName,String sPassword)throws  Exception{

    driver.findElement(By.xpath(".//*[@id='account']/a")).click();

    driver.findElement(By.id("log")).sendKeys(sUserName);

	System.out.println(sUserName);

    driver.findElement(By.id("pwd")).sendKeys(sPassword);

	System.out.println(sPassword);

    driver.findElement(By.id("login")).click();

    System.out.println(" Login Successfully, now it is the time to Log Off buddy.");

    driver.findElement(By.xpath(".//*[@id='account_logout']/a")).click();

	}

@DataProvider

public Object[][] Authentication() throws Exception{

     Object[][] testObjArray = ExcelUtils.getTableArray("D://ToolsQA//OnlineStore//src//testData//TestData.xlsx","Sheet1");

     return (testObjArray);

	}

@AfterMethod

public void afterMethod() {

    driver.close();

	}
}
Lưu ý: kiểm tra đăng nhập này sẽ thực hiện hai lần vì có hai người dùng thông tin trong cung cấp dữ liệu Array.
Bước 5: Khởi động kiểm tra đối với trường hợp Test Case trong tệp Test Data.
- Điều này có nghĩa là thử nghiệm của bạn chỉ nên được chạy một lần với dữ liệu được đề cập đến chống lại tên trường hợp thử nghiệm. Để làm điều này, chúng ta cần phải tinh chỉnh lớp tiện ích Excel, cộng thêm cần thêm vài chức năng để tìm ra tên Case Case hiện tại và số hàng có chứa tên Test Case.
package utility;
	import java.io.FileInputStream;

	import java.io.FileNotFoundException;

	import java.io.FileOutputStream;

	import java.io.IOException;

	import org.apache.poi.xssf.usermodel.XSSFCell;

	import org.apache.poi.xssf.usermodel.XSSFRow;

	import org.apache.poi.xssf.usermodel.XSSFSheet;

	import org.apache.poi.xssf.usermodel.XSSFWorkbook;

public class ExcelUtils {

		private static XSSFSheet ExcelWSheet;

		private static XSSFWorkbook ExcelWBook;

		private static XSSFCell Cell;

		private static XSSFRow Row;

	//This method is to set the File path and to open the Excel file, Pass Excel Path and Sheetname as Arguments to this method

	public static void setExcelFile(String Path,String SheetName) throws Exception {

		   try {

				// Open the Excel file

				FileInputStream ExcelFile = new FileInputStream(Path);

				// Access the required test data sheet

				ExcelWBook = new XSSFWorkbook(ExcelFile);

				ExcelWSheet = ExcelWBook.getSheet(SheetName);

				} catch (Exception e){

					throw (e);

				}

		}

	public static Object[][] getTableArray(String FilePath, String SheetName, int iTestCaseRow)    throws Exception

	{

	   String[][] tabArray = null;

	   try{

		   FileInputStream ExcelFile = new FileInputStream(FilePath);

		   // Access the required test data sheet

		   ExcelWBook = new XSSFWorkbook(ExcelFile);

		   ExcelWSheet = ExcelWBook.getSheet(SheetName);

		   int startCol = 1;

		   int ci=0,cj=0;

		   int totalRows = 1;

		   int totalCols = 2;

		   tabArray=new String[totalRows][totalCols];

			   for (int j=startCol;j<=totalCols;j++, cj++)

			   {

				   tabArray[ci][cj]=getCellData(iTestCaseRow,j);

				   System.out.println(tabArray[ci][cj]);

			   }

		}

		catch (FileNotFoundException e)

		{

			System.out.println("Could not read the Excel sheet");

			e.printStackTrace();

		}

		catch (IOException e)

		{

			System.out.println("Could not read the Excel sheet");

			e.printStackTrace();

		}

		return(tabArray);

	}

	//This method is to read the test data from the Excel cell, in this we are passing parameters as Row num and Col num

	public static String getCellData(int RowNum, int ColNum) throws Exception{

	   try{

		  Cell = ExcelWSheet.getRow(RowNum).getCell(ColNum);

		  String CellData = Cell.getStringCellValue();

		  return CellData;

		  }catch (Exception e){

			return"";

			}

		}

	public static String getTestCaseName(String sTestCase)throws Exception{

		String value = sTestCase;

		try{

			int posi = value.indexOf("@");

			value = value.substring(0, posi);

			posi = value.lastIndexOf(".");

			value = value.substring(posi + 1);

			return value;

				}catch (Exception e){

			throw (e);

					}

		}

	public static int getRowContains(String sTestCaseName, int colNum) throws Exception{

		int i;

		try {

			int rowCount = ExcelUtils.getRowUsed();

			for ( i=0 ; i<rowCount; i++){

				if  (ExcelUtils.getCellData(i,colNum).equalsIgnoreCase(sTestCaseName)){

					break;

				}

			}

			return i;

				}catch (Exception e){

			throw(e);

			}

		}

	public static int getRowUsed() throws Exception {

			try{

				int RowCount = ExcelWSheet.getLastRowNum();

				return RowCount;

			}catch (Exception e){

				System.out.println(e.getMessage());

				throw (e);

			}

		}
}
Thử nghiệm cuối cùng
-
Nhận Test Case Name.
-
Với Test Case name, lấy số hàng của bảng Excel để kiểm tra.
-
Nhận dữ liệu từ bảng tính excel cho hàng thử nghiệm đã tìm nạp. package practiceTestCases;
import java.util.concurrent.TimeUnit;
import org.openqa.selenium.By;
import org.openqa.selenium.WebDriver;
import org.openqa.selenium.firefox.FirefoxDriver;
import org.testng.annotations.Test;
import org.testng.annotations.BeforeMethod;
import org.testng.annotations.AfterMethod;
import org.testng.annotations.DataProvider;
import utility.ExcelUtils;
public class DataProviderWithExcel_002 {
private String sTestCaseName;

private int iTestCaseRow;

WebDriver driver;
public void beforeMethod() throws Exception {
  driver = new FirefoxDriver();

  driver.manage().timeouts().implicitlyWait(10, TimeUnit.SECONDS);

  driver.get("http://www.store.demoqa.com");
}
@Test(dataProvider = "Authentication")
public void f(String sUserName, String sPassword) {
    driver.findElement(By.xpath(".//*[@id='account']/a")).click();

    driver.findElement(By.id("log")).sendKeys(sUserName);

	System.out.println(sUserName);

    driver.findElement(By.id("pwd")).sendKeys(sPassword);

	System.out.println(sPassword);

    driver.findElement(By.id("login")).click();

    System.out.println(" Login Successfully, now it is the time to Log Off buddy.");

    driver.findElement(By.xpath(".//*[@id='account_logout']/a")).click();
}
public void afterMethod() {
driver.close();
}
public Object[][] Authentication() throws Exception{
    // Setting up the Test Data Excel file

 	ExcelUtils.setExcelFile("D://ToolsQA//OnlineStore//src//testData//TestData.xlsx","Sheet1");

 	sTestCaseName = this.toString();

  	// From above method we get long test case name including package and class name etc.

  	// The below method will refine your test case name, exactly the name use have used

  	sTestCaseName = ExcelUtils.getTestCaseName(this.toString());

    // Fetching the Test Case row number from the Test Data Sheet

    // Getting the Test Case name to get the TestCase row from the Test Data Excel sheet

 	iTestCaseRow = ExcelUtils.getRowContains(sTestCaseName,0);

    Object[][] testObjArray = ExcelUtils.getTableArray("D://ToolsQA//OnlineStore//src//testData//TestData.xlsx","Sheet1",iTestCaseRow);

    	return (testObjArray);

	}
}
Lưu ý: Thao tác này sẽ chỉ thực hiện một lần đối với dữ liệu trường hợp hiện tại của est.
Chúng ta sẽ tiếp tục tìm hiểu về Multi Browser, Cross Browser & Parallel Testing using TestNG và TestNG Listeners trong phần tiếp theo.
Các phần đã tìm hiểu trước đây:
https://viblo.asia/p/tim-hieu-ve-testng-framework-phan-1-aWj53Vyol6m
https://viblo.asia/p/tim-hieu-ve-testng-framework-phan-2-gGJ59X6PlX2
https://viblo.asia/p/tim-hieu-ve-testng-framework-phan-3-1VgZvByYZAw
All rights reserved
