Thao tác với Google Drive API
Bài đăng này đã không được cập nhật trong 4 năm
Trong bài viết này mình sẽ thao tác với Google Drive API sử dụng Ruby on Rails với gem google-api-client để thực hiện một số tác vụ cơ bản như upload file, tạo thư mục mới...
1. Thiết lập môi trường
Thêm gem "google-api-client" vào Gemfile và chạy bundle install để cài gem vừa thêm vào.
2. Tạo khóa xác thực trên Google Developers Console
Truy cập vào Google Developers Console để tạo 1 project. Sau khi khởi tạo xong, click tiếp vào button Go to credentials.
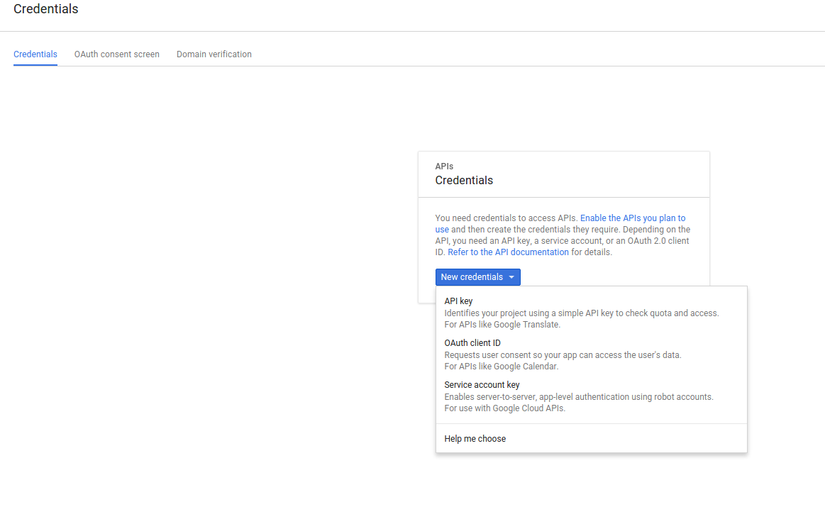
Tại màn hình API Manager, chọn tab Credentials, trong New credentials, chọn OAuth client ID
Nếu xuất hiện cảnh báo To create an OAuth client ID, you must first set a product name on the consent screen, bạn chuyển đến OAuth consent screen để khai báo thêm thông tin, tại đây yêu cầu chính là khai báo Product name shown to users để hiện thị khi yêu cầu người dùng cấp quyền. Sau đó có thể quay lại tab Credentials thực hiện lại.
Sau khi hoàn thành, ta sẽ được cung cấp CLIENT_ID và CLIENT_SECRET. Lưu lại 2 thông số này vào biến môi trường của Rails.
3. Tạo thư viện xác thực
Tạo controller google_authenticates sử dụng để xác thực với Google.
Tạo file lib/google/auth.rb với nội dung như sau
module Google
  SCOPES = [
    "https://www.googleapis.com/auth/drive",
    "email",
    "profile"
  ]
  REDIRECT_URI = "http://localhost:3000/google_authenticates"
  CLIENT_ID = ENV["CLIENT_ID"]
  CLIENT_SECRET = ENV["CLIENT_SECRET"]

  class Auth
    class << self
      def get_authorization_url
        client = Google::APIClient.new
        client.authorization.client_id = CLIENT_ID
        client.authorization.redirect_uri = REDIRECT_URI
        client.authorization.scope = SCOPES

        return client.authorization.authorization_uri(
          approval_prompt: :force,
          access_type: :offline
        ).to_s
      end

      def exchange_code authorization_code
        client = Google::APIClient.new
        client.authorization.client_id = CLIENT_ID
        client.authorization.client_secret = CLIENT_SECRET
        client.authorization.code = authorization_code
        client.authorization.redirect_uri = REDIRECT_URI

        begin
          client.authorization.fetch_access_token!
          return client.authorization
        rescue Signet::AuthorizationError
          raise CodeExchangeError.new nil
        end
      end

      def build_client credentials
        client = Google::APIClient.new
        client.authorization = credentials
        client
      end

      def build_drive client
        client.discovered_api("drive", "v2")
      end

      def build_oauth
        client.discovered_api("oauth2", "v2")
      end
    end
  end

  class GetCredentialsError < StandardError
    def initialize authorization_url
      @authorization_url = authorization_url
    end

    def authorization_url=(authorization_url)
      @authorization_url = authorization_url
    end

    def authorization_url
      @authorization_url
    end
  end

  class CodeExchangeError < GetCredentialsError
  end

  class NoRefreshTokenError < GetCredentialsError
  end
end
get_authorization_urlsẽ tạo ra đường link xác thực với require ta mong muốn dựa trênSCOPEta khai báo.access_type: :offlinesẽ cho phép ta lấyaccess tokenmới khiaccess tokencũ hết hạn mà không cần yêu cầu người dùng xác nhận lại.exchange_codesẽ trả lạicredentialsdựa trênauthorization_codelấy được sau khi xác nhận dựa trên link doget_authorization_urlsinh ra. Việc sử dụng gemgoogle-api-clientgiúp chúng ta không cần phải thao tác trực tiếp với token hay REST, tất cả tác vụ cơ bản gần như đã được gói gọn lại để sử dụng.
4. Tạo client để thao tác với Google Drive
Ta tạo file lib/google/client.rb với nội dung :
module Google
  FOLDER_MIME = "application/vnd.google-apps.folder"

  class Client
    attr_reader :client, :drive

    def initialize credentials
      @client = build_client credentials
      @drive = build_drive client
    end

    def get_user_info
      oauth2= client.discovered_api "oauth2", "v2"
      result = client.execute! api_method: oauth2.userinfo.get
      if result.status == 200
        result
      else
        false
      end
    end

    def get_files
      client.execute api_method: drive.files.list
    end

    def get_file file_id
      client.execute api_method: drive.files.get, parameters: {fileId: file_id}
    end

    def create_folder folder_name
      folder = drive.files.insert.request_schema.new({
        title: folder_name,
        mimeType: FOLDER_MIME
      })

      client.execute api_method: drive.files.insert, body_object: folder
    end

    def insert_file file_path, title: nil, parent_id: nil, description: nil
      mime_type = MIME::Types.type_for(file_path).first.content_type
      file = drive.files.insert.request_schema.new({
        title: title || File.basename(file_path),
        description: description,
        mimeType: mime_type
      })
      if parent_id
        file.parents = [{id: parent_id}]
      end
      media = Google::APIClient::UploadIO.new file_path, mime_type
      result = client.execute api_method: drive.files.insert,
        body_object: file,
        media: media,
        parameters: {
          uploadType: "multipart",
          alt: "json"
        }
    end

    private
    def build_client credentials
      client = Google::APIClient.new
      client.authorization = credentials
      client
    end

    def build_drive client
      client.discovered_api("drive", "v2")
    end
  end
end
Ta có thể thấy việc thực hiện các tác vụ với Google Drive cơ bản là gọi các hàm do Google tạo sẵn như :
- `client.execute api_method: drive.files.list để lấy danh sách các file trong drive.
client.execute api_method: drive.files.get, parameters: {fileId: file_id}để get file trên drive dựa trên id của nó.client.execute api_method: drive.files.insert ...để upload file lên drive.
Trước khi đưa file vào trong params thực hiện việc upload file, ta cần gói lại file đó theo chuẩn của Google (Mình nghĩ đây chính là quá trình mã hóa file theo chuẩn Base64). drive.files.insert.request_schema.new.
Đặc biệt Google Drive API không hỗ trợ tạo folder trực tiếp mà coi folder đó như 1 file đặc biệt với MIME là application/vnd.google-apps.folder, vậy nên để tạo 1 folder mới, ta đơn giản chỉ là sử dụng api để tạo file mới có MIME là application/vnd.google-apps.folder.
5. Kết luận
2 đoạn code trên đã có thể giúp ta thực hiện các tác vụ cơ bản với Google Drive cũng như minh họa được luồng hoạt động khi sử dụng API để tương tác. Một điểm mình khá thích là khi thực hiện client.execute, nếu token hiện tại hết hạn, nó sẽ tự get token mới về dựa trên các credentials truyền vào khi khởi tạo client. Việc lưu trữ credentials để sử dụng ở các phiên làm việc khác khá đơn giản bằng viện convert nó thành JSON và lưu vào Database, chi tiết việc này sẽ để bạn đọc tự thực hiện.
Bài viết trên đã mô tả các bước thực hiện, có code mẫu cũng như giải thích những hàm chính. Do kiến thức còn hạn chế nên sẽ có những sai sót, mong bạn đọc góp ý để mình hoàn thiện kiến thức cũng như nội dung bài viết.
All rights reserved
