Swift: Custom transition
Bài đăng này đã không được cập nhật trong 6 năm
Trong quá trình phát triển dự án thì việc gặp phải các yêu cầu về animation hay transition là điều thường xuyên, vì vậy chúng ta cần trau dồi thêm các kiến thức về phần này. Bài viết lần này sẽ là về cơ bản về custom transition - hiệu ứng chuyển view hay present để có thể tìm hiểu sâu hơn sau này. Có kha khá classes và delegates liên quan đến tiến trình chúng ta tạo một custom transition. Hãy xem qua chúng trước.
UIViewControllerTransitioningDelegate
Mỗi một view controller có thể có một transition delegate, với việc thực thi delegate bạn có thể cung cấp Custom animation và sự tương tác với controller interaction. Việc của chúng ta là tạo ra các objects để thực hiện animation, các delegate này sẽ thực hiện nhiệm vụ đặt chúng đúng chỗ để cho UIKit hiểu là animation này cho cái gì.
UINavigationControllerDelegate
Delegate này cũng có hai phương thức có trachs nhiệm để custom push và pop animation. Nó khá giống với transitioning delegate, nhưng cũng có một vài điểm khác biệt.
UINavigationControllerOperation
Là một enum bảo gồm hướng của navigation animation. Thường được sử dụng cho push hay pop.
UIViewControllerAnimatedTransitioning
Đây là nhưng objects được return ở transition delegate, cho nên đơn giản là chúng ta sẽ custom bằng việc implement delegate của chúng.
UIViewControllerContextTransitioning
Context này gói gọn tất cả các thông tin về transitioning, chúng ta có thể lấy các thông tin về toView, fromView hay containerView ...
Custom transition animations
Trên kia là lý thuyết và thông tin chung về những thứ chúng ta cần biết để bắt đầu bắt tay vào thực hiện custom transition. Hãy thử bắt đầu với một custom đơn giản, đoạn code dưới đây là một object implement UIViewControllerAnimatedTransitioning để thực hiện custom push animation cơ bản bằng fade animation.
open class FadePushAnimator: NSObject, UIViewControllerAnimatedTransitioning {

    open func transitionDuration(using transitionContext: UIViewControllerContextTransitioning?) -> TimeInterval {
        return 0.5
    }

    open override func animateTransition(using transitionContext: UIViewControllerContextTransitioning) {
        guard
            let toViewController = transitionContext.viewController(forKey: .to)
        else {
            return
        }
        transitionContext.containerView.addSubview(toViewController.view)
        toViewController.view.alpha = 0

        let duration = self.transitionDuration(using: transitionContext)
        UIView.animate(withDuration: duration, animations: {
            toViewController.view.alpha = 1
        }, completion: { _ in
            transitionContext.completeTransition(!transitionContext.transitionWasCancelled)
        })
    }
}
Việc implement này khá đơn giản, đầu tiên là một delegate cung cấp thông tin về duration và delegate thứ 2 chính là để chúng ta thực hiện hiệu ứng cho việc transition. Việc lấy thông tin từ context là vô cùng quan trọng. Việc tận dụng các thông tin từ context các bạn có thể tham khảo tại đây: https://developer.apple.com/library/archive/featuredarticles/ViewControllerPGforiPhoneOS/CustomizingtheTransitionAnimations.html
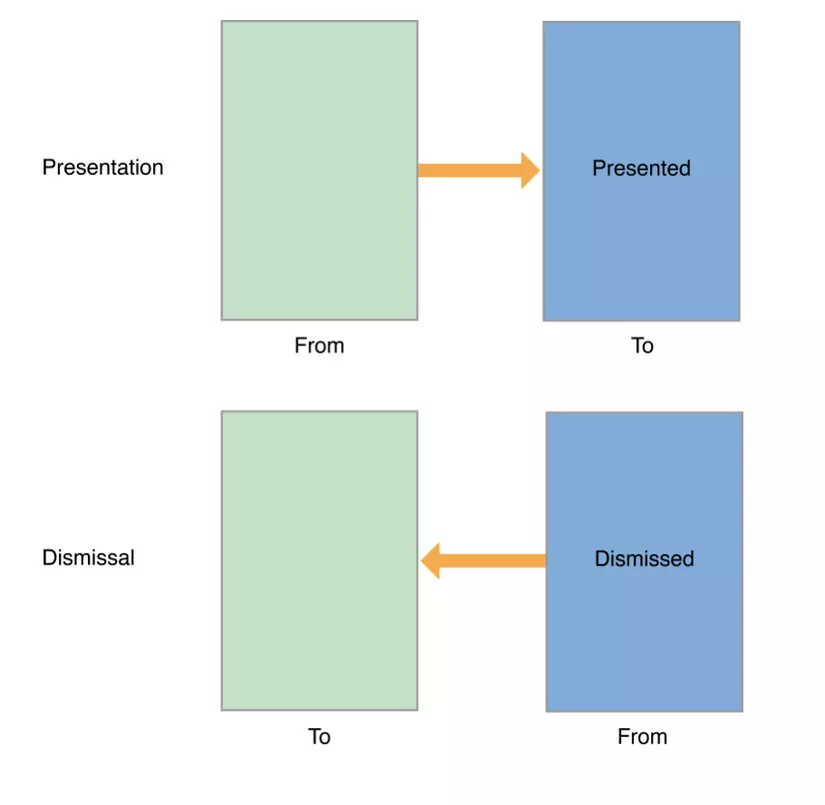
Hay đơn giản hơn thì các bạn có thể hiểu toView và fromView như hình dưới, nó cũng tương tự với push hay pop.

Giờ chúng ta có thể tạo một objects custom Pop transition cũng tương tự với Push thôi.
open class FadePopAnimator: CustomAnimator {

    open func transitionDuration(using transitionContext: UIViewControllerContextTransitioning?) -> TimeInterval {
        return 0.5
    }

    open override func animateTransition(using transitionContext: UIViewControllerContextTransitioning) {
        guard
            let fromViewController = transitionContext.viewController(forKey: .from),
            let toViewController = transitionContext.viewController(forKey: .to)
        else {
            return
        }

        transitionContext.containerView.insertSubview(toViewController.view, belowSubview: fromViewController.view)

        let duration = self.transitionDuration(using: transitionContext)
        UIView.animate(withDuration: duration, animations: {
            fromViewController.view.alpha = 0
        }, completion: { _ in
            transitionContext.completeTransition(!transitionContext.transitionWasCancelled)
        })
    }
}
Cuối cùng để hoàn tất công việc thì chúng ta sẽ return objects này ở navigation controller's delegate mà chúng ta muốn thực hiện.
extension MainViewController: UINavigationControllerDelegate {

    func navigationController(_ navigationController: UINavigationController,
                              animationControllerFor operation: UINavigationControllerOperation,
                              from fromVC: UIViewController,
                              to toVC: UIViewController) -> UIViewControllerAnimatedTransitioning? {
        switch operation {
        case .push:
            return FadePushAnimator()
        case .pop:
            return FadePopAnimator()
        default:
            return nil
        }
    }
}
Giờ chúng ta đã custom được push và pop transition animation mặc định bằng hiệu ứng fade mà chúng ta có. Từ đây chúng ta có thể custom thêm những thứ phức tạp hơn nữa. Việc custom present modal view và dismiss cũng sẽ có một vài điểm khác biệt đối với class FadePushAnimator() và FadePopAnimator(). Điều này có nghĩa là nếu lấy lấy nguyên 2 class kia để thực hiện custom sẽ không được. Và việc return chúng sẽ được return ở trong delegate method của UIViewControllerTransitioningDelegate. Mong bài viết đã cung cấp cho các bạn một kiến thức đủ để các bạn làm quen dễ hơn với việc custom transition.
References
https://theswiftdev.com/2018/04/26/ios-custom-transition-tutorial-in-swift/
All rights reserved