Sending Web Push Notifications from Rails
Bài đăng này đã không được cập nhật trong 7 năm
Ở bài viết này, chúng ta sẽ cùng nhau tìm hiểu một trong những cách để gửi notification trên màn hình desktop bằng ứng dụng Rails
Trước giờ, chúng ta đã quá quen với ứng dụng push notification trên các mobile hay các desktop app, bây giờ điều này đã trở nên khả thi trên môi trường web.
Web push notification ngày càng trở nên thông dụng và mạnh mẽ vì chúng cho phép chúng ta tương tác với người dùng ngay cả khi họ không mở trang web này.
Chúng ta sẽ thực hiện demo một Web Push API bằng ứng dụng Rails để push notification trên desktop trên 2 trình duyệt phổ biến nhất hiện nay là Chrome và Firefox.
Chúng ta sẽ lần lượt đề cập đến những thứ cơ bản trong việc thực thi push notification mặc dù hiện nay có khá nhiều các dịch vụ của bên thứ 3 đã làm thay các công việc này cho bạn như: Roost, PushCrew, OneSignal.
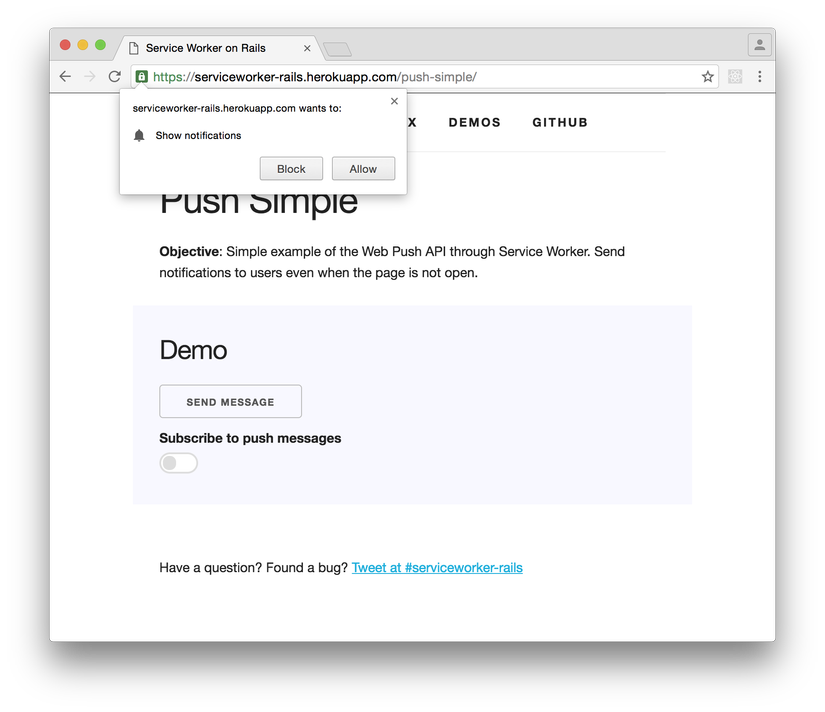
Demo
Bird's eye view
Push notification là một quá trình tương tác của 3 bên: user(thông qua trình duyệt của họ), Rails app và Web Push Server, gồm các bước sau:
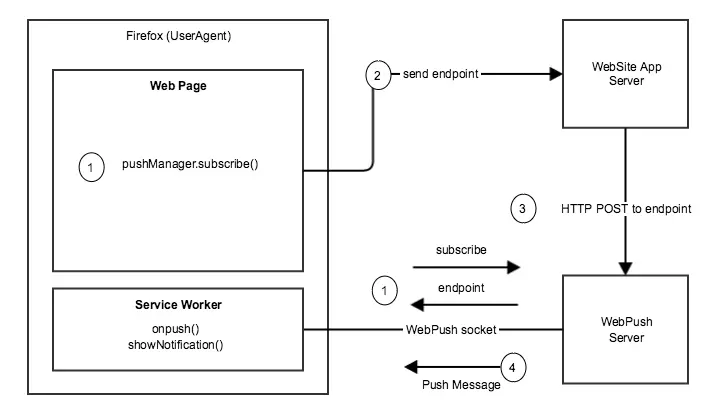
1, Chúng ta sử dụng Javascript trên page hiện tại của người dùng để đăng kí một service worker, subcribe đến push notification thông qua interface pushManager. Sau đó trình duyệt sẽ tạo một request đến Web Push server một PushSubscription, cái mà sẽ chứa một enpoint unique đến Web Push server và một authorization keys để encrypt body của message
2, Web page post thông tin subscription đến Rails app phía server
3, Để gửi một push notification, chúng ta sử dụng Ruby gem webpush từ Rails app, webpush chịu trách nhiệm gửi toàn bộ request đến Web Push server bao gồm mã hóa của nội dụng message được gói trong payload.
4, Nếu request ở bước 3 thành công, Web Push server sẽ mở một socket đến service worker đã đăng kí của chúng ta, cái mà có thể nghe được event push để show một notification đến trình duyệt người dùng. Bởi vì vòng đời của server worker là độc lập với web page nên chúng có thể sử lý các event ngay cả khi người dùng không mở trang web đó lên.
Setup
Đến lúc này chúng ta cần config ứng dụng app của chúng ta để sử dụng nền tảng Google Cloud Message bằng cách đăng kí một key cho ứng dụng , bạn có thể tham khảo tại: https://developers.google.com/web/fundamentals/?hl=en
Cả firefox và Chrome đều sẽ kết nối đến một file json manifest để cung cấp metadata cho việc push subscription và notification. Ví dụ:
{
  "name": "Your app name",
  "short_name": "Your app",
  "icons": [{
    "src": "images/icon-192x192.png",
    "sizes": "192x192",
    "type": "image/png"
  }],
  "start_url": "/",
  "display": "standalone",
  "gcm_sender_id": "<Your Project ID>",
  "gcm_user_visible_only": true
}
Hiện tại, file này có thể được đặt trong public/manifest.json. Trong app/views/layouts/application.html.erb bạn cần add một link tag đến file manifest
<link rel="manifest" href="/manifest.json">
Subscribe through a service worker
Service worker giúp chúng ta không còn thấy được sự khác biệt giữa push notification ở một ứng dụng web hay ứng dụng mobile. Trong file application.js chúng ta sử dụng đoạn code sau để đăng kí một service worker:
// app/assets/javascripts/application.js

if ('serviceWorker' in navigator) {
  console.log('Service Worker is supported');
  navigator.serviceWorker.register('/serviceworker.js')
    .then(function(registration) {
      console.log('Successfully registered!', ':^)', registration);
      registration.pushManager.subscribe({ userVisibleOnly: true })
        .then(function(subscription) {
            console.log('endpoint:', subscription.endpoint);
        });
  }).catch(function(error) {
    console.log('Registration failed', ':^(', error);
  });
}
Đoạn code trên sẽ đăng kí một service worker trên một phạm vi nhất định thông qua navigator.serviceWorker.register. Method này trả về một Promise là một thể hiện của ServiceWorkerRegistration.
The Service Worker
Trong file app/assets/javascripts/serviceworker.js, service worker sẽ show ra toàn bộ nội dung notification khi event push được nhận:
function onPush(event) {
  var title = (event.data && event.data.text()) || "Yay a message";

  event.waitUntil(
    self.registration.showNotification(title, {
      body: "We have received a push message",
      icon: "/assets/path/to/icon.png",
      tag:  "push-simple-demo-notification-tag"
    });
  )
}

self.addEventListener("push", onPush);
Rails setup
Add đến gem file
# Gemfile

gem 'serviceworker-rails'
Để route request từ /serviceworker.js đến file js của chúng ta trong assets pipeline, chúng ta sẽ config service worker middleware:
# config/initializers/serviceworker.rb

Rails.application.configure do
  config.serviceworker.routes do
    match "serviceworker.js"
  end
end
Persist the subscription
Ở bước này, chúng ta sẽ set up controller action để serialize subscription vào trong session của trình duyệt người dùng. Điều này cho phép chúng ta nhận subscription từ một người dùng nào đó.
Việc push subscribe có những dữ liệu quan trọng như endpoint và các key p256dh và auth, chúng ta cần sử dụng các dữ liệu này để encrypt các request từ rails app đến web push server
// subscription.toJSON();

{
  endpoint: "https://android.googleapis.com/gcm/send/a-subscription-id",
  keys: {
    auth: "16ByteString",
    p256dh: "65ByteString"
  }
}
Một khi có user subscribe, chúng ta có thể post một subscription đến rails app:
reg.pushManager.subscribe({ userVisibleOnly: true })
  .then(function(subscription) {
    $.post("/subscribe", { subscription: subscription.toJSON() });
  });
Với route:
# config/routes.rb

post "/subscribe" => "subscriptions#create"
Và tất nhiên, trong controller:
# app/controllers/subscriptions_controller.rb

class SubscriptionsController < ApplicationController
  def create
    session[:subscription] = JSON.dump(params.fetch(:subscription, {}))

    head :ok
  end
end
Push it
Chúng ta đã có một subscription, cũng có thể gửi một notification, giờ là lúc sử dụng gem webpush
# Gemfile

gem "webpush"
Với thông tin subscription, chúng ta có đẩy đủ những thông tin cần thiết để gửi một messages được mã hóa đến một user nào đó:
Webpush.payload_send(
  message: "Hello World!",
  endpoint: "https://android.googleapis.com/gcm/send/a-subscription-id",
  auth: "16ByteString",
  p256dh: "65ByteString"
  api_key: "google_api_key" # omit for Firefox, required for Google
)
Sau đó, chúng ta sẽ tạo ra một endpoint để trigger trực tiếp notification từ trình duyệt người dùng:
<!-- a view -->
<button class="js-push-button">Send a message</button>

<script type="text/javascript">
  (function() {
    $('.js-push-button').on("click", function onClick() {
      $.post("/push");
    });
  })();
</script>
Config route:
# config/routes.rb

post "/push" => "push_notifications#create"
Controller:
# app/controllers/push_notifications_controller.rb

class PushNotificationsController < ApplicationController
  def create
    Webpush.payload_send webpush_params

    head :ok
  end

  private

  def webpush_params
    subscription_params = fetch_subscription
    message = "Hello world, the time is #{Time.zone.now}"
    endpoint = subscription_params[:endpoint],
    p256dh = subscription_params.dig(:keys, :p256dh)
    auth = subscription_params.dig(:keys, :auth)
    api_key = enpoint =~ /\.google.com\// = ENV.fetch('GOOGLE_CLOUD_MESSAGE_API_KEY') || ""

    { message: message, endpoint: endpoint, p256dh: p256dh, auth: auth, api_key: api_key }
  end

  def fetch_subscription
    encoded_subscription = session.fetch(:subscription) do
      raise "Cannot create notification: no :subscription in params or session"
    end

    JSON.parse(Base64.urlsafe_decode64(encoded_subscription)).with_indifferent_access
  end
end
Mọi thứ đã OK, và chúng ta cùng xem kết quả:
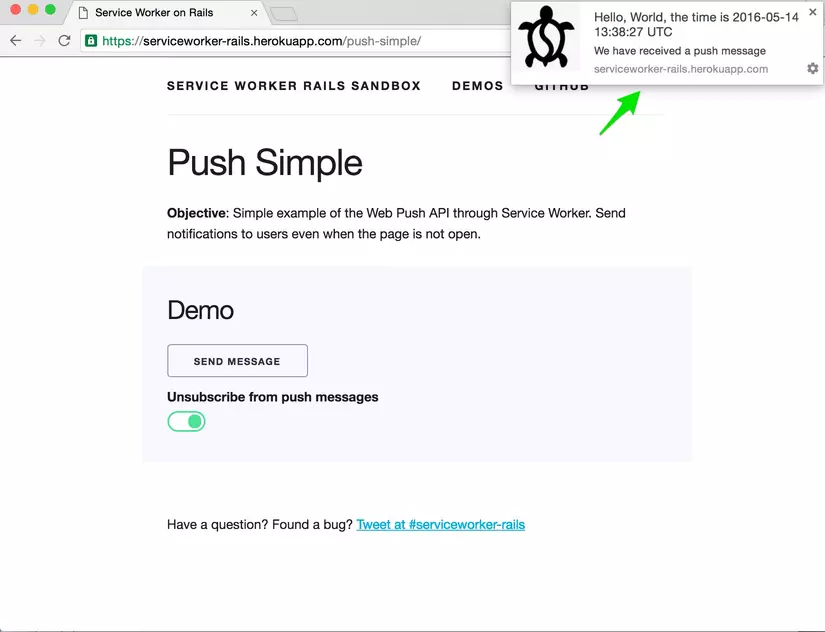 https://images.viblo.asia/55ac545f-d392-4a95-ac63-2cd79e751ebd.jpg
Chúng ta cũng có thể thêm một đoạn code để có thể off notification bằng lời gọi: PushSubscription#unsubscribe
function unsubscribe() {
  navigator.serviceWorker.ready
    .then((serviceWorkerRegistration) => {
      serviceWorkerRegistration.pushManager.getSubscription()
        .then((subscription) => {
          if (!subscription) {
            console.log("Not subscribed, nothing to do.");
            return;
          }

          subscription.unsubscribe()
            then(function() {
              console.log("Successfully unsubscribed!.");
            })
            .catch((e) => {
              logger.error('Error thrown while unsubscribing from push messaging', e);
            });
        });
    });
}

$(".js-unsubscribe-button").on("click", unsubscribe)
Source:
https://rossta.net/blog/web-push-notifications-from-rails.html
All rights reserved
