Laravel 5x Shopping cart (p2)
Bài đăng này đã không được cập nhật trong 4 năm
Tiếp tục SERIES: Tìm hiểu laravel & Xây dựng website bán hàng cùng Laravel 5x.
Phần 1: Blade template, Xây dựng giao diện người dùng Phần 2: User Authentication, Xây dựng trang login Phần 3: Back-end : Category management Phần 4: Back-end : Product management, Upload multiple images using dropzonejs Phần 5: Back-end : Tích hợp CKEditor, CKFinder cho bài viết Phần 6: Giới thiệu package ShoppingCart, Installation, Config... Phần 7: Tạo giỏ hàng Phần 8: Quản lý đơn hàng, Mail...
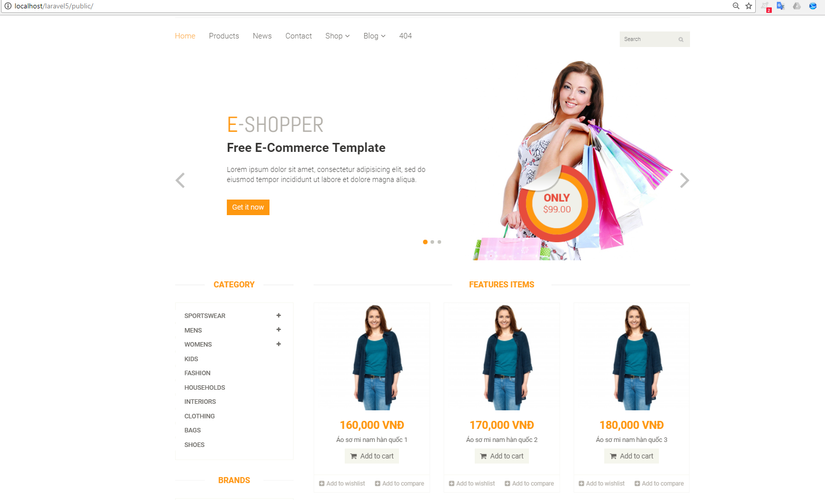
Ở Bài trước mình đã giới thiệu package ShoppingCart, Cách cài đặt, cấu hình, Nếu bạn chưa đọc thì có thể tham khảo trước. Trong bài Hnay chúng ta sẽ sử dụng package ShoppingCart tạo giỏ hàng. Dưới đây là giao diện đc sử dụng để demo.

Ok, sau đây mình sẽ hướng dẫn các bước thực hiện.
ADDING ITEMS TO THE SHOPPING CART
Step 1: Add Route
Route::post('/cart', 'CartController@cart');
FrontController có chức năng để add/update/delete sản phẩm trong giỏ hàng
Step 2: home.blade.php FORM
Chỉnh sửa trang hiển thị sản phẩm home.blade.php có nội dung như sau:
@extends('layouts.master')
@section('content')
<div class="features_items"><!--features_items-->
	<h2 class="title text-center">Features Items</h2>
	@if (count($listProduct) >0)
        @foreach($listProduct as $key=>$product)
            <div class="col-sm-4">
				<div class="product-image-wrapper">
					<div class="single-products">
						<div class="productinfo text-center">
							<img src="{{ asset('layouts/images') }}/home/product1.jpg" alt="" />
							<h2>{{ number_format($product->price )}} VNĐ</h2>
							<p>{{ $product->name }}</p>
							<form method="POST" action="{{url('cart')}}">
                                    <input type="hidden" name="product_id" value="{{$product->id}}">
                                    <input type="hidden" name="_token" value="{{ csrf_token() }}">
                                    <button type="submit" class="btn btn-fefault add-to-cart">
                                        <i class="fa fa-shopping-cart"></i>
                                        Add to cart
                                    </button>
                            </form>
						</div>
						<div class="product-overlay" style="display: none;">
							<div class="overlay-content">
								<h2>{{ number_format($product->price )}}</h2>
								<p>{{ $product->name }}</p>
								 <form method="POST" action="{{url('cart')}}">
                                    <input type="hidden" name="product_id" value="{{$product->id}}">
                                    <input type="hidden" name="_token" value="{{ csrf_token() }}">
                                    <button type="submit" class="btn btn-fefault add-to-cart">
                                        <i class="fa fa-shopping-cart"></i>
                                        Add to cart
                                    </button>
                                </form>
							</div>
						</div>
					</div>
					<div class="choose">
						<ul class="nav nav-pills nav-justified">
							<li><a href="#"><i class="fa fa-plus-square"></i>Add to wishlist</a></li>
							<li><a href="#"><i class="fa fa-plus-square"></i>Add to compare</a></li>
						</ul>
					</div>
				</div>
			</div>
        @endforeach
    @endif


</div><!--features_items-->
@endsection
Giải thích:
<form method="POST" action="{{ url('cart') }}">: tạo form với method là POST, khi submit<input type="hidden" name="product_id" value="{{$product->id}}">Id sản phẩm sẽ được thêm vào giỏ hàng<input type="hidden" name="token" value="{{ csrftoken() }}">security token
step 3: Modify Front Controller Cart Method
tạo CartController theo đường dẫn: Controllers/CartController.php
Nội dung: CartController.php
<?php

namespace App\Http\Controllers;

use Illuminate\Support\Facades\Request;
use Illuminate\Support\Facades\Redirect;
use App\Product;
use Cart;
class CartController extends Controller
{

    public function cart()
    {
       if (Request::isMethod('post')) {
            $this->data['title'] = 'Giỏ hàng của bạn';
            $product_id = Request::get('product_id');
            $product = Product::find($product_id);
            $cartInfo = [
                'id' => $product_id,
                'name' => $product->name,
                'price' => $product->price,
                'qty' => '1'
            ];
            Cart::add($cartInfo);
        }
        $cart = Cart::content();
        $this->data['cart'] = $cart;

        return view('layouts.cart', $this->data);

    }
}
if (Request::isMethod('post')) {…}Nếu request .sử dụng POST HTTP.$product_id = Request::get('product_id');được sử dụng để get giá trị product_id sản phẩm từ form.$product = Product::find($product_id);get thông tin sản phẩm từ databaseCart::add(array('id' => $product_id, 'name' => $product->name, 'qty' => 1, 'price' => $product->price));gọi phương thức Add của Cart, và truyền vào 1 mảng các thông tin của sản phẩm như tên sản phẩm, số lượng, giá, tên sản phẩm$cart = Cart::content();call phương thức content() của Cart, phương thức này sẽ trả về tất cả các sản phẩm có trong giỏ hàng.
CREATE VIEW
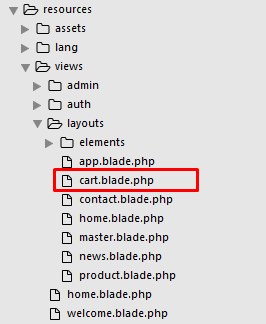
Tạo trang giỏ hàng cart.blade.php, theo đường dẫn

Nội dung file cart.blade.php
@extends('layouts.master')
@section('content')
<section id="cart_items">
    <div class="container">
        <div class="breadcrumbs">
            <ol class="breadcrumb">
                <li><a href="#">Home</a></li>
                <li class="active">Shopping Cart</li>
            </ol>
        </div>
        <div class="table-responsive cart_info">
            @if(count($cart))
            <table class="table table-condensed">
                <thead>
                    <tr class="cart_menu">
                        <td class="image">Item</td>
                        <td class="description"></td>
                        <td class="price">Price</td>
                        <td class="quantity">Quantity</td>
                        <td class="total">Total</td>
                        <td></td>
                    </tr>
                </thead>
                <tbody>
                    @foreach($cart as $item)
                    <tr>
                        <td class="cart_product">
                            <a href=""><img src="{{ asset('layouts/images') }}/home/product1.jpg" alt=""></a>
                        </td>
                        <td class="cart_description">
                            <h4><a href="">{{ $item->name }}</a></h4>
                            <p>Web ID: {{ $item->id }}</p>
                        </td>
                        <td class="cart_price">
                            <p>{{ number_format($item->price)}} VNĐ</p>
                        </td>
                        <td class="cart_quantity">
                            <div class="cart_quantity_button">

                                <form method="POST" action="{{url("cart?product_id=$item->id&increment=1")}}">
                                     <input type="hidden" name="product_id" value="{{ $item->id }}">
                                    <input type="hidden" name="_token" value="{{ csrf_token() }}">
                                    <button type="submit" class="cart_quantity_up">
                                         +
                                    </button>
                                </form>
                                <input class="cart_quantity_input" type="text" name="quantity" value="{{$item->qty}}" autocomplete="off" size="2">
                                <a class="cart_quantity_down" href="{{url("cart?product_id=$item->id&decrease=1")}}"> - </a>
                            </div>
                        </td>
                        <td class="cart_total">
                            <p class="cart_total_price">{{ number_format($item->subtotal)}} VNĐ</p>
                        </td>t
                        <td class="cart_delete">
                            <a class="cart_quantity_delete" href=""><i class="fa fa-times"></i></a>
                        </td>
                    </tr>
                    @endforeach
                    @else
                <p>You have no items in the shopping cart</p>
                @endif
                </tbody>
            </table>
        </div>
    </div>
</section> <!--/#cart_items-->

@endsection
demo

UPDATING ITEMS IN THE SHOPPING CART
để thực hiện các chức năng tăng hoặc giảm số lượng khi người dùng nhấp vào nút + hoặc - như hình trên, chúng ta cần chỉnh sửa như sau:
/resources/views/cart.blade.php
<a class="cart_quantity_up" href='{{url("cart?product_id=$item->id&increment=1")}}'> + </a>
<a class="cart_quantity_down" href='{{url("cart?product_id=$item->id&decrease=1")}}'> - </a>
/app/Http/Controllers/CartController.php
public function cart()
    {
       if (Request::isMethod('post')) {
            $this->data['title'] = 'Giỏ hàng của bạn';
            $product_id = Request::get('product_id');
            $product = Product::find($product_id);
            $cartInfo = [
                'id' => $product_id,
                'name' => $product->name,
                'price' => $product->price,
                'qty' => '1'
            ];
            Cart::add($cartInfo);
        }

         //increment the quantity
        if (Request::get('product_id') && (Request::get('increment')) == 1) {
            $rows = Cart::search(function($key, $value) {
                return $key->id == Request::get('product_id');
            });
            $item = $rows->first();
            Cart::update($item->rowId, $item->qty + 1);
        }

        //decrease the quantity
        if (Request::get('product_id') && (Request::get('decrease')) == 1) {
            $rows = Cart::search(function($key, $value) {
                return $key->id == Request::get('product_id');
            });
            $item = $rows->first();
            Cart::update($item->rowId, $item->qty - 1);
        }

        $cart = Cart::content();
        $this->data['cart'] = $cart;

        return view('layouts.cart', $this->data);

    }
REMOVING ITEMS FROM THE SHOPPING CART
$rowId = Cart::search(array('id' => Request::get('product_id')));
Cart::remove($rowId[0]);
CLEAR ALL ITEMS FROM SHOPPING CART
Cart::destroy();
SUMMARY
Trong hướng dẫn này, mình đã hướng dẫn một phần các tính năng của giỏ hàng. Mục đích là để cho bạn thấy làm thế nào để cài đặt và sử dụng Laravel Shoppingcart vào ứng dụng web Laravel của bạn và cách bạn có thể sử dụng nó để tạo một giỏ hàng dễ dàng.
All rights reserved