Deep Learning: Faceswap model
Bài đăng này đã không được cập nhật trong 8 năm
Plan of Attack
1. Faceswap Intuition
Faceswap is a process of change person face with other faces. There are many tools, libraries to do this job. However, I am going to build a "Faceswap" from scratch using one of the most powerful deep learning algorithms which is "AutoEncoders" algorithm. Why AutoEncoders?
An autoencoder is un-supervised deep learning that tries to reconstruct its input. It's mostly use to build a recommendation/suggestion system.
So for our "Faceswap", we are going to train our model with faces_a then we pass the image of face_a or face_b to the model and let it reconstruct the face. For more detail you can watch in this video.
2. Data Preparation
In this article, I am going swap my face with "The Rock". So, I need to collect his faces images and the best place to find it is using google image. And you can use the code in my previous article for this section.

However, what we need is just his face, so we need to write OpenCV code to crop all his faces into a folder where you can find the detail of face cropping in this post. After we crop faces, we need to do a manual check and remove the face doesn't belong to his faces. For our faces, we can use webcam to collect it where the code is here, and then we are ready for next step.
3. Init Model
Since our inputs are face images, it makes sense to use convolutional neural networks (convnets) as encoders and decoders. In practical settings, autoencoders applied to images are always convolutional autoencoders --they simply perform much better.
Let's implement it. The encoder will consist in a stack of Conv2D and MaxPooling2D layers (max pooling being used for spatial down-sampling), while the decoder will consist in a stack of Conv2D and UpSampling2D layers.
First, we need to load the needed package and init some variables such as image_size = 64, batch_size = 128...
from keras import backend as K
from keras.models import Model
from keras.layers import Input, Conv2D, MaxPooling2D, Flatten, Dense, Reshape, Conv2DTranspose, UpSampling2D, Activation
from keras.optimizers import Adam
from keras.callbacks import TensorBoard
from libs.read_images_from import read_images_from
import argparse

ap = argparse.ArgumentParser()
ap.add_argument("-m", "--model", type=str, default="",
    help="model name", required=True)
args = vars(ap.parse_args())

image_size = 64
input_shape = (image_size, image_size, 3)
layer_filters = [32, 64]
kernel_size = 5
latent_dim = 16
batch_size = 128
Next, let's define encoding model.
inputs = Input(shape=input_shape, name='encoder_input')
x = inputs

for filters in layer_filters:
    x = Conv2D(filters=filters,
               kernel_size=kernel_size,
               strides=2,
               activation='relu',
               padding='same')(x)
    x = MaxPooling2D((2, 2), padding='same')(x)

shape = K.int_shape(x)

x = Flatten()(x)
latent = Dense(latent_dim, name='latent_vector')(x)
encoder = Model(inputs, latent, name='encoder')
encoder.summary()

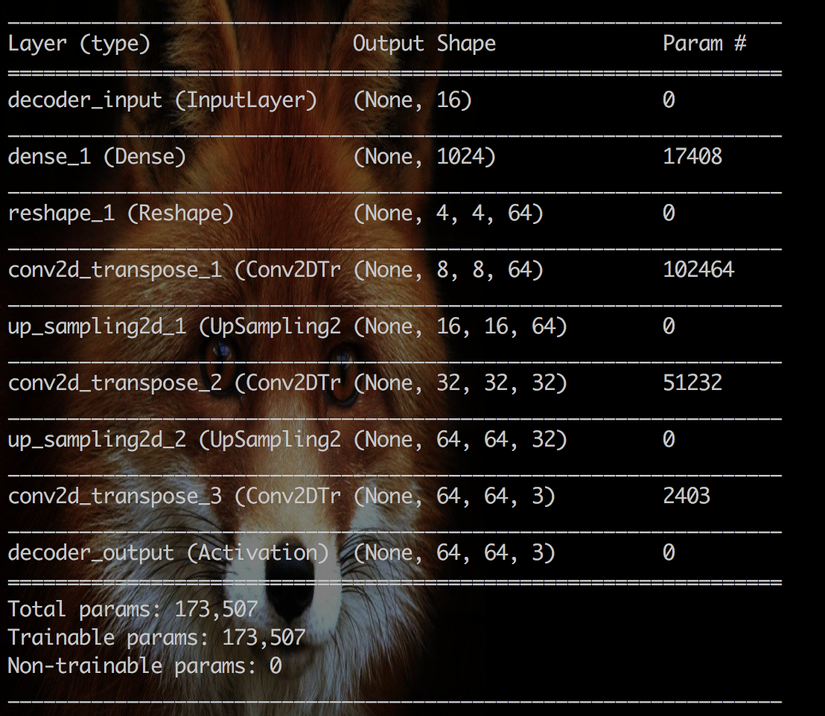
Next, we define decoder model.
# Build the Decoder Model
latent_inputs = Input(shape=(latent_dim,), name='decoder_input')
x = Dense(shape[1] * shape[2] * shape[3])(latent_inputs)
x = Reshape((shape[1], shape[2], shape[3]))(x)

for filters in layer_filters[::-1]:
    x = Conv2DTranspose(filters=filters,
                        kernel_size=kernel_size,
                        strides=2,
                        activation='relu',
                        padding='same')(x)
    x = UpSampling2D((2, 2))(x)


x = Conv2DTranspose(filters=3,
                    kernel_size=kernel_size,
                    padding='same')(x)
outputs = Activation('sigmoid', name='decoder_output')(x)

# Instantiate Decoder Model
decoder = Model(latent_inputs, outputs, name='decoder')
decoder.summary()
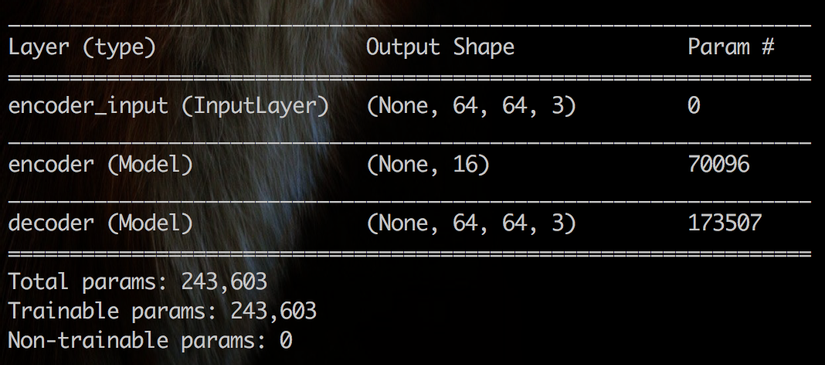
 Finally, the Autoencoder model.
# Autoencoder = Encoder + Decoder
# Instantiate Autoencoder Model
autoencoder = Model(inputs, decoder(encoder(inputs)), name='autoencoder')
autoencoder.summary()
optimizer = Adam(lr=5e-5, beta_1=0.5, beta_2=0.999)
autoencoder.compile(loss='mean_absolute_error', optimizer=optimizer)
4. Train Model
We need load and prepare face images before we fit into the model. So we need to define 2 methods read_images_from to load images from folder and random_warp to create a wrap image which use as train image.
# read_images_from.py
# it duplicate image and wrap the duplicate then resize to (64,64,3) then return.
import numpy
import cv2
from .umeyama import umeyama
coverage = 220

# get pair of random warped images from aligned face image
def random_warp(image):
    image = cv2.resize(image, (256, 256))
    assert image.shape == (256, 256, 3)
    range_ = numpy.linspace(128 - coverage//2, 128 + coverage//2, 5)
    mapx = numpy.broadcast_to(range_, (5, 5))
    mapy = mapx.T

    mapx = mapx + numpy.random.normal(size=(5, 5), scale=5)
    mapy = mapy + numpy.random.normal(size=(5, 5), scale=5)

    interp_mapx = cv2.resize(mapx, (80, 80))[8:72, 8:72].astype('float32')
    interp_mapy = cv2.resize(mapy, (80, 80))[8:72, 8:72].astype('float32')

    warped_image = cv2.remap(image, interp_mapx, interp_mapy, cv2.INTER_LINEAR)

    src_points = numpy.stack([mapx.ravel(), mapy.ravel()], axis=-1)
    dst_points = numpy.mgrid[0:65:16, 0:65:16].T.reshape(-1, 2)
    mat = umeyama(src_points, dst_points, True)[0:2]

    target_image = cv2.warpAffine(image, mat, (64, 64))

    return warped_image, target_image
# read_images_from.py
# it read image in given folder path.
import cv2
import os
import numpy as np
from .random_warp import random_warp

def read_images_from(path):
    valid_images = [".jpg",".gif",".png"]
    images = []
    wrap_images = []
    for f in os.listdir(path):
        ext = os.path.splitext(f)[1]
        if ext.lower() not in valid_images:
            continue

        image = cv2.imread(os.path.join(path,f))
        # images.append(image)
        wrap, target = random_warp(image)
        images.append(target)
        wrap_images.append(wrap)

    return np.array(wrap_images), np.array(images)
To train it, we will use the face images which we just prepare in step 2. However, we need to resize our image into (64,64,3) because the first layer of our model accept input is (64,64,3), and we will devide them with 255.0 in order to minimize calculation during training. Then we train our model with 1500 epochs and save it when the training is completed. And it take about 3 hours on my machine to complete.
wraped_face, a_faces = read_images_from("images/the_rock")

a_faces = a_faces.astype('float32') / 255.
wraped_face = wraped_face.astype('float32') / 255.


autoencoder.fit(wraped_face,
                a_faces,
                epochs=1500,
                batch_size=batch_size,
                callbacks=[TensorBoard(log_dir='/tmp/autoencoder')])

autoencoder.save("model/{0}_model.h5".format(args["model"]))
autoencoder.save_weights("model/{0}e_weight.h5".format(args["model"]))
Then run python train.py -m the_rock -n the_rock
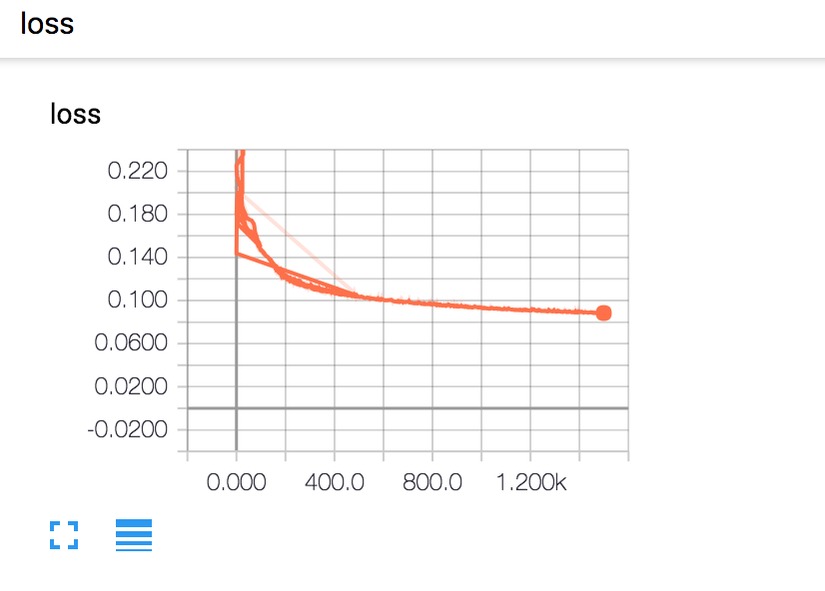
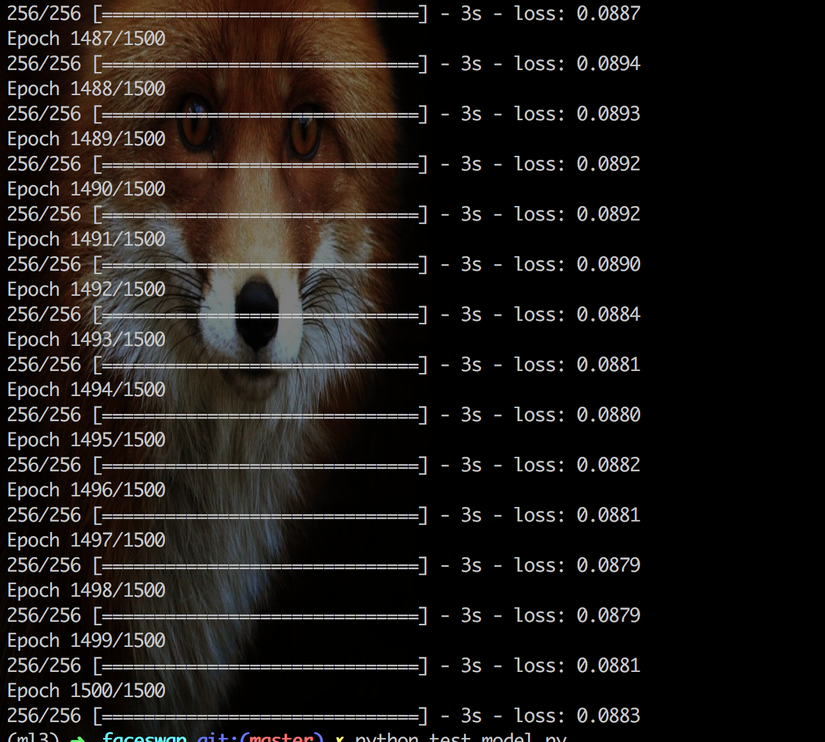 After 1500 epochs, the model converges to a loss of 0.0883.
5. Test Model
In testing, we load the saved model and weight. Then we can load images images to swap.
from keras.models import load_model
from libs.read_images_from import read_images_from
import numpy as np
import cv2
import argparse

image_size = 64
ap = argparse.ArgumentParser()
ap.add_argument("-m", "--model", type=str, default="",
   help="model name", required=True)
args = vars(ap.parse_args())

autoencoder = load_model("model/{0}_face_model.h5".format(args["model"]))
autoencoder.load_weights("model/{0}_face_weight.h5".format(args["model"]))

wrap ,a_faces = read_images_from("images/tests")

# show original image
for (index, img) in enumerate(a_faces):
 cv2.imshow("original_image_" + str(index), img)

a_faces = a_faces.astype('float32') / 255.
wrap = wrap.astype('float32') / 255.

decoded_imgs = autoencoder.predict(a_faces)
decoded_imgs = (decoded_imgs * 255).astype(np.uint8)
for (index, img) in enumerate(decoded_imgs):
 cv2.imshow("swap_image_" + str(index), img)

cv2.waitKey(0)
cv2.destroyAllWindows()
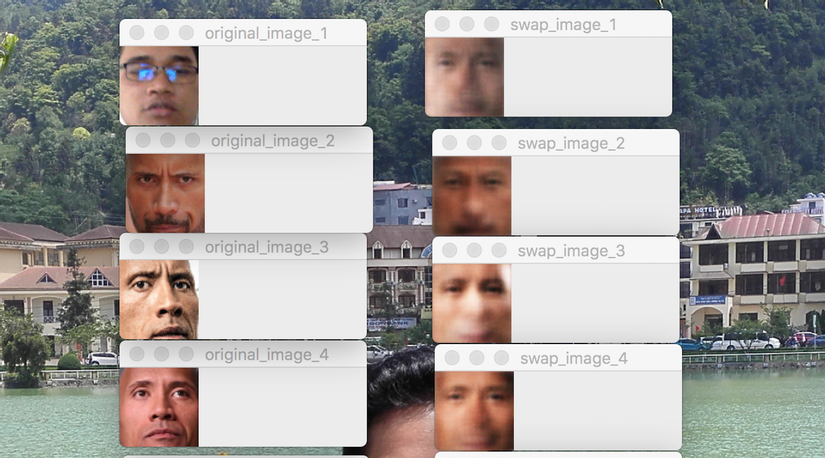
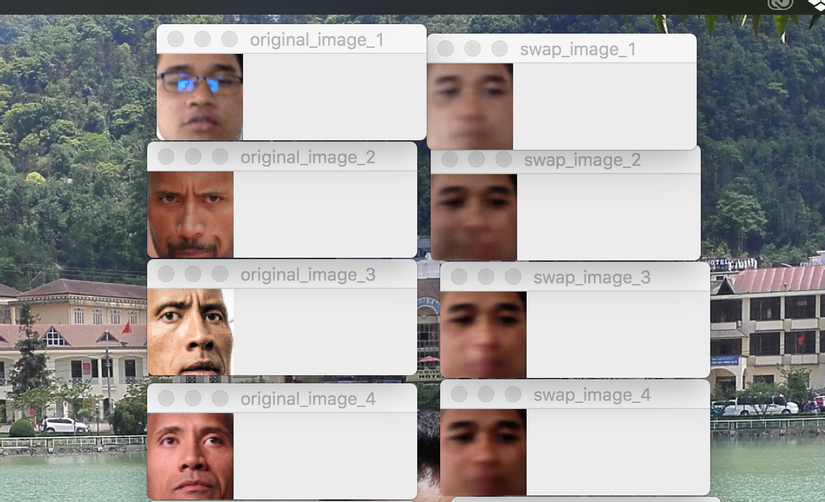
Then run the command python test_model.py -m the_rock to swap to "The Rock" face.
Let's look at the result we got where the original at left and swap at right:
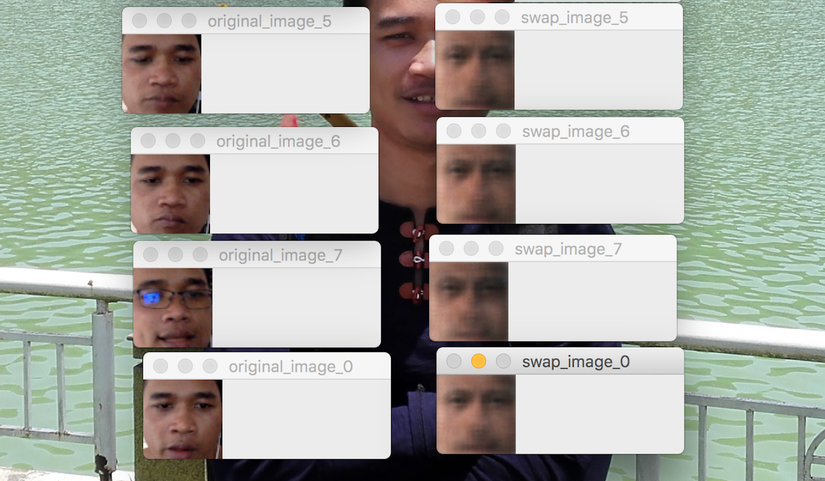
Then run the command python test_model.py -m rathanak to swap to my face.
Let's look at the result we got where the original at left and swap at right:
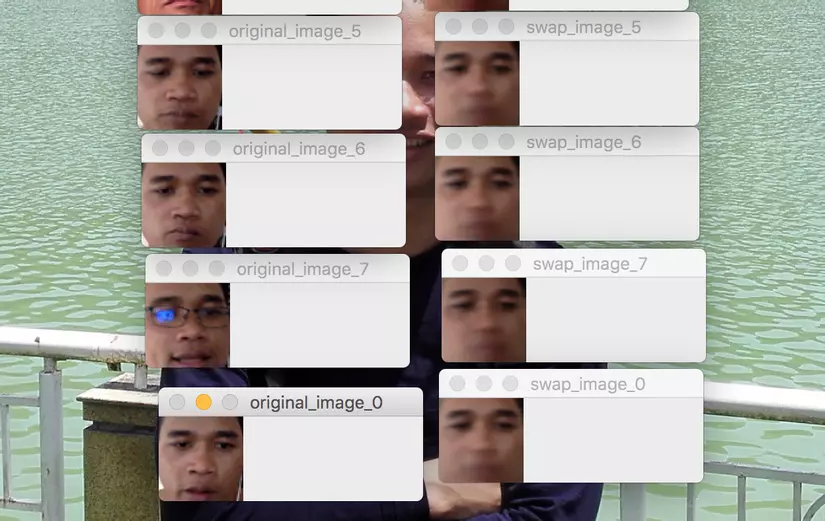
It's swapped. However, it seems yet close to real face. This can be improve with more epochs or do some parameters turning which I cannot do it on my machine due to my machine is small.
Resources
- source code
- https://keras.io/
- https://blog.keras.io/building-autoencoders-in-keras.html
- https://www.kaggle.com/zxql2015/1-autoencoder-with-keras
- https://github.com/llSourcell/deepfakes
- https://www.youtube.com/watch?v=7XchCsYtYMQ&feature=youtu.be
- https://en.wikipedia.org/wiki/Autoencoder
- https://www.quora.com/What-is-an-auto-encoder-in-machine-learning
- https://towardsdatascience.com/autoencoders-are-essential-in-deep-neural-nets-f0365b2d1d7c
Summaries
We just finished building a faceswap from scratch. Where we talk about the method we use to build the model, the tool and especially algorithm we use which is one of the most powerful deep learning algorithm nowadays. Then we init train and test the model. However, the result is yet like a real face. So now, it's your turn to improve the model.
That's it! If you have suggestions for more topics to be covered in this post (or in future posts), you can leave a comment below.

All rights reserved
