Custom collectionview giống với excel
Bài đăng này đã không được cập nhật trong 4 năm
1. Cách giải quyết bài toán
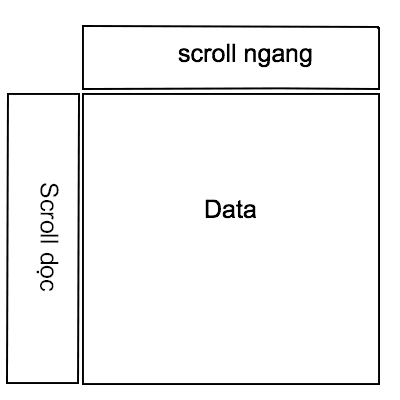
Nếu chỉ dùng 1 collectionview để custom thì sẽ khó thực hiện được, do đó chúng ta sẽ sử dụng 3 collectionview để làm:
- 1 collectionview ở top scroll ngang gọi là column collectionview,
- 1 collectionview bên trái scroll dọc gọi là row collectionview,
- 1 collectionview ở giữa làm nhiệm vụ hiển thị dữ liệu và scroll ngang dọc bình thường gọi là data collection view.

2. CollectionView layout
2.1 Column collectionview
Chúng ta sẽ tạo 1 class có tên ColumnCollectionViewLayout kế thừa từ UICollectionViewLayout
class ColumnCollectionViewLayout: UICollectionViewLayout {
}
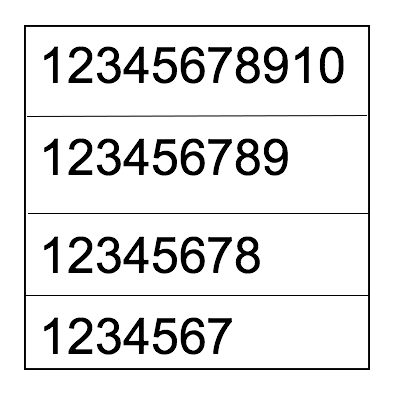
 vì dữ liệu ở cột không phải lúc nào cũng giống nhau, có hàng thì dữ liệu ít, có hàng dữ liệu lại nhiều do đó khi tạo collectionview column chúng ta phải tính toán độ dài của từng column trước.
Trước tiên ta sẽ tạo 1 function collection view layout, từ độ dài của mỗi trường data chúng ta đã tính toán sẵn ta có thể tính đc layoutattribute cho mỗi 1 cell data.
func createLayout() -> [UICollectionViewLayoutAttributes] {
    var attributesArr = [UICollectionViewLayoutAttributes]()

    var xOffSet: CGFloat = 0.0
    var yOffSet: CGFloat = 0.0

    var rowWidth: CGFloat = 300.0
    let headerHeight: CGFloat = 60.0


    let topSapce: CGFloat = 0.0
    let widthSpace: CGFloat = 0.0

    var column = 0

    for currentIndex in 0..<numberRows {
        column += 1

        rowWidth = columnSizes[column - 1]

        let indexPath = IndexPath(item: currentIndex, section: 0)
        let attribute = UICollectionViewLayoutAttributes(forCellWith: indexPath)

        let attributeHeight = headerHeight

        attribute.frame = CGRect(x: xOffSet, y: yOffSet, width: rowWidth, height: attributeHeight)
        attributesArr.append(attribute)

        xOffSet += widthSpace + rowWidth

        if column == columnCount {
            column = 0

            contentWitdth = (xOffSet > contentWitdth) ? xOffSet : contentWitdth
            contentHeight = (yOffSet > contentHeight) ? yOffSet : contentHeight

            xOffSet = 0
            yOffSet += attributeHeight + topSapce
        }
    }

    return attributesArr
}
Tiếp đó chúng ta override 2 hàm layoutAttributesForElements(in rect:) và collectionViewContentSize để trả về dữ liệu layout attribute đã tính toán được và contentsize của collection view
override func layoutAttributesForElements(in rect: CGRect) -> [UICollectionViewLayoutAttributes]? {
    return layoutAttributes
}

override var collectionViewContentSize : CGSize {
    return CGSize(width: contentWitdth , height: contentHeight )
}
2.2 Row collectionview:
Tương tự column collection view chúng ta cũng sẽ tạo 1 class RowCollectionViewLayout kế thừa từ UICollectionViewLayout
class RowCollectionViewLayout: UICollectionViewLayout {
}
Chúng ta cũng tính toán tương tự ColumnCollectionViewLayout nhưng sẽ đơn giản hơn
func createLayout() -> [UICollectionViewLayoutAttributes] {
    var attributesArr = [UICollectionViewLayoutAttributes]()

    let xOffSet: CGFloat = 0.0
    var yOffSet: CGFloat = 0.0

    let rowWidth: CGFloat = 80.0
    let rowHeight: CGFloat = 40.0

    let topSapce: CGFloat = 0.0

    for currentIndex in 0..<numberRows {

        let indexPath = IndexPath(item: currentIndex, section: 0)
        let attribute = UICollectionViewLayoutAttributes(forCellWith: indexPath)

        attribute.frame = CGRect(x: xOffSet, y: yOffSet, width: rowWidth, height: rowHeight)
        attributesArr.append(attribute)


        contentHeight = (yOffSet > contentHeight) ? yOffSet : contentHeight

        yOffSet += rowHeight + topSapce
    }

    contentWitdth = rowWidth

    return attributesArr
}
2.3 Data collectionview:
Data collection view sẽ là collection view hiển chính hiển thị dữ liệu của chúng ta, nó có thể scroll dọc, ngang hoặc hỗn hợp. Chúng ta cũng tạo 1 class DataCollectionViewLayout đễ tính toán layout attribute cho data collection
class DataCollectionViewLayout: UICollectionViewLayout {
}
Việc tính toán layout attribute ở data collectionview có phần phức tạp hơn là vì không như column hay row nó chỉ có chiều ngang hoặc dọc, ở data collection view dữ liệu là rất nhiều. Nếu số cột là m và số hàng là n, giả sử chúng ta bắt đầu từ cell 0 (đầu tiên) thì cell cuối cùng sẽ là cell m bắt đầu sang cell thứ m + 1 chúng ta sẽ phải xuống 1 dòng mới, chúng ta sẽ phải tăng row lên 1 và gán column về 0 để bắt đầu lại từ vị trí 0.
func createLayout() -> [UICollectionViewLayoutAttributes] {
    var attributesArr = [UICollectionViewLayoutAttributes]()

    var xOffSet: CGFloat = 0.0
    var yOffSet: CGFloat = 0.0

    let rowHeight: CGFloat = 40.0
    var rowWidth: CGFloat = 300.0

    let topSapce: CGFloat = 0.0
    let bottomSpace: CGFloat = 0.0
    let widthSpace: CGFloat = 0.0

    var column = 0
    var row = 0

    for currentIndex in 0..<numberRows {
        column += 1

        rowWidth = columnSizes[column - 1]

        let indexPath = IndexPath(item: currentIndex, section: 0)
        let attribute = UICollectionViewLayoutAttributes(forCellWith: indexPath)

        let attributeHeight = rowHeight

        attribute.frame = CGRect(x: xOffSet, y: yOffSet, width: rowWidth, height: attributeHeight)
        attributesArr.append(attribute)

        xOffSet += widthSpace + rowWidth

        // neu den cot cuoi cung thi reset
        if column == columnCount {
            // tro ve cot dau tien
            column = 0

            // tang row len 1
            row += 1

            yOffSet += attributeHeight + topSapce

            contentWitdth = (xOffSet > contentWitdth) ? xOffSet : contentWitdth
            contentHeight = (yOffSet > contentHeight) ? yOffSet : contentHeight

            xOffSet = 0
        }
    }

    contentHeight += bottomSpace

    return attributesArr
}
3. Đưa 3 collectionview vào viewcontroller:
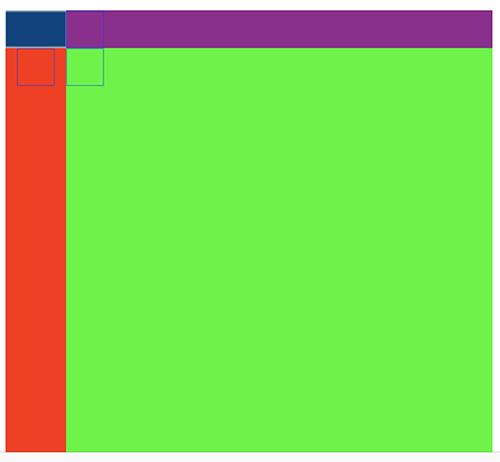
Trước tiên trong file storyboard chúng ta sẽ tiến hành kéo 3 collectionview vào như hình dưới
 Trong đó:
- Màu tím là column collectionview
- Màu đỏ là row collectionview
- Màu xanh lá cây là data collectionview
Tiếp đó trong viewcontroller chúng ta tạo 3 file layout cho từng collectionview và gán nó vào từng collectionview
let columnCollectionViewLayout = ColumnCollectionViewLayout()
let rowCollectionViewLayout = RowCollectionViewLayout()
let dataCollectionViewlayout = DataCollectionViewLayout()

columnCollectionView.collectionViewLayout = columnCollectionViewLayout
rowCollectionView.collectionViewLayout = rowCollectionViewLayout
dataCollectionView.collectionViewLayout = dataCollectionViewlayout
Để khi chúng ta scroll column collectionview thì data collectionview cũng scroll theo, hoặc scroll rowcollectionView data collectionview cũng scroll, chúng ta sẽ override function scrollViewDidScroll(_ scrollView:)
func scrollViewDidScroll(_ scrollView: UIScrollView) {
    let contentOffset = scrollView.contentOffset

    if scrollView == dataCollectionView {
        rowCollectionView.contentOffset.x = contentOffset.x
        columnCollectionView.contentOffset.y = contentOffset.y
    } else if scrollView == rowCollectionView {
        dataCollectionView.contentOffset.x = contentOffset.x
    } else if scrollView == columnCollectionView {
        dataCollectionView.contentOffset.y = contentOffset.y
    }
}
Nhờ function khi chúng ta scroll bất kỳ collection view thì 1 trong 2 collectionview còn lại cũng được scroll theo
3.1 Tính toán độ rộng của từng column data:
Như phần trên ta đã nói, vì độ rộng từng column là không giống nhau nên chúng ta sẽ phải tính toán độ rộng column size ở viewcontroller, nguyên tắc tính toán là chúng ta sẽ duyệt mảng data từ trên xuống dưới.
private func calculateColumnSize(_ values: [String], columnCount: Int) -> [CGFloat] {
    var columnIndex = 0
    var columnSizes = [CGFloat]()
    let marginLeft: CGFloat = 10.0
    let marginRigh: CGFloat = 10.0

    for i in 0..<values.count {
        let value = values[i]
        let label = UILabel()
        label.font = UIFont.hiraKakuProW3Size(16.0)
        label.numberOfLines = 0
        label.text = value
        label.sizeToFit()
        // tinh do dai cua chuoi ky tu
        let textSize = label.frame.width + marginLeft + marginRigh

        if columnSizes.count < columnCount {
            columnSizes.append(textSize)
        } else {
            let oldSize = columnSizes[columnIndex]

            if textSize > oldSize {
                columnSizes[columnIndex] = textSize
            }
        }

        columnIndex += 1

        if columnIndex == columnCount {
            columnIndex = 0
        }
    }

    return columnSizes
}
3.2 Kết quả

All rights reserved