Clean Architecture Kotlin Android
Bài đăng này đã không được cập nhật trong 5 năm
Introduction to Clean Architecture
When writing good quality code for complex applications, a considerable amount of effort and experience is required. One should not only satisfy customer's requirements and specifications but must build the application with scalabilty, flexibility, testabilty and maintainability in mind. All this will result in a stable robust and successful project if well put together.
There are many Architecture one could use to archieve this but in this particular case we will be adopting the Clean Architecture in conjuction with Mvp (Model View Presenter) in order to get you started in the most easiest way possible without complicating things too much. At least i will try. If you have no prior experience with the Mvp pattern please refer my previous tutorial at this link to get started.
What is Clean Architecture?
Clean Architecture concept was first introduced by Robert C. Martin, also known as Uncle Bob in 2012. It purpose was to combine a group of best practices that produce systems with the following characteristics:
- Testable: The business rules can be tested without the UI, Database, Web Server, or any other external element.
- UI-independent: The UI can be easily modified without changing the system.
- Independent of Frameworks: The architecture does not depend on the existence of some library of feature laden software. This allows you to use such frameworks as tools, rather than having to cram your system into their limited constraints.
- Independent of Database: You can replace Oracle or SQL Server, for Mongo, BigTable, CouchDB, or any other database. Your business rules are not bound to the database.
- Independent of any external agency: As a matter of fact, your business logic simply doesn’t know anything about the outside world.
Clean Arc Diagram
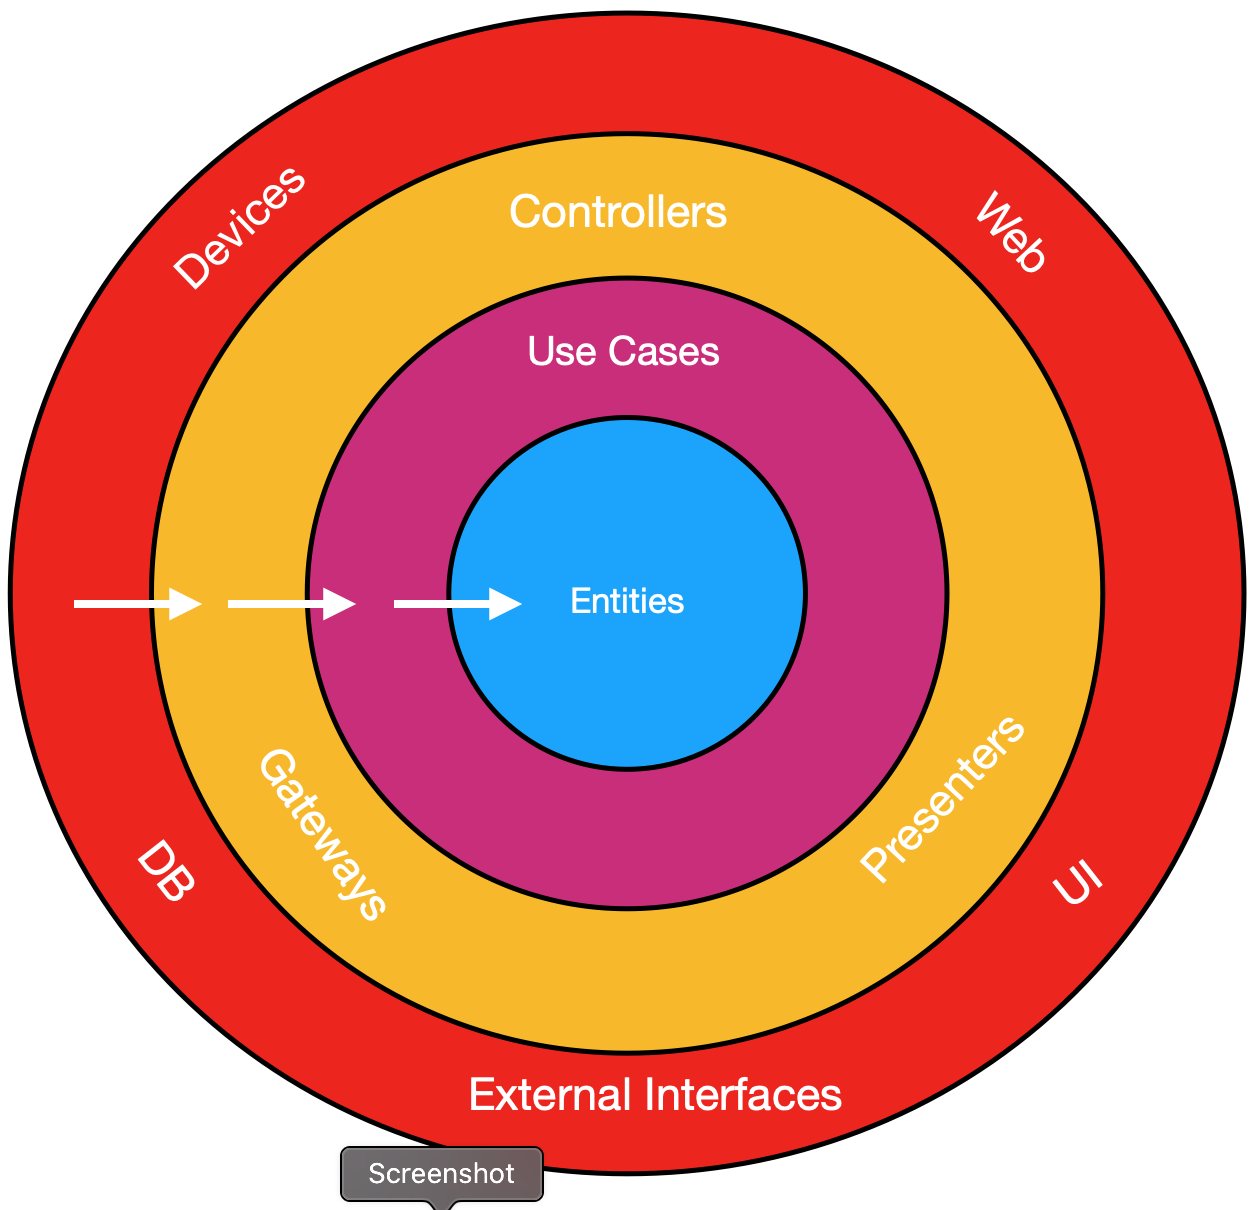
- Entities: They are the business objects of the application. These should not be affected by any external change to them, and these should be the most stable code within the application. These can be POJOs, objects with methods, or even data structures.
- Use Cases: Implement and encapsulate all of the business rules. These use cases orchestrate the flow of data to and from the entities, and direct those entities to use their enterprise wide business rules to achieve the goals of the use case.
- Interface Adapters: Convert and present data to the use case and entity layers to the format most convenient for some external agency such as the Database or the Web. It is this layer, for example, that will wholly contain the MVC architecture of a GUI. The Presenters, Views, and Controllers all belong in here. The models are likely just data structures that are passed from the controllers to the use cases, and then back from the use cases to the presenters and views.
- Frameworks and Drivers: Contain any frameworks or tools you need to run your application. Its the outermost layer and it is generally composed of frameworks and tools such as the Database, the Web Framework, etc. Generally you don’t write much code in this layer other than glue code that communicates to the next circle inwards.
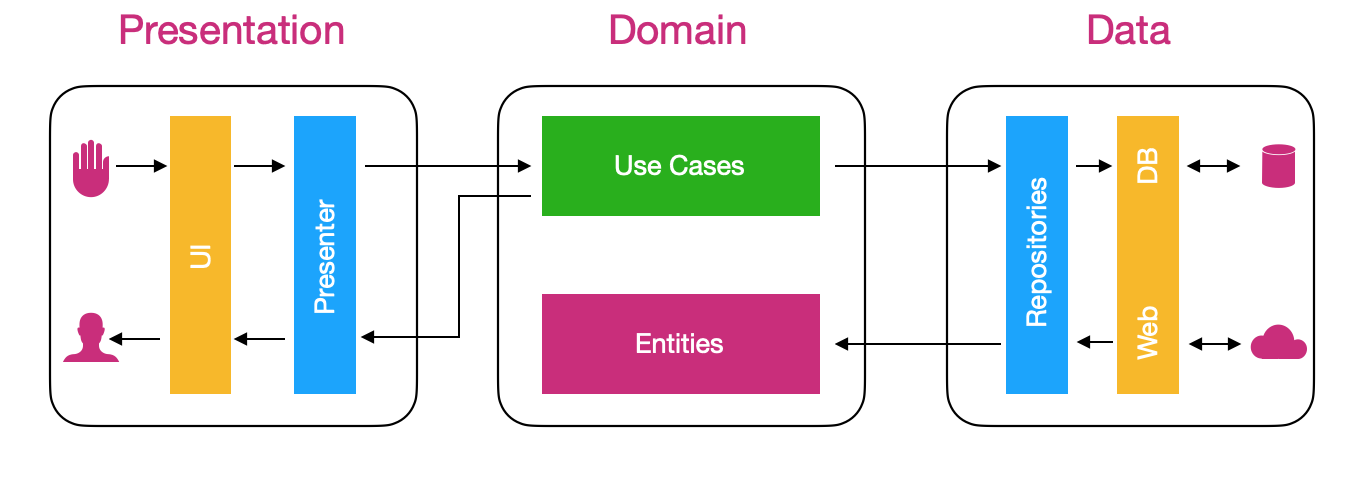
The Dependency Rule
This is the overriding rule that makes Clean Architecture work. It says that nothing in an inner circle should depend on anything in an outer circle. In particular, application and business rules shouldn’t depend on the UI, database, presenters, and so on. In particular, the name of something declared in an outer circle must not be mentioned by the code in the an inner circle. That includes, functions, classes. variables, or any other named software entity. These rules allow us to build systems that are simpler to maintain, as changes in outer circles won’t impact inner ones.
The concentric circles represent different areas of software. In general, the further in you go, the higher level the software becomes. The outer circles are mechanisms. The inner circles are policies. In short, we don’t want anything in an outer circle to impact the inner circles.
Demo Project
This project will introduce you to how you can use Clean Arc combined with Mvp without further complicating things to make it easy for you to understand. I will make a simple Memo app using Kotlin and perhaps a sqllite based database. The point of this demo is to show you the basic structure of your app packages and clean arc while also demostrating how once can apply Mvp. Enough talk! Let's begin.
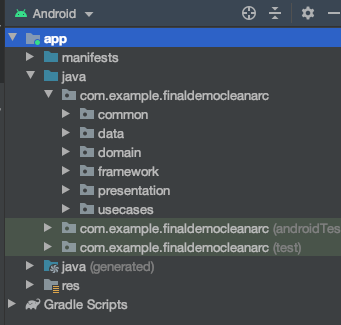
I believe the first step one needs to take is creating our seperate packages. We will add data, domain, presentation and common packages so the project structure looks like below:
Next lets add the necessary libraries to gradle file.
build.gradle
apply plugin: 'kotlin-kapt'

android {
........
}
implementation 'androidx.recyclerview:recyclerview:1.1.0'
implementation 'org.jetbrains.kotlinx:kotlinx-coroutines-android:1.3.3'

def room_version = "2.2.5"
implementation "androidx.room:room-ktx:$room_version"
implementation "androidx.room:room-runtime:$room_version"
api "androidx.room:room-runtime:$room_version"
kapt "androidx.room:room-compiler:$room_version"
All we have done here is added support for room library, Coroutines and recycler view support.
Now we will start by creating the inner most model which is Memo.kt in domain package.
Memo.kt
//Change to your package. We will add the Memo in data after
import com.example.finaldemocleanarc.data.db.model.Memo as DataMemo

data class Memo(
    var uid: Long? = null,
    var title: String,
    var content: String,
    var date: String
) {
    constructor() : this(null, "", "", "")
}

fun DataMemo.toPresentationModel(): Memo = Memo(
    uid, title, content, date
)
Next in data package, add more package in this heirachy:
[data]
 [db]
      [dao]
           [model]
Next we will create the Memo.kt inside the model package. This model will define our database table properties.
Memo.kt
import androidx.room.ColumnInfo
import androidx.room.Entity
import androidx.room.PrimaryKey

@Entity(tableName = "memo_items")
data class Memo(
    @PrimaryKey(autoGenerate = true)
    var uid: Long? = null,
    @ColumnInfo(name = "title")
    var title: String,
    @ColumnInfo(name = "content")
    var content: String,
    @ColumnInfo(name = "date")
    var date: String
) {
    constructor() : this(null, "", "", "")
}
Next we will create the MemoDao class in the "dao" package.
MemoDao.kt
import androidx.room.Dao
import androidx.room.Delete
import androidx.room.Insert
import androidx.room.Query

@Dao
interface MemoDao {
    @Query("SELECT * FROM memo_items")
    fun getAll(): List<Memo>

    @Query("SELECT * FROM memo_items WHERE uid IN (:id)")
    fun loadAllByIds(id: IntArray): List<Memo>

    @Query("SELECT * FROM memo_items WHERE title LIKE :title LIMIT 1")
    fun findByTitle(title: String): Memo

    @Insert
    fun insertMemo(vararg memo: Memo)

    @Delete
    fun delete(contact: Memo)
}
The MemoDao simple holds our CRUD methods for Room. Nexr we will create the AppDatabase class inside the "db" folder.
AppDatabase.kt
import android.content.Context
import androidx.room.Database
import androidx.room.Room
import androidx.room.RoomDatabase
import com.example.finaldemocleanarc.data.db.dao.MemoDao
import com.example.finaldemocleanarc.data.db.model.Memo

@Database(entities = [Memo::class], version = 1)
abstract class AppDatabase : RoomDatabase() {
    abstract fun memoDao(): MemoDao

    companion object {
        @Volatile private var instance: AppDatabase? = null
        private val LOCK = Any()

        operator fun invoke(context: Context)= instance ?: synchronized(LOCK){
            instance ?: buildDatabase(context).also { instance = it}
        }

        private fun buildDatabase(context: Context) = Room.databaseBuilder(context,
            AppDatabase::class.java, "memo_db")
            .allowMainThreadQueries()
            .build()
    }
}
Next we will create MemoRepository in "data" package. This class will be responsible for getting our data from the database and saving the memos. We will inject the Appdatabase.
MemoRepository.kt
class MemosRepository(
    private val memoPersistenceSource: MemoPersistenceSource, private val appDatabase: AppDatabase
) {
    var list = arrayListOf<Memo>()
    fun getSavedMemos(): List<Memo> {
        list.clear()
        list.addAll(appDatabase.memoDao().getAll())
        return list
    }

    fun addNewMemo(memo: Memo): List<Memo> {
        appDatabase.memoDao().insertMemo(memo)
        memoPersistenceSource.saveNewMemo(memo)
        return getSavedMemos()
    }
}

interface MemoPersistenceSource {
    fun getPersistedMemos(): List<Memo> {
        return emptyList()
    }

    fun saveNewMemo(memo: Memo)
}
Next in the framework package we will add a MemoSource class. This class will be the intermediary between our presentation and data.
MemoSource.kt
class MemoSource : MemoPersistenceSource {
    private var memos: List<Memo> = arrayListOf()
    override fun getPersistedMemos(): List<Memo> = memos
    override fun saveNewMemo(memo: Memo) {
        memos = memos + memo
    }
}
The MemoSource inherits the MemoPersistenceSource interface from MemosRepository.
Now we will create the usecases. We already established that we will only need two usecase. Firstly "AddNewMemo" and secondly "GetMemos". So now in the usecases package we will add 2 classes AddNewMemo.kt and GetMemos.kt
AddNewMemo.kt
import com.example.finaldemocleanarc.data.MemosRepository
import com.example.finaldemocleanarc.data.db.model.Memo

class AddNewMemo(private val memosRepository: MemosRepository) {
    operator fun invoke(memo: Memo): List<Memo> = memosRepository.addNewMemo(memo)
}
GetMemos.kt
import com.example.finaldemocleanarc.data.MemosRepository
import com.example.finaldemocleanarc.data.db.model.Memo

class GetMemos(private val memosRepository: MemosRepository) {
    operator fun invoke(): List<Memo> = memosRepository.getSavedMemos()
}
Next we will update our layouts. Add a recyclerview to activity_main, create item_memo.xml and so on. First lets create a layout resource file item_memo.xml
item_memo.xml
<?xml version="1.0" encoding="utf-8"?>
<LinearLayout xmlns:android="http://schemas.android.com/apk/res/android"
    xmlns:app="http://schemas.android.com/apk/res-auto"
    xmlns:tools="http://schemas.android.com/tools"
    android:layout_width="match_parent"
    android:layout_height="wrap_content"
    android:orientation="horizontal"
    android:gravity="center_vertical"
    android:layout_margin="10dp"
    android:padding="5dp">

    <ImageView
        android:id="@+id/imageView"
        android:layout_width="50dp"
        android:layout_height="50dp"
        android:layout_marginEnd="10dp"
        android:scaleType="fitXY"
        android:layout_gravity="top"
        app:srcCompat="@drawable/ic_memo" />

    <LinearLayout
        android:layout_width="0dp"
        android:layout_height="wrap_content"
        android:layout_weight="1"
        android:gravity="center_vertical"
        android:background="@drawable/bg_memo"
        android:paddingStart="5dp"
        android:paddingEnd="5dp"
        android:paddingBottom="5dp"
        android:orientation="vertical">

        <TextView
            android:id="@+id/title"
            android:layout_width="match_parent"
            android:layout_height="wrap_content"
            android:layout_marginStart="8dp"
            android:layout_marginEnd="8dp"
            android:textColor="@android:color/white"
            android:textSize="16sp"
            tools:text="some text..." />

        <TextView
            android:id="@+id/contents"
            android:layout_width="match_parent"
            android:layout_height="wrap_content"
            android:layout_marginStart="8dp"
            android:layout_marginEnd="8dp"
            android:textColor="@android:color/white"
            android:textSize="14sp"
            tools:text="some text..." />

        <TextView
            android:id="@+id/messageDate"
            android:layout_width="wrap_content"
            android:layout_height="wrap_content"
            android:layout_marginStart="8dp"
            android:layout_marginEnd="8dp"
            android:textSize="12sp"
            android:textColor="@android:color/darker_gray"
            tools:text="28/09/2018" />

    </LinearLayout>
</LinearLayout>
Next lets update the strings, styles and colors resource files.
colors.xml
<?xml version="1.0" encoding="utf-8"?>
<resources>
    <color name="colorPrimary">#E91E63</color>
    <color name="colorPrimaryDark">#880E4F</color>
    <color name="colorAccent">#AD1457</color>
    <color name="colorGreen">#0091EA</color>
</resources>
strings.xml
<resources>
    <string name="title">Title</string>
    <string name="Memo">Memo</string>
    <string name="action_new">New</string>
    <string name="new_memo">New Memo</string>
    <string name="save">Save</string>
    <string name="cancel">Cancel</string>
</resources>
styles.xml
<resources>
    <!-- Base application theme. -->
    <style name="AppTheme" parent="Theme.AppCompat.Light.NoActionBar">
        <!-- Customize your theme here. -->
        <item name="colorPrimary">@color/colorPrimary</item>
        <item name="colorPrimaryDark">@color/colorPrimaryDark</item>
        <item name="colorAccent">@color/colorAccent</item>
    </style>
</resources>
All we have changed here is to make our app full screen. We will create a custom toolbar later and make use of it instead of the default.
toolbar.xml
<?xml version="1.0" encoding="utf-8"?>
<androidx.appcompat.widget.Toolbar xmlns:android="http://schemas.android.com/apk/res/android"
    android:layout_width="match_parent"
    android:layout_height="wrap_content"
    xmlns:app="http://schemas.android.com/apk/res-auto"
    app:titleTextColor="@android:color/white"
    android:background="@color/colorPrimary"
    android:elevation="4dp" />
activity_main.xml
<?xml version="1.0" encoding="utf-8"?>
<LinearLayout xmlns:android="http://schemas.android.com/apk/res/android"
    xmlns:tools="http://schemas.android.com/tools"
    android:layout_width="match_parent"
    android:layout_height="match_parent"
    xmlns:app="http://schemas.android.com/apk/res-auto"
    android:orientation="vertical"
    android:background="@android:color/white"
    tools:context=".presentation.ui.MainActivity">

    <include
        android:id="@+id/toolbar"
        layout="@layout/toolbar" />

    <androidx.recyclerview.widget.RecyclerView
        android:id="@+id/recycler"
        android:layout_width="match_parent"
        android:layout_height="0dp"
        android:layout_weight="1"
        app:layoutManager="androidx.recyclerview.widget.LinearLayoutManager"
        tools:listitem="@layout/item_memo"/>

</LinearLayout>
Next add a menu resource file. We will add an icon for add new memo to the toolbar using this menu. You can add menu directory to the res and inside menu add the menu_main.xml
menu_main.xml
<?xml version="1.0" encoding="utf-8"?>
<menu
    xmlns:android="http://schemas.android.com/apk/res/android"
    xmlns:app="http://schemas.android.com/apk/res-auto"
    xmlns:tools="http://schemas.android.com/tools"
    tools:context=".MainActivity">
    <item
        android:id="@+id/action_new"
        android:orderInCategory="100"
        android:title="@string/action_new"
        android:icon="@android:drawable/ic_menu_add"
        app:showAsAction="ifRoom" />
</menu>
Next add this images to your drawable folder.

Next in the common package we will add two packages extensions and utils. In the extensions package we will add a ViewExtension.kt class.
ViewExtension.kt
import android.view.LayoutInflater
import android.view.View
import android.view.ViewGroup
import androidx.annotation.LayoutRes

fun ViewGroup.inflate(@LayoutRes layoutRes: Int): View =
    LayoutInflater.from(context).inflate(layoutRes, this, false)
Next lets create a DateUtils class in utils . Will be used to format our memo created date.
DateUtils.kt
import java.text.SimpleDateFormat
import java.util.*

open class DateUtils {
    open fun formatDate(date: Date): String {
        val pattern = "yyyy-MM-dd HH:mm"
        val simpleDateFormat = SimpleDateFormat(pattern, Locale.getDefault())
        return simpleDateFormat.format(date)
    }
}
Ok now lets move into the presentation package and add 3 packages adapter, presenter and ui (which can also be view). In the adapter package we will add MemoAdapter class.
MemoAdapter.kt
import androidx.recyclerview.widget.RecyclerView
import android.view.View
import android.view.ViewGroup
import com.example.finaldemocleanarc.R
import com.example.finaldemocleanarc.common.extensions.inflate
import com.example.finaldemocleanarc.domain.Memo
import kotlinx.android.extensions.LayoutContainer
import kotlinx.android.synthetic.main.item_memo.view.*
import kotlin.properties.Delegates

class MemoAdapter : RecyclerView.Adapter<MemoAdapter.ViewHolder>() {

    var items: List<Memo> by Delegates.observable(emptyList()) { _, _, _ -> notifyDataSetChanged() }

    override fun onCreateViewHolder(parent: ViewGroup, viewType: Int): ViewHolder =
        ViewHolder(parent.inflate(R.layout.item_memo))

    override fun onBindViewHolder(holder: ViewHolder, position: Int) {
        holder.bind(items[position])
    }

    override fun getItemCount(): Int = items.size

    class ViewHolder(override val containerView: View) : RecyclerView.ViewHolder(containerView),
        LayoutContainer {

        fun bind(memo: Memo) {
            with(memo) {
                itemView.title.text = title
                itemView.contents.text = content
                itemView.messageDate.text = date
            }
        }
    }
}
Next in the presenter package we will add our MainPresenter class for MainActivity.
MainPresenter.kt
import com.example.finaldemocleanarc.domain.Memo
import com.example.finaldemocleanarc.domain.toPresentationModel
import com.example.finaldemocleanarc.usecases.GetMemos
import com.example.finaldemocleanarc.usecases.AddNewMemo
import kotlinx.coroutines.Dispatchers
import kotlinx.coroutines.GlobalScope
import kotlinx.coroutines.launch
import kotlinx.coroutines.withContext
import com.example.finaldemocleanarc.data.db.model.Memo as DomainMemo

class MainPresenter(
    private var view: View?,
    private val getMemos: GetMemos,
    private val addNewMemo: AddNewMemo
) {
    interface View {
        fun renderMemos(memos: List<Memo>)
    }

    fun onCreate() = GlobalScope.launch(Dispatchers.Main) {
        val locations = withContext(Dispatchers.IO) { getMemos() }
        view?.renderMemos(locations.map(DomainMemo::toPresentationModel))
    }

    fun sendClicked(memo: Memo) = GlobalScope.launch(Dispatchers.Main) {
        val locations = withContext(Dispatchers.IO) {
            addNewMemo(
                com.example.finaldemocleanarc.data.db.model.Memo(
                    memo.uid,
                    memo.title,
                    memo.content,
                    memo.date
                )
            )
        }
        view?.renderMemos(locations.map(DomainMemo::toPresentationModel))
    }

    fun onDestroy() {
        view = null
    }
}
Now in the ui package we have to add our injector class and also move the MainActivity class to this package.
Injector.kt
import android.app.Activity
import com.example.finaldemocleanarc.data.MemosRepository
import com.example.finaldemocleanarc.data.db.AppDatabase
import com.example.finaldemocleanarc.framework.MemoSource
import com.example.finaldemocleanarc.presentation.presenter.MainPresenter
import com.example.finaldemocleanarc.usecases.GetMemos
import com.example.finaldemocleanarc.usecases.AddNewMemo

class Injector(activity: Activity) {

    var db = AppDatabase.invoke(activity)
    private val memoSource = MemoSource()
    private val memosRepository = MemosRepository(memoSource, db)

    fun providePresenter(view: MainActivity): MainPresenter {
        return MainPresenter(
            view,
            GetMemos(memosRepository),
            AddNewMemo(memosRepository)
        )
    }
}
Its ok if the view from MainActivity shows error, its because we havent extented the MainPresenter from the MainActivity yet. Before we update the MainActivity class i have decided to add memo using a dialog. It will contain 2 EditText and 2 buttons for save and cancel. Lets create the custom layout resource file.
dialog_memo.xml
<?xml version="1.0" encoding="utf-8"?>
<LinearLayout xmlns:android="http://schemas.android.com/apk/res/android"
    android:layout_width="match_parent"
    android:layout_height="match_parent"
    xmlns:tools="http://schemas.android.com/tools"
    android:orientation="vertical"
    tools:context=".presentation.ui.MainActivity">

    <TextView
        android:layout_width="match_parent"
        android:layout_height="wrap_content"
        android:text="@string/new_memo"
        android:gravity="center"
        android:background="@color/colorAccent"
        android:textColor="@android:color/white"
        android:textSize="18sp"
        android:padding="20dp" />

    <EditText
        android:id="@+id/edtTitle"
        android:layout_width="match_parent"
        android:layout_height="wrap_content"
        android:inputType="textCapCharacters"
        android:layout_margin="10dp"
        android:hint="@string/title" />

    <EditText
        android:id="@+id/edtContent"
        android:layout_width="match_parent"
        android:layout_height="100dp"
        android:inputType="textMultiLine"
        android:gravity="top"
        android:layout_margin="10dp"
        android:hint="@string/Memo" />

    <LinearLayout
        android:layout_width="match_parent"
        android:layout_height="wrap_content"
        android:orientation="horizontal"
        android:weightSum="2">

        <Button
            android:id="@+id/btnCancel"
            android:layout_width="wrap_content"
            android:layout_height="wrap_content"
            android:text="@string/cancel"
            android:layout_weight="1"
            android:textColor="@color/colorAccent"
            android:background="@android:color/transparent"
            android:layout_margin="10dp"
            android:gravity="center"
            android:layout_gravity="center" />

        <Button
            android:id="@+id/btnSave"
            android:layout_width="wrap_content"
            android:layout_height="wrap_content"
            android:layout_weight="1"
            android:text="@string/save"
            android:textColor="@color/colorGreen"
            android:background="@android:color/transparent"
            android:layout_margin="10dp"
            android:gravity="center"
            android:layout_gravity="center" />
    </LinearLayout>
</LinearLayout>
One text for title and the other for memo content. Date will be auto generated when user clicks save. Now to the MainActivity class.
MainActivity.kt
import android.content.Context
import android.os.Bundle
import android.view.*
import android.view.inputmethod.InputMethodManager
import androidx.appcompat.app.AlertDialog
import androidx.appcompat.app.AppCompatActivity
import androidx.appcompat.widget.Toolbar
import com.example.finaldemocleanarc.R
import com.example.finaldemocleanarc.common.DateUtils
import com.example.finaldemocleanarc.domain.Memo
import com.example.finaldemocleanarc.presentation.adapter.MemoAdapter
import com.example.finaldemocleanarc.presentation.presenter.MainPresenter
import kotlinx.android.synthetic.main.activity_main.*
import kotlinx.android.synthetic.main.dialog_memo.view.*
import java.util.*

class MainActivity : AppCompatActivity(), MainPresenter.View {

    private lateinit var presenter: MainPresenter
    private val memoAdapter = MemoAdapter()

    private fun setPresenter(injector: Injector): AppCompatActivity {
        presenter = injector.providePresenter(this)
        return this
    }

    override fun onCreate(savedInstanceState: Bundle?) {
        super.onCreate(savedInstanceState)
        setContentView(R.layout.activity_main)

        setSupportActionBar(toolbar as Toolbar?)
        supportActionBar?.title = getString(R.string.Memo)
        setPresenter(Injector(this))
        recycler.adapter = memoAdapter
        presenter.onCreate()
    }

    override fun onCreateOptionsMenu(menu: Menu?): Boolean {
        menuInflater.inflate(R.menu.menu_main, menu)
        return true
    }

    override fun onOptionsItemSelected(item: MenuItem): Boolean {
        val id = item.itemId
        return if (id == R.id.action_new) {
            showNoteMemoDialog()
            true
        } else super.onOptionsItemSelected(item)
    }

    private fun showNoteMemoDialog() {
        val builder: AlertDialog.Builder = AlertDialog.Builder(this@MainActivity)
        val viewGroup = findViewById<ViewGroup>(R.id.content)
        val dialogView: View =
            LayoutInflater.from(applicationContext).inflate(R.layout.dialog_memo, viewGroup, false)
        builder.setView(dialogView)
        val alertDialog: AlertDialog = builder.create()
        //Focus and show keyboard
        dialogView.edtTitle.requestFocus()
        showKeyboard()

        dialogView.btnSave.setOnClickListener {
            saveMemo(dialogView.edtTitle.text.toString(), dialogView.edtContent.text.toString())
            closeKeyboard()
            alertDialog.dismiss()
        }

        dialogView.btnCancel.setOnClickListener {
            closeKeyboard()
            alertDialog.dismiss()
        }

        alertDialog.setCanceledOnTouchOutside(false)
        alertDialog.show()
    }

    private fun saveMemo(title: String, content: String) {
        val memo = Memo(
            title = title,
            content = content,
            date = DateUtils().formatDate(Date())
        )
        presenter.sendClicked(memo)
    }

    private fun showKeyboard() {
        val inputMethodManager =
            this.getSystemService(Context.INPUT_METHOD_SERVICE) as InputMethodManager
        inputMethodManager.toggleSoftInput(
            InputMethodManager.SHOW_FORCED,
            0
        )
    }

    private fun closeKeyboard() {
        val inputMethodManager =
            this.getSystemService(Context.INPUT_METHOD_SERVICE) as InputMethodManager
        inputMethodManager.toggleSoftInput(
            InputMethodManager.HIDE_IMPLICIT_ONLY,
            0
        )
    }

    override fun onDestroy() {
        presenter.onDestroy()
        super.onDestroy()
    }

    override fun renderMemos(memos: List<Memo>) {
        memoAdapter.items = memos
    }
}
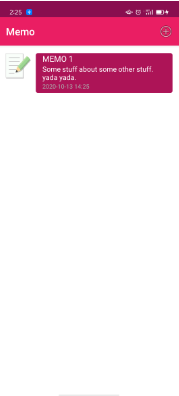
And thats it! Run the app 
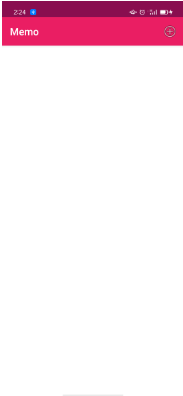
DEMO
Home
Add New
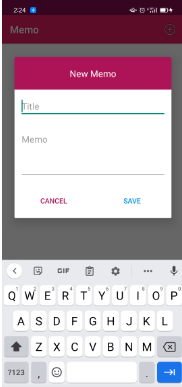
Add New 2
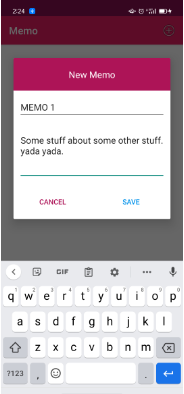
Save
All rights reserved