
Chinh phục bài toán Object Detection với Tensorflow V2 API trong 5 phút
Bài đăng này đã không được cập nhật trong 5 năm
1. Lời mở đầu
Chắc nhiều bạn đã khá quen thuộc với bài toán Object Detection với các mô hình Deep learning nổi tiếng như SIngle Shot Detector (SSD), Yolo (one-stage) hay Faster-RCNN (two-stage). Tuy nhiên để implement lại các mô hình này tương đối phức tạp, khó khăn đặc biệt với những bạn mới bắt đầu tìm hiểu về Computer Vision. Do đó hôm nay mình xin giới thiệu về phương pháp sử dụng Tensorflow API cho bài toán Object Detection được xây dựng trên bản tensorflow v2 mới được tensorflow cập nhật gần đây. Các bạn có thể xem bài hướng dẫn tương tự cho bản Tensorflow API V1 của tác giả Phạm Thị Hồng Anh hoặc bài Sử dụng Yolo V5 để detect lúa mì của tác gỉa Việt Hoàng.
Nói sơ qua về Tensorflow API, đây là một thư viện do Tensorflow cung cấp cho ta rất nhiều cách thực hiện của nhiều paper nổi tiếng trong nhiều lĩnh vực như Computer Vision, Natural Language Processing, Audio and Speech. Các bạn có thể xem link github của Tensorflow API tại đây.
2. Chuẩn bị dữ liệu cho việc huấn luyện
Việc chuẩn bị dữ liệu cho việc huấn luyện gồm các bước như sau:
- Gán nhãn cho dữ liệu
- Chia dữ liệu thành hai tập train và validate
- Tạo label map
- Chuyển dữ liệu về dạng TFRecord
- Chỉnh config của mô hình phù hợp với dữ liệu
2.1 Gán nhãn cho dữ liệu
Ở đây mình khuyên các bạn sử dụng một tool là LabelImage hỗ trợ trong việc gắn nhãn các bức ảnh. Các bạn có thể cài đặt dễ dàng cài đặt trên anaconda bằng lệnh:
pip install labelImg
Các bạn khởi động và chọn format dữ liệu là PascalVOC. Sau đó các bạn vẽ bounding box và chọn các nhãn tương ứng. Về cách sử dụng tool Labelmage này bạn có thể tham khảo tại đây. Dưới đây mình liệt kê một số thao tác quan trọng:
| Phím tắt | Ý nghĩa |
|---|---|
| Ctrl + s | Lưu |
| Ctrl + u | Load toàn bộ ảnh từ một thư mục |
| w | Vẽ bounding box |
| d | Ảnh tiếp theo |
| a | Ảnh trước |
| del | xóa bounding box |
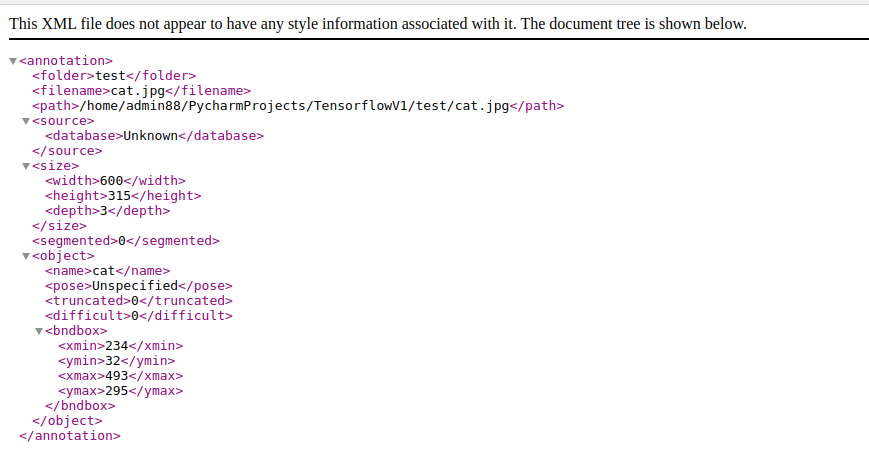
Ở bước này, mình sẽ thu được file xml chứa tọa độ của các object mà mình annotate có nội dung như sau:
2.2 Chia dữ liệu thành hai tập train và validate
""" usage: partition_dataset.py [-h] [-i IMAGEDIR] [-o OUTPUTDIR] [-r RATIO] [-x]

Partition dataset of images into training and testing sets

optional arguments:
  -h, --help            show this help message and exit
  -i IMAGEDIR, --imageDir IMAGEDIR
                        Path to the folder where the image dataset is stored. If not specified, the CWD will be used.
  -o OUTPUTDIR, --outputDir OUTPUTDIR
                        Path to the output folder where the train and test dirs should be created. Defaults to the same directory as IMAGEDIR.
  -r RATIO, --ratio RATIO
                        The ratio of the number of test images over the total number of images. The default is 0.1.
  -x, --xml             Set this flag if you want the xml annotation files to be processed and copied over.
"""
import os
import re
from shutil import copyfile
import argparse
import math
import random


def iterate_dir(source, dest, ratio, copy_xml):
    source = source.replace('\\', '/')
    dest = dest.replace('\\', '/')
    train_dir = os.path.join(dest, 'train')
    test_dir = os.path.join(dest, 'test')

    if not os.path.exists(train_dir):
        os.makedirs(train_dir)
    if not os.path.exists(test_dir):
        os.makedirs(test_dir)

    images = [f for f in os.listdir(source)
              if re.search(r'([a-zA-Z0-9\s_\\.\-\(\):])+(.jpg|.jpeg|.png)$', f)]

    num_images = len(images)
    num_test_images = math.ceil(ratio*num_images)

    for i in range(num_test_images):
        idx = random.randint(0, len(images)-1)
        filename = images[idx]
        copyfile(os.path.join(source, filename),
                 os.path.join(test_dir, filename))
        if copy_xml:
            xml_filename = os.path.splitext(filename)[0]+'.xml'
            copyfile(os.path.join(source, xml_filename),
                     os.path.join(test_dir, xml_filename))
        images.remove(images[idx])

    for filename in images:
        copyfile(os.path.join(source, filename),
                 os.path.join(train_dir, filename))
        if copy_xml:
            xml_filename = os.path.splitext(filename)[0]+'.xml'
            copyfile(os.path.join(source, xml_filename),
                     os.path.join(train_dir, xml_filename))


def main():

    # Initiate argument parser
    parser = argparse.ArgumentParser(description="Partition dataset of images into training and testing sets", formatter_class=argparse.RawTextHelpFormatter)
    parser.add_argument(
        '-i', '--imageDir',
        help='Path to the folder where the image dataset is stored. If not specified, the CWD will be used.',
        type=str,
        default=os.getcwd()
    )
    parser.add_argument(
        '-o', '--outputDir',
        help='Path to the output folder where the train and test dirs should be created. '
             'Defaults to the same directory as IMAGEDIR.',
        type=str,
        default=None
    )
    parser.add_argument(
        '-r', '--ratio',
        help='The ratio of the number of test images over the total number of images. The default is 0.1.',
        default=0.1,
        type=float)
    parser.add_argument(
        '-x', '--xml',
        help='Set this flag if you want the xml annotation files to be processed and copied over.',
        action='store_true'
    )
    args = parser.parse_args()

    if args.outputDir is None:
        if not os.path.exists('./TrainValDataset'):
            os.makedirs('./TrainValDataset')
        args.outputDir = './TrainValDataset'

    # Now we are ready to start the iteration
    iterate_dir(args.imageDir, args.outputDir, args.ratio, args.xml)
Để toàn bộ nội dung đoạn code trên vào file partion_dataset.py và chạy dòng lệnh dưới đây, dữ liệu của bạn sẽ tự động lưu vào thư mục TrainValDataset và được chia thành hai thư mục train, test.
python partion_dataset.py -i ./Dataset/ -x -r 0.1
Trong đó
- -i : đường dẫn tới thư mục chứa dữ liệu bao gồm cả file xml và image
- -x: định dạng file label là xml
- -r: tỉ lệ hai tập train và test. Ở đây mình để là 0.1
2.3 Tạo label map
Ta định nghĩa sẵn file label_map.pbtxt phục vụ cho việc huấn luyện có format như sau:
item {
  id: 1
  name: 'cat'
}

item {
  id: 2
  name: 'dog'
}
Chú ý ID là 0 dành cho lớp background
2.4 Chuyển dữ liệu về dạng TFRecord
TFRecord là một định dạng dữ liệu giúp chúng ta dễ dàng nén lượng lớn dữ liệu về dạng file nhị phân. File nhị phân này được thiết kế để dữ liệu được lưu trữ một cách tuyến tính giúp cho tốc độ đọc dữ liệu nhanh hơn, hiệu quả hơn.
Để chuyển dữ liệu ở bước 2.3 về dạng TFRecord, ta chuyển toàn bộ nội dung code sau vào file create_tf_record.py
import os
import glob
import pandas as pd
import io
import xml.etree.ElementTree as ET
import argparse

import tensorflow
from PIL import Image
from object_detection.utils import dataset_util, label_map_util
from collections import namedtuple

tf = tensorflow.compat.v1
os.environ['TF_CPP_MIN_LOG_LEVEL'] = '2'    # Suppress TensorFlow logging (1)

# Initiate argument parser
parser = argparse.ArgumentParser(
    description="Sample TensorFlow XML-to-TFRecord converter")
parser.add_argument("-x",
                    "--xml_dir",
                    help="Path to the folder where the input .xml files are stored.",
                    type=str)
parser.add_argument("-l",
                    "--labels_path",
                    help="Path to the labels (.pbtxt) file.", type=str)
parser.add_argument("-o",
                    "--output_path",
                    help="Path of output TFRecord (.record) file.", type=str)
parser.add_argument("-i",
                    "--image_dir",
                    help="Path to the folder where the input image files are stored. "
                         "Defaults to the same directory as XML_DIR.",
                    type=str, default=None)
parser.add_argument("-c",
                    "--csv_path",
                    help="Path of output .csv file. If none provided, then no file will be "
                         "written.",
                    type=str, default=None)

args = parser.parse_args()

if args.image_dir is None:
    args.image_dir = args.xml_dir

label_map = label_map_util.load_labelmap(args.labels_path)
label_map_dict = label_map_util.get_label_map_dict(label_map)


def xml_to_csv(path):
    """Iterates through all .xml files (generated by labelImg) in a given directory and combines
    them in a single Pandas dataframe.

    Parameters:
    ----------
    path : str
        The path containing the .xml files
    Returns
    -------
    Pandas DataFrame
        The produced dataframe
    """

    xml_list = []
    for xml_file in glob.glob(path + '/*.xml'):
        tree = ET.parse(xml_file)
        root = tree.getroot()
        for member in root.findall('object'):
            # bnd box contain 4 coordinate of format [xmin, ymin, xmax, ymax]
            bndbox = member.find('bndbox')

            # if object is None, ignore
            if member.find('name') is None:
                continue

            value = (root.find('filename').text,
                     int(root.find('size')[0].text),
                     int(root.find('size')[1].text),
                     member.find('name').text,
                     int(bndbox.find('xmin').text),
                     int(bndbox.find('ymin').text),
                     int(bndbox.find('xmax').text),
                     int(bndbox.find('ymax').text)
                     )
            xml_list.append(value)
    column_name = ['filename', 'width', 'height',
                   'class', 'xmin', 'ymin', 'xmax', 'ymax']
    xml_df = pd.DataFrame(xml_list, columns=column_name)
    return xml_df


def class_text_to_int(row_label):
    return label_map_dict[row_label]


def split(df, group):
    data = namedtuple('data', ['filename', 'object'])
    gb = df.groupby(group)
    return [data(filename, gb.get_group(x)) for filename, x in zip(gb.groups.keys(), gb.groups)]


def create_tf_example(group, path):
    with tf.gfile.GFile(os.path.join(path, '{}'.format(group.filename)), 'rb') as fid:
        encoded_jpg = fid.read()
    encoded_jpg_io = io.BytesIO(encoded_jpg)
    image = Image.open(encoded_jpg_io)
    width, height = image.size

    filename = group.filename.encode('utf8')
    image_format = b'jpg'
    xmins = []
    xmaxs = []
    ymins = []
    ymaxs = []
    classes_text = []
    classes = []

    for index, row in group.object.iterrows():
        xmins.append(row['xmin'] / width)
        xmaxs.append(row['xmax'] / width)
        ymins.append(row['ymin'] / height)
        ymaxs.append(row['ymax'] / height)
        classes_text.append(row['class'].encode('utf8'))
        classes.append(class_text_to_int(row['class']))

    tf_example = tf.train.Example(features=tf.train.Features(feature={
        'image/height': dataset_util.int64_feature(height),
        'image/width': dataset_util.int64_feature(width),
        'image/filename': dataset_util.bytes_feature(filename),
        'image/source_id': dataset_util.bytes_feature(filename),
        'image/encoded': dataset_util.bytes_feature(encoded_jpg),
        'image/format': dataset_util.bytes_feature(image_format),
        'image/object/bbox/xmin': dataset_util.float_list_feature(xmins),
        'image/object/bbox/xmax': dataset_util.float_list_feature(xmaxs),
        'image/object/bbox/ymin': dataset_util.float_list_feature(ymins),
        'image/object/bbox/ymax': dataset_util.float_list_feature(ymaxs),
        'image/object/class/text': dataset_util.bytes_list_feature(classes_text),
        'image/object/class/label': dataset_util.int64_list_feature(classes),
    }))
    return tf_example


def main(_):
    writer = tf.python_io.TFRecordWriter(args.output_path)
    path = os.path.join(args.image_dir)
    examples = xml_to_csv(args.xml_dir)
    grouped = split(examples, 'filename')
    for group in grouped:
        tf_example = create_tf_example(group, path)
        writer.write(tf_example.SerializeToString())
    writer.close()
    print('Successfully created the TFRecord file: {}'.format(args.output_path))
    if args.csv_path is not None:
        examples.to_csv(args.csv_path, index=None)
        print('Successfully created the CSV file: {}'.format(args.csv_path))


if __name__ == '__main__':
    tf.app.run()
Sau đó ta chạy câu lệnh dưới đây để thực hiện việc convert dữ liệu:
# create train record
python create_tf_record.py -x ./TrainValDataset/train/ -l ./label_map.pbxt -o ./TrainValDataset/train.record

# create test record
python create_tf_record.py -x ./TrainValDataset/test/ -l ./label_map.pbtxt -o ./TrainValDataset/test.record
2.5 Chỉnh pipeline.config của mô hình phù hợp với dữ liệu
Đầu tiên ta dowload pretrained model tại model zoo của tensorflow 2. Lưu ý : các backbone là họ của resnet chỉ được hỗ trợ thực hiện classfification không hỗ trợ detection.
Ở đây mình hướng dẫn bạn một số cách để chỉnh file pipeline.config như sau:
- Chỉnh lại số num_classes định huấn luyện. Ở đây mình có 4 classes nên mình để num_classes = 4
ssd {
   num_classes: 4
   image_resizer {
   fixed_shape_resizer {
       height: 320
       width: 320
   }
}
- Chỉnh lại batch_size và thêm một số phương pháp augmentation. Ban đầu mặc định của tensorlfow api, phần augmentation chỉ có một hàm là random_image_scale, do đó để làm giàu thêm dữ liệu bạn có thêm một số hàm như dưới đây và thêm bớt phù hợp với yêu cầu bài toán.
train_config {
  batch_size: 64
  data_augmentation_options {
    random_horizontal_flip {
    }

    random_vertical_flip {
    }

    random_rotation90 {
    }

    random_adjust_brightness {
    }

    random_adjust_contrast {
    }

    random_image_scale {
    }
  }
  }
- Cuối cùng, ta cần phải chỉnh lại đường dẫn tới pretrained checkpoint cũng như đường dẫn tới nơi các file chứa dữ liệu như : train.record, test.record và label_map.pbtxt
# Chỉnh sửa đường dẫn tới file fine tune checkpoint
fine_tune_checkpoint: "./ssd_mobile_net_v2/ckpt-47"

# Chỉnh sửa đường dẫn tới file label_map, train.record và test.record
train_input_reader {
label_map_path: "./label_map.pbtxt"
tf_record_input_reader {
  input_path: "./TrainValDataset/train.record"
}
}

eval_input_reader {
label_map_path: "./label_map.pbtxt"
shuffle: false
num_epochs: 1
tf_record_input_reader {
  input_path: "./TrainValDataset/test.record"
}
}
3. Trainning
Sau khi hoàn thành tất cả các bước trong phần chuẩn bị dữ liệu, chúng ta đã sẵn sàng trong việc huấn luyện mô hình.
- Nếu bạn định train trên máy local , bạn cần cài đặt coco api cho máy tính của mình:
pip install -U cython
git clone https://github.com/cocodataset/cocoapi.git
cd cocoapi/PythonAPI
make
pip install "git+https://github.com/philferriere/cocoapi.git#egg=pycocotools&subdirectory=PythonAPI"
- Nếu bạn định train trên colab thì hoàn toàn không cần cài bất cứ thư viện nào cả. Hơn nữa, bản tensorlfow trên colab cũng được fix rất nhiều lỗi mà bản local vẫn chưa có. Do đó mình khuyến khích các bản dùng google colab để train model
Nào let's go, bắt đầu các bước để train model nào :
- Download repo của tensorflow Các bạn nên git clone cả thư mục models thay vì chỉ mỗi thư mục object detection do nó liên quan đến nhiều đường dẫn import giữa các file bên trong. Download như này nhìn hơi rắc rối do có nhiều file không liên quan bên trong nhưng giúp các bạn tránh các lỗi về sau
git clone https://github.com/tensorflow/models.git
- Cài đặt package python
cd models/research
# Compile protos.
protoc object_detection/protos/*.proto --python_out=.

# Install TensorFlow Object Detection API.
cp object_detection/packages/tf2/setup.py .
python -m pip install --use-feature=2020-resolver .

!python setup.py build
!python setup.py install
- Train model
%cd ./object_detection/
!python model_main_tf2.py --model_dir=link_to_output_trained_model --pipeline_config_path=link_to_pipeline.config
trong đó:
- model_dir: thư mục mà mô hình huấn luyện sẽ được lưu
- pipeline_config_path: đường dẫn tới file pipeline.config
Trong quá trình huấn luyện mô hình, các bạn nên thay đôi file pipeline.config để thử nghiệm nhiều tham số khác nhau để tìm được cấu hình phù hợp nhất cho dữ liệu.
4. Lưu mô hình đã huấn luyện
Để tiện cho việc sử dụng sau này, các bạn có thể chạy câu lệnh sau đây để lưu lại mô hình đã huấn luyện
python exporter_main_v2.py --input_type image_tensor --pipeline_config_path link_to_pipeline.config --trained_checkpoint_dir link_to_used_checkpoint --output_directory link_to_output_saved_model
trong đó :
- --input_type: type của input đầu vào (nên để mặc định là image_tensor)
- --pipeline_config_path: đường dẫn tới file pipeline.config
- --trained_checkpoint_dir : thư mục lưu checkpoint mà bạn định dùng cho model
- --output_directory : đường dẫn thư mục để lưu saved model
5. Ví dụ
Sau khi có được checkpoint tốt tốt tí rồi, thì đến lúc thử xem nó chạy có ngon không . Ở đây có hai cách để xây dựng model:
Cách 1: Xây dựng model từ file checkpoint
Cách 2: Xây dựng model từ saved model mà mình đã export được ở phần 4
Ở trong ví dụ này mình sử dụng cách 1, các bạn có thể dùng code của mình theo ví dụ dưới đây :
import tensorflow as tf
import numpy as np
import cv2
from object_detection.utils import label_map_util
from object_detection.utils import config_util
from object_detection.builders import model_builder


class Detector(object):
    def __init__(self, path_config, path_ckpt, path_to_labels):
        self.path_config = path_config
        self.path_ckpt = path_ckpt
        self.label_path = path_to_labels

        self.category_index = label_map_util.create_category_index_from_labelmap(path_to_labels, use_display_name=True)
        self.detection_model = self.load_model()
        self.detection_scores = None
        self.detection_boxes = None
        self.detection_classes = None

    def detect_fn(self, image):
        """Detect objects in image."""
        image, shapes = self.detection_model.preprocess(image)
        prediction_dict = self.detection_model.predict(image, shapes)
        detections = self.detection_model.postprocess(prediction_dict, shapes)
        return detections

    def load_model(self):
        # Load pipeline config and build a detection model
        configs = config_util.get_configs_from_pipeline_file(self.path_config)
        model_config = configs['model']
        detection_model = model_builder.build(model_config=model_config, is_training=False)

        # Restore checkpoint
        ckpt = tf.compat.v2.train.Checkpoint(model=detection_model)
        ckpt.restore(self.path_ckpt).expect_partial()

        return detection_model

    def predict(self, image):
        original_img = np.copy(image)

        image = np.asarray(image)

        input_tensor = tf.convert_to_tensor(np.expand_dims(image, 0), dtype=tf.float32)
        detections = self.detect_fn(input_tensor)

        # All outputs are batches tensors.
        # Convert to numpy arrays, and take index [0] to remove the batch dimension.
        # We're only interested in the first num_detections.
        num_detections = int(detections.pop('num_detections'))
        # num_detections = int(detections.pop('num_detections'))
        detections = {key: value[0, :num_detections].numpy() for key, value in detections.items()}
        detections['num_detections'] = num_detections

        # detection_classes should be ints.
        detections['detection_classes'] = detections['detection_classes'].astype(np.int64)

        self.detection_scores = detections['detection_scores']
        self.detection_classes = detections['detection_classes']
        self.detection_boxes = detections['detection_boxes']

        # draw bounding boxes and labels
        image, coordinate_dict = self.draw(image)

        return image, original_img, coordinate_dict

    def draw(self, img):
        coordinate_dict = dict()
        height, width, _ = img.shape
        li = []

        for i, score in enumerate(self.detection_scores):
            if score < 0.3:
                continue

            self.detection_classes[i] += 1
            # if background, ignore
            if self.detection_classes[i] == 0:
                continue

            label = str(self.category_index[self.detection_classes[i]]['name'])
            ymin, xmin, ymax, xmax = self.detection_boxes[i]
            real_xmin, real_ymin, real_xmax, real_ymax = int(xmin * width), int(ymin * height), int(xmax * width), int(
                ymax * height)

            curr = real_xmax * real_ymax - real_ymin * real_xmin
            status = check_overlap(curr, li)
            if status == 1:
                continue

            li.append(real_xmax * real_ymax - real_ymin * real_xmin)
            # check overlap bounding boxes

            cv2.rectangle(img, (real_xmin, real_ymin), (real_xmax, real_ymax), (0, 255, 0), 2)
            cv2.putText(img, label, (real_xmin, real_ymin), cv2.FONT_HERSHEY_SIMPLEX, color=(0, 0, 255), fontScale=0.5)
            coordinate_dict[label] = (real_xmin, real_ymin, real_xmax, real_ymax)

        return img, coordinate_dict


def check_overlap(curr, li):
    for va in li:
        # overlap
        if abs(va - curr) < 1000:
            return 1
    return 0


image = cv2.imread(image_path)
start = time.time()
image, original_image, coordinate_dict = detector.predict(image)
end = time.time()
print("Estimated time: ", end - start)
cv2.imwrite('corner_test.png', img)
cv2.imshow('test', img)
cv2.waitKey(0)
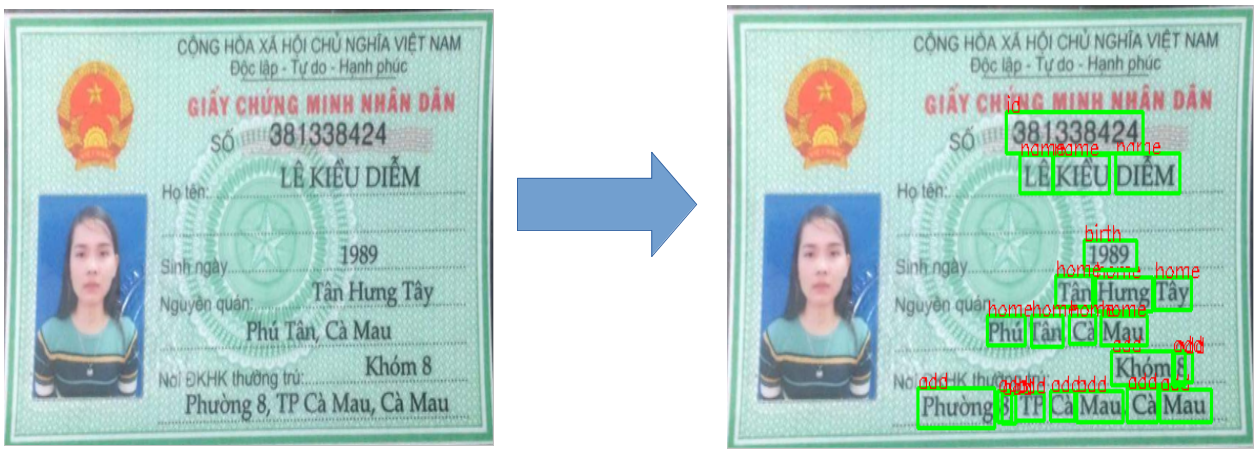
Và ta có kết quả là:
Tài liệu tham khảo
All rights reserved
