Bắt đầu với Laravel và Swagger Documentation
Bài đăng này đã không được cập nhật trong 7 năm

Tài liệu là xương sống của một ứng dụng. Nó cho phép các developers hiểu cách ứng dụng hoạt động mà không cần phải đọc qua toàn bộ source code.
Swagger là một framework có thể hỗ trợ các developers trong toàn bộ quá trình phát triển API, từ thiết kế và viết tài liệu, cho đến testing và deployment.
Cài đặt
Hãy bắt đầu với một ứng dụng đơn giản.
Composer
Đầu tiên chúng ta cần cài đặt composer, tạo một project Laravel và cài đặt các dependences.
https://getcomposer.org/download/
Laravel
Sử dụng composer tạo một Laravel project, phiên bản Laravel hiện tại là 5.7.
composer create-project --prefer-dist laravel/laravel blog
Local Development Server
Việc cài đặt môi trường không nằm trong phạm vi bài viết, vì vậy chúng ta sẽ sử dụng serve của Laravel để tiết kiệm thời gian.
cd blog && php artisan serve
CTRL+C để stop server.
Swagger
swagger-php là một trong những package được quan tâm và dễ sử dụng nhất để tạo tài liệu API ngay trong project Laravel.
Cài đặt
Trong bài viết này tôi sử dụng version 2.0.13.
composer require zircote/swagger-php 2.0.13
Files & Scripts
Swagger yêu cầu một số thông tin về ứng dụng, chẳng hạn như hostname, trong trường hợp này là localhost.
Điều quan trọng là giữ các files không nằm ngoài thư mục root của project, vì vậy chúng ta hãy chạy một số command.
Tạo development folder và các swagger scripts.
mkdir development && cd development
touch swagger.sh && chmod +x swagger.sh
touch swagger-constants.php
touch swagger-v1.php
Trong file swagger.sh, thêm một đoạn script để generate document file.
#!/bin/bash

mkdir ../public/swagger
php ../vendor/bin/swagger --bootstrap ./swagger-constants.php --output ../public/swagger ./swagger-v1.php ../app/Http/Controllers
Nội dung file swagger-constants.php.
<?php
define("API_HOST", 'localhost:8000');
Cuối cùng đến file swagger-v1.php.
<?php
/**
 * @SWG\Swagger(
 *     schemes={"http"},
 *     host=API_HOST,
 *     basePath="/",
 *     @SWG\Info(
 *         version="1.0.0",
 *         title="Laravel and Swagger",
 *         description="Getting started with Laravel and Swagger",
 *         termsOfService="",
 *         @SWG\Contact(
 *             email="name@example.com"
 *         ),
 *     ),
 * )
 */
Chạy Script
Cuối cùng chúng ta đã có thể chạy script.
./swagger.sh
# Output
Swagger-PHP 2.0.13
------------------
-----------------------
0 operations documented
Nó đã hoạt động. Tuy nhiên chúng ta vẫn cần làm một số việc nữa để có thể test các API endpoints.
Endpoint Documentation & Validation
Trong tutorial này, chúng ta sẽ tạo một controller gọi là UserController (app/Http/Controllers/UserController.php).
Đều tiên chúng ta hãy tạo một endpoint để có thể sử dụng tính năng này.
Routing
Trong routes/api.php chúng ta thêm
Route::get('create', 'UserController@create');
Controller
Đối với UserController, chúng ta sẽ sử dụng code dưới đây:
<?php

namespace App\Http\Controllers;

use Illuminate\Http\Request;

class UserController extends Controller
{
    /**
     * Combine firstname and lastname
     *
     * @param Request $request
     * @return \Illuminate\Http\Response|string
     */
    public function create(Request $request)
    {
        $userData = $request->only([
            'firstname',
            'lastname',
        ]);
        if (empty($userData['firstname']) && empty($userData['lastname'])) {
            return new \Exception('Missing data', 404);
        }
        return $userData['firstname'] . ' ' . $userData['lastname'];
    }
}
Chúng ta có thể chắc chắn rằng api này đã hoạt động bằng cách chạy nó trên trình duyệt
cd .. && php artisan serve
http://127.0.0.1:8000/api/create?firstname=viblo&lastname=reader
Ta sẽ thấy
viblo reader
Swagger UI
Chúng ta đã có thể tạo ra document file bằng json, bây giờ chúng ta sẽ tạo UI để có thể tương tác và test các endpoints.
File swagger.sh tạo ra một sub folder bên trong public folder với một file có tên là swagger.json chứa thông tin về UI, các endpoints và các dữ liệu để test.
/app
/public
|__ /swagger
Cài đặt
Trong file swagger.sh có lẽ bạn đã biết đâu là nơi chúng ta sẽ tạo ra swagger folder.
User Interface
Để thêm giao diện chúng ta sẽ truy cập https://github.com/swagger-api/swagger-ui, download về và copy các file trong dist folder đặt trong swagger folder.
Sửa lại file index.html
Chúng ta cần sửa lại url trong file index.html thành swagger.json. Đây là toàn bộ file index.html
<!-- HTML for static distribution bundle build -->
<!DOCTYPE html>
<html lang="en">
  <head>
    <meta charset="UTF-8">
    <title>Swagger UI</title>
    <link rel="stylesheet" type="text/css" href="./swagger-ui.css" >
    <link rel="icon" type="image/png" href="./favicon-32x32.png" sizes="32x32" />
    <link rel="icon" type="image/png" href="./favicon-16x16.png" sizes="16x16" />
    <style>
      html
      {
        box-sizing: border-box;
        overflow: -moz-scrollbars-vertical;
        overflow-y: scroll;
      }

      *,
      *:before,
      *:after
      {
        box-sizing: inherit;
      }

      body
      {
        margin:0;
        background: #fafafa;
      }
    </style>
  </head>

  <body>
    <div id="swagger-ui"></div>

    <script src="./swagger-ui-bundle.js"> </script>
    <script src="./swagger-ui-standalone-preset.js"> </script>
    <script>
    window.onload = function() {

      // Build a system
      const ui = SwaggerUIBundle({
        url: 'swagger.json',
        dom_id: '#swagger-ui',
        deepLinking: true,
        presets: [
          SwaggerUIBundle.presets.apis,
          SwaggerUIStandalonePreset
        ],
        plugins: [
          SwaggerUIBundle.plugins.DownloadUrl
        ],
        layout: "StandaloneLayout"
      })

      window.ui = ui
    }
  </script>
  </body>
</html>
Swagger Annotations
Annotations là format viết swagger documentation trong các php files tạo thành file swagger.json.
Thông thường, annotations nên được đặt trực tiếp trong các controllers (app/Http/Controllers).
Chúng ta sẽ bắt đầu tìm hiểu những annotation blocks nào quan trọng nhất.
SWG\Get() đề cập đến loại HTTP method chúng ta sẽ sử dụng, trong trường hợp này, chúng ta lấy dữ liệu (GET).
path, route của endpoint “/api/create”
SWG\Parameter() chúng ta có 2 tham số cần cho route — firstname và lastname
query, tham số sẽ được truyền vào thông qua query
SWG\Response() kiểu trả về và code nếu data đúng hoặc sai.
Thêm Swagger annotations dưới đây vào trước create() function và chạy ./swagger.sh lại lần cuối cùng.
    /**
     * @SWG\Get(
     *     path="/api/create",
     *     description="Return a user's first and last name",
     *     @SWG\Parameter(
     *         name="firstname",
     *         in="query",
     *         type="string",
     *         description="Your first name",
     *         required=true,
     *     ),
     *     @SWG\Parameter(
     *         name="lastname",
     *         in="query",
     *         type="string",
     *         description="Your last name",
     *         required=true,
     *     ),
     *     @SWG\Response(
     *         response=200,
     *         description="OK",
     *     ),
     *     @SWG\Response(
     *         response=422,
     *         description="Missing Data"
     *     )
     * )
     */
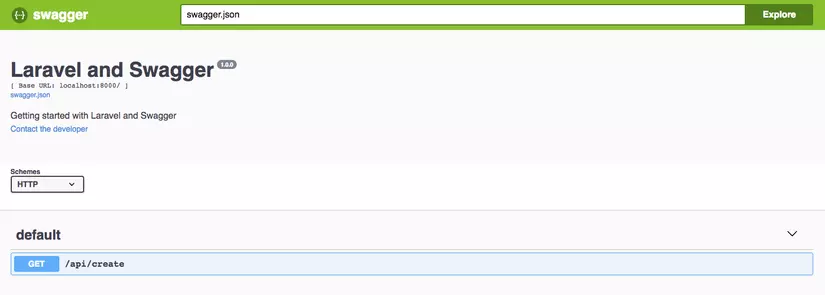
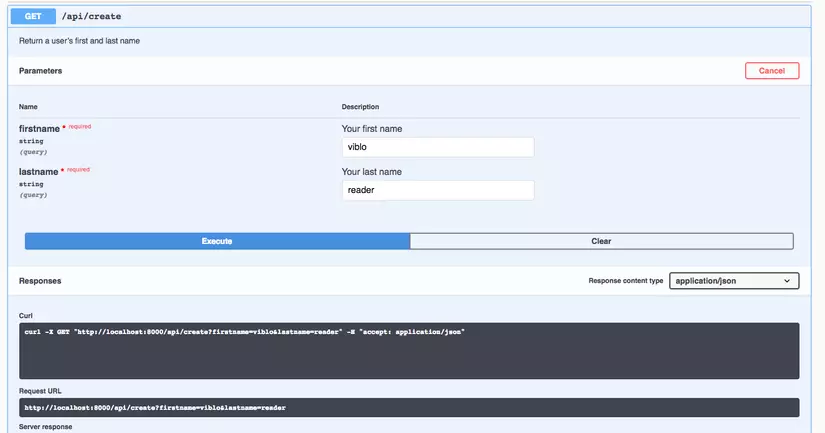
Thành quả
Bạn có thể xem thành quả tại http://127.0.0.1:8000/swagger/index.html

Chúng ta có thể điền giá trị firstname, lastname sàu đó bấm Execute để test endpoint

Như với hầu hết các hướng dẫn, có rất nhiều điều về Swagger và tài liệu nói chung. Tôi khuyên bạn nên truy cập vào package trên Github để hiểu rõ hơn về cách mọi thứ hoạt động và cú pháp liên quan đến các yêu cầu phức tạp hơn.
Cảm ơn đã đọc bài viết.
Tham khảo: http://garrettvorce.com/laravel-and-swagger-documentation/
All rights reserved