Animated Routes với MKMapView
Bài đăng này đã không được cập nhật trong 7 năm
Apple MapKit cho phép bạn đặt các tuỳ chỉnh overlay với các tọa độ cụ thể trên bản đồ, sau đó sẽ được hiển thị như một phần của bản đồ và sẽ di chuyển cùng với bất kỳ chuyển động nào của bản đồ.
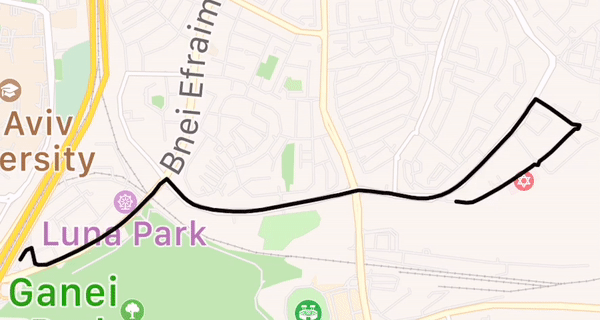
Một trong những loại overlay bạn có thể thêm là Polyline. Một polyline về cơ bản là một nhóm Tọa độ mô tả một tuyến đường trên bản đồ. Ví dụ: bạn có thể biểu thị tuyến đường giữa hai tọa độ trên bản đồ, như dưới đây:

Vẽ Polyline là một việc tương đối đơn giản, nhưng mình muốn làm thêm một bước và làm chuyển động cho tuyến đường này, để truyền tải đến người dùng cảm giác về hướng và khoảng cách đến đích của họ.
Trong bài này, bạn sẽ triển khai code để làm chuyển động MKPolyline trên MKMapView.
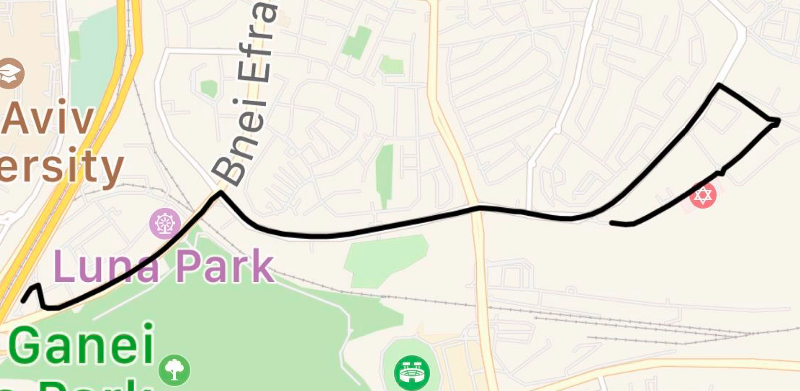
Kết quả sẽ như dưới đây:
Vấn đề?
Thật không may, các nhà cung cấp bản đồ phổ biến nhất như Apple hoặc Google lại không cung cấp giải cho animated polylines. Khi bạn cung cấp một tuyến cho bất kỳ Map SDK nào, chúng sẽ chỉ là hiển thị ngay lập tức trên bản đồ.
Áp dụng Polyline
Trước tiên, bạn nên hiểu cách áp dụng một polyline cho bản đồ.
Lưu ý: Đối với hướng dẫn cụ thể này, mình sẽ sử dụng Apple Map MapKit.
Giả sử bạn có một mảng tọa độ, bạn sẽ muốn khởi tạo một đối tượng MKPolyline:
let route = [CLLocationCoordinate2D](/*...an array of coordinates...*/)
let polyline = MKPolyline(coordinates: route, count: route.count)
Bạn sẽ xử lý việc kết xuất các overlay trong phương thức MKMapViewDelegate delegate — mapView (_: rendererFor  .
.
func mapView(_ mapView: MKMapView, rendererFor overlay: MKOverlay) -> MKOverlayRenderer {
    // Make sure we are rendering a polyline.
    guard let polyline = overlay as? MKPolyline else {
        return MKOverlayRenderer()
    }

    // Create a specialized polyline renderer and set the polyline properties.
    let polylineRenderer = MKPolylineRenderer(overlay: polyline)
    polylineRenderer.strokeColor = .black
    polylineRenderer.lineWidth = 2
    return polylineRenderer
}
Bây giờ bạn đã có 1 renderer, tất cả những gì bạn cần làm là thêm polyline vào MKMapView:
mapView.addOverlay(polyline)
Animating Polyline
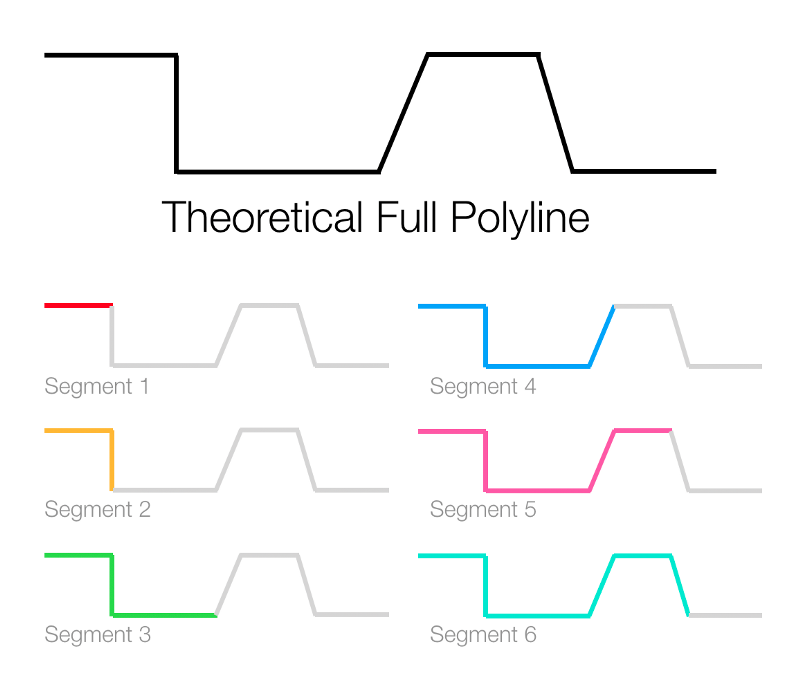
Bây giờ bạn đã có một polyline được vẽ trên bản đồ, bạn sẽ cần vẽ theo các phân đoạn nhỏ để tự tạo hiệu ứng chuyển động.
Kỹ thuật mà bạn sẽ sử dụng là chia nhỏ các polyline thành các phân đoạn liên tiếp, trong đó mỗi phân đoạn sẽ bao gồm các phân đoạn trước.
Bạn sẽ sử dụng Timer lặp lại để lặp lại các tọa độ và tính toán các phân đoạn sao cho phù hợp.
Thêm biến Timer vào ViewController của bạn:
class MapViewController: UIViewController {
    private var drawingTimer: Timer?
}
Giờ là lúc để tạo phương thức cho chuyển động của polyline.
private func animate(route: [CLLocationCoordinate2D],
                     duration: TimeInterval,
                     completion: (() -> Void)?) {
    // Your animation happens here
}
Phương thức sẽ nhận một mảng tọa độ làm tham số, thời gian của animation và một completion closure.
Tiếp theo, hãy để thiết lập một số hằng số. Thêm đoạn code sau vào bên trong phương thức mới của bạn:
guard !route.isEmpty else { return }
// The number of times you'll draw the line until the polyline is complete
let totalSteps = route.count
// The current coordinate step to be drawn on the map
var currentStep = 1
// The drawing interval between steps
let stepInterval = duration / TimeInterval(totalSteps)
Tại đây, bạn quyết định có bao nhiêu phân đoạn để vẽ nên polyline. Bạn càng có nhiều tọa độ, độ phân giải bản vẽ và độ mượt sẽ càng cao.
Tiếp theo, thực hiện logic cho Timer:
drawingTimer = Timer.scheduledTimer(withTimeInterval: stepDrawDuration, repeats: true) { [weak self] timer in
    guard let self = self else {
        // Invalidate animation if we can't retain self
        timer.invalidate()
        completion?()
        return
    }

    guard currentStep < totalSteps else {
        // If this is the last animation step...
        let finalPolyline = MKPolyline(coordinates: route, count: route.count)
        self.mapView.addOverlay(finalPolyline)
        // Assign the final polyline instance to the class property.
        self.polyLine = finalPolyline
        timer.invalidate()
        completion?()
        return
    }

    // Animation step.
    // The current segment to draw consists of a coordinate array from 0 to the 'currentStep' taken from the route.
    let subCoordinates = Array(route.prefix(upTo: currentStep))
    let currentSegment = MKPolyline(coordinates: subCoordinates, count: subCoordinates.count)
    // Render on map.
    self.mapView.addOverlay(currentSegment)

    currentStep += 1
}
Vậy là đã xong 🧙♀️🎉
Phương thức mới của bạn sẽ hiển thị chuyển động của polyline bằng cách chia nó thành các phân đoạn, như được hiển thị ở hình minh hoạ trên. 😎
Tham Khảo: https://medium.com/gett-engineering/animated-routes-with-mkmapview-1b51c6afd3bb
All rights reserved
