Xây dựng ứng dụng phi tập trung (Dapp) với Reacjs
Bài đăng này đã không được cập nhật trong 6 năm
Các bài viết trước trong chuỗi bài "Xây dựng dapp":
- Plain: https://viblo.asia/p/xay-dung-ung-dung-phi-tap-trung-dapp-gAm5y8LLldb
- Cocos Creator: https://viblo.asia/p/xay-dung-ung-dung-phi-tap-trung-dapp-voi-cocos-creator-63vKjk2bZ2R
- Unity: https://viblo.asia/p/xay-dung-ung-dung-phi-tap-trung-dapp-voi-unity-QpmlexwVZrd
- Vuejs: https://viblo.asia/p/xay-dung-ung-dung-phi-tap-trung-dapp-voi-vuejs-vyDZOaP95wj
Mở đầu
Đầu tiên chúng ta sẽ xây dựng một ứng dụng với phần smart contract đã được xây dựng ở bài trên

Phía frontend sẽ sử dụng create-react-app để init project:
npx create-react-app react-frontend
Nếu chưa có gói create-react-app thì hãy install bằng lệnh sau:
npm install -g create-react-app
Sau khi đã Happy Hacking! thì chúng ta sẽ config lại một chút các package, mặc dù quy mô của app demo này không cần thiết phải dùng đến redux vì không chứa quá nhiều components tuy nhiên để hướng dẫn cho các app phức tạp sau này, mình sẽ tạm ứng dụng thêm redux để quản lý các state.
=> Do đó yêu cầu người đọc cần đã có kiến thức cơ bản về redux
Thêm các dependencies :
"dependencies": {
    "@testing-library/jest-dom": "^4.2.4",
    "@testing-library/react": "^9.3.2",
    "@testing-library/user-event": "^7.1.2",
    "react": "^16.12.0",
    "react-dom": "^16.12.0",
    "react-scripts": "3.3.0",
    "react-redux": "^7.0.3",
    "redux": "^4.0.1",
    "redux-thunk": "^2.3.0",
    "thunk": "^0.0.1",
    "web3": "1.0.0-beta.55"
  }
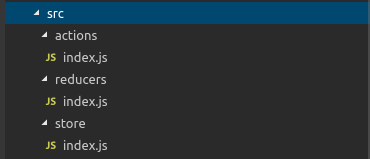
Thêm 3 folder action, reducers và store vào project :

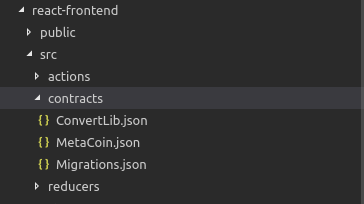
Tiếp đó là thêm cả phần contracts trong folder build của smart contract sau khi được migrate vào phần src để có thể dễ dàng tương tác hơn

Triển khai ứng dụng
Actions
Đầu tiên sẽ bắt đầu từ folder actions,
Đầu tiên sẽ là action để yêu cầu kết nối với metamask để lấy web3. Để gọi pop-up metamask thì trước hết các bạn add thêm function getWeb3() vào folder utils/getWeb3.js :
import Web3 from 'web3';

const getWeb3 = async () => {
  // Wait for loading completion to avoid race conditions with web3 injection timing.
  if (window.ethereum) {
    const web3 = new Web3(window.ethereum);
    try {
      // Request account access if needed
      await window.ethereum.enable();
      // Acccounts now exposed
      return web3;
    } catch (error) {
      console.error(error);
    }
  }
  // Legacy dapp browsers...
  else if (window.web3) {
    // Use Mist/MetaMask's provider.
    const web3 = window.web3;
    console.log('Injected web3 detected.');
    return web3;
  }
  // Fallback to localhost; use dev console port by default...
  else {
    const provider = new Web3.providers.HttpProvider('http://127.0.0.1:9545');
    const web3 = new Web3(provider);
    console.log('No web3 instance injected, using Local web3.');
    return web3;
  }
};

export default getWeb3;
Viết function đầu tiên web3Connect():
import getWeb3 from 'utils/getWeb3';

export const WEB3_CONNECT = 'WEB3_CONNECT';
export const web3Connect = () => async (dispatch) => {
  const web3 = await getWeb3();
  const accounts = await web3.eth.getAccounts();
  if (web3.currentProvider.connection.networkVersion !== '3') {
    alert('Unknown network, please change network to Ropsten network');
    return;
  }
  if (accounts.length > 0) {
    const account = accounts[0];
    let balance = await web3.eth.getBalance(account);
    dispatch({
      type: WEB3_CONNECT,
      web3,
      account
    });
  } else {
    console.log('Account not found');
  }
};
Tiếp đó sẽ là action Init các contract:
Function này sẽ lạ hơn một chút vì sẽ cần đến file mà chúng ta đã deployed trong phần contract. Công việc của chúng ta là add them folder contract từ folder build phía trên. Như đã nói thì chỉ cần 2 thứ là ABI và Address là có thể tạo ra instance tương tác với blockchain
import MetaCoin from 'contracts/MetaCoin.json';

*
*
*

export const INIT_CONTRACT = 'INIT_CONTRACT';
export const instantiateContracts = () => async (dispatch, getState) => {
  const state = getState();
  let web3 = state.web3;
  const networkId = process.env.REACT_APP_NETWORK_ID;
  let metaCoinAddress = MetaCoin.networks[networkId].address;
  let metaCoin = new web3.eth.Contract(MetaCoin.abi, metaCoinAddress, {
    transactionConfirmationBlocks: 1
  });
  dispatch({
    type: INIT_CONTRACT,
    metaCoin
  });
};
Cuối cùng thêm 2 action sendCoin và getBalance:
export const SEND_COIN = 'SEND_COIN';
export const sendCoin = (receiver, amount) => (dispatch, getState) => {
  const state = getState();
  const metacoin = state.metacoin;
  const account = state.account;
  metacoin.methods
    .sendCoin(receiver, amount)
    .send({ account })
    .then(() => {
      console.log('success');
      dispatch({
        type: SEND_COIN,
        amount
      });
    })
    .catch((e) => {
      console.log(e);
    });
};
export const GET_BALANCE = 'GET_BALANCE';
export const getBalance = () => async (dispatch, getState) => {
  const state = getState();
  const metaCoin = state.metaCoin;
  const account = state.account;
  let balance = await metaCoin.methods.getBalance(account).call({ from: account });
  dispatch({
    type: GET_BALANCE,
    balance
  });
};
Đủ các action và giờ sẽ tiếp tục xây dựng reducer
Reducer
Như các action đã được xây dựng phía trên, chúng ta sẽ xây dựng được các initialState và action type tương ứng
import * as actions from 'actions';

const initialState = {
  web3: null,
  account: null,
  balance: null,
  metaCoin: null
};

const rootReducer = (state = initialState, action) => {
  switch (action.type) {
    case actions.WEB3_CONNECT:
      return {
        ...state,
        web3: action.web3,
        account: action.account
      };
    case actions.INIT_CONTRACT:
      return {
        ...state,
        metaCoin: action.metaCoin
      };
    case actions.GET_BALANCE:
      return {
        ...state,
        balance: action.balance
      };
    default:
      return state;
  }
};

export default rootReducer;
Store
Xây dựng phần store, mình sẽ sử dụng thunk cho phần Middleware
import rootReducer from 'reducersiddle';
import { createStore, applyMiddleware } from 'redux';
import thunk from 'redux-thunk';

const store = createStore(rootReducer, applyMiddleware(thunk));
export default store;
Cuối cùng để cung cấp store trong mọi component của ứng dụng, ta cần wrap chúng trong Provider
import React from 'react';
import ReactDOM from 'react-dom';
import './index.css';
import App from './App';
import * as serviceWorker from './serviceWorker';
import { Provider } from 'react-redux';
import store from 'store';

ReactDOM.render(
  <Provider store={store}>
    <App />
  </Provider>,
  document.getElementById('root')
);

// If you want your app to work offline and load faster, you can change
// unregister() to register() below. Note this comes with some pitfalls.
// Learn more about service workers: https://bit.ly/CRA-PWA
serviceWorker.unregister();
Như vậy đã hoàn thiện phần quản lý các State, bây giờ sẽ đến phần xây dựng giao diện và ứng dụng của app
App
Với tính chất một bài cơ bản thì mình sẽ demo phần tương tác với Blockchain với 2 phương thức đơn giản:
- Tạo transaction: Thông qua hàm sendCoin đã được xây dựng ở phần actions
- Đọc thông tin: Đọc dữ liệu về balance của user thông qua hàm getBalance
Đầu tiên chúng ta sẽ bắt user đằng nhập metamask, do đó sẽ gọi function web3Connect ngay khi component được mount . Để tối ưu lượng code thì mình sẽ sử dụng 2 Hook :
- useEffect : Tương tự như tác dụng componentDidMount nhưng dùng cho function component
- useDispatch : Thay cho việc chúng ta sử dụng mapDispatchToProps
Thêm vào App.js :
import React, { useEffect } from 'react';
import { useDispatch } from 'react-redux';
import logo from './logo.svg';
import './App.css';
import * as actions from 'actions';

function App() {
  const dispatch = useDispatch();
  useEffect(() => {
    dispatch(actions.web3Connect());
  });

  return (
    <div className='App'>
      <header className='App-header'>
        <img src={logo} className='App-logo' alt='logo' />
        <p>
          Edit <code>src/App.js</code> and save to reload.
        </p>
        <a
          className='App-link'
          href='https://reactjs.org'
          target='_blank'
          rel='noopener noreferrer'
        >
          Learn React
        </a>
      </header>
    </div>
  );
}

export default App;
Đến đây thì khi vào trang sẽ tự động bán ra popup metamask yêu cầu đăng nhập nếu user chưa đăng nhập và sẽ tự động lấy địa chỉ account
Tiếp theo hiển thị ra balance và account, thêm một chút Hook useSelector để lấy giá trị trực tiếp từ store:
import React, { useEffect } from 'react';
import { useDispatch, useSelector } from 'react-redux';
import logo from './logo.svg';
import './App.css';
import * as actions from 'actions';

function App() {
  const dispatch = useDispatch();
  const { balance, account } = useSelector((state) => ({
    balance: state.balance,
    account: state.account
  }));

  useEffect(async () => {
    async function fetWeb3Init() {
      await dispatch(actions.web3Connect());
      await dispatch(actions.instantiateContracts());
    }

    function getBalance() {
      setInterval(() => {
        dispatch(actions.getBalance());
      }, 2000);
    }

    fetWeb3Init();
    getBalance();
  }, []);

  return (
    <div className='App'>
      <header className='App-header'>
        <img src={logo} className='App-logo' alt='logo' />
        <p>
          <b>Account: </b> <i>{account}</i>
        </p>
        <br />
        <p>Balance: {balance}</p>
        <a
          className='App-link'
          href='https://reactjs.org'
          target='_blank'
          rel='noopener noreferrer'
        >
          Learn React
        </a>
      </header>
    </div>
  );
}

export default App;
Và để hoàn thiện phần cuối cùng chúng ta sẽ tạo thêm một form nho nhỏ để sendCoin, gồm 2 giá trị receiver và amount bằng cách sử dụng useState :
import React, { useEffect, useState } from 'react';
import { useDispatch, useSelector } from 'react-redux';
import logo from './logo.svg';
import './App.css';
import * as actions from 'actions';

function App() {
  const dispatch = useDispatch();
  const { balance, account } = useSelector((state) => ({
    balance: state.balance,
    account: state.account
  }));
  const [amount, setAmount] = useState('');
  const [receiver, setReceiver] = useState('');

  useEffect(() => {
    async function fetWeb3Init() {
      await dispatch(actions.web3Connect());
      await dispatch(actions.instantiateContracts());
    }

    function getBalance() {
      setInterval(() => {
        dispatch(actions.getBalance());
      }, 2000);
    }

    fetWeb3Init();
    getBalance();
  }, [dispatch]);

  return (
    <div className='App'>
      <header className='App-header'>
        <img src={logo} className='App-logo' alt='logo' />
        <p>
          <b>Account: </b> <i>{account}</i>
        </p>
        <br />
        <p>Balance: {balance}</p>
        <label>
          Receiver:
          <input
            type='text'
            value={receiver}
            onChange={(e) => {
              setReceiver(e.target.value);
            }}
          />
        </label>
        <label>
          Amount:
          <input
            type='text'
            value={amount}
            onChange={(e) => {
              setAmount(e.target.value);
            }}
          />
        </label>
        <button
          onClick={() => {
            dispatch(actions.sendCoin(receiver, amount));
          }}
        >
          Submit
        </button>
      </header>
    </div>
  );
}

export default App;
Kết qủa
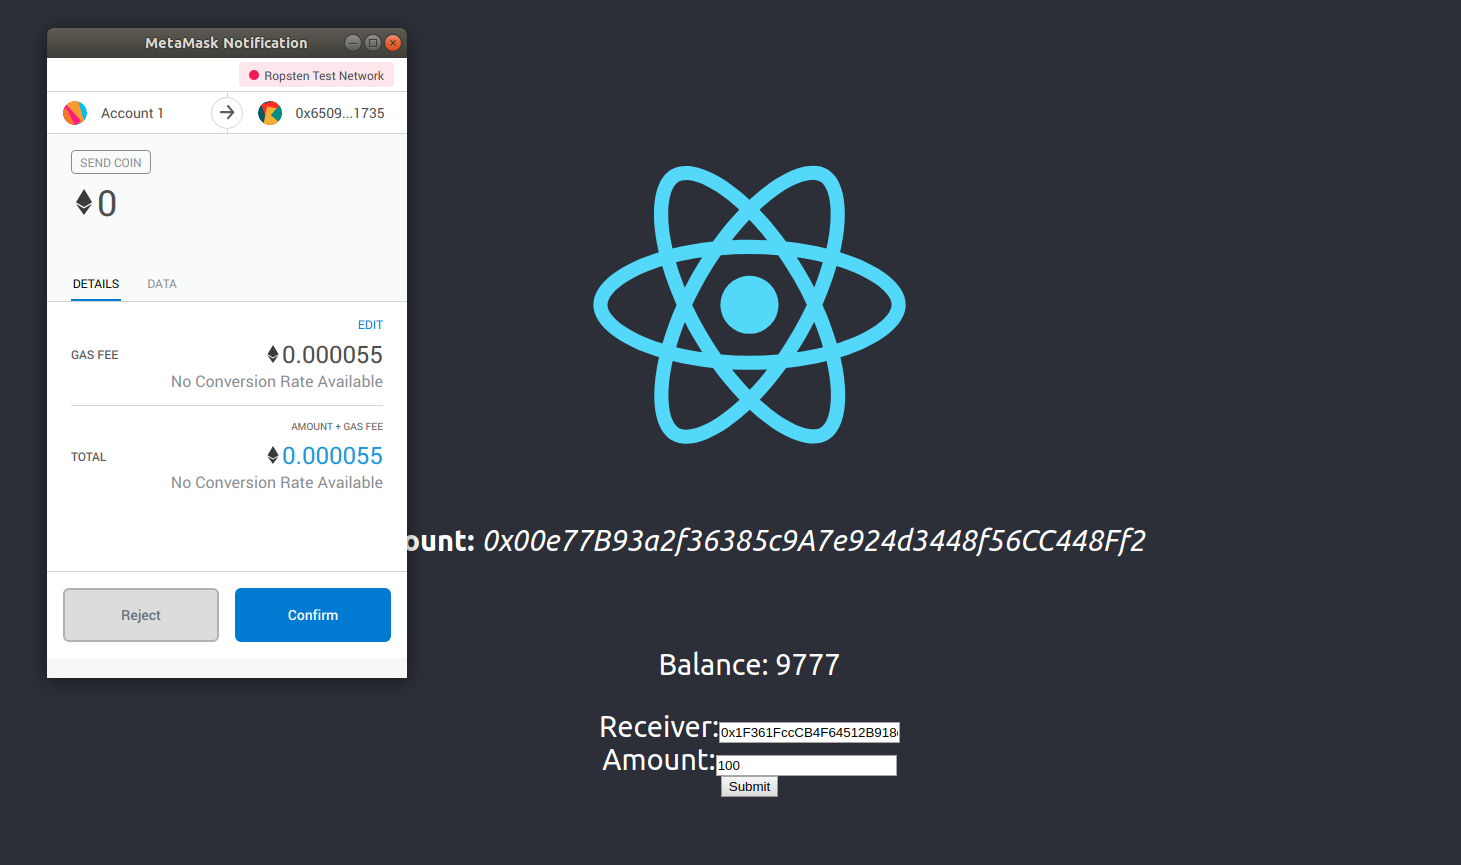
Cuối cùng thì kết quả sẽ có dạng như sau :

Giao diện khá basic nhưng về cơ bản các function đã chạy khá ổn. Qua bài trên mình đã hướng dẫn khởi tạo một Dapp cơ bản với Reactjs , bài tiếp theo mình sẽ hướng dẫn xây dựng trên Vuejs và quản lý các state với Vuex
Các bạn có thể tham khảo code tại đây: https://github.com/tranchien2002/EthCodeBased/tree/add-react
All rights reserved